Built In Overflow question

ofalegend

Member
Ok, so just by chance I happened across a 75 gallon bowfront with a built in overflow, which I purchased instead of the 55 gallon I had from 8 years ago and had planned on using. My new question is regarding this overflow and how its supposed to work precisely.
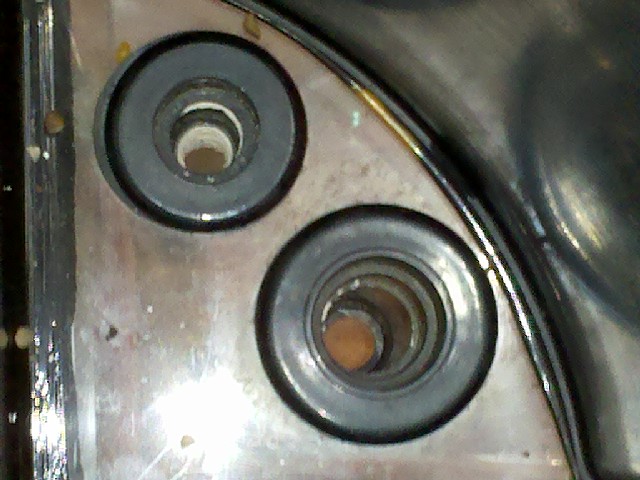
Its a corner overflow with 2 holes drilled in the bottom. First, I assume one is for the drain and one for the return, correct?
If that's the case, then how does the "drain" bulkhead work? Does the water flow from the top of the overflow box all the way to the bottom and just fall through the bulkhead into a pipe underneath the tank to the sump, or should there be a PVC pipe inside the overflow box from the bottom to almost the top where the water will flow over, fill up the overflow box, then spill over into the PVC pipe inside the tank and flow down to the sump? Does that question make sense? I guess what I'm asking is how should the INSIDE of the built in corner overflow box look inside the tank?
 

al&burke

Active Member
You need to put two bulk heads and attach two risers that will act as your drain. I would almost opt for two drains one working and the other as back up, some others might have other ideas. The riser usually has an elbow or two on the top so you can adjust it to flow nice. I personally thing that an overflow should have two drains one as primary and the other as back up. Some pictures would be nice - lets see what some of the others think. Happy New Year.
 

acrylic51

Active Member
Following along....Agree with Al pics would help a bit.....What is the brand of tank? I'm assuming that the holes in the overflow are different sizes?
 

ofalegend

Member
Thanks everyone. I found the Durso standpipe, will pick up the supplies to plumb it. Not sure on the manufacturer, it was a used tank on CL for a decent price so I grabbed it.
Acrylic51, you're correct, there are two different size holes, looks like a 1" and maybe a 1.5"? I plan on replacing the bulkheads just because I don't know how old they are. Here's a few pictures...as you can see, its still outside, just drained from the "test fill" and its filthy, I have a lot of cleaning up to do for sure. The stand is horribly cheap (and too light, I wouldn't be comfortable putting it on there), so I'm probably going to use my custom built stand, which the bowfront will fit on perfectly. Fortunately I had the foresight to build the stand 18" wide when I built it for a possible future upgrade to 75 rather than 13" wide for the 55gallon.
The only question I have left is regarding which pipe is the overflow and which is the return?


deejeff442

Active Member
the bigger one is the overflow. i have bought endless stuff on craigslist.my 250 tank was $300.my friend built the stand.
 

ofalegend

Member
Oh! And while I have everyone's attention, I had a quick sump/refugium question.
My original plan with the 55 was to do a 20L sump, but bumping up to a 55 I think that will be too small, so after looking at Flower's sump/refuguim thread, I've decided to do a 20L and a 10g and connect them with 2 bulkheads. There's a glass shop close by that I'll get to drill the (1" I assume? 1 1/2"?) bulkheads. My question is should I do the protein skimmer and return pump compartments in the 20L and a 10g refugium, or vice versa?
 

deejeff442

Active Member
i dont see a problem with that stand.i would do the fuge in the 10 gallon.the fuge dont need alot of flow so maybe split the drain pipe from the tank .one to the fuge and the other to the skimmer section.
 

acrylic51

Active Member
I'd use the larger 20 for your skimmer and return pump......Fuge will be fine in the 10 gallon. Thanks for the pics and good looking tank by the way.....You are correct the larger bulkhead for the drain, and you could use the smaller for the return, but as Al suggested earlier in the post you could use both as a drain. The larger bulkhead being the primary, and the smaller being a backup. The problem with running a durso pipe is space limits in the overflow box.....Try stuffing 1 1/2" PVC durso pipe in the overflow.....it will get rather tight.
The biggest question is how are you planning on returning the water to the tank? Will the canopy allow you to do an up and over return? If not you have a couple choices, and the first being use the 2nd hole in the overflow as your return or the 2nd is to modify your canopy to accept the return line....Either way will work.
I would suggest if your planning on following Al's recommendation as 2 drains to search for BeanAnimal overflow. A lot of work done on the concept and a lot easier and quieter than the standard durso.....
 

ofalegend

Member
The canopy isn't built yet, so it will let me do anything I want :) I have a canopy for the custom built stand, but its designed for a square tank, so we'll have to build a new one this spring, not in a hurry for that. I'll use both the overflow pipes for drains, a backup is a good idea (though I decided last night to put the aquarium on the only concrete floor with vinyl covering in the house, both for stability and to reduce damage should something flood).
I looked up the BeanAnimal overflow, and this might be a silly question, but its designed to have 3 drilled bulkheads, and this tank only has two, how could I use it?
As for the return, I plan on plumbing it for an over-the-tank return with Loc-lines for water dispersion? Any suggestions/recommendations on a pump? I'll be using the cheap one that came iwth the tank while it cycles, but I'd much prefer to have a good quality return pump (GPH rating for a 75 gallon? Thoughts?) before I add any livestock.
Right now the plan is FOWLR, but if all goes well and I can make it a go this time around, I'd like to consider soft corals in the future (maybe 6months to a year). For now I have a cheap 48" 4 bulb PC light that I'll use, which of course would/will be upgraded before any corals are considered.
 

acrylic51

Active Member
All 3 weren't used as drains in that setup style.....1 is a backup and you have 2 and could utilize a lot of his principles in the thread to make a quiet, dependable system....
 

ofalegend

Member
Ok, here's the stand retrofit in progress. As I said before, it was previously designed for a 55 gallon tank, but built wide enough to accomodate a 75. There was an edge built around it to hide the plastic banding on the 55 gallon tank. Since the 75 is a bowfront, I decided to just eliminate the lip and let the tank sit flat on the top, so I had to remove the trim, saw off the lip, and reattach the trim. Also decided on a granite top for the stand.
Going with a 40 gallon breeder tank for a sump/refugium. I originally was going with a 20 gallon sump and a 10 gallon refugium with 2 bulkheads drilled and a drain hung over into the 20, but my local glass company would NOT drill the 10, even after I told them it didn't matter if it shattered, just trash it. So, I'm going to just do the 40gallon breeder tank for a sump (though its quite a bit more expensive) and add glass baffles/partitions. I have 45 lbs of live rock curing, and plan on a 1" sand bed in the DT and a 5" DSB in the refugium. Will add another 40 or so lbs of base rock from the LFS and hopefully aquascape with egg crate or an acrylic sheet and acrylic bolts or rods.
My next question is can the band on the tank itself be painted with Krylon fusion paint? Its oak, and I hate hate hate it, I would MUCH rather it be black, so I thought about painting it, but wasn't sure if the paint would stick given the corrosive nature of saltwater. Thoughts?
 

deejeff442

Active Member
i dont see why not?i would sand the wood to make it rough a bit first.
i painted the back of my 250 with that stuff ,nice sky blue.its been there two years.
 

acrylic51

Active Member
Is the band plastic? I think it could be but not sure how well it will hold up to wear and tear unless it's possibly clear coated.
 

ofalegend

Member
It is plastic, yup. I thought about sanding it then first then painting as someone else recommended. Clear coating might also be an option. I also considered buying wood veneering and contact-cementing it on the rims and then painting the veneering or staining it to match the stand (and eventual hood I plan to build in the future)?
 

2quills

Well-Known Member
I think you can paint it no problem. As someone mentioned to me before it doesn't hold up forever if you have to clean or scrub the surface very much. If you have to clean up much salt creep off the plastic trim from time to time it will eventually wear like all paint will. Also, degredation from U.V. in alot of cases may play a roll. I also think a clear coat over it will help alot in regaurds to it's ability to last over time. But totally doable IMO.
 

acrylic51

Active Member
There isn't any doubt in my mind that it can't be painted.....The question is how well it will hold up and Corey mentioned varying factors....I did my 240 and painted PVC and with regular cleaning and the UV from MH's yes it does take a beating....That is why I had recommended something on the line of clear coating to give it a little protection.
 
Top