clown boy
Active Member
How to Re-Size and Post a PictureFor folks with Windows
 I know that there are a lot of free re-sizing tools out there, but this is a free alternative packaged with your Windows operating system. The program is called PAINT. Here is how to get to it:Click on Start > All Programs > Accessories > Paint
Once Paint opens, be sure to maximize the window.
At the upper left, click on File > Open
A box opens up, and the directory labeled "My Pictures" usually appears. If this is not where your picture is, then browse to your picture.
Once you see your picture, Double Click It to select it. The picture will open up in the Paint program.
Then click and drag the bottom-right corner of the image towards the middle, keeping an eye in the dimension numbers near the bottom-right corner of the window to make sure that they go below 500×500.
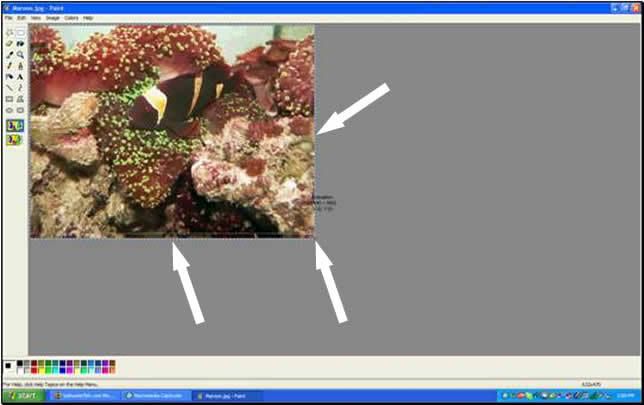
Once you get it below 500×500, click and drag on the re-sizing points to fine-tune it (e.g.: to restore it’s proportion).
These are the re-sizing points:

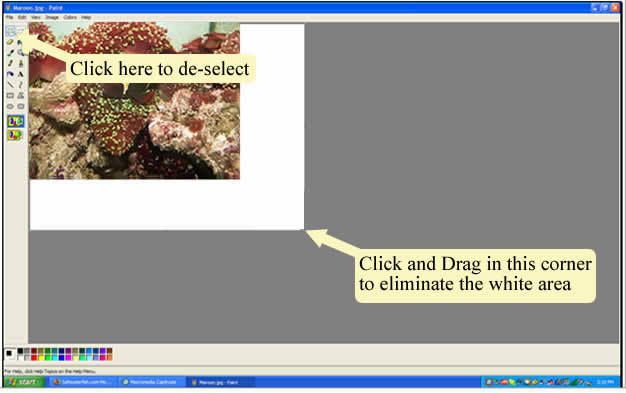
Once you get it right, you should see a white area. To get rid of this, click on the icon near the top-left corner that looks like a star to de-select. Then click and drag the bottom-right corner of the white area towards the bottom-right corner of the image as shown below.

Once that is done, click on File > Save As…, then type the name that you want your new re-sized image to have. Next be sure that in the Save as type box (just below the box where you named your document) it is JPEG format. Use the pull down menu to select it, then click Save.
Now, open up a post at Saltwaterfish.com (as if you are going to write a comment in the forums). Select the Go Advanced button. Advanced posting opens up. Type in whatever comment you want to post with your picture, then scroll down to Manage Attachments and click it.
Once the Manage Attachments window opens, click on the browse button. Navigate to your new re-sized image and click on it, then click Open. Click Upload. Once the upload is complete, just close the window and post your message! (If the picture file does not appear in the upload area, then picture is still too large and you’ll need to go back to PAINT to check it/resize it.)
Congratulations!
Questions and Comments are welcome.
Hope this helps!
Clown Boy


Once Paint opens, be sure to maximize the window.
At the upper left, click on File > Open
A box opens up, and the directory labeled "My Pictures" usually appears. If this is not where your picture is, then browse to your picture.
Once you see your picture, Double Click It to select it. The picture will open up in the Paint program.
Then click and drag the bottom-right corner of the image towards the middle, keeping an eye in the dimension numbers near the bottom-right corner of the window to make sure that they go below 500×500.
Once you get it below 500×500, click and drag on the re-sizing points to fine-tune it (e.g.: to restore it’s proportion).
These are the re-sizing points:

Once you get it right, you should see a white area. To get rid of this, click on the icon near the top-left corner that looks like a star to de-select. Then click and drag the bottom-right corner of the white area towards the bottom-right corner of the image as shown below.

Once that is done, click on File > Save As…, then type the name that you want your new re-sized image to have. Next be sure that in the Save as type box (just below the box where you named your document) it is JPEG format. Use the pull down menu to select it, then click Save.
Now, open up a post at Saltwaterfish.com (as if you are going to write a comment in the forums). Select the Go Advanced button. Advanced posting opens up. Type in whatever comment you want to post with your picture, then scroll down to Manage Attachments and click it.
Once the Manage Attachments window opens, click on the browse button. Navigate to your new re-sized image and click on it, then click Open. Click Upload. Once the upload is complete, just close the window and post your message! (If the picture file does not appear in the upload area, then picture is still too large and you’ll need to go back to PAINT to check it/resize it.)
Congratulations!
Questions and Comments are welcome.
Hope this helps!
Clown Boy


