Overflow Suggestions

yannifish

Active Member
Hello, everyone, it has been ages since I've been on here.
I have a 55 gallon tank, and am planning on breaking it down due to multiple issues (algae mainly) and want to set it up again the proper way (using RO/DI water...).
I am currently using a HOB overflow that uses an aqualifter pump to pull air out of the U-tube. Today that pump decided to quit, and luckily I noticed the high water levels before overflow slowed down enough that the tank overflowed. For the night I manually sucked the air out of the U-tube, I'll look into replacing the pump tomorrow. (and set up the ten gallon tank my two clownfish will live in until the 55 is set up again).
So, I am now planning how I want to set up the 55. I think I want drilled overflows. I don't want to deal with HOB and all the issues associated anymore. So, I was thinking dual 3/4" or 1" overflows. Overkill, I know, but I want one overflow to be able to handle all the water in the case that the other clogs for any reason. So, I'm just looking for input on what you all think would be a good, as fool proof as possible set up.
 

acrylic51

Active Member
So your wanting to drill the tank yourself......If that's the case good BeanAnimal overflow design, and you'll enjoy....
 

beaslbob

Well-Known Member
Quote:
Originally Posted by yannifish http:///t/390549/overflow-suggestions#post_3459468
Hello, everyone, it has been ages since I've been on here.
I have a 55 gallon tank, and am planning on breaking it down due to multiple issues (algae mainly) and want to set it up again the proper way (using RO/DI water...).
I am currently using a HOB overflow that uses an aqualifter pump to pull air out of the U-tube. Today that pump decided to quit, and luckily I noticed the high water levels before overflow slowed down enough that the tank overflowed. For the night I manually sucked the air out of the U-tube, I'll look into replacing the pump tomorrow. (and set up the ten gallon tank my two clownfish will live in until the 55 is set up again).
So, I am now planning how I want to set up the 55. I think I want drilled overflows. I don't want to deal with HOB and all the issues associated anymore. So, I was thinking dual 3/4" or 1" overflows. Overkill, I know, but I want one overflow to be able to handle all the water in the case that the other clogs for any reason. So, I'm just looking for input on what you all think would be a good, as fool proof as possible set up.
1) part of the adjustments of a sump system is to fail the overflow/drain to make sure the sump runs dry before a flood.
2) you can use the sump pump to suck out the air of the HOB overflow. Just setup a venturi with the pump to replace the aqua lifter. Then if the pump fails so does the water returning to the tank.
my .02
 

acrylic51

Active Member
Agree sump adjustment is a key, but with the BeanAnimal overflow system or design it'll handle any flow you wanna throw at it as long as you build it correctly. (3) ways for the flow to continue to run if 1 or worse case 2 should fail the 3rd will handle all the flow, and no issue with using air line to suck air out of the system.....
 

2quills

Well-Known Member
Last time I checked most 55g tanks these days are all tempered if you got your tank from one of the big chain pet stores so you may want to check before you drill anything. Just food for thought. + 1 on the Bean set up though.
 

2quills

Well-Known Member
Typically there's usually a sticker on the bottom of the tank somewhere that would indicate if either the whole tank is tempered or if just the bottom panel is tempered. If there's no sticker at all then it's anyone's guess. Knowing who manufactured it would be the first real clue. But you can usually get an idea by the thickness of glass used for whatever size tank it is. Generally thicker glass is used if the tank is not tempered. Some manufactures like the one's who make tanks that you find at a ***** or walmart or something like that will use tempered glass because you can use thinner glass to build with and it's cheaper (I've already had one of these tanks leak and killed all my fish). But some other well known brands like Aqueon (aka All Glass), Oceanic, Marineland or someone along those lines just use tempered on the bottom panel so the tank is safe to drill on any of the 4 sides.. Custom built tanks or any REEF READY tanks are usually safe to modify.
 

acrylic51

Active Member
Quote:
Originally Posted by Southern Wolf http:///t/390549/overflow-suggestions#post_3459611
Shawn... is that kind of overflow better than the internals from glass holes?
I'm not saying Glass Holes is a bad deal....A good deal in the aspect that many can easily obtain the parts/tools needed to drill their tanks, but IMO, you can easily use a dremel or Rotozip and a diamond bit, with bulkhead in hand and accomplish the same task for less money.....With that being said their overflow kits are nice, but me personally I can do everything they can, but I never like to be limited to endless possibilities.....Meaning they have standard kits they sell....What if you wanted to use a slim line internal overflow box, that only drops down inside the tank roughly 4".....Do they offer that......I'm not sure, but using their kits you can accomplish a better overflow design such as the BeanAnimal, but your limited to stuffing it inside their boxes which might or might not fit.....
Again good kits, but can be a truly DIY project that you can build and tune to your exact needs.....
Quote:
Originally Posted by Southern Wolf
http:///t/390549/overflow-suggestions#post_3459622
How would you know if its tempered. Now your making me even more nervous about drilling my tank.o t
Agree with what Corey said about knowing who the manufacturer was and usually you can go to their website and find out what tanks they used tempered glass and what not.....In all honest if I was drilling a tank that wasn't already; and being what little knowledge I have I would never drill a tank in the bottom for an overflow again....
.Again personal preference to most, but for me, I know that in my mind I see most corner or bottom drilled tanks can be rather limiting in what you can do.....Basically the size of the overflow box limits things.....Again with a little "time" I've run both types of setups....Corner overflows (drilled from the bottom), center mounted overflows (drilled from the bottom), and my current setup which utilizes an external C2C overflow design utilizing the BeanAnimal system, and I would never go back again....Corner overflows would be rather limiting in the BeanAnimal setup design, and quite frankly wouldn't go back to the other style drains. Basically I don't think they could handle what the BA design can......
With that said drilling the tank in the back wall or end for that fact opens up many possiblilites IMHO.....1 you can do an internal overflow (weir) that takes up less space; meaning more room inside the tank, and you could truly design an overflow/return system to your liking. Also with a 3 sided overflow design you will obtain more surface skimming area than with corner mounted overflows taking up less space......Just my .02
 

acrylic51

Active Member
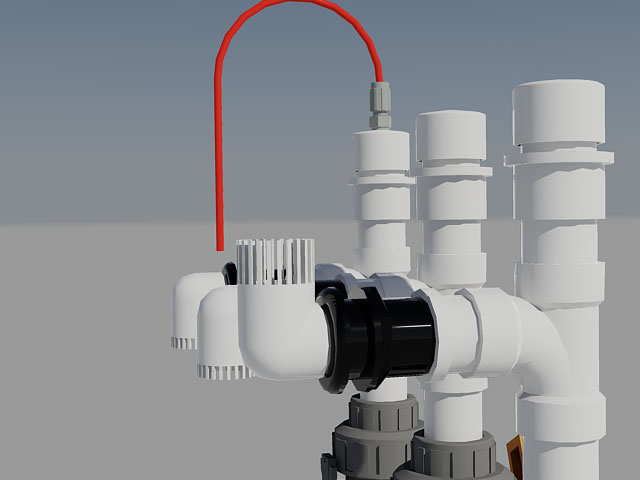
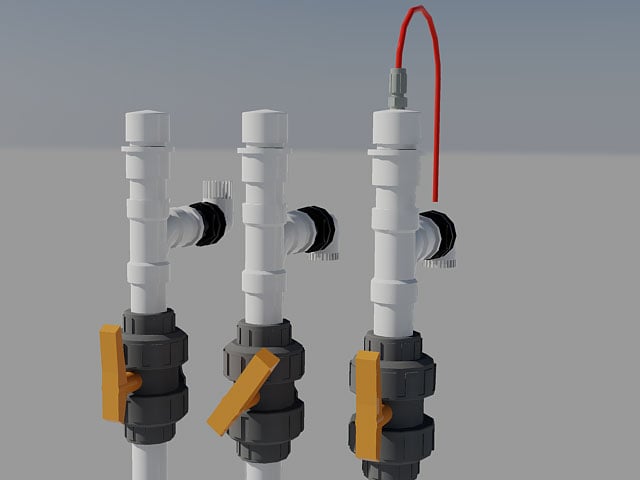
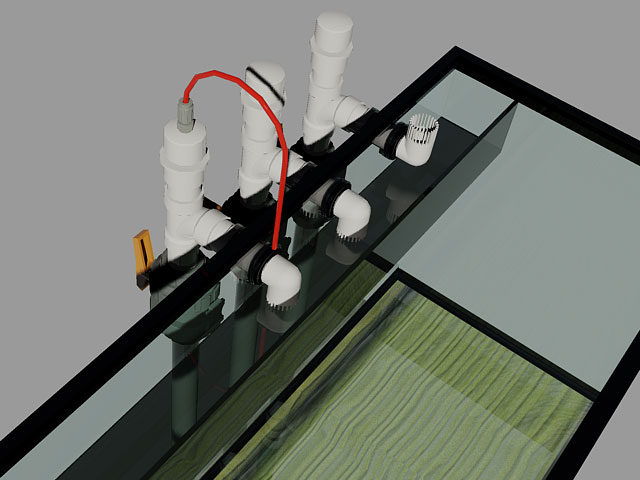
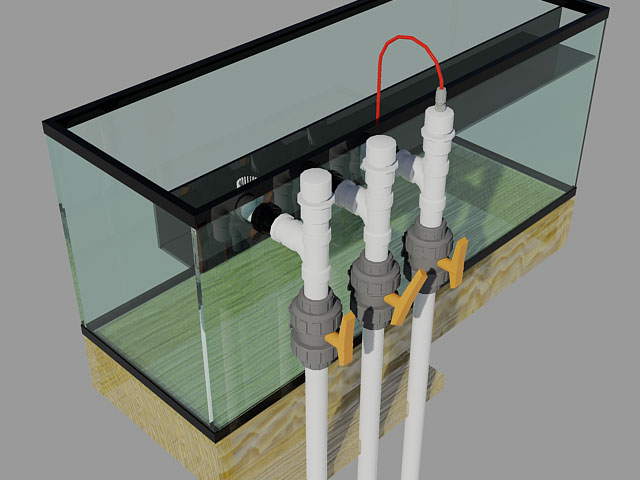
Here's some quick pics which will give you a brief; quick idea what's going on with the design.....


From left to right:
1) Emergency standpipe
2) Siphon standpipe
3) Open channel standpipe
All of the standpipes are built with 1.5" PVC fittings (adapted to the 1" bulkhead with a bushing). Each standpipe consists of a Sanitary-Tee topped with a threaded adaptor and a screw on cap. True union ball valves below the Tee are for adjustment of the system and/or isolation of the display if needed. The valve is only truly needed on the Siphon (middle) standpipe. The Open Channel standpipe (right) is fitted with an airline that is curled back over and attached just below the trim inside the overflow box. All caps are sealed with teflon tape so that they are airtight.
Something to keep in mind:
rgb(235, 235, 235); ">A submerged drain that is running at a full siphon will handle MUCH MORE flow than a similar drain that allows air in.
How the system works:
Notice that both the Emergency (left) and Siphon (middle) standpipes are capped. During normal operation the valve on the Siphon (middle) standpipe is adjusted (as shown in the render above) until the water level in the overflow box rises high enough that air is not being sucked into its down-turned elbow. This means that the standpipe is running at full siphon with NO air being sucked in. This is DEAD SILENT. However, it also means that the standpipe is NOT handling all of the flow from the return pump. This is where the Open Channel (right) standpipe comes into play. The Open Channel (right) standpipe is open to the air via the airline attached to it. Because air is allowed in, the standpipe will not siphon or gurgle. The excess flow that is not being handled by the Siphon (middle) standpipe quetly flows through the Open Channel (right) standpipe. Because the flow is very low, very little air makes its way to the sump.
This setup is VERY set-and-forget! It is self tuning over a very wide range and does not need to be touched once set. It operates silently and introduces very little air into the sump (if any). The caps can be removed to clean the standpipes if the situation ever arises.
Failsafe:
The setup has (2) failsafe features.
1) The Emergency (left) standpipe is set at a level slightly higher than the normal operating height of the overflow box. It is simply an up-turned elbow or strainer. If the water level rises above the normal operating level then it will flow down the Emergency (left) standpipe. This standpipe is also airtight. If the water level rises high enough the standpipe will begin to siphon and flush the overflow box.
NOTE:The Emergency (left) standpipe will also kick in during system startup. It takes a few moments for the air to be purged from the Siphon (middle) standpipe, during which time the water level in the overflow box may run high and into the Emergency (left) standpipe.
2) The Open Channel (right) standpipe is equipped with an airline that is attached in the overflow box. If the water level rises to the critical point of overflow and the Emergency (left) standpipe can not handle the flow (say due to blockage from algea or something) then the water will cover the inlet of the airline. The flooded air intake will in effect convert the Open Channel (right) standpipe into a full siphon standpipe, allowing it to handle much more flow. This will flush the overflow box and prevent flooding.
That's it... simple and effective!
This system MUST use the (3) standpipes that are described above. The emergency standpipe is a CRITICAL part of this design. Omitting the emergency standpipe is asking for a flood!

Here are some other renderings that show some of the detail. I prefer to have the strainers touch the bottom of the overflow box. I used a table saw to fabricate them out of street elbows. No snails or fish can get into the standpipes. If your overflow box is deeper, then standard bulkhead strainers or those from a place aquaticeco can be used.
a, sans-serif; background-color: rgb(235, 235, 235); " />
The CAP on the Open Channel standpipe was drilled, tapped and then threaded to accept a standard John Guest airline fitting.
All (3) standpipes extend into the sump and terminate just below the water level.
 

yannifish

Active Member
The BeanAnimal system looks interesting. I like how quite it would be. That's one complaint I have right now, how loud the overflow it. I'd just have to build an overflow box, but I'm pretty sure I could handle that. I like the no bubbles in the sump too. Do you have more details on it?
2Quills, the tank is an All-Glass. It's been a while since I've seen the bottom of the tank, but I think I remember it saying just the bottom is tempered.
How do you set up the venturi with the return pump?
 

acrylic51

Active Member
Quote:
Originally Posted by yannifish http:///t/390549/overflow-suggestions#post_3459668
The BeanAnimal system looks interesting. I like how quite it would be. That's one complaint I have right now, how loud the overflow it. I'd just have to build an overflow box, but I'm pretty sure I could handle that. I like the no bubbles in the sump too. Do you have more details on it?
2Quills, the tank is an All-Glass. It's been a while since I've seen the bottom of the tank, but I think I remember it saying just the bottom is tempered.
How do you set up the venturi with the return pump?
I'm pretty sure the tank bottom is tempered. I sent you a PM with more info on the design. As a side note, there isn't any need to set up a venturi with the return pump. If you read the link you'll fully understand the concept. It's really simple.
 

yannifish

Active Member
Well I won't be drilling the bottom, just the sides, and those should be plated, yes?
I think I already understand the design, it seems pretty much fool proof. Would there be any need for strainers on the pipes since they are in an overflow box?
The venturi would just be temporary to keep the current overflow in operation while I set up the ten gallon.
 

acrylic51

Active Member
No they sides, back and front aren't tempered.....Strainers are a good idea.....You could actually fabricate your own strainers. Corey did a very nice job on his strainers. I prefer his method over the more traditional ones you can buy.
 
Top