sump setup for 125

chips

Member
I got a new 125 tank
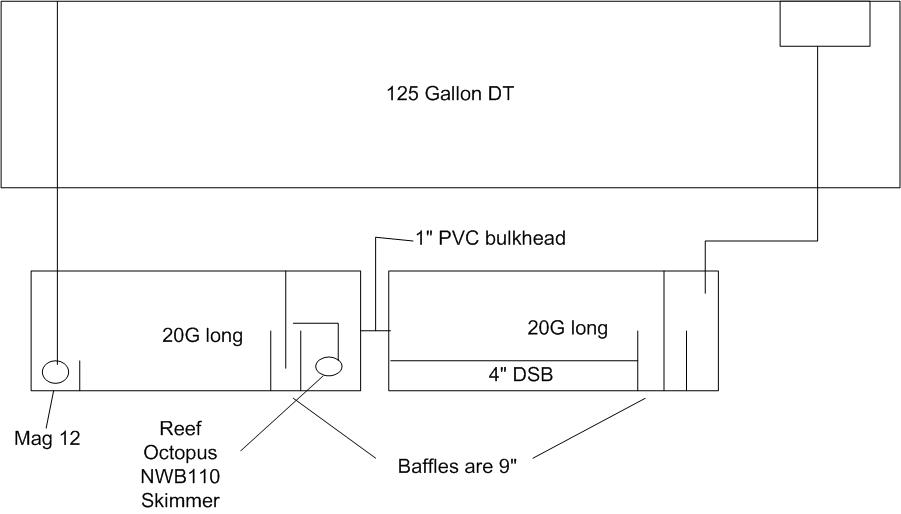
.. I am trying to figure out a way to use my existing sump / refugium. Currently I have a 55G DT with a 20 gallon long setup for my sump / refugium. My plan is to use the sump along with another 20G long so I have enough water storage for power outage or for turning the tank off. This is if I can't turn the 55 gallon into the sump for lack of space in the cabinet. My idea is to have both 20's under the cabinet hooked together by a U siphon. The over flow goes into sump 1, through the siphon to sump 2 and returns to DT. When I get everything moved to the 125 I will then have 2 overflows and 2 returns, maybe. both sumps still would be hooked up with the U siphon. I thought about making bulkheads to connect the two but I don't have the tools to drill the glass tanks and I don't know the cost of doing it that way. If the U siphon trick wouldn't work I would look more into that option if I had to. I will be using powerheads for turnover in the DT in both setups. If you wouldn't mind, look at these pictures and give me the good and the bads of this setup. Will this work or will I be flooding my floor?
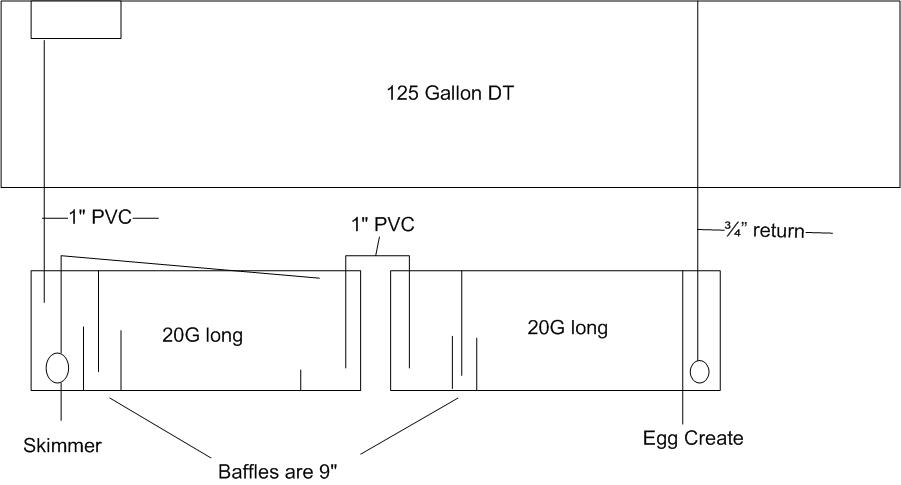
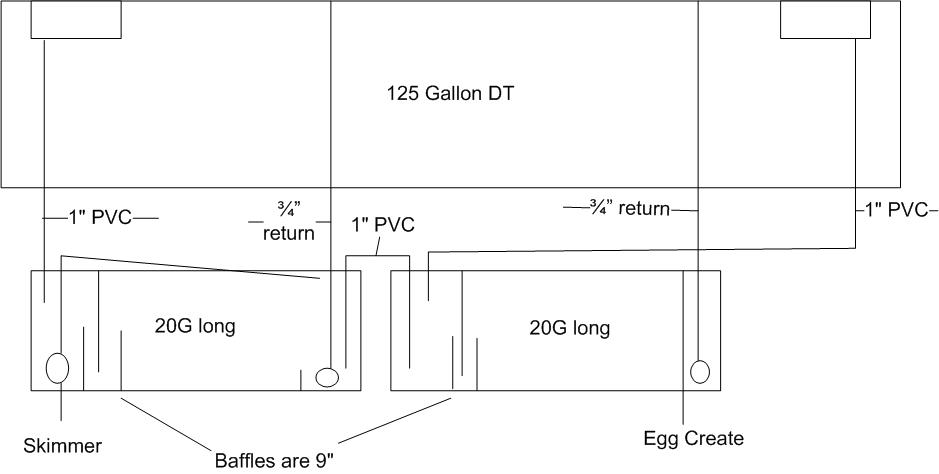
I will be starting out the 125 with the first image since my currently running 55 is using one of the return pumps and overflows. Then when everything is moved I will end up with the second picture. I may be putting another skimmer in the second sump, I don't know. I am talking about using a seaclone 150 for the second skimmer and that thing works just as good unplugged as it does plugged in. What do you think about the setup?
 

acrylic51

Active Member
Congrats!!!!! Personally I would make the 55 my sump, and forget about the (2) 20 gallon tanks stuffed underneath. I also don't think the U tube overflow setup between the (2) 20 gallon tanks is a good idea at all.....To many possibilities of something going crazy with the overflow and you have a disaster on your hands. At times in the hobby, it's not always about the ease of things. Sometimes it's just all around better for everyone and everything if we take the extra step to do things a little different. What I'm referring to if your set on using the (2) 20 gallons for your sump; fuge combo, then I would take the extra time, energy, money, and drill the tanks with an 1.5 bulkhead hole, and use a uni seal and PVC to connect the 2 tanks. You could put strainers on the ends of the PVC between the 2 tanks if you'd choose to. This would be a lot more reliable than your proposed method of the overflow......
In your pic on both drawings, really unsure; unclear the purpose of the egg crate near the return pumps......Sorry my question mark key doesn't work, but What purpose would the egg crate serve.......Personally I wouldn't want my return pump pulling from my fuge. I'd want my return pump positioned in my sump with my skimmer. I would feed the fuge area directly from the drain from the DT, and like I had mentioned earlier I would connect the tanks by uni seal, and let the fuge feed back into the sump, and then returned back to the DT.
Also curious what your other skimmer choice is......Take the Seaclone and make a door stop with it.......What pump are you planning on using for the return to the DT......I'm assuming a submersible pump........
 

chips

Member
My idea of the egg crate by the pumps was to keep the chaeto or whatever macro algae I put in there from getting into the pump. I agree the bulkhead would be much better but I don't know anything about drilling glass. Like everything else though, I could learn.
My ultimate goal would be to use the 55 as the sump but I do not think that it will fit under the stand and leave enough room to work on it or get the skimmer collection cup off for cleaning. That leaves me with using the (2) 20s for the sump / refugium setup. After the move is done I would be using the octopus 4 NWB110. It is the needle wheel rated for 100 gallons, the seaclone we talked about using it for target practice on another post I put on here but would be used on the 125 while it is cycling. I am planning on using a submersible pump that I will have to buy since I will still be running my 55 until the 125 gets cycled and ready for livestock. I think I will end up with something like a Mag 12 and add powerheads for additional turn over. I would like to change everything in one move put I have to cure rock and cycle the 125 first. That means I have to keep the 55 going to keep my coral and fish living.
Here is another improved (I hope) picture. I may have the skimmer output go to the return pump instead of the first chamber of the bubble trap and just put it in a sock or something to prevent bubbles in the DT??

I know the octopus skimmer would need to be upgraded but I can't do that, this skimmer isn't even broken in yet. My wife would shoot me. This is why I was asking about an algae scrubber on my other post to try and make up the difference a little bit. What do you think? is this getting any better for what it is?
 

acrylic51

Active Member
Ok.....sorry for the delay getting back to you.....Looking at the pics there are a couple things I'd change.....First I would never dump all my flow or drainage from my DT into the fuge....IMHO I think you'd be better served if the overflow line was "T'd" off. Meaning 90% of the overflow water draining into the skimmer 20 gallon, and the other line with a valve draining into the fuge side. I'd put a valve on the fuge supply line so you can regulate the flow for the fuge.....
Also in the above pic to simplify things, there would honestly be no need for the baffles in the fuge 20 gallon tank.....Again the drain line from the overflow would be T'd off and the flow won't be tremendous dumping into the fuge side, so should save you a little time and money....Another thing to double check would be finding out what the recommended water depth is for your particular skimmer and make your baffles walls accordingly......Being clearance could; might be tight under the stand and if you water level is to deep and you have to raise the skimmer you might not be able to get the skimmer performing correctly.....Just a word of caution easier to double check water depth, then having to redo the baffles or worse yet the skimmer not performing......
A really good site to check out for some good info on properly designing and setting up a sump would be melevsreef dot com. He has tons of good info on his site, and you can look at his pics and get some creative ideas as well.
 

chips

Member
I am on a different computer that does not have the picture on it for me to edit to what you are talking about. But I do think I understand what you are saying. If I took a T and valve on the overflow line going to the fuge. Adjust the valve that 90% goes to the 20G tank with the skimmer and 10% goes to the 20G with the DSB. Remove the baffles on the tank with the DSB. I already have the 20G with the skimmer running on my 55 with the baffles at 9". My octopus skimmer operates between 6" - 10" if I remember the specs. I built the baffles to be just under the highest water level so the skimmer could sit on the bottom of the tank and not be raised up so I have room above the collection cup. If I am thinking about this correctly and I want to have a 9" water level in the 20G with the DSB I would have to put the bulkhead at 9". Is this correct? The reason I want to keep it at a 9" level is so it will give me enough room for drainage during power outage or turning the tank off without overflowing the sump / refugium. I am planning on having a 1 1/2" drop in the DT with the power off. This will be 8.4 gallons draining into the sump/fuge. With a 9" water level in the sump/fuge I would have room for 9.35 gallons. This gives me 1 gallon extra room for the unexpected / unknown. Also the sump never runs entirely at 9", just the part with the skimmer in it. I am also giving a little extra on the 1 1/2" drop in the DT, I got that number off a forum as a good number to plan on with a 125. Is that cutting it to close? I will check out that place and see what is there. Thanks for the info.
Ultimately I would like to have the 55 as my sump / fuge. I saw some pictures of the 415 plywood tank, what a beautiful cabinet. If I could make something like that I would, well change careers first, then have somewhere to put the 55. You really have a talent with that.
 

acrylic51

Active Member
Changing careers isn't that great.....What you think your gaining at times, usually means your going to sacrifice elsewhere, trust me!!!!!!
Thanks for the compliment.....It's been a long build, and starting to see the light at the end of the tunnel......Through 1 tank change, and building another one, it's been time consuming....The plywood tank is actually cut into pieces as we speak!!!!! After cutting it apart I realized there was no way it would leak, but decided to go a different route.
I'd have to do a little digging on the skimmer your running, and yes all skimmers have recommended depth levels, but if you search deep enough you'll find what everyone says the real "sweet spot" is for the skimmer, and go from there. If we can find that sweet spot exactly for the skimmer and get it tuned good, you should be good. An important thing to remember is don't overstock and don't overfeed. I glanced over on your other thread and Seth (Snake) added about another possibility of utilizing a scrubber. Again it might be more benefit to run a scrubber vs running a fuge. Any real reason for a DSB......
 

chips

Member
The only reason I put a DSB on there was because I had the room. I really don't think I want one thoug. I hear they only last a certain amount of time and can cause more problems than what they are worth if not done and maintained properly. It more than likely will be a little live sand and rock rubble.
I looked at what the factory levels were for the skimmer and searched some reviews and forums. I found the most people having good results at 8" or 9". I was shooting for 8" when I built the sump. I cut my acrylic at 8" but that gave me about 8.5 - 9 inch water level. I didn't cut any slots where the water flows over the baffle and didn't take in account for the silicone on the bottom. But for my first sump build, it works and I learned.
I have changed careers a few times and have found sometimes the grass really isn't greener on the other side. I ended up having to change careers again to get back to where I needed to be. I think it would really have to be something for me to switch careers again.
 

chips

Member
Well I found out that my 55 gallon will not fit under my stand unless I get a glass company to cut the top 3 - 4 inches off the tank. Could that be done? I have heard of that before but I don't know if it is okay to do or not. I also thought about if I was taking the 55g to a glass shop to get it cut, what would you think about getting them to drill two wholes in the back of the 125 for the overflow? I thought about getting two bulkheads in the back of the 125 with 1" PVC to use for the overflow. Would that work?
 

acrylic51

Active Member
Not really sure if the glass company would cut the tank down or not......Might be cheaper in the long run to go with a tank with a shorter height in the long run.....As far as getting the 125 drilled....You could call around and talk to the different glass companies, but most will probably tell you they aren't responsible if it were to break. The biggest thing is to make sure the sides aren't tempered. If they are tempered forget drilling all together. Curious.....Do you have access to a dremel or Rotozip tool.....You can easily and cheaply drill the tank yourself....All it takes is patience!!!!
If your set on drilling the tank, and you want to tackle it yourself, I'm quite sure I have a diamond hole saw bit in the garage. I bought it awhile ago for whatever reason I can't recall, but it's yours if that's the route you choose to go........If your thinking of drilling doing an overflow setup I'd recommend googling BeanAnimal Silent overflow and read through it.....Definitely some good info you might want to look at.....
 

chips

Member
I think after reading Seths reply on my other post I may try and look at modifying the current stand a little bit to get the height that I need. Basically building another stand on top of the stand that I have now. I will really have to think about that though, it may be almost as cost effective to build the entire stand. I am kind of on the fence with drilling the 125 for the overflow since I don't know much about how that is done. Will the water level be at the bulkhead whole and not go any higher, or with the use of valves would the water be able to go above that level. I will be looking at the BeanAnimal Silent overflow you mentioned and see what I can learn from there,,
I really think I am going to do something with the stand to allow me to use the 55 as the sump so I won't need the hole saw but thank you very much for the offer. If I was to end up putting hte bulkhead idea in the 125 for the overflow I may come back to that. I do have a dremel and a rotozip..
 

chips

Member
I have been away for a little bit taking care of some other things before my wife kicked me out from putting this project first. I still don't understand how another project like finishing building the laundry room could come before this.
Anyway, I scored a couple of sheets of Acrylic
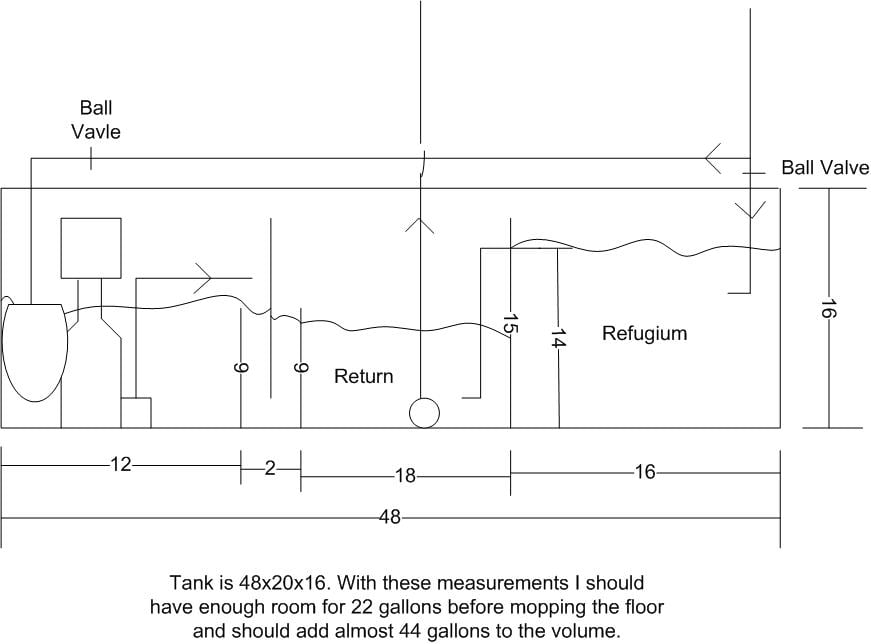
for free and decided to rethink using a separate sump and refugium and combining them. I looked at melevsreef and borrowed his design with my own measurements. Thanks for pointing me there Shawn, it is very helpful. I really like the beananimal silent over flow but am really worried about drilling my new 125. I think I may build my own overflow kind of like melvesreef and add beananimal system to it. I will have to think about that one and see if I can draw it up later on. I don't have not ever had any real problem with the "U" siphon system knock on wood so I may stick with that. Here is the new sump I am looking at going with. What do you think?
 

acrylic51

Active Member
Marks designs are always good...They are proven and tested.......I see nothing wrong with the Utube overflow system if your comfortable with the system. I've used them years ago and never had any issues with them. I would prefer them over some of the newer units on the market. I still think your worrying a bit to much about drilling the tank. It honestly is quite simple, just a little time and patience.
 

chips

Member
I am probably over worried about drilling the tank and it I am sure after I drilled the first one I would wonder why in the world I was so worried in the first place. I did go and look at the tank (it is in storage for right now) and it has a sticker on the bottom saying that it is tempered glass. I just don't know if it is just the bottom that is tempered or if all of it is. It is a marineland tank, does anyone know if those are all tempered or just the bottoms? I also measured the stand to make sure the sump would fit in it and I found that it won't. I based my measurements on the tank size instead of the stand. The sump will be the same length and height but the width can't be any more than 15" so it will be 48"x15"x16. This should still give me room for 16 gallons to drain back from the DT with the power off, is that enough for a 125? I may also yinker with the idea of building it so it sticks out the back. I would have to make parts of it not as wide as other parts for the braces of the stand. This way would give me more volume and I wouldn't have to have 90 degree elbows to get the overflow into the sump. Would doing that cause dead spots in the sump? Also, if something ever happened to the sump after the DT was setup there would be no way to remove it from the stand.
 

acrylic51

Active Member
I think you'll be fine drilling the tank, and I'm pretty confident that only the bottom panel is tempered on the tank. As far as sump you will have stuff that settles in spots, but during maintenance you can siphon it out worse case.
 
S

smallreef

Guest
Yeah if its a marineland tank only the bottom is tempered...
And with a sump being smaller than the tank you really dont have "dead" spots but low flow spots,,, but you want lower flow in it anyway...
 
Top