DIY Sump Filter

Hi,
I was looking at few videos on DIY sump filters. The water from the DT enters the sump tank by gravity and the flow can be controlled too. And sump tank has to be divided in to 4 chambers. I also saw the trick for bubble trap. Now my question is what media should I put in each chamber? And where does the protein skimmer come ?... after the sump filtration?
I know im asking too much, but does anyone have diagrams of sump and protein skimmer installations.
The sump filtration setup looks scary, I hope I done mess up and flood the floor.
 

acrylic51

Active Member
You are correct the water from the DT travels to the sump by gravity, and it's not really recommended to restrict the flow going to the sump from the DT....A excellent site to check out and read is melevsreef.com and it will explain most of your questions and illustrate how a sump is setup as well....
 

2quills

Well-Known Member
Originally Posted by acrylic51
http:///forum/post/3291629
You are correct the water from the DT travels to the sump by gravity, and it's not really recommended to restrict the flow going to the sump from the DT....A excellent site to check out and read is melevsreef.com and it will explain most of your questions and illustrate how a sump is setup as well....
+1
I'm gonna email Marc and tell him we need some free schwagg for pluggin his site so much

Melevs reef is where I got the inspiration for building my sump.
 

2quills

Well-Known Member
Originally Posted by Sparty059
http:///forum/post/3291701
How big of a sump would I need for a 125 gallon? Any suggestions?
I'm going to use a 55G sump for my 120G tank. You might want to look into possibly a 40G breeder to fit under your stand if that tank in your picture is the one you're talking about.
 

sparty059

Active Member
What do you mean a 40G breeder? Is that a specific type? How much on avg does it cost to make one of these on your own? I know very little about this stuff and am thinking about outsourcing and getting a rep from my LFS to do this for me. He said it would cost anywhere from $200-$300 plus the labor costs-- that would include the Sump, the UV Light Filtration (I think) and the skimmer (I think). Think I can do it for considerablly less and fairly quickly/easily?
 

sparty059

Active Member
I did a quick google search and see what a breeder tank is. While I was googling, I thought of another question. How do I prevent from overflow? I don't want any leakage or overflow when I make this or have it made, so is there any rule of thumb that I need to know... I have only 1 over flow pipe in the center with the teeth guards at the top for water to flow down. It has the two tubes - 1 that will have the water output and the other that will have the water return. How do I keep a constant flow to prevent the over flow/leakage from either the sump tank and or the aquarium?
--I also have a 1400 powerhead that will keep the water flowing in the tank as well (which I might get another for the bottom if need be).
 
S

saxman

Guest
With a proper O/F, the amount of flow OUT of your DT is controlled by the amount of flow (return) INTO your DT. Therefore, if your pump is shut off (or power fails), the "active" flow will be halted.
However, there will still be some "backflow" into your sump from water in the plumbing, as well as the DT until the water level goes below the teeth on the O/F. There will also be some back siphoning if your return fittings are below the water level of the DT. These all must be accounted for by leaving room in the sump for this "excess" water.
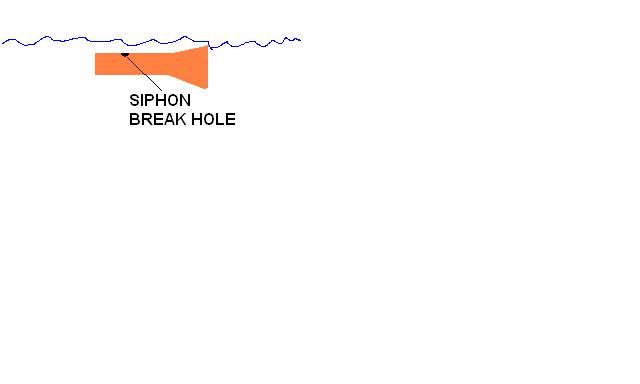
The amount of this water can be minimized by the use of "siphon breaks" on your return fittings (drill a 1/8" hole in the top of your fitting), or simply placing them at a shallow level (say 1/2" below the surface of the DT water level). Once the siphon break (or return fitting) is exposed to air, the water will stop siphoning into the sump.
Siphon break:

ALSO, when you set your system up, fill the DT, then add some water to your sump until you have a couple of inches above the pump. Turn the system on and add water to the "pump bay" (if you use a submersible pump) or the sump (if you use an external pump) as needed.
THEN, shut your system off and allow the backsiphon water to drain into the sump (be ready to turn the pump back on if the sump gets close to overflowing). Adjust water levels, return fitting levels, etc. until you can shut the pump off and you have enuff room for the backflow in your sump.
NOW, turn the system back on and mark the water level on the side of your sump. This is your "add water to here" level, and is the level you'll add your top-off water to. Trust me, once you see this running, it's simple to understand.
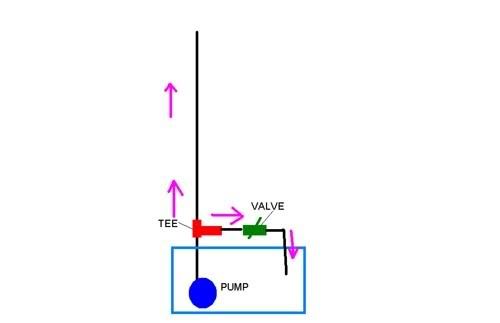
Now...one last thing. When choosing your return pump, try to match it closely to the capacity of your O/F in terms of GPH. If you run too "hot" a pump, you can pump your sump dry and overflow your tank. Some peeps simply add a valve on the output of the pump, however, I like to add a bleed line back to my sump to fine tune the system in terms of performance as well a noise level. This allows one to run the pump wide-open, but reduce the flow (IMHO, this is easier on your pump than restricting it).
Bleed Line:

HTH
 
[QUOTE
The amount of this water can be minimized by the use of "siphon breaks" on your return fittings (drill a 1/8" hole in the top of your fitting), or simply placing them at a shallow level (say 1/2" below the surface of the DT water level). Once the siphon break (or return fitting) is exposed to air, the water will stop siphoning into the sump.
Siphon break:
Saxman, I did not get the siphon break very well. Can you elaborate. Thanks!
 

sparty059

Active Member
So I just got a call back from the LFS rep that was going to work on my sump tank, and was informed that he can not create a sump tank for me without having to break the studs in the back and reattach them after. I'm hesitant to do that so I'd like everyone's opinion on this. The tank is a 125 gallon tank (would like to be a saltwater reef), the dimensions of the cabinet are:
16" Deep (Front of cabinet to back)
21 1/2" Tall (From top to bottom)
49" Long (All the way through)
There is a 2" divider between the doors but does not impact the inside of the cabinet (cosmetic only).
Is there anyway I can still fit a 40 gallon breeder in here by just sliding it in? I already have my pipe for the in and out in the center of the tank. Am I hopeless and need to break the studs to do this or can I do this on my own?
Here's a very BOLD
question...
If I can do this, can someone please... PLEASE, in the easiest, most laymen terms ever, give me direction to build one. I know I already need a 40 gallon tank... I feel I'm half way there now. I know I need 2 dividers (1 area for the saltwater and the heater, and the others I have no clue)... I would like to buy a UV to filter and kill off anything else before putting it back into my tank... my goal is to not have to clean everything every other week... yet still would like it to be sparkling.
Please everyone, ideas and tips... and directions are much appreciated. I'm grasping for any hope at this point as I'm edging more towards saying "screw it" and getting rid of the tank after JUST getting it.
Me right now at my desk--->
 
S

saxman

Guest
Originally Posted by mooseythemoron
http:///forum/post/3291743
[QUOTE
The amount of this water can be minimized by the use of "siphon breaks" on your return fittings (drill a 1/8" hole in the top of your fitting), or simply placing them at a shallow level (say 1/2" below the surface of the DT water level). Once the siphon break (or return fitting) is exposed to air, the water will stop siphoning into the sump.
Saxman, I did not get the siphon break very well. Can you elaborate. Thanks!
Imagine drinking from a straw...as long as the end of the straw is under water, you can draw water thru the straw. If you raise the end out of the water, all you get is air.
Now imagine the same straw with a hole in the side. Again, as long as the end of the straw AND the hole are both submerged, you can draw water thru it. However, once the hole in the side of the straw hits air, all you can draw thru the straw is air, even if the end is underwater.
So, a siphon break bascially performs this function. Since siphon break holes are higher than the end of the return fitting, as the water level decreases, the siphon stops sooner, which means less "backwash" into your sump. This allows you to put a bit more water into your sump, which increases your overall system volume without the worry of overflowing it.
You do need to keep these holes clean, which means poke a toothpick into them every so often as part of your normal maintenence routine (sometimes they get algae buildup in them).
 

sparty059

Active Member

Originally Posted by Sparty059
http:///forum/post/3291747
So I just got a call back from the LFS rep that was going to work on my sump tank, and was informed that he can not create a sump tank for me without having to break the studs in the back and reattach them after. I'm hesitant to do that so I'd like everyone's opinion on this. The tank is a 125 gallon tank (would like to be a saltwater reef), the dimensions of the cabinet are:
16" Deep (Front of cabinet to back)
21 1/2" Tall (From top to bottom)
49" Long (All the way through)
There is a 2" divider between the doors but does not impact the inside of the cabinet (cosmetic only).
Is there anyway I can still fit a 40 gallon breeder in here by just sliding it in? I already have my pipe for the in and out in the center of the tank. Am I hopeless and need to break the studs to do this or can I do this on my own?
Here's a very BOLD
question...
If I can do this, can someone please... PLEASE, in the easiest, most laymen terms ever, give me direction to build one. I know I already need a 40 gallon tank... I feel I'm half way there now. I know I need 2 dividers (1 area for the saltwater and the heater, and the others I have no clue)... I would like to buy a UV to filter and kill off anything else before putting it back into my tank... my goal is to not have to clean everything every other week... yet still would like it to be sparkling.
Please everyone, ideas and tips... and directions are much appreciated. I'm grasping for any hope at this point as I'm edging more towards saying "screw it" and getting rid of the tank after JUST getting it.
Me right now at my desk--->

In addition to this... I'd like to ask if someone can tell me all the parts I will need as well. I'm currently looking at purchasing this right now to add on to what I hope to make soon...
http://www.amazon.com/Turbo-Twist-3X.../dp/B000256DNQ
Again, all help is greatly appreciated!
 
S

saxman

Guest
I have a Turbo-Twist, and it's a nice unit. That being said, one needs to consider what a UV unit affects: waterborne organisms such as algae spores. This is all well and good, however, most (not all) pathogens are benthic/demersal in nature, which means they live on the various surfaces within the tank, and thus, are unaffected by UV units. That being said, ****** has a brief swimming stage (Theront stage, 24-48 hrs) where it can be affected by UV, provided the necessary dwell time and UV power is used. You also need to have very clean water (filtered) to achieve maximum efficacy, so feeding the unit with a canister filter of some kind is best. It's kinda your call, but my UV unit is in the closet ATM, altho I know folks who swear by them. Personally, I'd put the money towards a good skimmer.
What size are the door openings in your stand? Is it possible to work a sump into the stand thru them? How tuff is it to remove the divider and replace it without it looking bad? Maybe you would consider changing to a larger single door? Is it possible to squeeze a softer tub ("Rubbermaid") into one of the openings?
The sump itself is very simple. You'll need:
Sump (usually an aquarium, but folks use "rubbermaid" tubs as well).
Baffles (depending on sump configuration). I use 1/4" acrylic, others use glass.
Return pump (what is your O/F rated at, or what's the ID of your standpipe at the bulkhead (BH)? )
What type of plumbing (pipe) will you use? I prefer to use black thickwall
vinyl hose (Lee's or equiv.) and threaded fittings, others use rigid PVC (Schedule 40) and slip fittings (need to be glued).
Various Loc-Line (LL), plumbing fittings, etc.
The whole thing does sound daunting, but if you're even a bit of a DIY-er, you can knock this out of the park with a bit of guidance.
Before anyone goes further, is it simply the sump or the sump and whole plumbing thing you're having issues with?
 

acrylic51

Active Member
Tagging along.... Will have to wait till I'm home to really read this, but lfs sounds like their making it harder than needed though....
 

2quills

Well-Known Member
Indeed, there are easier ways to do it if need be. you don't necissarily need a 40G breeder...infact, that may actually be to wide to fit very well under your stand. If you could fine someone who is selling like a 38G long tank that might be better. Or one other possibility is to use two 20G tanks...one for your fuge and the other for your sump. There's lots of ways of setting up sump filtration systems. The key is figuring out what is really going to work best for the individuals set up. What may work great for some might not necissarily be doable for others.
Take a good look at the center brace on the front of your cabinet stand, Sparty. Many people will remove just that piece to fit a tank under there and then re-attach it.
Once you get the basics down of understanding how sumps work they are really not all that complicated. But there are some key issues to plan for like previsously mentioned. Certain ways of setting up your system in order to all but illiminate the posibilty of any flood occuring.
You have water in your sump and water in your tank. Water gets pumped from your sump via a return pump. That water then fills up in the tank and begins to spill over into your overflows. Therefore, as long as your overflows and drain lines aren't blocked then you won't flood your tank. Now if your return line coming back into the tank happens to be set below the water line and the return pump gets shut off, then water is going to backflow down the return line and back into the sump causing it to fill up with water untill the water in the tank reaches a point to where air is introduced into the return line. This is what a siphon break is for. Making a small hole in your return tube or whatever you use at the surface of the water line will cause the backfeed from happening in the event that the return pump gets shut off. Or another way to illiminate this is by not submerging your return line under water at all.
On my tank for instance...my return tubes (loc-line fittings) will basically be set right at the water line, with 2 nozzles pointing down into the tank and 2 nozzles dispersing water at the surface. Once my pump gets shut off, I'll have a small amount of water backflowing into the sump but will stop almost immediately by air entering into the 2 nozzles set at the water surface in the tank...causing an air break.
I say, search every picture and read every piece of litterature you guys can find on the subject. I've been researching sumps for over a year now and am just finally getting the last little details on my system worked out.
 

acrylic51

Active Member
Originally Posted by Sparty059
http:///forum/post/3291725
What do you mean a 40G breeder? Is that a specific type? How much on avg does it cost to make one of these on your own? I know very little about this stuff and am thinking about outsourcing and getting a rep from my LFS to do this for me. He said it would cost anywhere from $200-$300 plus the labor costs-- that would include the Sump, the UV Light Filtration (I think) and the skimmer (I think). Think I can do it for considerablly less and fairly quickly/easily?
Sparty not to be a wise a$$, but tell the LFS no thanks!!!! $200-$300 for a sump, uv, and skimmer??? You'll be replacing it shortly.....1 UV filtration isn't as important as led to believe at this stage, and is only effective if done correctly and isn't a cure all......
 

acrylic51

Active Member

Originally Posted by Sparty059
http:///forum/post/3291747
So I just got a call back from the LFS rep that was going to work on my sump tank, and was informed that he can not create a sump tank for me without having to break the studs in the back and reattach them after. I'm hesitant to do that so I'd like everyone's opinion on this. The tank is a 125 gallon tank (would like to be a saltwater reef), the dimensions of the cabinet are:
16" Deep (Front of cabinet to back)
21 1/2" Tall (From top to bottom)
49" Long (All the way through)
There is a 2" divider between the doors but does not impact the inside of the cabinet (cosmetic only).
Is there anyway I can still fit a 40 gallon breeder in here by just sliding it in? I already have my pipe for the in and out in the center of the tank. Am I hopeless and need to break the studs to do this or can I do this on my own?
Here's a very BOLD
question...
If I can do this, can someone please... PLEASE, in the easiest, most laymen terms ever, give me direction to build one. I know I already need a 40 gallon tank... I feel I'm half way there now. I know I need 2 dividers (1 area for the saltwater and the heater, and the others I have no clue)... I would like to buy a UV to filter and kill off anything else before putting it back into my tank... my goal is to not have to clean everything every other week... yet still would like it to be sparkling.
Please everyone, ideas and tips... and directions are much appreciated. I'm grasping for any hope at this point as I'm edging more towards saying "screw it" and getting rid of the tank after JUST getting it.
Me right now at my desk--->

Sparty059.....is the tank currently setup? If the tank isn't currently setup, what does the top of the stand look like? Is it a solid top? Is there some sort of cross bracing on the top of the stand where the tank sits? If the tank isn't setup yet, it might be easier to put the sump in from the top and then set the tank into place.
If the tank is already setup; then yes the center brace (2") could be removed.....But I caution, if the tank is full and setup before anything is removed I would support the stand on both sides of the center support before removing, and to reinstall it could be done a couple ways, but probably the simpliest would be using a pocket hole jig setup....that way you'd never see anything from the viewing side. I can think a couple other ways as well, but that being the easiest IMO....
 

acrylic51

Active Member

Originally Posted by Sparty059
http:///forum/post/3291747
So I just got a call back from the LFS rep that was going to work on my sump tank, and was informed that he can not create a sump tank for me without having to break the studs in the back and reattach them after. I'm hesitant to do that so I'd like everyone's opinion on this. The tank is a 125 gallon tank (would like to be a saltwater reef), the dimensions of the cabinet are:
16" Deep (Front of cabinet to back)
21 1/2" Tall (From top to bottom)
49" Long (All the way through)
There is a 2" divider between the doors but does not impact the inside of the cabinet (cosmetic only).
Is there anyway I can still fit a 40 gallon breeder in here by just sliding it in? I already have my pipe for the in and out in the center of the tank. Am I hopeless and need to break the studs to do this or can I do this on my own?
Here's a very BOLD
question...
If I can do this, can someone please... PLEASE, in the easiest, most laymen terms ever, give me direction to build one. I know I already need a 40 gallon tank... I feel I'm half way there now. I know I need 2 dividers (1 area for the saltwater and the heater, and the others I have no clue)... I would like to buy a UV to filter and kill off anything else before putting it back into my tank... my goal is to not have to clean everything every other week... yet still would like it to be sparkling.
Please everyone, ideas and tips... and directions are much appreciated. I'm grasping for any hope at this point as I'm edging more towards saying "screw it" and getting rid of the tank after JUST getting it.
Me right now at my desk--->

Sorry to hijack the thread, but Sparty059, doing a quick check no the 40 gallon breeder will not fit your stand......
 
Top