How do u fine tune a asm g-3???
- Thread starter lazypinoy
- Start date
quads4_lif
Member
you can do a reculation mod and do a drain mod on the cup and you can do a gate valve mod. google a site called asm skimmer . com
thegrog
Active Member
The frain valve mod just helps so you dont' have to take the cup off every time it gets full. Nothing to do with performance.
The recirc mod really helps increase performance, but not easy to do.
The Gate valve is easy to do (with the right parts) and REALLY helps "fine tune" things.
I would also highly recommend replacing the needle wheel with a mesh mod. This is where you remove the pins from the impeller wheel and replace with plastic mesh. I just did it this weekend and REALLY notice an increase in performance!! Real easy to do as well. Took me 20 minutes. I am recharging digital camera now so I will post some pics later.
Hope this helps.
quads4_lif
Member
That one I have not heard done I am interested in more info also.
lazypinoy
Member
Originally Posted by TheGrog
The frain valve mod just helps so you dont' have to take the cup off every time it gets full. Nothing to do with performance.
The recirc mod really helps increase performance, but not easy to do.
The Gate valve is easy to do (with the right parts) and REALLY helps "fine tune" things.
I would also highly recommend replacing the needle wheel with a mesh mod. This is where you remove the pins from the impeller wheel and replace with plastic mesh. I just did it this weekend and REALLY notice an increase in performance!! Real easy to do as well. Took me 20 minutes. I am recharging digital camera now so I will post some pics later.
Hope this helps.
thanks, pics would really help
acrylic51
Active Member
I have to agree that the mesh wheel mod might be an option to look at as far as increasing the efficiency of the skimmer......To fine tune the skimmer the gate valve mod would be the first mod to make fine tuning easier and more precise since your using a gate valve to adjust the water height inside the skimmer body.....The recirc mod is easy to do and isn't hard at all.....The recirc mod will increase the skimmers skimmer capacity more than being able to fine tune it......Also playing with the water depth the skimmer sits in will also help with fine tuning the skimmer as well.
thegrog
Active Member
Sorry for the delay, been having problems with photoshop lately.
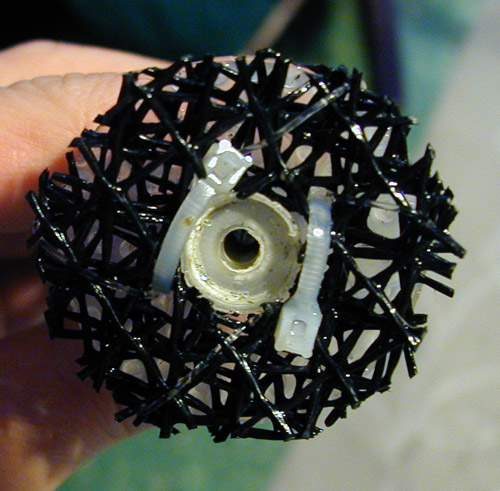
Here are two pics of the mesh mod.
First, I cut off all the pins from the impeller.
Next I CAREFULLY drilled out the venturi intake hole 1/16 larger in diameter for greater air flow in. I didn't dare go more and risk breaking it off.
The first pic is my first try with Gutterguard plastic. I used 5 layers and used zipties to secure it down using the holes already in the impeller. This worked much better than the stock pins.
The second pic is what I am running now. It is called Enkamat mesh. Do a google search for "enkamat mesh" and you can find where to get it. I used three layers and again, ziptied it to the impeller. It's performance is FAR better than the gutterguard. You can see and hear the difference when running!!! I had to open my gate valve 1-1/2 turns from the gutterguard setting as it was overflowing with foam!!!
Hope this helps!

thegrog
Active Member
Originally Posted by LazyPinoy
looks pretty good. ok ill give it a shot this weekend. thanks alot!
Good luck!
I think that drilling out the venturi intake is important for the extra airflow. Just be slow and careful with it!! If you can, use progressively larger drillbits in 1/64 increments.
looks pretty good. ok ill give it a shot this weekend. thanks alot!
Good luck!
I think that drilling out the venturi intake is important for the extra airflow. Just be slow and careful with it!! If you can, use progressively larger drillbits in 1/64 increments.
quads4_lif
Member
Hey Grog you should do a how to on it. If not I will attempt it when I take my skimmer apart to clean it. and I will try and do a how to.
thegrog
Active Member
Originally Posted by quads4_lif
Hey Grog you should do a how to on it. If not I will attempt it when I take my skimmer apart to clean it. and I will try and do a how to.
I wish I took pics durring it.
It is really easy to do and describe without pics. Here is the step-by-step.
1. Unplug pump and remove from skimmer (would be tough to do when running)!
 sorry, coffee not kicked in yet.
2. Remove intake housing and impeller assembly.
3. Carefully cut pins off of needlewheel. I used a pair of fine wirecutters but a dremmel with a cutting wheel would work even better (don't have one). Try getting them to about 1/16 - 1/8 inch in height. I don't cut them flush as I feel they help hold the mesh in place.
4. Cut 3 squares of mesh slightly larger than impeller wheel.
5. Layer the mesh 3 layers thick. Using a fine pair of scissors, cut a 1/4" hole in center so it can fit over center shaft. Does not have to be size of shaft as it will squeeze over it and help hold in place.
6. Secure with two zipties using the holes already in the impeller. Have the secure portion facing out (see above pic) to prevent scraping back of impeller housing. Do NOT overtighten!!! This can cause mesh to bow outward. Just tight enough to secure mesh to wheel and keep it flat.
7. Using a pair of scissors, trim mesh around wheel edge so it is nice and round.
8. Place back in pump and reassembel housing. Do a "dry test" where you plug it in and see if it spins. If not, you may have a corner of mesh catching on something.
9. Place back into skimmer assembly and connect everything.
10. Plug back in. You may have to blow some air into venturi hose as I found there is some sort of fluid lock when first starting up.
11. Re-tune skimmer as your skimmate will be WAY more!!
That is it. Easy to do and takes about 20 minutes. My mistake was overtightening the zipties and that caused the mesh to bow outward and catch on the housing. If that happens, cut the ties and put 2 new ones on.
For the venturi intake sizing, just find what drillbit size fits in there and go up by 1/32" (1/64 even better) and bore it out SLOWLY. You can even do it by hand if you have a hand tap that can grip the drillbit. Go up a total of 1/16" in diameter (2-1/32 bits or 4-1/64 bit sizes) This allows even more air into intake and furthur increases performance.
Hope this helps!!

Hey Grog you should do a how to on it. If not I will attempt it when I take my skimmer apart to clean it. and I will try and do a how to.
I wish I took pics durring it.
It is really easy to do and describe without pics. Here is the step-by-step.
1. Unplug pump and remove from skimmer (would be tough to do when running)!
2. Remove intake housing and impeller assembly.
3. Carefully cut pins off of needlewheel. I used a pair of fine wirecutters but a dremmel with a cutting wheel would work even better (don't have one). Try getting them to about 1/16 - 1/8 inch in height. I don't cut them flush as I feel they help hold the mesh in place.
4. Cut 3 squares of mesh slightly larger than impeller wheel.
5. Layer the mesh 3 layers thick. Using a fine pair of scissors, cut a 1/4" hole in center so it can fit over center shaft. Does not have to be size of shaft as it will squeeze over it and help hold in place.
6. Secure with two zipties using the holes already in the impeller. Have the secure portion facing out (see above pic) to prevent scraping back of impeller housing. Do NOT overtighten!!! This can cause mesh to bow outward. Just tight enough to secure mesh to wheel and keep it flat.
7. Using a pair of scissors, trim mesh around wheel edge so it is nice and round.
8. Place back in pump and reassembel housing. Do a "dry test" where you plug it in and see if it spins. If not, you may have a corner of mesh catching on something.
9. Place back into skimmer assembly and connect everything.
10. Plug back in. You may have to blow some air into venturi hose as I found there is some sort of fluid lock when first starting up.
11. Re-tune skimmer as your skimmate will be WAY more!!
That is it. Easy to do and takes about 20 minutes. My mistake was overtightening the zipties and that caused the mesh to bow outward and catch on the housing. If that happens, cut the ties and put 2 new ones on.
For the venturi intake sizing, just find what drillbit size fits in there and go up by 1/32" (1/64 even better) and bore it out SLOWLY. You can even do it by hand if you have a hand tap that can grip the drillbit. Go up a total of 1/16" in diameter (2-1/32 bits or 4-1/64 bit sizes) This allows even more air into intake and furthur increases performance.
Hope this helps!!
quads4_lif
Member
Yes it does thank you very much