New 100 gallon rimless build
- Thread starter drm100
- Start date
drm100
Member
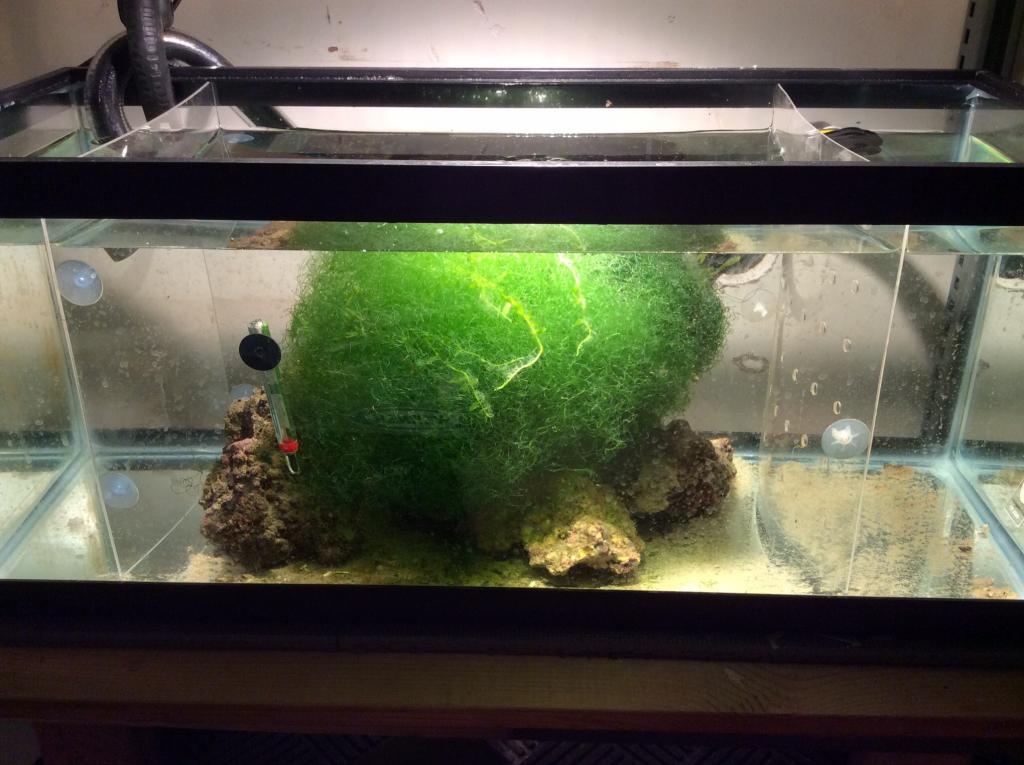
This is the remote fuge I've been playing with. I'm thinking it will run a lot better if I also drill the input side instead of hanging the hose over, and if I silicon glass on both sides instead of the wedged in acrylic? The acrylic is about an inch off the bottom glass on both sides, is that enough of a flow through the tank?
pegasus
Well-Known Member
Yep, you're almost there. As for your fuge, I think 1" gaps will give very sufficient flow... maybe too much. You can measure the flow by timing how many minutes it takes to fill a gallon jug. Round up or down to the nearest minute and divide 60 by those minutes to get your GPH. You can do it by the quart or cup by doubling or quadrupling (respectively) the fill time and divide 60 by the total. Your target GPH depends on what you want to achieve. Nitrate reduction via macros requires a fairly slow flow...
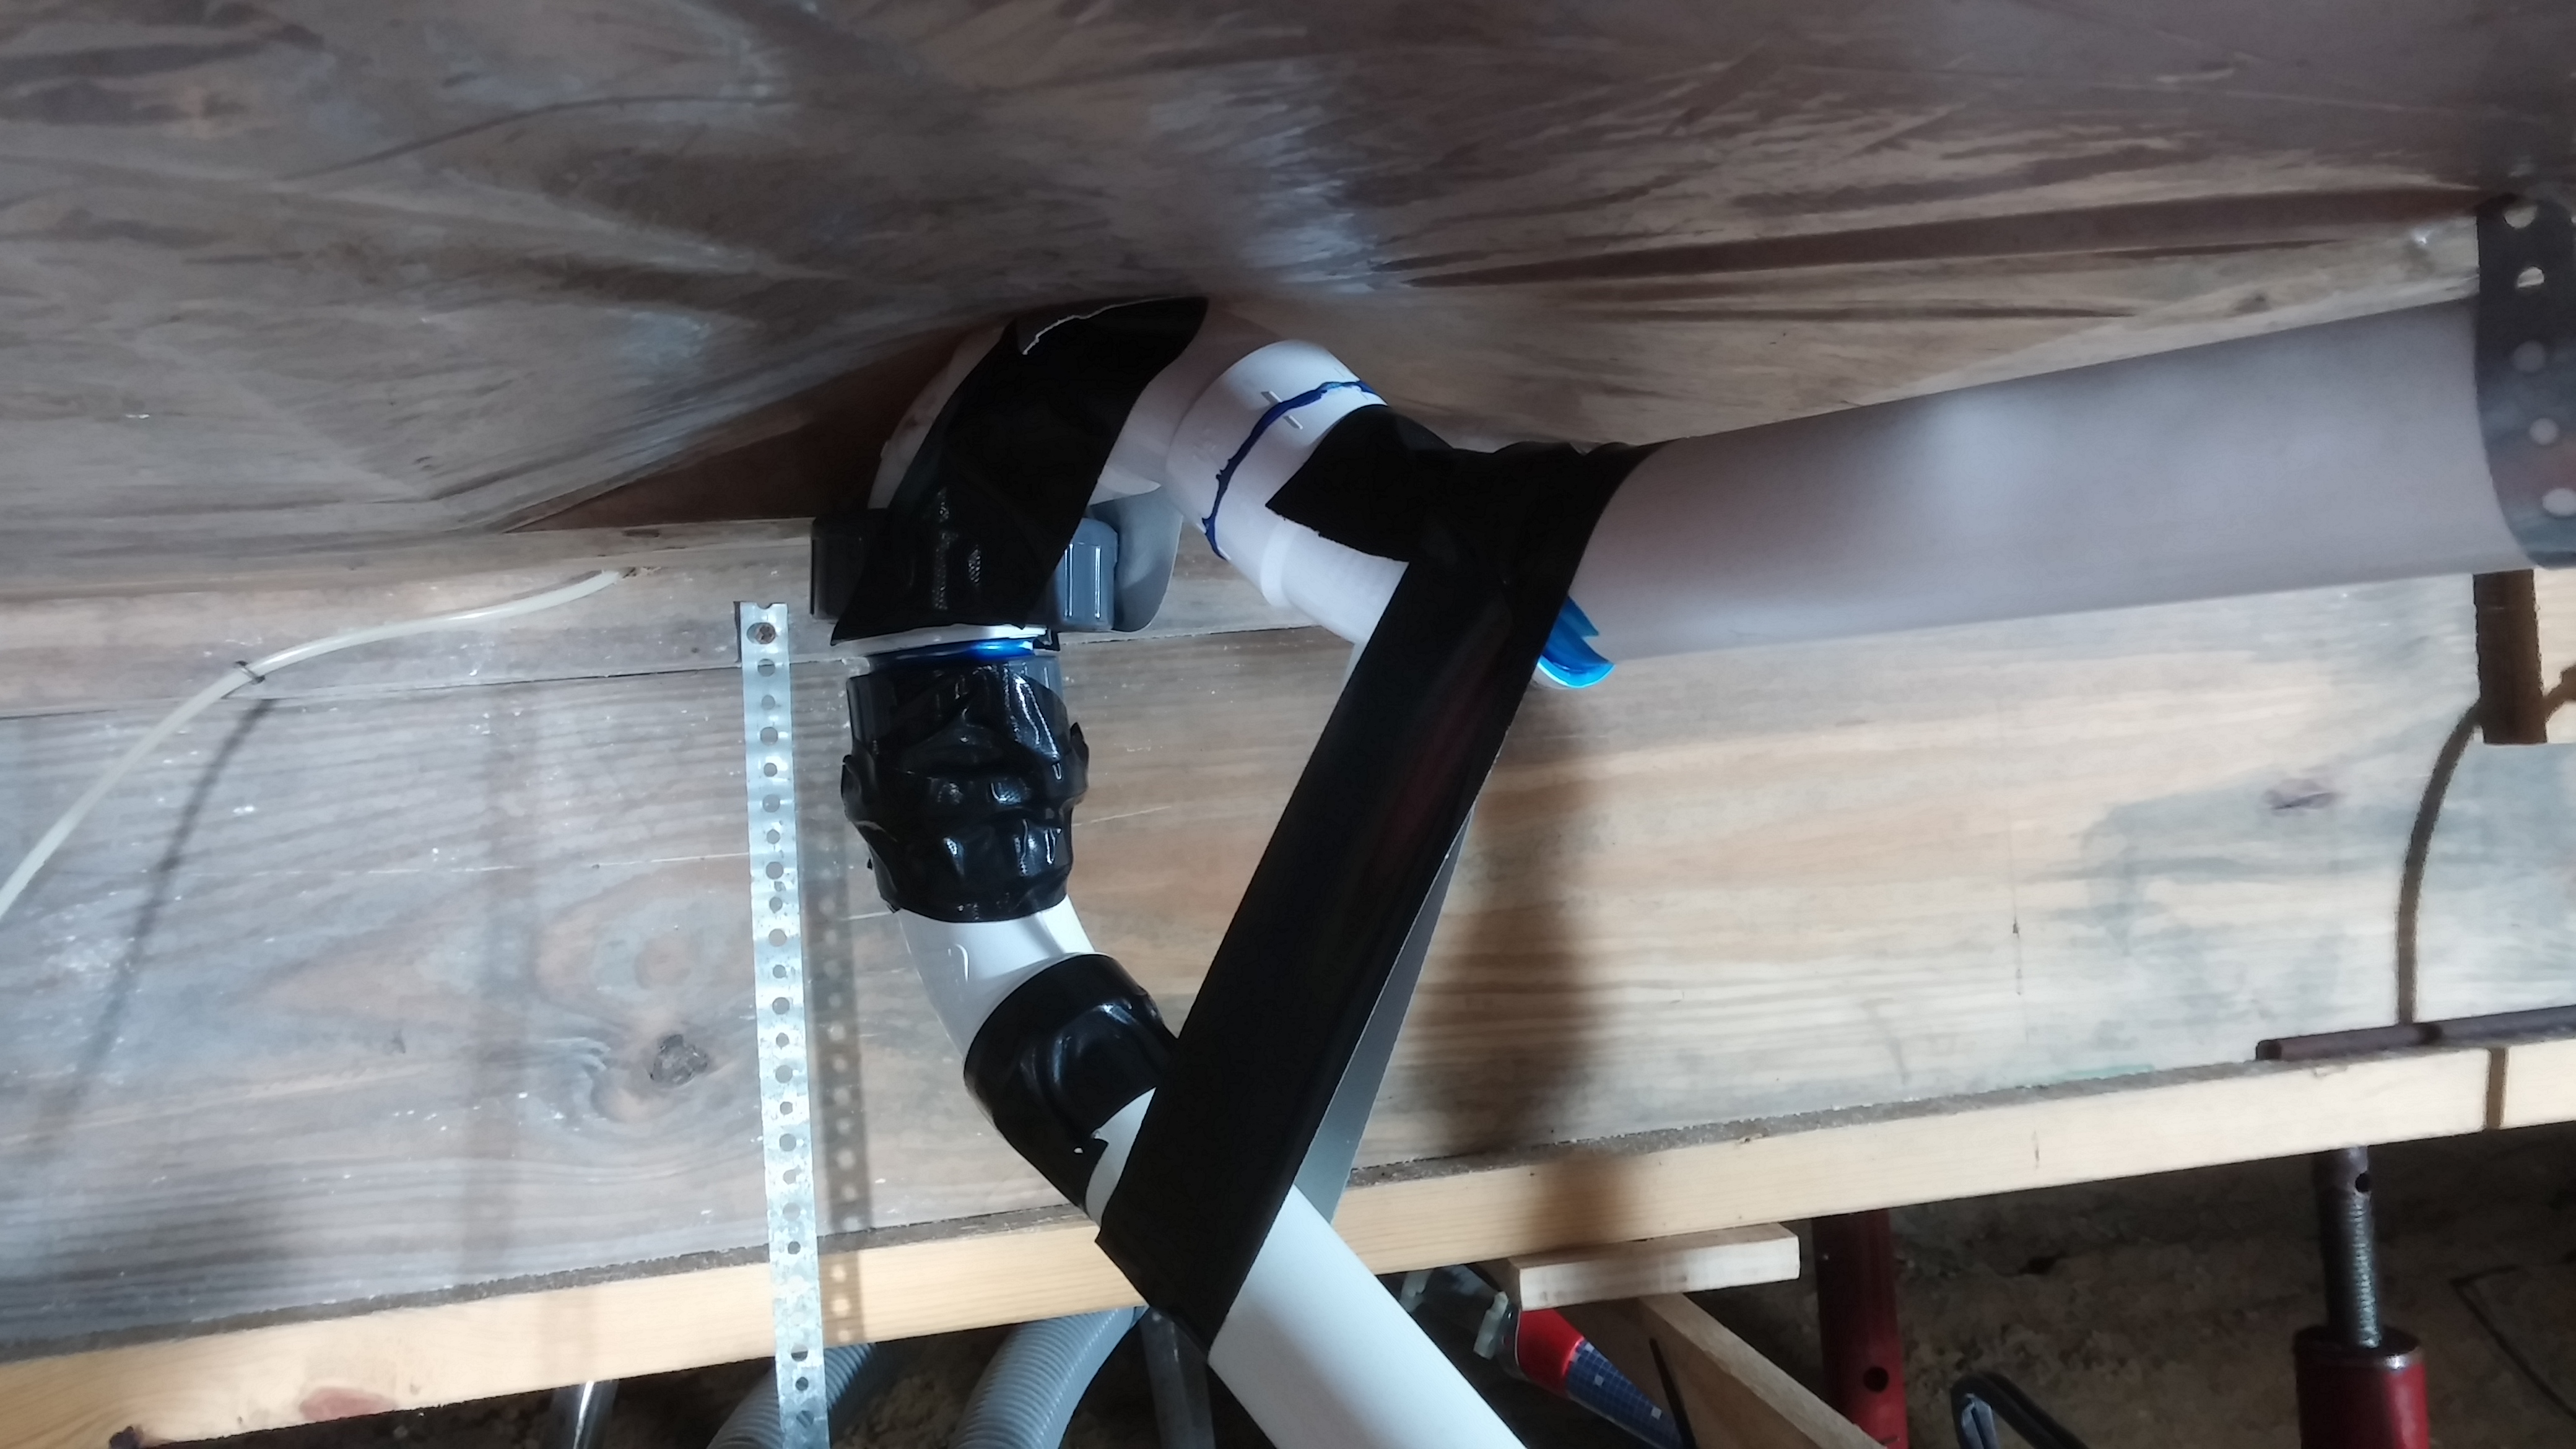
One thing I noticed... your booster pump appears to be feeding into the sediment filter. This okay if you have clean tap water or a pre-filter. I ran my feed line through the 1st stage, then to the booster. This keeps the pump clean, and there's no loss of flow unless the filter clogs. A little tip I picked up along the way...
One thing I noticed... your booster pump appears to be feeding into the sediment filter. This okay if you have clean tap water or a pre-filter. I ran my feed line through the 1st stage, then to the booster. This keeps the pump clean, and there's no loss of flow unless the filter clogs. A little tip I picked up along the way...
drm100
Member
I have a prefilter before the pump, i hope that's enough. I read up on the booster before I got it lol, I made the mistake of just ordering the ro unit without reading about chloromines first, so I made 100g of fresh ro water then read that ventura has chloromines in the water. Lol wasn't happy, I dumped that water, ordered the filter upgrade then the pump because the water pressure I got was only 25 psi.
As for the fuge I may just do half inch gaps, it's getting more of a flow then I want now, but some of that is from the hose pointing down and the water flow hitting the bottom and then shooting under the acrylic, will help a lot when I drill it I'm hopeing.
As for the fuge I may just do half inch gaps, it's getting more of a flow then I want now, but some of that is from the hose pointing down and the water flow hitting the bottom and then shooting under the acrylic, will help a lot when I drill it I'm hopeing.
pegasus
Well-Known Member
Quote:
Originally Posted by Pegasus http:///t/397729/new-100-gallon-rimless-build/20#post_3547365
Yep, you're almost there. As for your fuge, I think 1" gaps will give very sufficient flow... maybe too much. You can measure the flow by timing how many minutes it takes to fill a gallon jug. Round up or down to the nearest minute and divide 60 by those minutes to get your GPH. You can do it by the quart or cup by doubling or quadrupling (respectively) the fill time and divide 60 by the total. Your target GPH depends on what you want to achieve. Nitrate reduction via macros requires a fairly slow flow...
One thing I noticed... your booster pump appears to be feeding into the sediment filter. This okay if you have clean tap water or a pre-filter. I ran my feed line through the 1st stage, then to the booster. This keeps the pump clean, and there's no loss of flow unless the filter clogs. A little tip I picked up along the way...
I have to apologize... I am a total idiot at the end of a long day. After a good night's sleep, I realized I made a terrible error in my formula (see above). The time it takes to fill a gallon is NOT DIVIDED by 60, but rather MULTIPLIED by 60. I didn't realize what I had written until I tested the flow of my 40B awhile ago, and tried to use the screwed up formula. It took 24 seconds to fill a gallon, or just over 2 gallons per minute. I didn't think 30 gallons an hour sounded right, and once I realized my mistake, it came out to a little over 120 GPH. This is only 3 turnovers per hour (120/40=3), but I tested it with the pump on the basement floor. Once it is installed in the refugium, this will reduce the head by more than two feet. I hope it makes enough difference so I don't have to buy a bigger pump.
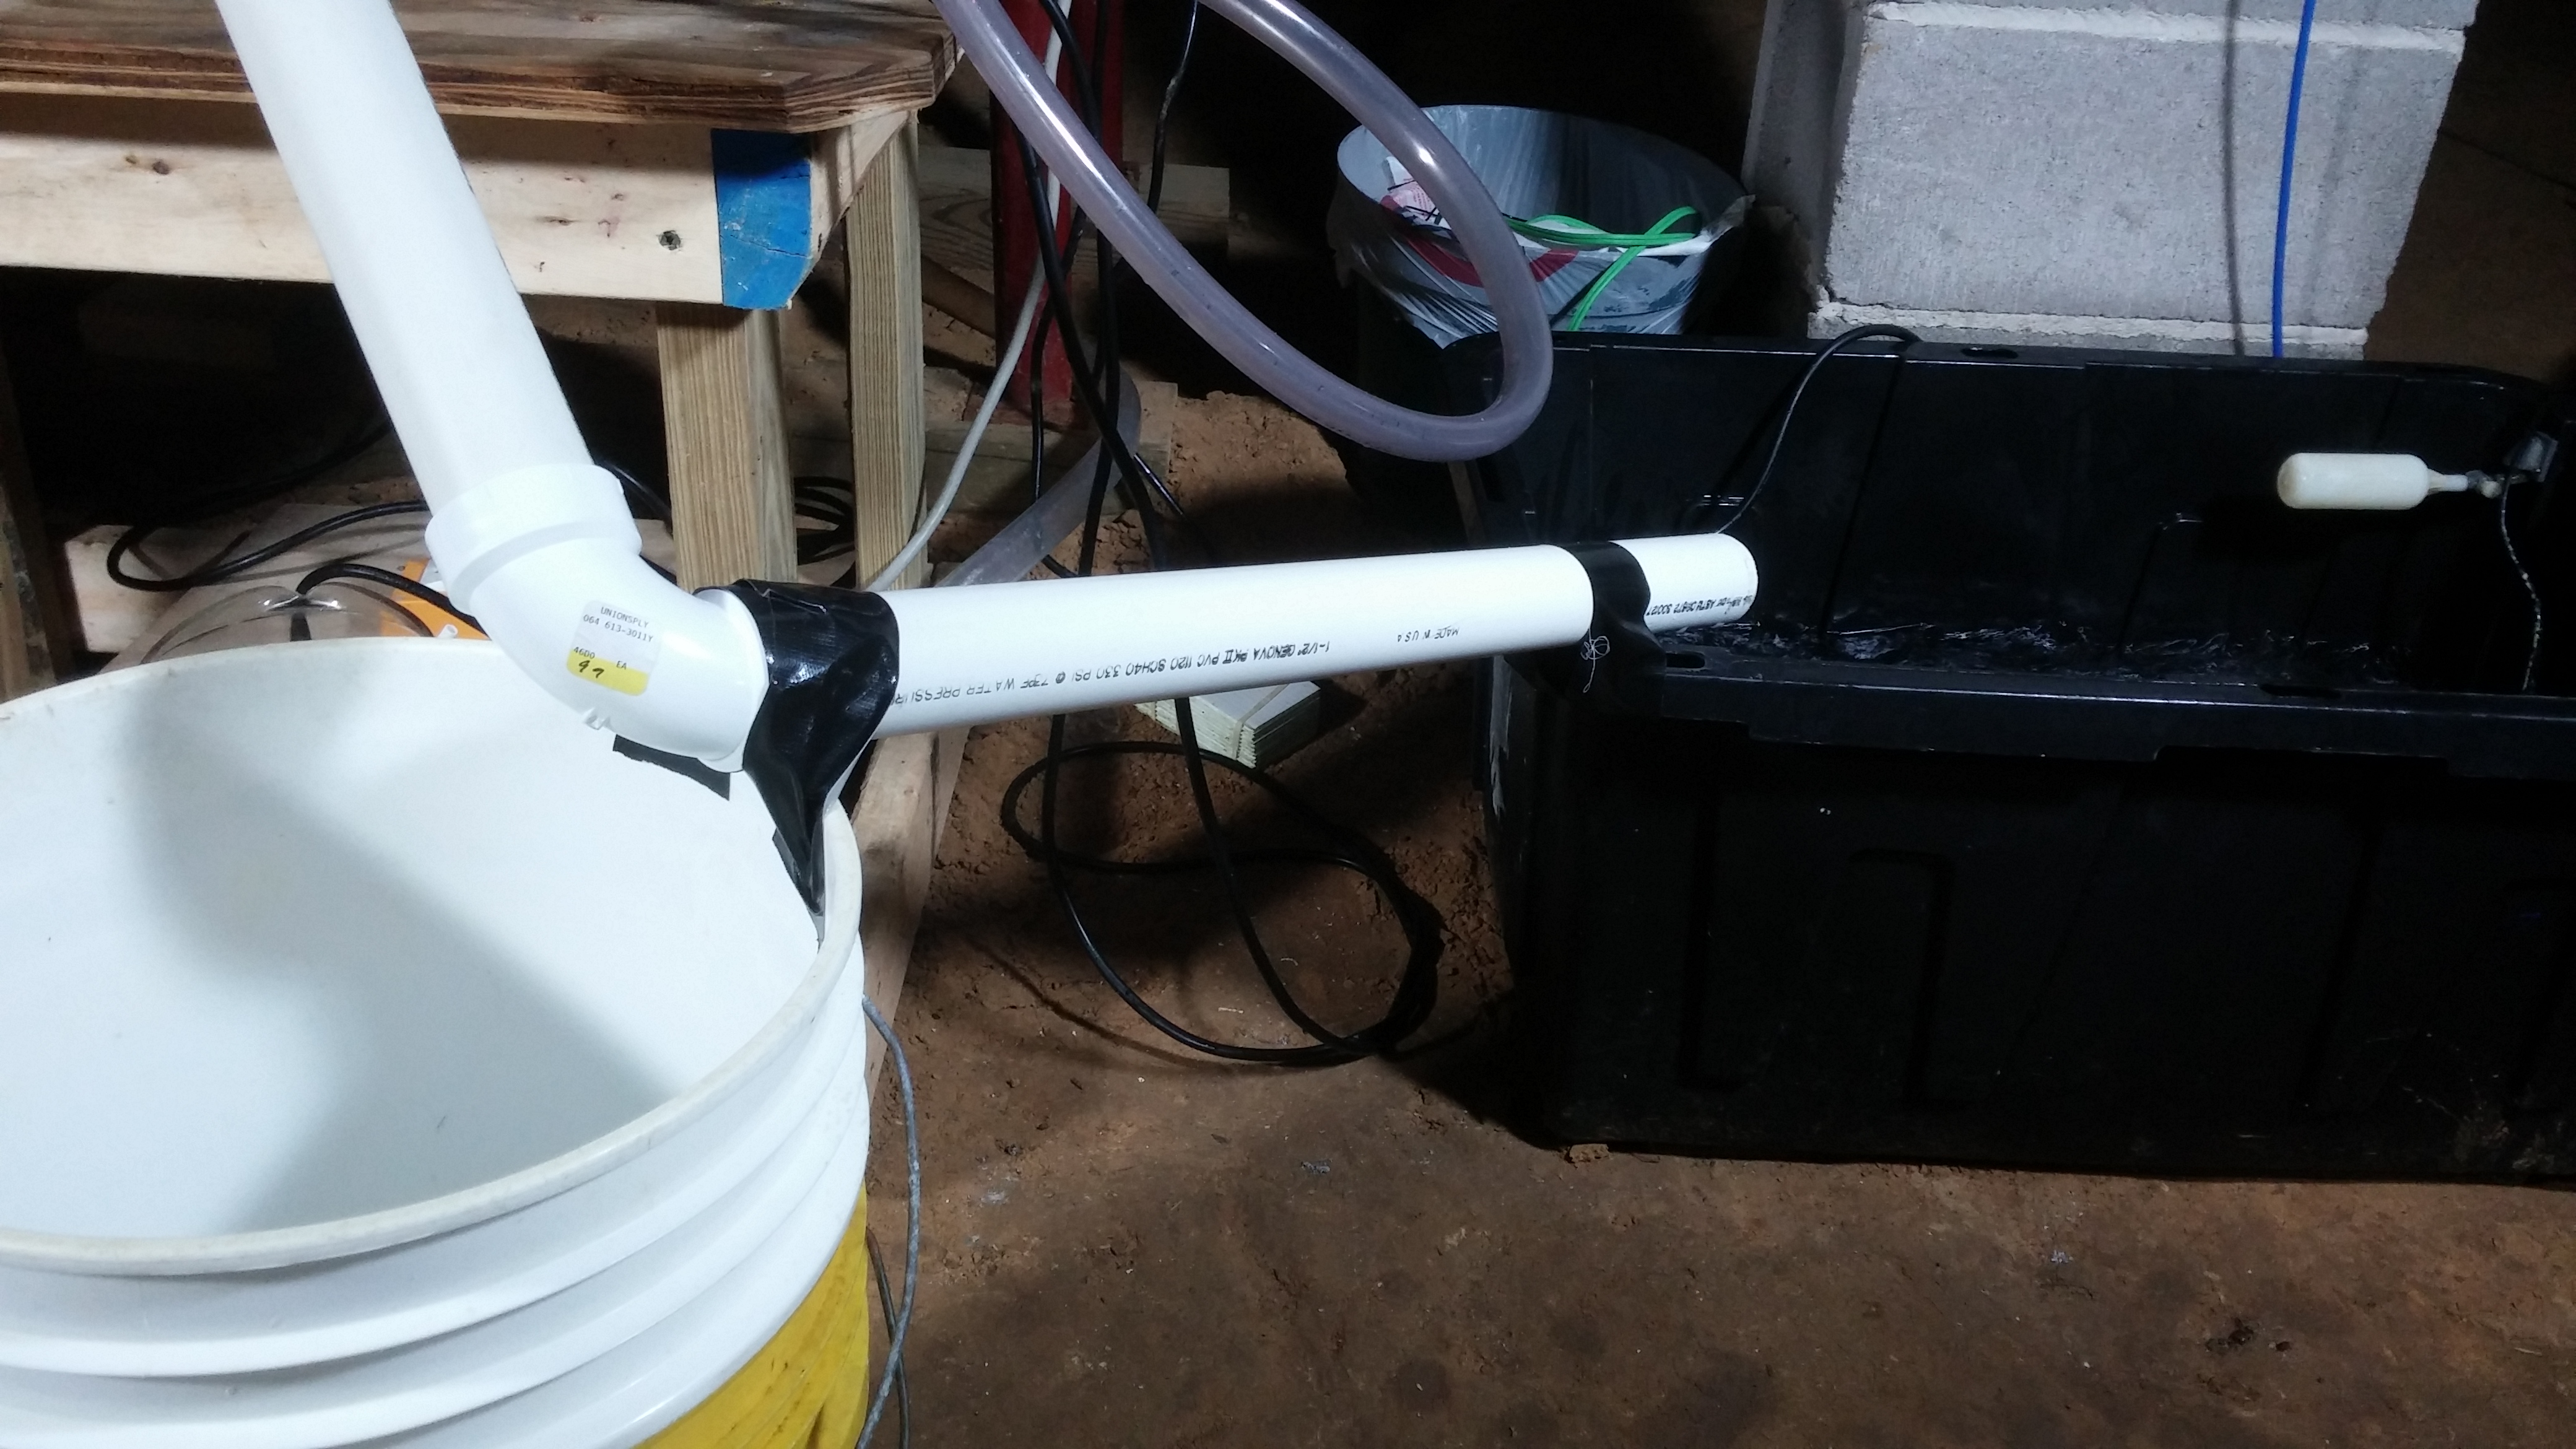
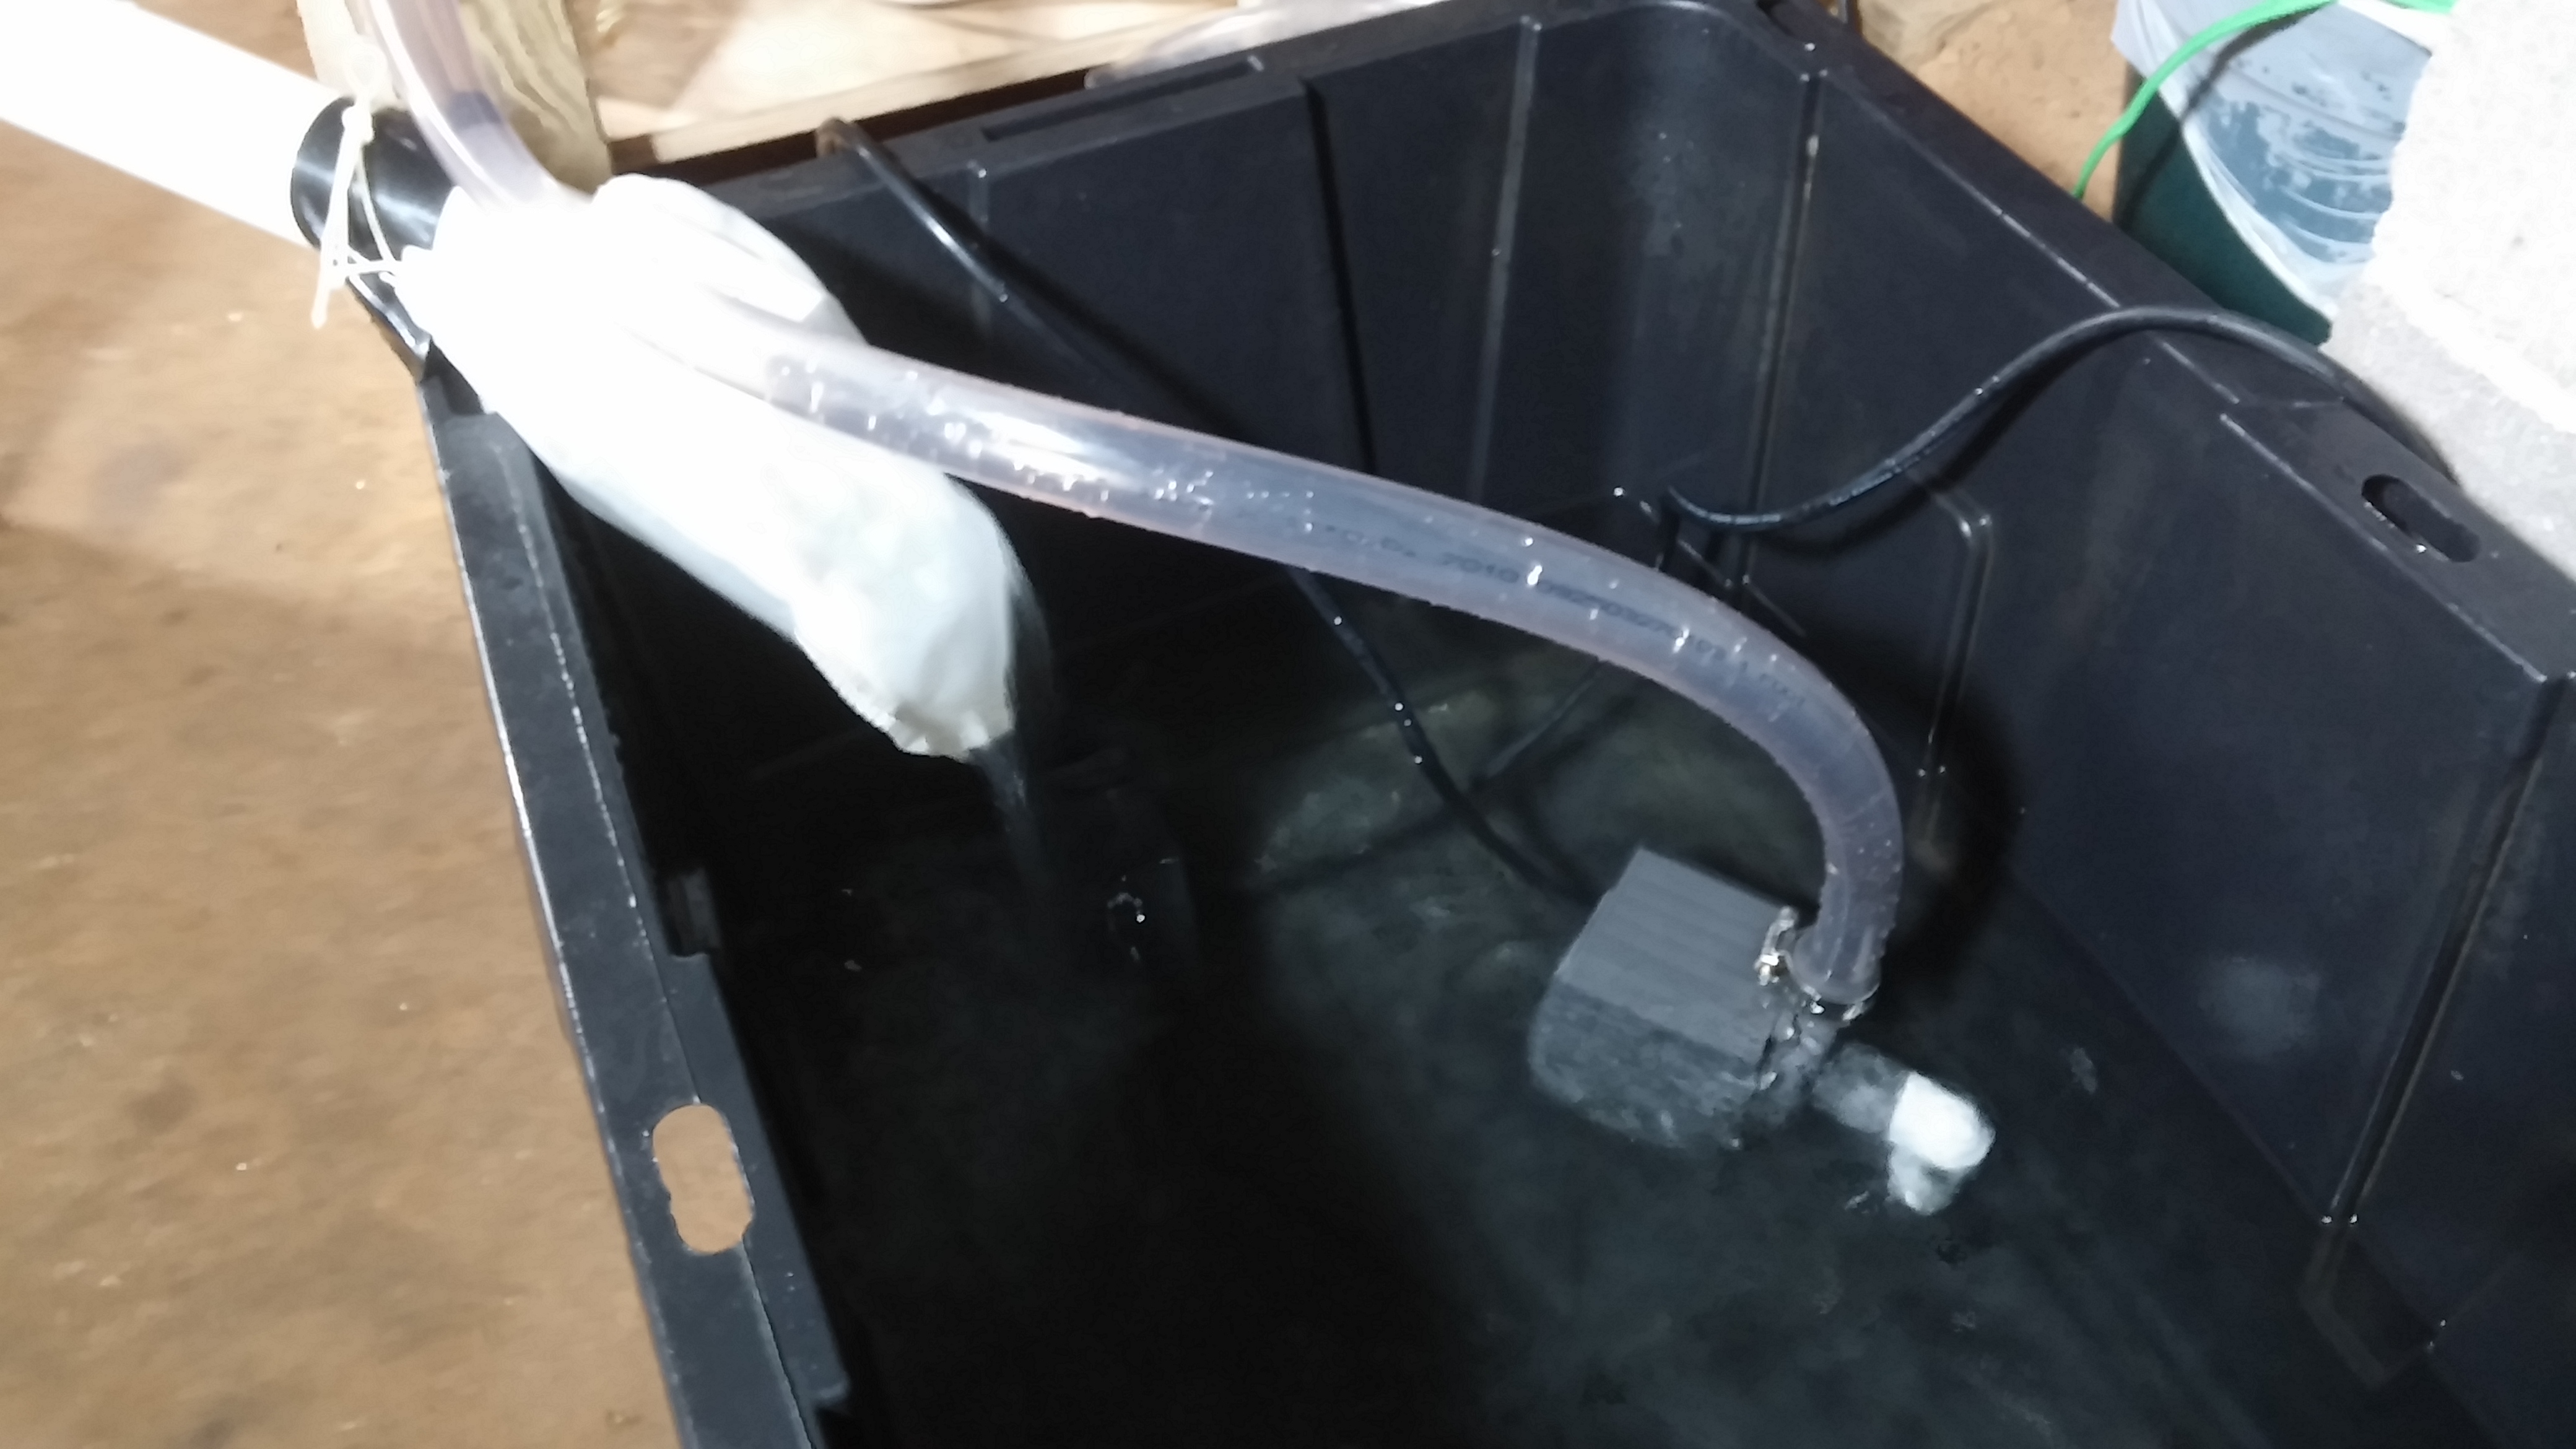
Here are some pics of my latest plumbing job. It's some of my best work, so I'm a little proud of myself:


I know... right? Not everyone can create such a masterpiece from so little! LOL!!!
Actually, it was a temporary setup so I could test the flow, and most importantly, how much drainage there would be in the event of a power outage. I am adding the 40B to the refugium along with my 125G and RDSB, and it gets pretty full during power outages, so I tested to make sure there was no overflow. The check-valve on pump line and the inverted home made P-trap in the drain (first picture) did it's job, and I was pleasantly surprised when I had 2 1/2 quarts of drainage after killing the pump. Woot!!!
Originally Posted by Pegasus http:///t/397729/new-100-gallon-rimless-build/20#post_3547365
Yep, you're almost there. As for your fuge, I think 1" gaps will give very sufficient flow... maybe too much. You can measure the flow by timing how many minutes it takes to fill a gallon jug. Round up or down to the nearest minute and divide 60 by those minutes to get your GPH. You can do it by the quart or cup by doubling or quadrupling (respectively) the fill time and divide 60 by the total. Your target GPH depends on what you want to achieve. Nitrate reduction via macros requires a fairly slow flow...
One thing I noticed... your booster pump appears to be feeding into the sediment filter. This okay if you have clean tap water or a pre-filter. I ran my feed line through the 1st stage, then to the booster. This keeps the pump clean, and there's no loss of flow unless the filter clogs. A little tip I picked up along the way...
I have to apologize... I am a total idiot at the end of a long day. After a good night's sleep, I realized I made a terrible error in my formula (see above). The time it takes to fill a gallon is NOT DIVIDED by 60, but rather MULTIPLIED by 60. I didn't realize what I had written until I tested the flow of my 40B awhile ago, and tried to use the screwed up formula. It took 24 seconds to fill a gallon, or just over 2 gallons per minute. I didn't think 30 gallons an hour sounded right, and once I realized my mistake, it came out to a little over 120 GPH. This is only 3 turnovers per hour (120/40=3), but I tested it with the pump on the basement floor. Once it is installed in the refugium, this will reduce the head by more than two feet. I hope it makes enough difference so I don't have to buy a bigger pump.
Here are some pics of my latest plumbing job. It's some of my best work, so I'm a little proud of myself:
I know... right? Not everyone can create such a masterpiece from so little! LOL!!!
Actually, it was a temporary setup so I could test the flow, and most importantly, how much drainage there would be in the event of a power outage. I am adding the 40B to the refugium along with my 125G and RDSB, and it gets pretty full during power outages, so I tested to make sure there was no overflow. The check-valve on pump line and the inverted home made P-trap in the drain (first picture) did it's job, and I was pleasantly surprised when I had 2 1/2 quarts of drainage after killing the pump. Woot!!!
pegasus
Well-Known Member
Quote:
Originally Posted by drm100 http:///t/397729/new-100-gallon-rimless-build/20#post_3547366
I have a prefilter before the pump, i hope that's enough. I read up on the booster before I got it lol, I made the mistake of just ordering the ro unit without reading about chloromines first, so I made 100g of fresh ro water then read that ventura has chloromines in the water. Lol wasn't happy, I dumped that water, ordered the filter upgrade then the pump because the water pressure I got was only 25 psi.
As for the fuge I may just do half inch gaps, it's getting more of a flow then I want now, but some of that is from the hose pointing down and the water flow hitting the bottom and then shooting under the acrylic, will help a lot when I drill it I'm hopeing.
I wasn't sure what that was ahead of the pump... I thought it may have been a fancy shutoff valve. LOL! A pre-filter will help, that's for sure. I hope your water is cleaner than mine, because I have to change sediment filters about every three months! GRRRR!!!
Yeah, I thought 1" gap across the entire bottom might be a little extreme, but 1/2" should get you closer to the results you want. Not sure if the down flow is playing too much of a role in the amount of flow, but could add another elbow to the end of the hose to verify or eliminate that piece of the puzzle. No need to drill if it's not necessary, right? It's easy enough to do, but there's always the inherent risk of breaking a perfectly good tank...
drm100
Member
I have to apologize... I am a total idiot at the end of a long day. After a good night's sleep, I realized I made a terrible error in my formula (see above). The time it takes to fill a gallon is NOT DIVIDED by 60, but rather MULTIPLIED by 60. I didn't realize what I had written until I tested the flow of my 40B awhile ago, and tried to use the screwed up formula. It took 24 seconds to fill a gallon, or just over 2 gallons per minute. I didn't think 30 gallons an hour sounded right, and once I realized my mistake, it came out to a little over 120 GPH. This is only 3 turnovers per hour (120/40=3), but I tested it with the pump on the basement floor. Once it is installed in the refugium, this will reduce the head by more than two feet. I hope it makes enough difference so I don't have to buy a bigger pump.
Here are some pics of my latest plumbing job. It's some of my best work, so I'm a little proud of myself:


I know... right? Not everyone can create such a masterpiece from so little! LOL!!!
Actually, it was a temporary setup so I could test the flow, and most importantly, how much drainage there would be in the event of a power outage. I am adding the 40B to the refugium along with my 125G and RDSB, and it gets pretty full during power outages, so I tested to make sure there was no overflow. The check-valve on pump line and the inverted home made P-trap in the drain (first picture) did it's job, and I was pleasantly surprised when I had 2 1/2 quarts of drainage after killing the pump. Woot!!!
Lol that's an awesome setup! Looks like something I do hehe, but, if it works that's what counts!
Here are some pics of my latest plumbing job. It's some of my best work, so I'm a little proud of myself:
I know... right? Not everyone can create such a masterpiece from so little! LOL!!!
Actually, it was a temporary setup so I could test the flow, and most importantly, how much drainage there would be in the event of a power outage. I am adding the 40B to the refugium along with my 125G and RDSB, and it gets pretty full during power outages, so I tested to make sure there was no overflow. The check-valve on pump line and the inverted home made P-trap in the drain (first picture) did it's job, and I was pleasantly surprised when I had 2 1/2 quarts of drainage after killing the pump. Woot!!!
Lol that's an awesome setup! Looks like something I do hehe, but, if it works that's what counts!
drm100
Member
I wasn't sure what that was ahead of the pump... I thought it may have been a fancy shutoff valve. LOL! A pre-filter will help, that's for sure. I hope your water is cleaner than mine, because I have to change sediment filters about every three months! GRRRR!!!
Yeah, I thought 1" gap across the entire bottom might be a little extreme, but 1/2" should get you closer to the results you want. Not sure if the down flow is playing too much of a role in the amount of flow, but could add another elbow to the end of the hose to verify or eliminate that piece of the puzzle. No need to drill if it's not necessary, right? It's easy enough to do, but there's always the inherent risk of breaking a perfectly good tank...
Hopefully the half inch does the trick. I'm going to tear down my 29g freshwater soon and use that for the fuge. That way I don't have to mess with the one on there right now till I get the 29 setup right. Going to drill both sides on that one, I just don't trust that hose clipped onto the side of the tank lol, with my luck it will pop off.
On another note hopefully it doesn't get to hot this summer, I really don't want to invest in a chiller yet. Tanks set at a steady 77, but it's been jumping up 1 to 1 1/2 degrees each day and it's been pretty mild really. Just don't like it lol. Like things to be steady.
Oh and you have a basement? Never heard of anyone here with one till you lol, wish I had one.
pegasus
Well-Known Member
Quote:
Originally Posted by drm100 http:///t/397729/new-100-gallon-rimless-build/20#post_3547382
Lol that's an awesome setup! Looks like something I do hehe, but, if it works that's what counts!
I'm not sure if that's a compliment... or an insult! LMAO!!! Living in the rural South and working on commission in this stagnant economy makes it a little difficult to do things the way I want. I'd love to be able to set up my tank (a little) differently, but I'm on a very tight budget. It's probably for the best, since I blew a fuse the other day wiring up a light switch! I'd shut down an entire power grid if I were wiring your rig! This is my passion, and it gives me great satisfaction because I somehow make it work. There's nothing else like it...
drm100
Member
I'm not sure if that's a compliment... or an insult! LMAO!!! Living in the rural South and working on commission in this stagnant economy makes it a little difficult to do things the way I want. I'd love to be able to set up my tank (a little) differently, but I'm on a very tight budget. It's probably for the best, since I blew a fuse the other day wiring up a light switch! I'd shut down an entire power grid if I were wiring your rig! This is my passion, and it gives me great satisfaction because I somehow make it work. There's nothing else like it...
No insult at all! I do things the same way lol, I'm on a tight budget now also I saved for my system but lmao not nearly enough, so now it's a little addition a month for me.
No insult at all! I do things the same way lol, I'm on a tight budget now also I saved for my system but lmao not nearly enough, so now it's a little addition a month for me.
pegasus
Well-Known Member
Quote:
Originally Posted by drm100 http:///t/397729/new-100-gallon-rimless-build/20#post_3547385
Hopefully the half inch does the trick. I'm going to tear down my 29g freshwater soon and use that for the fuge. That way I don't have to mess with the one on there right now till I get the 29 setup right. Going to drill both sides on that one, I just don't trust that hose clipped onto the side of the tank lol, with my luck it will pop off.
On another note hopefully it doesn't get to hot this summer, I really don't want to invest in a chiller yet. Tanks set at a steady 77, but it's been jumping up 1 to 1 1/2 degrees each day and it's been pretty mild really. Just don't like it lol. Like things to be steady.
Oh and you have a basement? Never heard of anyone here with one till you lol, wish I had one.
Can't blame you... a dislodged hose can cause a lot of water damage and a fried pump. That's the reason I drilled my 40B rather than using a siphon type overflow box. Better safe than sorry.
Weather here in MS can go from teens in winter, to 100F in the summertime. I notice a fluctuation of 1-2 degrees in my tank between seasons. The basement stays cooler than the tank year round, so all I need is a decent heater for the tank. I love having the basement, as this is where all of my equipment is located. The tank stand is full of tubs and things, but the only plumbing is 5 hoses going through the floor behind the stand. Two overflow hoses, one return line, and two water change hoses. I manually perform water changes from the basement, and never see the tank until it's completed. It's a slightly crude method, but one that's been effective for more than a year. Some day... when I strike it rich... I'll fully automate everything.
drm100
Member
Can't blame you... a dislodged hose can cause a lot of water damage and a fried pump. That's the reason I drilled my 40B rather than using a siphon type overflow box. Better safe than sorry.
Weather here in MS can go from teens in winter, to 100F in the summertime. I notice a fluctuation of 1-2 degrees in my tank between seasons. The basement stays cooler than the tank year round, so all I need is a decent heater for the tank. I love having the basement, as this is where all of my equipment is located. The tank stand is full of tubs and things, but the only plumbing is 5 hoses going through the floor behind the stand. Two overflow hoses, one return line, and two water change hoses. I manually perform water changes from the basement, and never see the tank until it's completed. It's a slightly crude method, but one that's been effective for more than a year. Some day... when I strike it rich... I'll fully automate everything.
We'll I have the back wall of the garage lol a space about 3 ft wide and 12 long, but it's enough for now lol, just a few holes in the wall to the tank rofl. I have an apex but I don't use nearly what I could on it, that's taking me awhile to get the hang of.
pegasus
Well-Known Member
A 3'x12' space is a bit confining, but very doable. This frees up stand space for test kits, food, locking grandchildren in, and such. I hope to own an apex someday, but I can only imagine there's quite a learning curve to using it properly. I'm sure there are some pros around here who can answer any questions on it's use. I have trouble programming the timer on my lights, so I can't be of any use to you with that piece of equipment...
drm100
Member
A 3'x12' space is a bit confining, but very doable. This frees up stand space for test kits, food, locking grandchildren in, and such. I hope to own an apex someday, but I can only imagine there's quite a learning curve to using it properly. I'm sure there are some pros around here who can answer any questions on it's use. I have trouble programming the timer on my lights, so I can't be of any use to you with that piece of equipment...
Ya the reading material on it is huge lol, so I read a bit at a time, it's the programming stuff that confuses me.
So I've caught 5 Cirolanids, I think that's the name, so far. The bad bugs with the eyes. I go hunting every night lol while I'm checking out the tanks night life. And I also saw something creepy lol. Was looking at one of the rocks and a part of it pushed itself out rofl freaked me out. No clue what it is, shaped sort of like a football and looks exactly like the rock, some kind of clam or close to it maybe.
pegasus
Well-Known Member
Quote:
Originally Posted by drm100 http:///t/397729/new-100-gallon-rimless-build/20#post_3547395
Ya the reading material on it is huge lol, so I read a bit at a time, it's the programming stuff that confuses me.
So I've caught 5 Cirolanids, I think that's the name, so far. The bad bugs with the eyes. I go hunting every night lol while I'm checking out the tanks night life. And I also saw something creepy lol. Was looking at one of the rocks and a part of it pushed itself out rofl freaked me out. No clue what it is, shaped sort of like a football and looks exactly like the rock, some kind of clam or close to it maybe.
If you think you have Cirolanid isopods, be sure to check out the pictures of the Sphaeromatid isopods in this article. They are commonly mistaken for Cirolanid isopods when people first discover them in their aquariums, but Sphaeromatids are beneficial scavengers that should remain in your tank. You can quickly check to see if your isopods are Sphaeromatids by isolating one of them and seeing if it can roll up into a ball. Sphaeromatids can do this while most other isopods, including Cirolanids, cannot. (http://reefkeeping.com/issues/2006-02/bp/index.php)
I have a rock that has three small clams on it. They are the same color as the rock, and they are all in small holes in the rock. When frightened, they clam up (literally) and retract slightly into the holes.