New 90G Reef (Almost)

indyws6

Member
Greetings

I am almost to the point that I can put water in my tank for my 90G reef project. Here are 3 photos that show the current, albeit incomplete, state of things. (I have, literally, 300+ photos so far documenting everything - it's a sickness
- I could create a thread showing all of the steps if anyone felt that information and photos from a newbie would be helpful to others...
Just thought I would throw this out there for comments, suggestions, critiques, etc. (be kind)!


mr. green

Member
Looks nice so far!! Good Work.
Is that a Neptune Controller? Would you mind commenting on it and what is needed to run these. Beside the controller, do you need to buy anything else? I am looking to get one and just would like to know what is needed for the complete package.
Thanks.
 

indyws6

Member
Mr. Green - Hello!
Thanks for the comments. I have a lot of work to do, but it's finally starting to look like an aquarium. If anyone is interested in a detailed equipment list, I can provide that for additional comments & suggestions...
The controller you see is a Digital Aquatics ReefKeeper. It was less expensive than some of the alternatives and provides most of the functions I was looking for at this stage. I obviously haven't used it in a "live" setting yet, but I have configured all of the channels as they will be when the tank is running to test it - so far so good. The only "complaint" I have is that the remote multiple outlet strip is connected by a single power cord, which makes it difficult to put some channels on a battery backup while excluding others. For example, I want my return pump, heater(s) and powerheads on a UPS, but not the lights. Ideally, everthing would be on a UPS, but that is simply not feasible without a major investment - the load needed to support the halides would require a rather large UPS and the number of batteries required to get a reasonable amount of run-time would be significant.
To counter this problem, what I have done is the following:
1) Connect the ReefKeeper to the wall outlet (utility power)
2) Connect a UPS to each outlet (channel) on the ReefKeeper for which I want UPS backup (there will be two) and set them to "always on"
3) Connect a multiple outlet strip to each UPS. One UPS will support the return pump, skimmer pump and powerheads while the other supports the heater(s) (doing this to balance load and run-time)
4) Connect the devices to the multiple outlet strips
The big drawback to this is the inability to use the "feed" function. This function will automatically turn-off the pumps for a pre-set time to avoid pulling the food into the filter. Connected in the manner I'm using it, the power to the outlet channel on the ReefKeeper goes off like it should, but that just triggers the UPS(s) to go on battery backup. Without dismantling the ReefKeeper multiple outlet box and wiring separte power sources for each outlet (channel), I see no way around this. I'm willing to give-up that feature for the security of battery backup on my pumps and heater. Just my opinion - I hope this helps...
 

indyws6

Member
GMFORD1979 - Thanks for the comments...
I will definitely post pics as I start stocking the tank. I am getting very close to actually putting water in it, which I hear is a mandatory requirement for a reef tank :hilarious
I had another thread regarding how to approach getting water for the initial fill since I didn't have an RO/DI unit. Based on the responses, I placed an order for one yesterday (Coralife PureFlo II / 50gpd 4-stage), so if all goes well I will be doing some plumbing work this weekend or early next week.
I am very anxious to get some critters, but trying to temper that with the reality of the cycling, testing and unexpected problems that always seem to appear, etc.
 

trainfever

Active Member
I dont see any, so I would recommend installing a GFCI. A Ground Fault Circuit Interupter. You can buy a power strip with one built in or now they have one that plugs right into a dual outlet. It has two outlets and both are protected. It cost around 15 bucks. Other than that, it all looks good. Cant wait to see fish in it.
 

2563

Member
Originally Posted by indyws6
I am getting very close to actually putting water in it, which I hear is a mandatory requirement for a reef tank
Thats funny, when I started I was told water was optional. Oh well, times change. :thinking:
But seriously, it's coming together quite nicely, it looks like it's going to be quite the setup!
 

indyws6

Member
TRAINFEVER - There will be GFCI protection, but I have heard through SWF forums that UPS's tend to trip them. I am trying to think through the options and how to incorporate them with the approach I am using for electric feeds (described in one of the previous responses). I am also looking to see (at the suggestion of a forum member) if arc-fault circuit protection is available for Wadsworth breaker boxes (I have an older home)
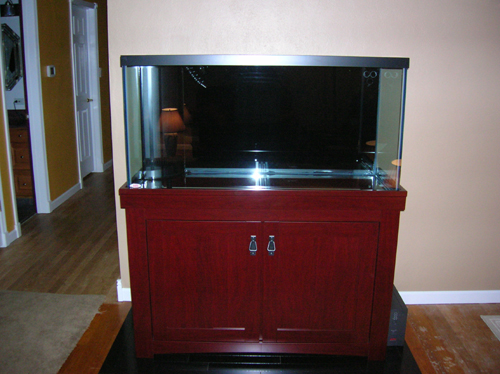
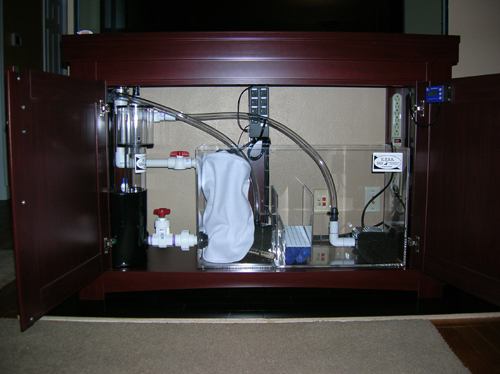
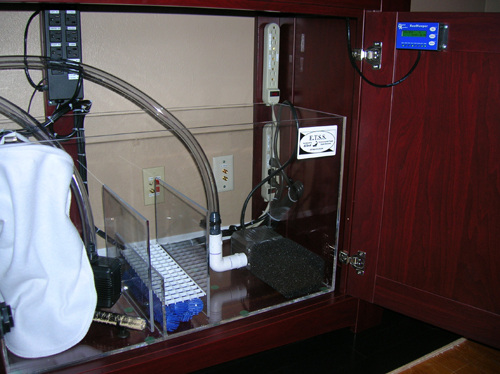
2563 & MOPAR9012 - Thanks for the comments. I really appreciate it. I know my setup won't even approach the complexity and detail of some I have seen here, but it is nice to hear comments from fellow reefers, especially for a newbie like me. I will post some more photos that show a little better detail when I find the best combination to get quality photos from the digital camera I have...
My RO/DI unit should be delivered on Friday. I am trying to determine the best options for installation. Here are my high-level thoughts - comment as you see fit to let me know if I'm insane

Due to space limitations and the contruction style of my home (and relatively easy access to the plumbing feed) the RO/DI unit will be installed in the garage alongside the water softener
1) Install a large tank (~40+ gallons) to hold the RO/DI water. For reference, my softener has a brine tank that woul be perfect for this (large, rugged, lid, built-in float valve, already set-up for correct style of plumbing, etc.) but they cost about $125 :mad: Looks like DIY!
2) Plumb a valve at the bottom of the tank to make bucket filling easy
3) Here's the part that I need to think through the details - plumb flexible line from the holding tank through the crawlspace and in to the room where the aquarium is (with the appropriae float switches, pump, etc.) and use this as my auto top-off system
Thoughts???
Thanks in advance for your help - this forum is a great resource
 

nigerbang

Active Member
Holy Hell...Thats going to be nice...and I love stand..Nice color..looking foward to more pics.......
 

indyws6

Member
NIGERBANG - Thanks for the comments - I appreciate it. The stand is the cherry mission-style offering from All-Glass Aquariums. Although not shown (yet), I also have the matching canopy. Unfortunately, I will need to modify the canopy slightly to fit over the lighting I purchased as the supports are too close together to clear the width of the light unit (Outer-Orbit 2x150w 10K HQI, 2x130w 420/460nm Actinics & 6xMoonLights)
The carpet was cut away and I had a slab of black maple hardwood flooring installed to support the aquarium stand. For the record, I have carpet ordered for that room but thought it made sense to do all of the heavy lifting prior to installing new carpet. Don't want you all to think I live like a slob
 

reefforbrains

Active Member
So pretty and shiny new.......Very considerate of you to let your reef have cable tv too. Like the GFCIs too, nice foresight.
 

indyws6

Member
REEFFORBRAINS - Thanks

If you look closely, you can see that my house is also wired for a home network (don't get me started - I am a Cisco FREAK!). I have a web-accessible pan/tilt/zoom camera that I intend to connect once everything is up and running - FishCam2K7 if you will :hilarious
 

mx mr bean

Member
very nice tank. i have the same exact size and stand except i also got the matching canopy on top. its like the final piece to the puzzle.
 

ryanbush

New Member
Originally Posted by mx Mr Bean
very nice tank. i have the same exact size and stand except i also got the matching canopy on top. its like the final piece to the puzzle.
that stand is pretty nice looking, what kind is it?
 

indyws6

Member
ALL - Thanks for the compliments! I appreciate it. I'm also certainly willing to hear any sugestions or critiques - I want to do this "right"
MX MR Bean - I, too, have the canopy. Unfortunately, the side supports (the ones that rest on the tank rim to support the canopy) are too close together to clear my light fixture. I will be re-engineering the supports this weekend. (The light system is an Outer Orbit 48" unit with 2x150w MQI Metal Halides, 2x65w Actinics (2 tubes are 420nm and 2 tubes are 460nm) and 6xMoonlight bulbs.
RYANBUSH - The tank, stand and canopy are all from All-Glass Aquarium. The style is called "Classic Mission" and it is available in black, maple and cherry.
http://www.all-glass.com/products/fe...lassicmission/
 

mx mr bean

Member
ya thats the stuff. the wood is very high quality. it was a little pricey too lol but well worth it. btw i also had a problem fitting in my 48" T5 Nova Extreme lighting system. the sides half less than half an inch of space between them and the canopy on each side.
 

indyws6

Member
MX MR BEAN - I thought the stand was a little pricey, too, but I wanted something better than the particle board/contact paper "furniture" you usually see. I'm satisfied with this one.
Unfortunately, I had to exchange the tank (delivered with a scratch on the front pane) AND the canopy (delivered with two 36" long scratches from the staples used to close the cardboard box). There have been days where it was hard to not get discouraged with this project, but it's finally starting to come together :cheer:
Do you notice much heat buildup in the canopy considering the tight fit to the lighting system???
 

mx mr bean

Member
lol ive had so many problems with all glass my stands were always messed up one way or another. But yes the heat build up is tremendous. Instead of drilling a giant hole in the side of the canopy to air it out i just mounted a little fan on the inside to circulate the air. I plan to mount one more fan to circulate the other side. But the little fans solved my heat problem.
 
Top