125 Plumbing

bencc27

New Member
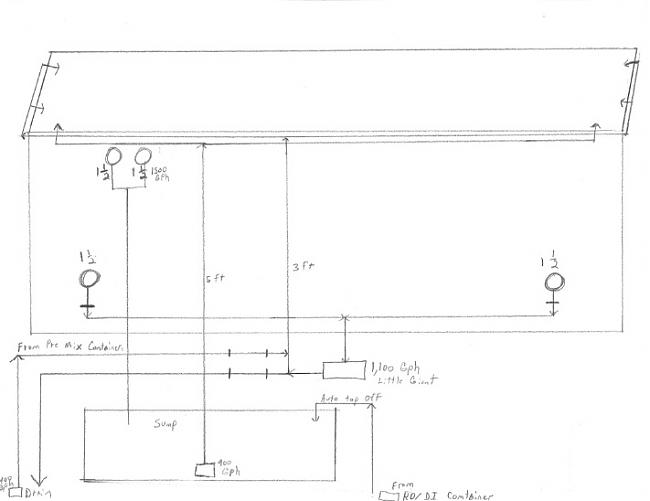
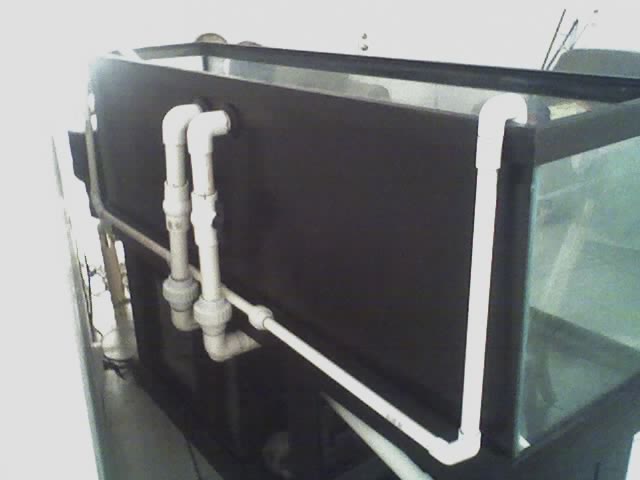
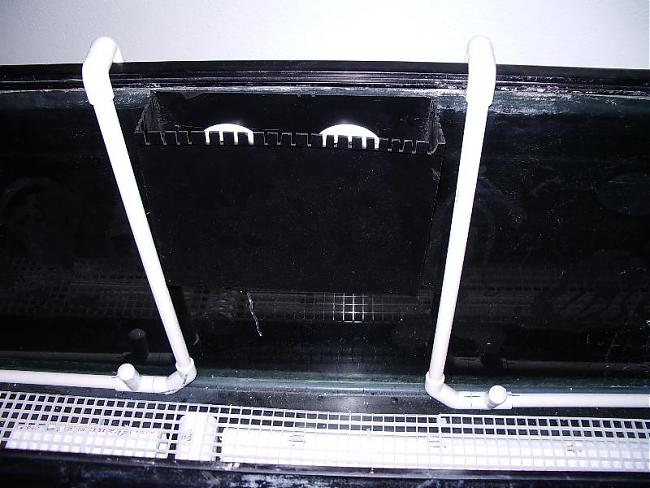
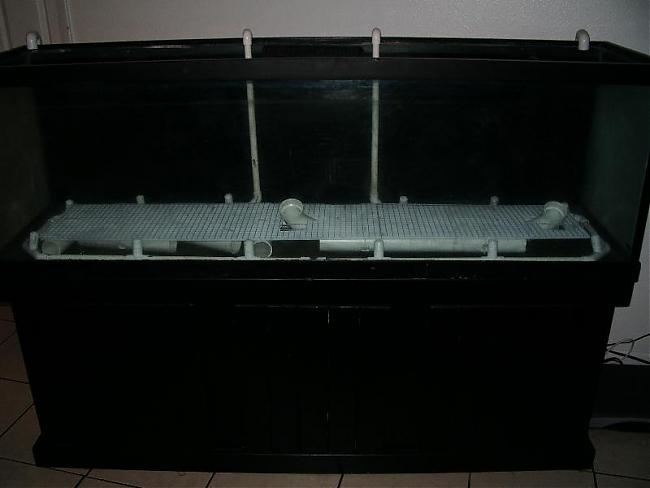
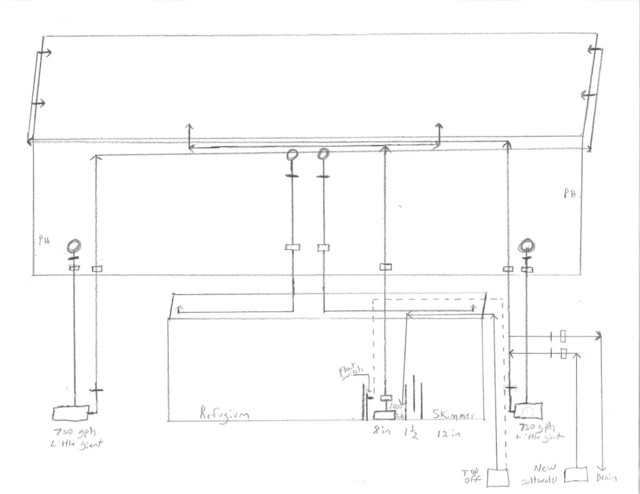
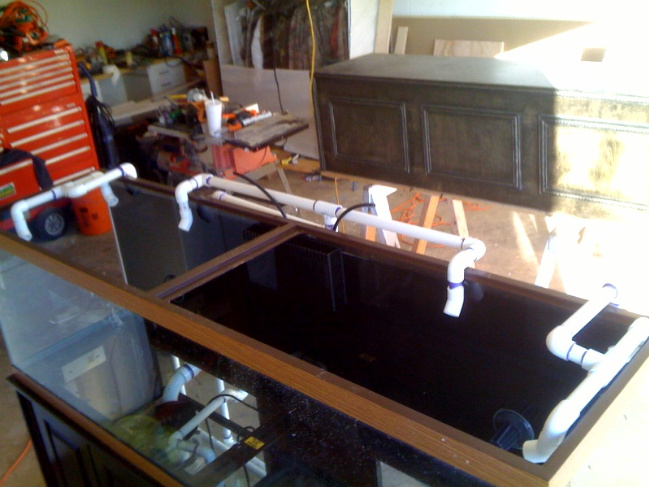
I've started my 125 project and am currently working on the plumbing design. This tank will eventually be a full reef tank but at the same time I would like to have some of the cool fish that are possible in a 6 foot tank. Im going to attempt to attach my layout pic for the plumbing. Im sure I will still need a couple powerheads as the turnover with just this will probably not be enough. I've been doing saltwater for a while and know the biggest pain and one of the more important things in keeping a healthy tank is the water changes depending on who's advise your taking. So I designed this for easy water changes. Im new to the closed loop thing but I have used it as kinda the center point of attempting to make the water change easy. Any advise would be appreciated.
 

posiden

Active Member
It looks good to me except........
I assume the little lines represent ballvalves and or unions. You are going to want to put a ballvalve directly after the pump. This way the water pressure from the drains wont be messing around with the change water. I will see if I can mod your attachement.
 

posiden

Active Member
Sorry it got sloppy with all of my chicken scratch. Red is the ball valves and the green is the unions.
 
E

eric b 125

Guest
ben, welcome to the boards! its weird you joined in february but didnt post until now... either way, i agree w/ posiden on the ball joints and unions
 

bencc27

New Member
Thanks for the advise. I didn't really think about unions. That definitely could be a lot of help down the road. Eric I've actually been on here off and on since about 2003. I opened this new account when I started looking into getting back into the hobby now that I'm in a house I will be in for a while. I appreciate the help. I'm sure I will have a few more questions down the road. I'm currently finishing up the canopy build. I got the plans for it off of here. Next will be drilling the glass for the overflow and the closed loop. I've got all the stuff for it but im still a little nervous about taking a drill to the tank.
 

bmkj02

Member
A little idea on what I did on my 125. The plumbing on the bottom of the inside of the tank is on a closed loop system and the two top corners are coming from my sump/fuge. I just dont like the idea or drilling so low of the tank for the reason is something happens all the water is leaked out the tank but that my opinon.


posiden

Active Member
Originally Posted by bencc27
http:///forum/post/3166482
Thanks for the advise. I didn't really think about unions. That definitely could be a lot of help down the road. Eric I've actually been on here off and on since about 2003. I opened this new account when I started looking into getting back into the hobby now that I'm in a house I will be in for a while. I appreciate the help. I'm sure I will have a few more questions down the road. I'm currently finishing up the canopy build. I got the plans for it off of here. Next will be drilling the glass for the overflow and the closed loop. I've got all the stuff for it but im still a little nervous about taking a drill to the tank.
Something that I have read is, several people have bought a 5 or 10 gallon tank to practice on before drilling thier nice display. Its always a craps shoot on wether or not the tank has tempered glass. So, if a drilled tank is what you want.........you gotta drill it. I know I chewed on my lip when the moment came to put a hole in my 75. Just take your time. You'll be fine.
 

bencc27

New Member
I got it drilled and it was actually really pretty simple. Here are a few pics. Im also including a pic of the canopy I built using some plans I found on here. Painting the back of the tank now and working on my diy sump. Im using a 55g tank. My plan is skimmer on one end and refugium on the other with the return pump in the middle. I am using a valve to slow the flow down to the side with the refugium. Ill attach pics of this when Im done.


E

eric b 125

Guest
dude, that canopy is sick! congrats on the successful drilling
 

bencc27

New Member
Got the back painted, the sump finished and started the plumbing today. Waiting on pumps to finish the rest of the plumbing. Its going to be a little different than the the original design. I decided to put the overflow in the center and due to a mix up on that auction site I am going to end up with two smaller little giant pumps instead of one bigger one for the closed loop. Should also be getting the protein skimmer next week.
 

posiden

Active Member
Without a proper Durso for the drain, you might run into a noise issue. If that happens you will need to redo the top section of the drain at the bulkhead. I would not have done the ball valves on the drains either. You orignal drawing didn't show ballvalves on the drains.
It looks really good though. Nice work.
 

bencc27

New Member
Here is the updated design. Im not to worried about the noise because it will be in its own room. It shouldnt be loud enough to be heard in another room should it? The reason I put to ball valves on the drain was becasue I want to be able to control the flow to the refugium side of the sump. I also was thinking when I do water changes I want to be able to stop the dt from draining to its stopping point into the sump so it wont drop the water level so much in the dt when I pump out 25 or 30 gallons. Basically I will shut off the return pump and close the overflow valves before doing a water change. I actually have it all back apart now due to using silicone type II on the baffels in the sump and the overflow bulkheads. Im removing all the sealent and re sealing it with type I.


bencc27

New Member
I finally got most of the plumbing done. I ended up putting both of the closed loop pumps on the same side.


haktran

Member
Look so good. Can I also see a picture of your sum/refugium please? 125 is my dream tank. Will get it some day.
 

reefkprz

Active Member
why did you put ball valves on your overflow drains? the last thing you want to do is restrict flow through them while pumping water into the tank this can easily cause flooding. I can see having them for when the system is off but be carefull not to use them when the system is running.
great looking build
 

mkroher

Member
Originally Posted by reefkprZ
http:///forum/post/3179462
why did you put ball valves on your overflow drains? the last thing you want to do is restrict flow through them while pumping water into the tank this can easily cause flooding. I can see having them for when the system is off but be carefull not to use them when the system is running.
great looking build

+1
I keep seeing builds with valve on the drains. why are people doing this? If you want to control the flow, put a valve on the return pump, not the drain.
 

bmkj02

Member
I placed ball valves on my drains too. The reason is if for any reason you need to do any kind of maintenance or removal of pipes you dont have to worry about your tank draining all the way down. IMO it's a smart thing to do. Always keep it open all the way and control the flow by the returns.
 

mkroher

Member
Originally Posted by bmkj02
http:///forum/post/3179542
I placed ball valves on my drains too. The reason is if for any reason you need to do any kind of maintenance or removal of pipes you dont have to worry about your tank draining all the way down. IMO it's a smart thing to do. Always keep it open all the way and control the flow by the returns.
why would your tank drain all the way down? what happens in a power outage?
 

posiden

Active Member
Originally Posted by bmkj02
http:///forum/post/3179542
I placed ball valves on my drains too. The reason is if for any reason you need to do any kind of maintenance or removal of pipes you dont have to worry about your tank draining all the way down. IMO it's a smart thing to do. Always keep it open all the way and control the flow by the returns.

You cant remove the drain pipes to do maintence on them if the water level is still high enough to drain out the holes. Sure you can remove the piping after the ballvalve..........but that is only part of the piping. What if your blockage is above the ballvalve?
 
Top