diy acrylic overflow on glass?

acrylic51

Active Member
Originally Posted by madddmarr
were can i by acrylic ihave a very similar tank and i am going to try the same thing u did(21 deep 22high 72 long)what do u think about two overflows one in each corner.were did u get drill bit
Check your yellow pages for a plastics dealer near your or Tap Plastics and there are a few others if you do a search....
 

sleasia

Active Member
Hello Acrylic51...where have you been since christmas? Hope all is well. Guess what... :cheer: Its not the overflow at all!!!! No leaks in the overflow. Until I completely emptied the overflow I did not realize that the leak was occuring through the threaded joint I had connecting the part of the return in the overflow to the return bulkhead. I must have either forgotten to put tape in there or didn't put enough...I also haven't put the little holes in the lockline spouts just below the water level, so when everything was shut off there was backsiphoning from the locklines down through the return to the threaded joint leak in the return bulkhead, which leaked inside the overflow and made it look like it was the overflow leaking....so no problem...I went ahead and put in a backup standing drain from the drain bulkhead inside the overflow, just so I don't have to panic again. and I can either fix the leak, or just put the holes in the locklines to prevent any further episode of backsiphoning.....


sleasia

Active Member
sorry put the wrong pic up here's the standpipe thing... Bojik was helping me out with this problem...and the standpipe is good, alot quieter, and now my chest pain is all gone!!! :hilarious
 

sleasia

Active Member
I have some nice coraline algae, some clean up crew guys, some type of low light anenome which came with the rocks, and two shrooms....here they are


sleasia

Active Member
what's up there now is just a perfecto florescent strip light with only two daylight bulbs...probably the things in the tank are doing ok because of the skylights in the family room. There is alot of sunlight in this room, its all windows.
Man, am I glad the overflow isn't what's leaking.
 

sleasia

Active Member
you mean the one using the air filter valves?...I didn't do it, I just drilled little holes below the water line in each lock line return and I think its working. I didn't rip apart the return and fix the joint because as long as there is no back siphoning it shouldn't be a problem...(I think, maybe I'm wrong) no more problems so far.....I am hooking up the chiller and slowly cooling the tank to 78 (it was at 82 for a day or so, but some books I've read say to keep reefs between 80-85, though it seems because of fish problems everyone is keeping them around 78-80?) then, guess what, I think I will buy one more r/o unit to hook up upstairs and have a line run down to this tanks's sump with a float for auto top off, so that I no longer have the top off bucket visible in the family room.... I pump all the water for this tank up from the basement using the other tanks crazy pump.... today's crazy but maybe tomarrow I post pics of the 5 baby pink polyps from the frags you sent and the xenia "buds"
 

bojik

Member
Originally Posted by sleasia
you mean the one using the air filter valves?...I didn't do it, I just drilled little holes below the water line in each lock line return and I think its working. I didn't rip apart the return and fix the joint because as long as there is no back siphoning it shouldn't be a problem...(I think, maybe I'm wrong) no more problems so far.....I am hooking up the chiller and slowly cooling the tank to 78 (it was at 82 for a day or so, but some books I've read say to keep reefs between 80-85, though it seems because of fish problems everyone is keeping them around 78-80?) then, guess what, I think I will buy one more r/o unit to hook up upstairs and have a line run down to this tanks's sump with a float for auto top off, so that I no longer have the top off bucket visible in the family room.... I pump all the water for this tank up from the basement using the other tanks crazy pump.... today's crazy but maybe tomarrow I post pics of the 5 baby pink polyps from the frags you sent and the xenia "buds"

Ok :) depends on the type of corals and fish some will do well in higher temps 82ish and some at higher than 77 they get twitchy. *shrugs* I keep mine at 78-80 but a LFS I go to keeps everything thats warm water at ~82 soft corals included.
 

sleasia

Active Member
Ok, I'm so excited...after waiting over a month, my lights came. I'm using a 72" aquatinics t5 "constellation" fixture". so far I only have eight bulbs (the unit will hold 14) I have two actinics, two aqua blues, and 4 6000k's.....and look at how great it is even half full!!!!! I thought I might have to work tonight so I put the lighting up in a temporary fashion for now.. I plan to replace the current canopy with a similar thing which will be a bit higher only so that it will hide the fixture completely....and, I went shopping.....I appreciate all the help everyone gave me so much....I am so pleased


sleasia

Active Member
my two tenants...a blue green chromis and a lawnmower blenny. I also have a brittle star, hermits, snails and peppermint shrimp which have been in the tank a few months now


sleasia

Active Member
And...guess what might be happening in the main tank?????maybe, just maybe, my blue face angel is beginning to change????? (or is he sick? I don't think so, he behaves normally) Is my little angel growing up????


80sbaby

Member
Originally Posted by sleasia
saltnoob...this should not be hard since your tank is already acrylic...you can "weld" the acrylic overflow you make to the tank using weld-on, and as I understand it, this bond will be much stronger than siliconing acrylic to glass....also if you drill, it will be soooooo easy... just use a hole bit. and it will be like cutting through butter. good luck.
What tool did you use to put the holes in your glass tank?
 

sleasia

Active Member
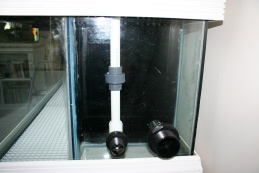
I learned the glass drilling from (I think it was) Turning Tim?....but he suggested using a "Rotozip" (brand name for a dremel type rotary tool) "tile bit" used for cutting standard floor and wall tile. these bits are about $11 or so at the big orange home fix it up store....hanging with or near the dremel bits...they fit also in standard dremels. you need to lubricate the cutting surface (the actual hole you are cutting) continually with water so that it doesn't overheat and crack. With this tank, I pumped water over the cutting area through tubing taped strategically on the side of the tank in order to direct water flow over the cutting area. In a later tank I simply put a bucket of water up on a lader, and using airling tubing used gravity to irrigate the cutting area. On this other tank I held the airline tubing in my left hand and aimed it so water flowed continuously over my cutting surface, while I held the dremel with my right hand and did the cutting.....(I always seem to have to work alone which always complicates things) If you have someone else around to help they can take care of the water while you do the cutting.
the other thing you can do is go online and buy a diamond hole cutting drill bit...but they are alot more expensive $50-$100 a bit. they will cut a cleaner hole for you if you can handle a heavy drill. you still need to lubricate/irrigate the cutting surface with water....This was a bit awkward for me...I wasn't sure I would be able to easily manage this much heavier piece of equipment, so I opted instead to use the smaller (and ultimately cheaper route) the dremel and "tile bit"
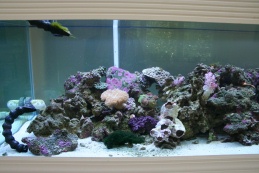
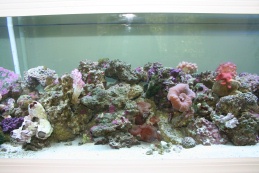
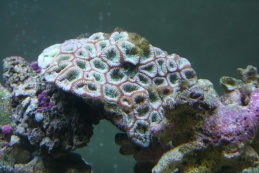
 

sleasia

Active Member
Also SCInet spent alot of time teaching me how not to electrocute myself again, and since you are drilling and using water, its probably a good idea to plug the drill into a GFCI outlet or use a plug in GFCI. because ultimately the dremel gets a bit wet from all the water.
 
Top