First time sump/refugium

florida joe

Well-Known Member
Originally Posted by truehle
http:///forum/post/2922463
You definitely made a lot of sense.
Its just not readily apparent to the novice(ME) that the overflow box has a variable flow rate. Would it would be safe to say that the flow rate is at its theoretical maximum if all things are working properly (assuming no DT pump to force flow to sump)?
So the thought is this, right? ....The flow rate of the overflow ranges from ZERO to the advertised flow rate. ZERO when there is insufficient water in the system, and maximized when things are properly flowing. That's why its important to buy and return pump that's rated for less flow rate than the overflow. Did I somehow just make sense there??? I think I need coffee.

The mistake I was making was thinking that both overflow and return pump always operated at their advertised volumetric flow rates, and to me that meant FLOOD (and angry wife).
Thank you for the explanation. Again, you all are an invaluable source of info!
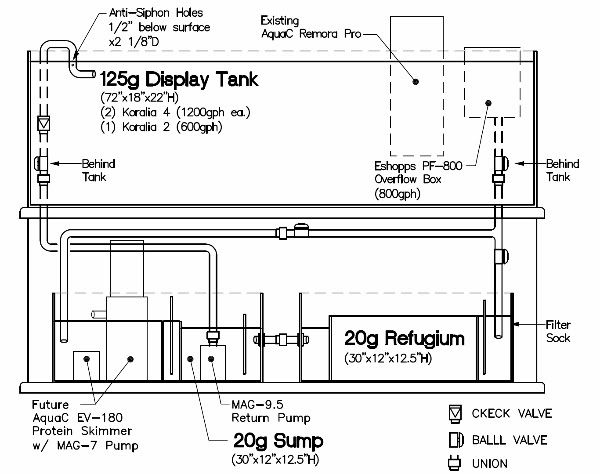
Your flow rate is NOT working at its maximum when you have established the level you are comfortable with in your sump. It is working at an equilibrium level to maintain that specific level if you were to add water to your DT you would increase the flow and the level in your sump would rise. You could in theory reach a max level of flow from your overflow box but to reach that you would have to be just below the point of overflowing the box back into your DT.and you would need a large enough sump to handle the added water
 

florida joe

Well-Known Member
Originally Posted by truehle
http:///forum/post/2922482
Ok, I revised the plan again. I think I'd like to stay with the single overflow design. But I took your advice on removing excess control on the return flow (now that I understand overflow vs. return much better), and I added a baffle on the pump side of the bulkhead to help prevent bubbles from entering return pump area.
Oh, and I added the ball valve and union on the horizontal supply line to the skimmer area.

I LIKE IT
I LIKE IT. The only minor changes I would consider are to reverse positions of the skimmer and the return pump. My reasoning is this; I would want the retuning water from my skimmer as far away from the skimmer pump so I am not skimming a large amount of the same water. I would pipe the water from the skimmer back into the refug And it might be easyer that way. BUT if piping is not a concern you are in a better position where you are. I would also add bio-balls to the area under the filter sock. They are great at what they are designed to do
 

truehle

Member
Thank you florida joe, robertmathern, Ilovemytank, Saltnoob, and snakeblitz33 !!!!
I really really do appreciate all the time and effort guiding me on this. It might be awhile, but I'll post pics when I get it all done.
 

florida joe

Well-Known Member
Originally Posted by truehle
http:///forum/post/2922727
Thank you florida joe, robertmathern, Ilovemytank, Saltnoob, and snakeblitz33 !!!!
I really really do appreciate all the time and effort guiding me on this. It might be awhile, but I'll post pics when I get it all done.
and remember we are always here to help
 

choog

Member
Originally Posted by florida joe
http:///forum/post/2922431
What I would do at this point is to turn off the pump. There is going to be a certain amount of back flow until your siphon brake mechanisms take effect. If you think you will overflow your sump, start the pump. Remove some water from your DT thus lowering the level in your sump. Turn off the pump again monitor the level of your sump with the back flow. Repeat until you get to a safe level. With your pump turned off. That is the total volume of your system. I would then put a mark on the sump at the water level. This mark will be your gauge for top offs. As you loose water through evaporation the level in your sump will lower. Add water to your tank until the level comes up to the mark in your sump and you are good to go.
I hope this makes some sense? If it does to anyone out there PLEASE explain it to me I think I have confused myself


The water level due to evaporation will only show up in the return portion of you sump correct? B/c the baffles regulate the water height in the other chambers.
 

robertmathern

Active Member
Originally Posted by choog
http:///forum/post/2922769
The water level due to evaporation will only show up in the return portion of you sump correct? B/c the baffles regulate the water height in the other chambers.
My friend looks like you answered your question. Yes that is correct.
 

florida joe

Well-Known Member
Originally Posted by choog
http:///forum/post/2922769
The water level due to evaporation will only show up in the return portion of you sump correct? B/c the baffles regulate the water height in the other chambers.
yes your return pump is at a constant.There is one other thing that will influence the height of the water in your sump. If you have pre-filters in your overflow lines, as they get dirty they slow down the passage of water to your sump thus lowering the level
 
D

dennis210

Guest
Guys I love the thread but have a question. When I added my refugium, and since then 3 others to tanks of friends - I found that a level flow from refugium to sump has problems with regurging back and forth. Yey if the refugium is elevated even a little so water again flows downhill the system works much better and prevents overflowing the refugium when the resurges happen. Just a thought.
 

florida joe

Well-Known Member
Originally Posted by Dennis210
http:///forum/post/2923987
Guys I love the thread but have a question. When I added my refugium, and since then 3 others to tanks of friends - I found that a level flow from refugium to sump has problems with regurging back and forth. Yey if the refugium is elevated even a little so water again flows downhill the system works much better and prevents overflowing the refugium when the resurges happen. Just a thought.
Dennis my friend I don’t really understand your question (comprehension is not one of my strong points). Water will seek its own level if your refug and sump are placed on the same level surface and you turned off your circulation pump the only way you would over flow your refug is if the water level of your sump with the pump off was higher then the top of your refug.
 

ilovemytank

Member
This has been a great thread. You have put alot of design into your tank and that is first attribute to a successfull arquarium keeper. Florida Joa: great explanation of the variable flow rate of the overflow. You need to dumb it down though for people like me ( not more than five letter words ! ).

Dennis; I totaly didn't understand your question ( I think it had a six letter word in it ?!? ). True93; I hate to suggest this but, I want to put a question in your head about the design. You split the drain into the sump and the refugium. What is the real reason for doing this ? If its concern about the flow rate in the refugium Thats what you can solve with the barriers. If its so you can have a second Bio-Ball or live rock rubble entrance into the sump then I understand, If its not and you keeps this design I would build an egg crate shelve there to use a filter pad and you will remove alot more detrius and waste at this point. You can allow the water to run into the refugium through the bulk head into the sump and up your return pumps if you didn't want the split. If you go with the split design then I would definately go with the additional shelf for a filter pad. By the way go with 7" filter socks in the refugium instead of 4". It makes all the difference in the world. With the barriers in the sump; I don't have them because I want maximum space and my skimmer has a huge foot print. I never experience micro bubbles in my DT. The way you are designing your sump it would be very easy to add the barriers at a later date if you experience micro bubbles but without them they may give you that extra inch or two of space that makes all the differance in the world. Its really important that your pipe connecting the two tanks can keep up the flow of water. Don't go small on the bulk heads ! Good luck and you should take pictures as you design and build it and post the progress.
 

florida joe

Well-Known Member
Great post my friend and it forced me to take another look at his final design. I cannot speak for him but my view is this. I would some how put a valve between the ref and sum where they are bullheaded together. Now with the duel influent water to both sump and refug he can shut the valve to the refug and the by pass valve from refug to sump and completely isolate the refug from the system do maintenance on the refug or even remove the tank and still continue to operate his sump (protein skimmer and return pump)
Note add a coupling to the pvc after the valve and before the sock filter
 

ilovemytank

Member
I use a 3" bulkhead that has a 2" pipe between my tanks. The problem with a valve is space between the tanks. When I put the pvc pipe in the bulk head on each side ( This is because of the size of my tanks ) I don't have enough room inbetween the tanks for a valve. I can use the plugs though that completely stop up the piping between the tanks and they only cost a couple of bucks at home depot.
Florida Joe : Not to go off subject but do you have an opinion about automatic top off pumps for a water reserve ? The problem is the tank would have to be ehigher elevation to the sump. I'm not sure if that will cause a siphon effect when power is off. I want optimum skimmer performance at all times. I lose 3-4 gallons a day. I thought about a 5 gallon bucket drilling with a drip doser to put water in slowly but my water loss varies.
Soory True93 to ask this on your thread but you will benefit from this too.
 

florida joe

Well-Known Member
Originally Posted by Ilovemytank
http:///forum/post/2924894
I use a 3" bulkhead that has a 2" pipe between my tanks. The problem with a valve is space between the tanks. When I put the pvc pipe in the bulk head on each side ( This is because of the size of my tanks ) I don't have enough room inbetween the tanks for a valve. I can use the plugs though that completely stop up the piping between the tanks and they only cost a couple of bucks at home depot.
Florida Joe : Not to go off subject but do you have an opinion about automatic top off pumps for a water reserve ? The problem is the tank would have to be ehigher elevation to the sump. I'm not sure if that will cause a siphon effect when power is off. I want optimum skimmer performance at all times. I lose 3-4 gallons a day. I thought about a 5 gallon bucket drilling with a drip doser to put water in slowly but my water loss varies.
Soory True93 to ask this on your thread but you will benefit from this too.

keep this to your self, but it works·1 - 5 gallon plastic gas caddy, with removable spout. MAKE SURE THAT THE

[hr]
CAP HAS A REPLACEABLE LID THAT WILL COVER AND SEAL THE OPENING ONCE THE SPOUT IS REMOVED.
oRemove the brass filter screen inserted in the opening of the caddy, if so equipped.
oDiscard the removable spout.
·1 appliance timer, with three pronged, grounded outlet.
·1 Tetra Luft Pump.
oYou can use any back pressure-rated air pump, but I favor Tetra's for it's survivability and dependability.
o1/4" vinyl airline hose. Enough to run from beneath your cabinet to wherever you site your caddy. 12 feet should do it.
·Rigid plastic tubing.
oThe 1/8" plastic tubing used for uplift tubes in UGFs works very well.
o1 - 12 inch section will do fine, cut into two (2) lengths; one (1) three inch, and the other five inches.
·Aquariums safe (non-toxic) silicone cement or equivalent.
· After removing the spout from the caddy, insert the disk into the

[hr]
cap. You now have a lid that will pressure seal the caddy.
1.a. Drill two holes to accommodate the rigid airline tubing.
2.b. Silicone or glue the two pieces into the lid and allow to fully cure/dry.
· Cut a length of vinyl airline hose that when attached to the inside end of the longer, (five inch) rigid tubing, touches the bottom of the caddy when you

[hr]
on the cap. You may wish to attach a "clunker" or other weight to the end of this hose to keep it from floating off the bottom when in use.
· Cut another length of hose to run from this same five inch tubing back to your sump or aquarium. This will attach to the outside exposed end of the same, five inch tube.
· Cut a third length of hose to run from the other, shorter tube to the Tetra Luft Pump. There is no other connections to be made. The exposed end of the shorter, three inch tube should extend into the container, BUT NOT TOUCH THE WATER'S SURFACE WHEN THE CADDY IS FILLED.
·· Plug the electrical cord from the Tetra Luft Pump to the appliance timer. You are done with the actual construction of your top-off system!
Fill the caddy with RO water. Plug the timer into the wall outlet and rotate the dial until the timer kicks the Tetra pump on. In a container that you know to hold a specific volume, such as a quart jar, time how long it takes for the caddy to over-pressurize and fill the test container. This is how long you need to set the timer's on-off plugs to fill your sump or aquarium back to pre-evaporated levels!
PLEASE NOTE, you should already know how much water evaporates from your sump/tank. If not, then place a mark at the high-level line of your sump or aquarium. Wait 24 hours and then measure how much water it takes to refill back to that mark. This is your tank's rate of evaporation. Of course, this will vary due to humidity and the different seasons of the year. Adjust the appliance timer as necessary
Filling the caddy with distilled water or other pre-treated tap water will allow you a week or longer of hands-off replenishment. I have even dosed calcium-enriched water this way. Kalkwasser will settle out and clog the vinyl hose over time, so I never used calcium hydroxide with this arrangement, only the liquid varieties such as Reef Calcium by Sea Chem.
Strontium can also be added to the water for replenishment as well. Neat, huh? And it works well. Remember, each day it will take the pump a little longer to pressurize the caddy as the volume of water is reduced. Keep an eye on it the first week or so to determine the "quirks" that always develop when you DIY!! refilled the caddy once a week and let it do it's thing the other six days!

·
 

truehle

Member
Originally Posted by Ilovemytank
http:///forum/post/2924700
This has been a great thread. You have put alot of design into your tank and that is first attribute to a successfull arquarium keeper.
True93; I hate to suggest this but, I want to put a question in your head about the design. You split the drain into the sump and the refugium. What is the real reason for doing this ? If its concern about the flow rate in the refugium Thats what you can solve with the barriers. If its so you can have a second Bio-Ball or live rock rubble entrance into the sump then I understand, If its not and you keeps this design I would build an egg crate shelve there to use a filter pad and you will remove alot more detrius and waste at this point. You can allow the water to run into the refugium through the bulk head into the sump and up your return pumps if you didn't want the split. If you go with the split design then I would definately go with the additional shelf for a filter pad. By the way go with 7" filter socks in the refugium instead of 4". It makes all the difference in the world.
Its really important that your pipe connecting the two tanks can keep up the flow of water. Don't go small on the bulk heads ! Good luck and you should take pictures as you design and build it and post the progress.

Ilovemytank, I had three ideas stemming from why I chose to split the intake. 1. Control flow into refugium. I've read that a moderate flow is desired. 2. I can isolate the refugium if necessary. 3. I thought it may be beneficial to have "unfiltered" water pass thru the skimmer.
But now you got me thinking....Other than being able to isolate the refugium, there really isn't a need to have unfiltered water goto the skimmer, right? There's just the question about kind of flow I should be having thru the refugium. Any suggestions?
Thanks for the heads up on the 7" filter socks and a large bulkhead thru the two tanks. I was thinking about 1-1/2" but probably best to go with 2".
I will have some pictures available very soon, I hope. I installed a 6500K CFL flood light under the tank, and I practiced drilling a few junk glass panes before I touch the "to-be" sump and refugium. Now that was a learning experience.
Originally Posted by florida joe

http:///forum/post/2924782
I would some how put a valve between the ref and sum where they are bullheaded together. Now with the duel influent water to both sump and refug he can shut the valve to the refug and the by pass valve from refug to sump and completely isolate the refug from the system do maintenance on the refug or even remove the tank and still continue to operate his sump (protein skimmer and return pump)
Note add a coupling to the pvc after the valve and before the sock filter
iv> florida joe, I will try to provide a valve in between the to tanks, but I maybe limited to about 6" or so. I'll have to see what I have space to do. Great idea though!
Originally Posted by Ilovemytank
http:///forum/post/2924894
I use a 3" bulkhead that has a 2" pipe between my tanks. The problem with a valve is space between the tanks. When I put the pvc pipe in the bulk head on each side ( This is because of the size of my tanks ) I don't have enough room inbetween the tanks for a valve. I can use the plugs though that completely stop up the piping between the tanks and they only cost a couple of bucks at home depot.
Florida Joe : Not to go off subject but do you have an opinion about automatic top off pumps for a water reserve ? The problem is the tank would have to be ehigher elevation to the sump. I'm not sure if that will cause a siphon effect when power is off. I want optimum skimmer performance at all times. I lose 3-4 gallons a day. I thought about a 5 gallon bucket drilling with a drip doser to put water in slowly but my water loss varies.
Soory True93 to ask this on your thread but you will benefit from this too.
AND, no problem about asking about the automatic topoff...I love the extra info!
And finally a question of mine. Generally speaking, how much above a return pump is needed to not suck any air? (2"-3"???)
 

florida joe

Well-Known Member
When you say 1 ½ to 2-inch bulkhead are you tanking about the size of the PVC you are going to use? Remember you need a 1 ¾ inch hole for a 1 inch bulkhead fitting so a 2 inch fitting is going to take a large diameter hole be sure to figure this in and allow the space needed to drill
You want the water level high enough above your return pump so you do not suck in air with normal evaporation between top offs. It’s a trial and error thing. Go well above it and then work your way down until you feel comfortable
 

truehle

Member
Originally Posted by florida joe
http:///forum/post/2928570
When you say 1 ½ to 2-inch bulkhead are you tanking about the size of the PVC you are going to use? Remember you need a 1 ¾ inch hole for a 1 inch bulkhead fitting so a 2 inch fitting is going to take a large diameter hole be sure to figure this in and allow the space needed to drill
Yeah, I was meaning the 2" PVC. I know I'll probably need a +/- 3'' hole for the bulkhead. But, I'll wait until I have part in-hand before I do any drilling on the tanks.
 

ilovemytank

Member
Originally Posted by truehle
http:///forum/post/2928587
Yeah, I was meaning the 2" PVC. I know I'll probably need a +/- 3'' hole for the bulkhead. But, I'll wait until I have part in-hand before I do any drilling on the tanks.
If you need advice on where to get a great diamond cut drill bit for tanks to make a 3" hole for 2" pvc piping and the bulkheads at extremely good prices PM me.
 

truehle

Member
Here are a couple pictures of the project so far.
The first is the side access hole I cut out to get the tanks in. I decided to make the hole about 6" taller than the tanks to be able to do maintenance from the side too. I put a layer of foam under the tanks for added peace of mind.
The second pic is the lamp for the refugium. Its a 16W PAR38 Flood Daylight CFL (75W equiv.). I think I may use one of the side holes on the mount and then angle the light. It will end up giving me a couple more inches of space if for whatever reason the refugium gets completely full of water. Or maybe I can find a lower profile junction box.

 
Top