How long for acrylic?
- Thread starter 1snapple
- Start date
acrylic51
Active Member
What WeldOn solvent are you using? WeldOn 3 or 4? Curious as to how your using clamps? There isn't and really shouldn't be anything clamped together. What I'm saying is no real need to clamp the 2 pieces together. If your clamping the pieces together your not really allowing for a good glue joint. Meaning your not really allowing the solvent to actually soften/melt both surfaces. That is why the pin method is recommend, and clamping can lead to a somewhat dry seam; meaning solvent doesn't completely cover or fill the seam.
When I fab and glue, I don't use any clamps....If you go back to Flower's Sump build you will see all I use are framing squares to hold the pieces in the correct position. For bigger builds such as my sump for my tank, I actually built jigs out of 2x4's to keep things in place till they setup.
The WeldOn 3 and 4 are pretty quick, but, when I do a joint or build I usually try to set myself up as to where I can do 2 seams all but at once. Meaning I lay 1 panel flat, and mock up both end pieces to be attached to the panel and mock into place with the framing squares. That way both ends are setting the same amount of time. Just seems to be more efficient for me that way. I usually let the joint sit 1/2 hour or so, but never really beat it around, since it hasn't reached it's full cure. The best way to tell is feel your pieces to see how stable they are and that will tell you if you can continue on or what for things to setup a little longer.....
acrylic51
Active Member
Josh if you go into my pic gallery I think I have pics for my sump showing what I use to build larger items.....I'm pretty sure your working on your frag tank and probably need something a little larger than framing squares, but I have a trick to get you by if you don't want to build dedicated jigs though.....Let me know....
1snapple
Active Member
Thanks shawn, I used 90* clamps, Lifted 1 side up a little bit, filled the seam, Then lowered
it onto the other piece and let it sit, left clear edges and looks good.
The way I used to tell if it was okay to move it was to see if there was any more liquid
on the surface, because it sets when the solvent has evaporated and that was usually
30mins.
I did a really rookie mistake, I welded the edges wrong, so it didnt completely fit on the base,
so I got some scrap pieces and welded them to seal 1 edge.
I filled w/ water and there wasnt any leaking.
acrylic51
Active Member
Lets see some pics!!!! I think I did a short video in Flower's build. I think the thing that takes me so long is I double, triple check I'm lined up and gluing the right panels. Always have your pieces cut a hair oversize to allow for something being out of whack makes it a little easier to fix IMHO. Try to shoot a good pic of your glued seam. Sometimes it might appear as a sweet joint, but upon real close inspection you'll find your solvent didn't actuall go completely through the seam as you had thought. This is another good reason to use the pin method.

1snapple
Active Member
Okay, here are some pics. Alot of pics.
I held one piece slightly above the other piece, Added the solvent in between the pieces,
Then loosened the clamps just enough for the acrylic to drop into the seam.
My screw up when setting up the sides. I think I am just going to do a bead of silicone here just to be 100% sure its waterproof. ( i tested yesterday w/ water and it was fine.)
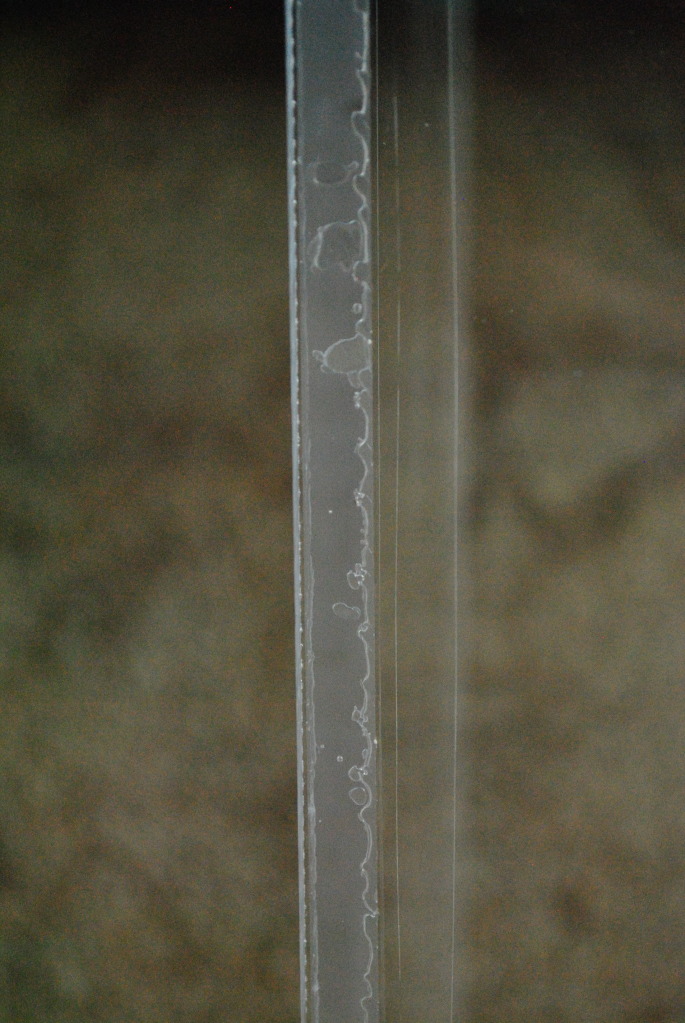
This is the worse seam.
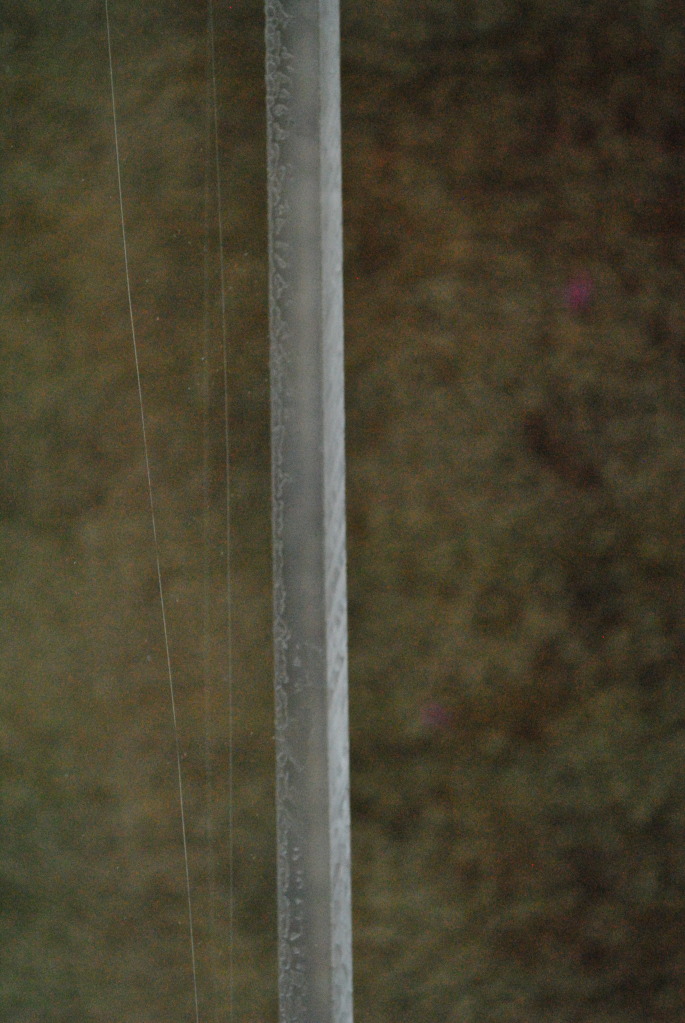
Another of the bad seams.

Every other seam looks like this ^
I held one piece slightly above the other piece, Added the solvent in between the pieces,
Then loosened the clamps just enough for the acrylic to drop into the seam.
My screw up when setting up the sides. I think I am just going to do a bead of silicone here just to be 100% sure its waterproof. ( i tested yesterday w/ water and it was fine.)
This is the worse seam.
Another of the bad seams.
Every other seam looks like this ^
acrylic51
Active Member
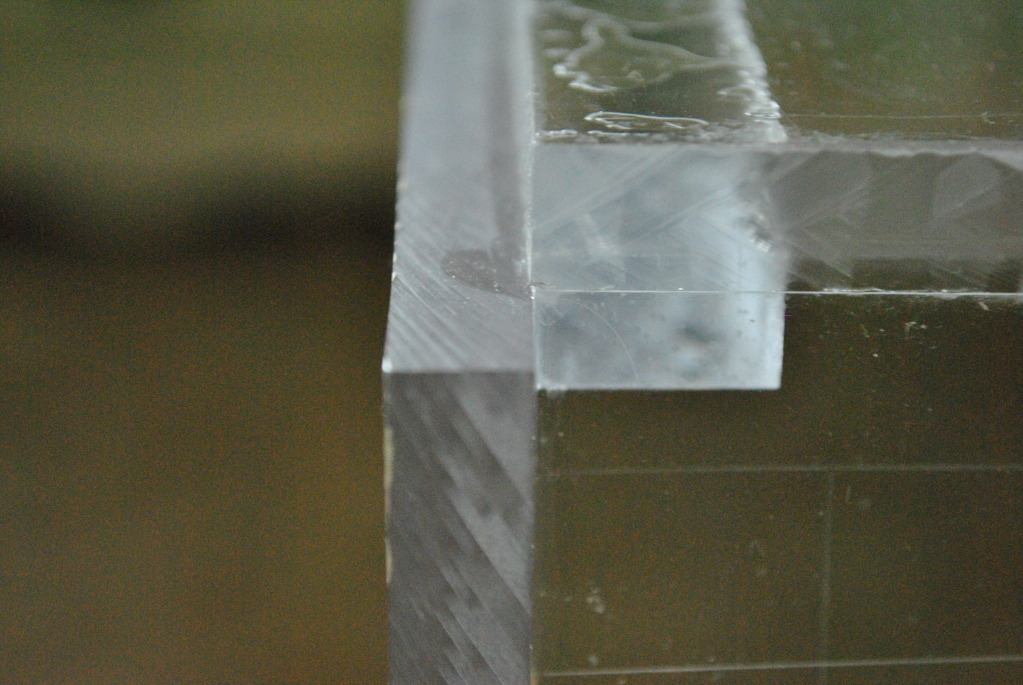
Josh I'm not following what your doing in the first pic???? It appears that you have a block glued to 1 of your other panels? What is the purpose or reasoning?
Quote:
Originally Posted by 1Snapple http:///forum/thread/383575/how-long-for-acrylic#post_3356148
Okay, here are some pics. Alot of pics.
I held one piece slightly above the other piece, Added the solvent in between the pieces,
Then loosened the clamps just enough for the acrylic to drop into the seam.
My screw up when setting up the sides. I think I am just going to do a bead of silicone here just to be 100% sure its waterproof. ( i tested yesterday w/ water and it was fine.)
This seam is "dry" you didn't get complete coverage of the seam....Also noticed in the above pic that I can still see saw blade marks...What are you using to prep your edges? You want you edges free from all marks....Baby butt smooth.
This is the worse seam. This seam looks a little better, but your still not getting complete coverage of the seam......
Another of the bad seams. This seam is quite a bit better.....Little air bubbles, but much better....

Every other seam looks like this ^
The seams all appear a little different, but not bad.....I would honestly forget the clamp idea....your not allowing enough solvent to completely cover the joint. Make sure you prep your edges really well, and keep them flat and try to remove all saw blade marks from the edges to be joined. Allow a tad of hang over on all your glued joints, so when it's complete, you can take a flush trim bit and clean everything up flush.
As Corey stated silicone doesn't bond very well. Is this the start of your frag tank?
Quote:
Originally Posted by 1Snapple http:///forum/thread/383575/how-long-for-acrylic#post_3356148
Okay, here are some pics. Alot of pics.
I held one piece slightly above the other piece, Added the solvent in between the pieces,
Then loosened the clamps just enough for the acrylic to drop into the seam.
My screw up when setting up the sides. I think I am just going to do a bead of silicone here just to be 100% sure its waterproof. ( i tested yesterday w/ water and it was fine.)
This seam is "dry" you didn't get complete coverage of the seam....Also noticed in the above pic that I can still see saw blade marks...What are you using to prep your edges? You want you edges free from all marks....Baby butt smooth.
This is the worse seam. This seam looks a little better, but your still not getting complete coverage of the seam......
Another of the bad seams. This seam is quite a bit better.....Little air bubbles, but much better....
Every other seam looks like this ^
The seams all appear a little different, but not bad.....I would honestly forget the clamp idea....your not allowing enough solvent to completely cover the joint. Make sure you prep your edges really well, and keep them flat and try to remove all saw blade marks from the edges to be joined. Allow a tad of hang over on all your glued joints, so when it's complete, you can take a flush trim bit and clean everything up flush.
As Corey stated silicone doesn't bond very well. Is this the start of your frag tank?
al&burke
Active Member
If you have access to a jointer - that would help a lot. I agree with Shawn the joints don't look to bad. You could put a small fillet of Weld On - very small you don't want to soften up the acrylic. Shawn might not agree with me here, let's see what he says. I use methylene chloride to glue my acrylic.
1snapple
Active Member
O.K.
I got P.O. today looking at it so I said B.S.
I took it to the table saw. Cut off the bottom.
i am going to make another bottom a bigger then the tank and make a ledge at the front.
I have to ask, can you use a torch to make it smooth? I have a MAPP gas torch ready to go if I can do it.
Bottom is getting cut tomorrow.
Yes it is the beginning to the frag tank. I am going to plumb it in w/ the 95 from the overflow.
I will put a T joint in the PVC going to the sump, have that go to the frag tank, then go from the bottom side of the tank and drill
a 1" bulkhead and drain into the sump.
Whats a good 30g fish to put in here to clean frags?

al&burke
Active Member
A router can be set up to clean a straight edge. If you have a router table that has two separate fences - an infeed and an outfeed. the infeed fence is set 1/16 deeper than the out, ecsentially the outfeed is flush with the router bit. This will give you an clean surface to glue. Google it i am sure it is out there.
acrylic51
Active Member
Cool deal.... As Al had suggested another bead of solvent?!?!? Could work, but you run a good chance of putting more stress on the joint than original and therefore it would be weaker than original.
I agree with your decision to cut the bottom off, and start with a bigger panel. I like to cut all my panels max 1/4 bigger than needed, except the height I cut dead on. With cutting your panels a little larger than designed it allows you to get the correct measurements of your project, and at the same time it allows you to make sure all your panels are perfectly square. The key is keeping it square, and no biggie if you have a little hangover on each side, because the flush cut router bit can be used to trim everything flush an clean. Thi is especially important when gluing the bottom panel to your walls.
I don't know what order your building your tank in, but your walls should be welded together, an then the bottom attached. This way the bottom can be adjusted if you were a little off somewhere instead of trying to tweak your side panels which would cause stress on your other panels. It also will allow you to take up any irregularities in any of the panels from bowing or what not. Again leaving a little hangover ensures you have complete coverage of material to glue to.
It looks from the pics you used a razor blade? I see a pretty consistent mark on the panels????? I would also advise that during construction to leave your panels covered with the protective sheeting. This helps prevent any undue scratching, splashes of glue and other mishaps. Just remove enough protective sheeting to properly glue the joint.
As far as prepping the edges as Al suggested either a jointed, or a router table. Another option is using a hand held router and you will need a straight edge to guide the router. As Al suggested you just want to remove a 1/32" or 1/16" tops. Even after I run it on the jointed or router I like to tape a piece of 220 sandpaper to my work table and slide the edge over the sandpaper. I tape it down so I know the acrylic is riding over a flat surface. It's to easy while hand sanding to round an edge over. After a couple passes on the 220 I tape a piece of 400 grit wet/dry paper am wet it down and again same procedure as before. I like my edges super smooth like glass. I then wipe my glue surfaces down to make sure they are clean and free of any junk. I use a quick swipe of alcohol, but I know Al disagrees with that practice. It had worked well for me, but on cheap extruded acrylic DON'T because it will craze and almost always will.
As far as taking the torch to the edge. Never torch or heat am edge to be glued before gluing. If you do you will not get a good, solid joint. If you browse Flowers thread you'll see the plastic framing squares I use and how I notched th out, which allows you to hold the panel in place, and at the same the same time you can at all times verify your panels are square. If the panels are super big or heavy another option is to clp the square to your work table to keep your panels square as you glue or double sided tape works quite well also. Another way is to build jigs out of 2x4's to square your panels. That is what I did for building my sump which in size is comparable to your frag tanks. These jigs now have doubled ad jigs to support my tank as I pour the epoxy for my tank. HTH a bit.....