Mega-Powerful Nitrate and Phosphate Remover Replaces Skimmer, Refugium, Everything
- Thread starter santamonica
- Start date
vayapues
Member
The design does put the light at a distance from the screen. Experience has taught (I am sure we have all had this experience) that water splashing on a hot bulb causes it to burst.
Let me know what your thoughts and experience are? have you run tests based on the light being at different distances?
One solution would be to use a polished mirror to angle the light down to the screen. I actually have several lying around the house from my other hobby, astronomy. I don't want to go to the extra bother though if I don't need to.
thoughts?
santamonica
Member
Fresh air is not needed if you are not pulsing the flow with a pump and wavemaker (the air cannot make it through the water to the screen). As for CO2, that actually comes out of the water, not the air. So you should be fine.
Light distance: I'm watching about ten people try out different combinations, and in every case, when the light was more than 3 or 4 inches away, growth was very very slow. Then they moved the light up close, and in about 2 days, the screen is covered. Maybe you can just put some kind of extension on your light or the base, that will bring the light down. There really is no splashing to worry about, some others are running with no bucket at all, and nothing but the screen gets wet. Looks at the pics in the beginning of this thread... my light is just one inch from the top of the screen. I don't think you need a mirror.
Light distance: I'm watching about ten people try out different combinations, and in every case, when the light was more than 3 or 4 inches away, growth was very very slow. Then they moved the light up close, and in about 2 days, the screen is covered. Maybe you can just put some kind of extension on your light or the base, that will bring the light down. There really is no splashing to worry about, some others are running with no bucket at all, and nothing but the screen gets wet. Looks at the pics in the beginning of this thread... my light is just one inch from the top of the screen. I don't think you need a mirror.
santamonica
Member
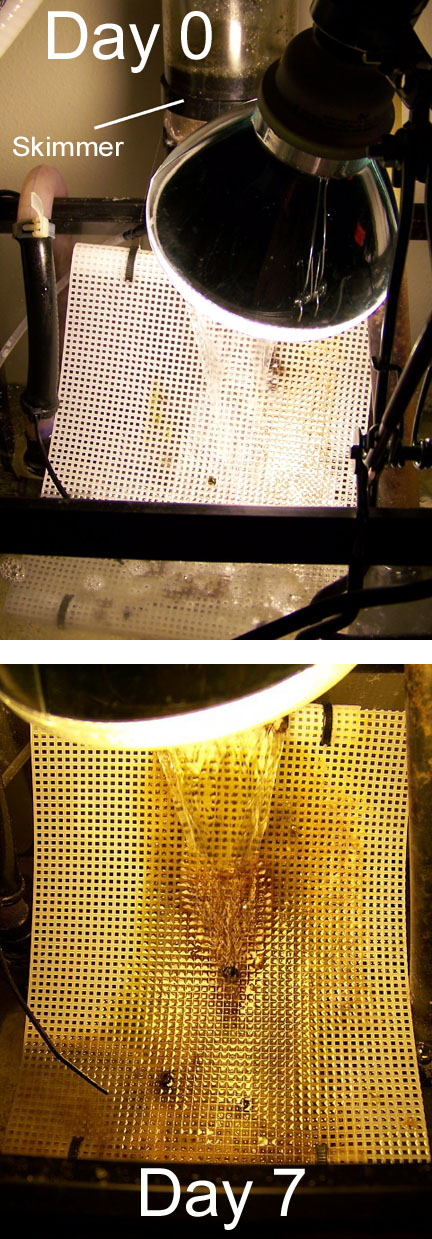
Here is an example of a screen that I wish were done better. He's using the skimmer output and dropping it right down on the screen at an angle, so that most of it goes through the screen. I'd rather see the water spread out across the screen. Also, the light is too far away. Thus, he got very little growth in the first seven days:

vayapues
Member
My design is different to all of these in that the light is enclosed within the unit. The white walls reflect the light back out in a lampshade effect. In essence, the screen is within the light.
Last night was the first night that I left the unit on, after all my testing. Sitting next to my tank, the unit lights my entire living room by itself, as the light reflects around inside, and then out. Basically the same principal as a lampshade. At this point, I am not real worried about the lack of light. If we do not get good results, I will modify the design.
Last night was the first night that I left the unit on, after all my testing. Sitting next to my tank, the unit lights my entire living room by itself, as the light reflects around inside, and then out. Basically the same principal as a lampshade. At this point, I am not real worried about the lack of light. If we do not get good results, I will modify the design.
sly
Active Member
Originally Posted by vayapues
http:///forum/post/2743810
My design is different to all of these in that the light is enclosed within the unit.
Your design inspired me to build one for myself over the weekend. I added a surge device on the outside and I must say it works very well. I had to go through about 3 prototypes before I got it right but now it surges once every 30 seconds and is completely self regulating.
I'll start a new thread on it a little later and explain it in more detail...


Full Bucket before surge

Bucket after surge

During water surge

After surge
This design is completely self regulating and is virtually silent. I set the water level in the trash can to where it will be high enough to not splash when the water travels down the screen.


I added an Aqua Lifter pump to help break the siphon. With lower water flow it didn't even need a pump but when I hooked everything up to my Rio 2100 pump I had to add the aqua lifter to add air to the siphon when the water level got low so that it would fully break the siphon. Without the Aqua Lifter the siphon would not fully break and so it would not surge. Instead it would just fill the bucket up until it reached a balance to where the water level stayed the same and just ran out in a continuous stream into the scrubber.
If the siphon opening were a little higher then I'm sure it would start to break the siphon earlier which would mean that I could probably not even need to use the Aqua Lifter...Meaning that this is a solid state, completely self regulating surge device.

http:///forum/post/2743810
My design is different to all of these in that the light is enclosed within the unit.
Your design inspired me to build one for myself over the weekend. I added a surge device on the outside and I must say it works very well. I had to go through about 3 prototypes before I got it right but now it surges once every 30 seconds and is completely self regulating.
I'll start a new thread on it a little later and explain it in more detail...


Full Bucket before surge

Bucket after surge

During water surge

After surge
This design is completely self regulating and is virtually silent. I set the water level in the trash can to where it will be high enough to not splash when the water travels down the screen.


I added an Aqua Lifter pump to help break the siphon. With lower water flow it didn't even need a pump but when I hooked everything up to my Rio 2100 pump I had to add the aqua lifter to add air to the siphon when the water level got low so that it would fully break the siphon. Without the Aqua Lifter the siphon would not fully break and so it would not surge. Instead it would just fill the bucket up until it reached a balance to where the water level stayed the same and just ran out in a continuous stream into the scrubber.
If the siphon opening were a little higher then I'm sure it would start to break the siphon earlier which would mean that I could probably not even need to use the Aqua Lifter...Meaning that this is a solid state, completely self regulating surge device.

santamonica
Member
Yes Sly excellent work... will comment on it shortly.
santamonica
Member
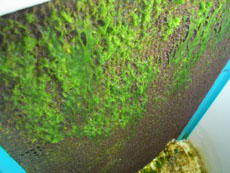
Today I thought I'd show what's up with my screen. I'm back to using just my main original bucket (that started with pre-grown screen), since the 2nd bucket that I used for the build thread is on loan to the lfs. I'll be posting progress pics of that soon. But for my tank/screen, N and P are zero of course. I check every day unless I forget. The main development has been true green turf, i.e, not green hair or slime. Now, hair and slime are always there (they grow right over everything else), but I started noticing that after regular cleanings there were still some green remaining. I thought I was just rushing and missing it, but it got to be too much green. So on the next cleaning I used the camera, and when cleaning I found for the first time true green turf. I also let it grow more than I normally would, so the pics would show more:
Here is the screen just before cleaning, looking down into the bucket (both sides looked about the same).
Hi-Res: http://www.radio-media.com/fish/Scre...ng08-27-08.jpg
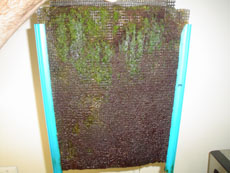
Here is the screen pulled out (still not cleaned):
Hi-Res: http://www.radio-media.com/fish/Scre...ed08-27-08.jpg
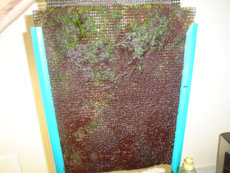
Here is the screen after a regular cleaning (scrubbing) with fingernails and toothbrush. Note that tons of green remains:
Hi-Res: http://www.radio-media.com/fish/Scre...ng08-27-08.jpg
Here is the screen after scraping with a razor blade:
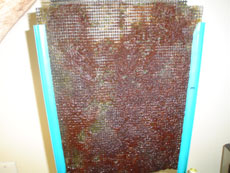
Hi-Res: http://www.radio-media.com/fish/Scre...ng08-27-08.jpg
Note how most of the green turf is on the top half of the screen, near the lights. The flow is the same; only the light is stronger near the top (the very top is only one inch from the lights). It had been exactly on one month since I'd used a razor before this. It took that long for the real turf to grow (both red/brown and green). Real turf takes so long because it is very tightly packed and strong, with very little water. It looks like the green turf grows a bit faster than the red/brown, however, and is not quite as strong; it grows longer too. However I still could not scrub it off with my fingernails or a toothbrush, no matter how hard I tried. Only the razor could get it off. Took about 5 minutes; not bad for a month of growing.
Anyways, intrigued by this green turf, I went down to the beach with a camera so I could search for what I've been wanting for a while: Pics of how real turf lives. Sure enough I found it on the pylings of the pier at Paradise Cove (just north of Malibu):
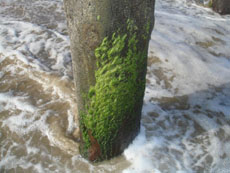
Hi-Res: http://www.radio-media.com/fish/TurfBeach.jpg
ll.jpg" border="0" alt="" />
Hi-Res: http://www.radio-media.com/fish/TurfBeachCloseup.jpg
It's exacty what was on my screen. The white specs you see are sand. In order to get the second (closup) pic, I had to pinch the turf very hard and pull it out... like pulling out plant roots; then I held it up for the pic. Note also that it's low tide, which means that the turf holds its color and stays alive for many hours in direct sunlight with no water. Further down the beach I found the same turf on rocks that were 100 feet away from the water.
So, like I said before, real turf is used to living out of the water, and that's why I say that to simulate this (as Aday's machine does) you need some type of on-off-on pulsed flow, and the easiest way I could think to do this was a wavemaker timer (although, as I'll post soon, other folks are coming up with ingenious ways too.)
And again, the importance of light is clearly apparent with this green turf, since it grew no more that 6" away from the lights at the top. And lastly, it does look like some of the red/brown is being replaced by the green, which makes sense since the original red/brown came from IA with their different nutrients and lighting.
Here is the screen just before cleaning, looking down into the bucket (both sides looked about the same).

Hi-Res: http://www.radio-media.com/fish/Scre...ng08-27-08.jpg
Here is the screen pulled out (still not cleaned):

Hi-Res: http://www.radio-media.com/fish/Scre...ed08-27-08.jpg
Here is the screen after a regular cleaning (scrubbing) with fingernails and toothbrush. Note that tons of green remains:

Hi-Res: http://www.radio-media.com/fish/Scre...ng08-27-08.jpg
Here is the screen after scraping with a razor blade:

Hi-Res: http://www.radio-media.com/fish/Scre...ng08-27-08.jpg
Note how most of the green turf is on the top half of the screen, near the lights. The flow is the same; only the light is stronger near the top (the very top is only one inch from the lights). It had been exactly on one month since I'd used a razor before this. It took that long for the real turf to grow (both red/brown and green). Real turf takes so long because it is very tightly packed and strong, with very little water. It looks like the green turf grows a bit faster than the red/brown, however, and is not quite as strong; it grows longer too. However I still could not scrub it off with my fingernails or a toothbrush, no matter how hard I tried. Only the razor could get it off. Took about 5 minutes; not bad for a month of growing.
Anyways, intrigued by this green turf, I went down to the beach with a camera so I could search for what I've been wanting for a while: Pics of how real turf lives. Sure enough I found it on the pylings of the pier at Paradise Cove (just north of Malibu):

Hi-Res: http://www.radio-media.com/fish/TurfBeach.jpg
ll.jpg" border="0" alt="" />
Hi-Res: http://www.radio-media.com/fish/TurfBeachCloseup.jpg
It's exacty what was on my screen. The white specs you see are sand. In order to get the second (closup) pic, I had to pinch the turf very hard and pull it out... like pulling out plant roots; then I held it up for the pic. Note also that it's low tide, which means that the turf holds its color and stays alive for many hours in direct sunlight with no water. Further down the beach I found the same turf on rocks that were 100 feet away from the water.
So, like I said before, real turf is used to living out of the water, and that's why I say that to simulate this (as Aday's machine does) you need some type of on-off-on pulsed flow, and the easiest way I could think to do this was a wavemaker timer (although, as I'll post soon, other folks are coming up with ingenious ways too.)
And again, the importance of light is clearly apparent with this green turf, since it grew no more that 6" away from the lights at the top. And lastly, it does look like some of the red/brown is being replaced by the green, which makes sense since the original red/brown came from IA with their different nutrients and lighting.
sly
Active Member

Parts list (all 3/4" PVC fittings):
- 2 90 degree elbows
- 1 slip coupling
- 1 Tee with slip fittings and a threaded 1/2" opening
- 1/2" barb fitting
Teflon Pipe Tape
1 threaded male/female slip coupling
O-ring
3/4" pipe cut into pieces to join fittings together
Here's how it works. As water fills the bucket it rises up to the top of the J and creates a siphon. The siphoning water quickly rushes out creating a surge effect. As the water level drops, the inlet on the aqua lifter pump starts to suck air. Water continues to drop until the siphon breaks at the main PVC opening. Air from the aqua lifter then reaches the barb fitting and squirts just enough air into the tube to finish fully breaking the siphon. Once the siphon is fully broken, water then starts to fill the bucket again. As it rises it covers the inlet hose of the aqua lifter and causes it to start squirting water through the barb fitting. Water rises up until its high enough to start a siphon again...
There are two adjustments to get it to work. One is the amount of water entering the bucket. I have a ball valve on the outlet of the main pump which feeds the whole scrubber. You don't want to have so much water entering the bucket that the siphon can't keep up. Also, the more water flow you have, the shorter the surges. I like to keep about 30 seconds between surges and so I adjusted the water flow accordingly.
Next you can adjust the height of the airline tubing which is strapped with the wire tie. This sets the level to where the aqua lifter starts to suck air. You don't want the airline to be too high or else the aqua lifter will suck air too soon and break the siphon before the surge has finished. If you have the airline too low then it won't suck enough air and won't break the siphon fully. If the siphon does not break fully then the water level will rise in the bucket and find a balance to where the siphon equals the water coming in... This means that the bucket will just sit there at the same water level and never surge.
If you wanted to use more water flow then you can use a taller bucket and larger diameter tubing. Everything I used was 3/4" and it was more than enough to keep up with the Rio 2100 pump I'm using.
When I tested it in the sink I didn't even need the aqua lifter pump. I used little water flow and it surged itself with no moving parts. The Rio pump puts out a lot more water flow and so I had to add the aqua lifter pump so that the siphon could break properly. What was happening was the barb fitting didn't stay out of the water long enough to draw enough air to break the siphon. If you put the barb fitting a little higher you may be able to use higher water flows without having to use an aqua lifter pump.
santamonica
Member
Well Sly that is another great design of Vaya's build. The screen looks good too. It's kind of a tall-bucket version of my bucket, with your surge add-on of course. It's great that you are able to get the surge to work... it can only help things in the long run, and you'll know that flow will never be a problem. Also, with both trash can designs, the lid will keep things more quiet than my open bucket (some folks may not want to hear the soft waterfall sounds).
I might remark, however, that in both designs, the one thing I'm a little concerned about is the distance of the bulb to the screen. And in yours in particular, the shading of the light by the pvc pipe is going to block most of the direct energy of the light. You might notice in the screen pics that I posted yesterday that the majority of the new green turf grew within six inches of the light, and this is with the floodlight pointed directly at the screen. Also, in other designs that people are currently trying, some are putting the light 12" inches or more away, and in every case the growth is minimal or none, even after seven days. Whereas when the light is within an inch or two of the screen, growth is good by just two days, and the screen is full in seven days. So I have two ideas... first, how about using two lights in your lid like this:

Not only does this keep the light from being shaded by the pipe, it also adds twice the light, which is critical since your bulbs are not floodlights and thus the energy is not being focused onto the screen. Also note I added extensions to the bulbs, that if you could do them, would bring the light closer to the screen. A second option might be to put mirrors on the sides of the can, but this still leaves you with just one light, and the travel distance of the light would be long and it would lose energy (light energy falls off with the square of the distance; thus if you double the distance, the energy is reduced to 25% of what it was.)
Anyways, great designs and we'll see what happens either way!
I might remark, however, that in both designs, the one thing I'm a little concerned about is the distance of the bulb to the screen. And in yours in particular, the shading of the light by the pvc pipe is going to block most of the direct energy of the light. You might notice in the screen pics that I posted yesterday that the majority of the new green turf grew within six inches of the light, and this is with the floodlight pointed directly at the screen. Also, in other designs that people are currently trying, some are putting the light 12" inches or more away, and in every case the growth is minimal or none, even after seven days. Whereas when the light is within an inch or two of the screen, growth is good by just two days, and the screen is full in seven days. So I have two ideas... first, how about using two lights in your lid like this:
Not only does this keep the light from being shaded by the pipe, it also adds twice the light, which is critical since your bulbs are not floodlights and thus the energy is not being focused onto the screen. Also note I added extensions to the bulbs, that if you could do them, would bring the light closer to the screen. A second option might be to put mirrors on the sides of the can, but this still leaves you with just one light, and the travel distance of the light would be long and it would lose energy (light energy falls off with the square of the distance; thus if you double the distance, the energy is reduced to 25% of what it was.)
Anyways, great designs and we'll see what happens either way!
vayapues
Member
Wow Sly,
I am impressed by the genious of your design. Very cool, and quite brilliant.
I have the same question as SantaMonica. How bright is your box? Mine glows so brightly that it lights the entire room. I am assuming that you are getting a similiar effect. With the light bouncing back and forth off the inside of the unit.
sly
Active Member
Thanks. It's pretty bright. I am using a 120 watt equivalent CFL bulb. I think I'm going to try the idea of using two of them, offset from center. I have another fixture laying around that I can scavenge for parts and so mounting a second one won't be that hard.
Another thing I'm thinking about is mounting a fan in the lid with it exhausting upward. Then drilling two holes in the sides so that it can draw fresh air in and direct it directly toward the screen.
I started playing with the surge device some more and it will run without a pump if you offset the two siphon breaks more. By placing a piece of PVC in the main opening you increase the distance between the main siphon break and the barb fitting. This allows the barb fitting to start drawing air sooner which means that it will fully break the siphon and create the surge you are looking for.

santamonica
Member
If you install a fan, I'd make it blow air into the can, directly at the screen, simulating wind at the beach. The exits can be anywhere. The idea is that when the flow is "off", the air cleans off the micor-thin boundary layer of water that sticks to the algae and keeps it from passing metabolites to and from the water column.
thauro77
Member
I finally decided to build the filter by using my existing sump system.
I followed the instructions and honestly it was way easier that building the bucket version.
Expenses:
PVC tubbing and fittings $2.50
Gutter filter $1.79
Light Fixtures $9.50
2 Light bulbs $16.00
Total $29.79
What I did was to remove the bio balls and the tray from the sump and the protein skimmer. I used the return hose from the sump and conected it to the pvc tubbing. I drilled the pvc tubbing to fit the "gutter cover" that is made completely in plastic and has a net in it in order to allow flow. I conected everything to the hose and turned the pump again. Water flows really steady, no splaters, no sound and all the net is covered. I hope this is right since I amreally exited about this. If you guys seem that I should change somethig, please let me know,


santamonica
Member
That looks fantastic! What's the screen made out of? Did you rub algae into it? Three requests of your fine build:
1. Can you tilt the clip-on lights so they come down and point to the middle of the screen?
2. Can you get pics of the screen bottom, which will show how much water is flowing?
3. Can you give us N and P readings?
1. Can you tilt the clip-on lights so they come down and point to the middle of the screen?
2. Can you get pics of the screen bottom, which will show how much water is flowing?
3. Can you give us N and P readings?
thauro77
Member
I did not rub any algae into the screen. The screen is made out of plastic. Is one of those gutter screens that hols stuff from falling into the water. As far as I know all the screen is plastic, including the net. Also there is like to inches of water at the bottom and 2 inches of the screen are submerged under water. I will try to take thise readings when getting home.


santamonica
Member
Sounds good. Rubbing some algae all over the screen will help it start growing quickly.


