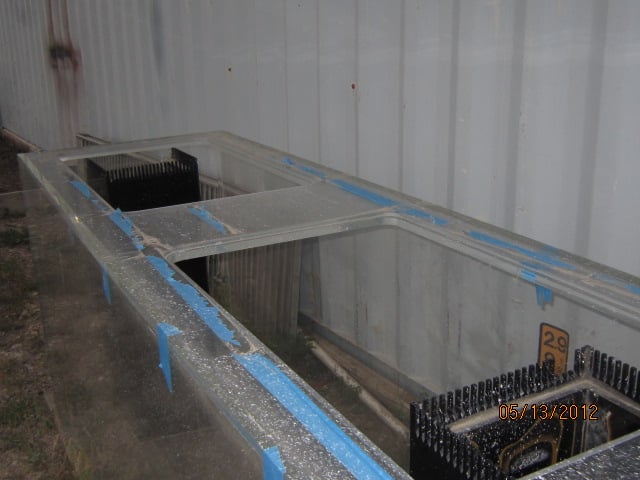
ok 540 again

deejeff442

Active Member
well i have been watching the show tanked.by the way i love the show. alot of you here know i have a 540 acrylic tank sitting outside.i have my 250 reef .i am building a house across the street.after watching the show i have a bad itch to do an aggressive tank.puffers,triggers,eel,big angels maybe a shark (probably not) now this tank has alot of scratches mostly at the bottom 4-5 inches i figure a 4 inch sand bed.it would hide most of the scratches and less work polishing. also has a bad seam at the bottom.i think acrylic gave me a link to find a triangle piece to glue in.now my question is ? i have been looking for a polishing kit but really only find hand pads.any idea where to find a machime kit? i make concrete countertops and have a couple nice polishers that blow water through the polishing pads .instead of a dry pad i can see everything perfect when water is going through the pad.also need the link to the acrylic site where the triangle piece was ? i plan to fix the leak first ,make sure it holds water then polish .then keep my 250 reef and make the 540 into a fowlr. sometimes i wish i could shake the itch.
 

snakeblitz33

Well-Known Member
Well, congrats on the decision to have an aggressive reef. I'll be following your build thread.
I have never seen acrylic polishing pads for a powertool. Then again, I haven't been looking very hard. Good luck searching!
 

rickross23

Active Member
Cool cool cool! I love tanked also. Get one of the acrylic buffers ATM has! Definitely get a shark! Please! I want one very bad but can't due to tank size.
 

acrylic51

Active Member
Google micro mesh and you should be able to find different sizes to fit your buffer/sander. Depending how deep the scratches are you might have to be a little aggressive with the sanding at first. Again check out micro mesh and you'll also want the Novus polish. For deeper scratches start with the Novus 3, and then work down to Novis 2, and then the finishing polish like Brilliance.
As far as repairing the seam, I'm curious as to a couple things..... What thickness material and which seam? Any pics of the bad seam and tank. Depending how bad it is there are possibly several options. This is a lot of water and definitely a deal you want to do right, because your only going to get 1 shot at it, so I recommend before anything practice gluing techniques a lot.
Give more info and I'll direct you on some ideas!!!
 

snakeblitz33

Well-Known Member
Blah, sharks just swim in circles all day every day. I saw a shark tank in person and lost interest in a few minutes. It's kinda like... once you've seen it you have seen it kinda deal. At least it was for me.
 

muse1

Member
Good good glad your going to get it going, as much as I wanted to drive out there and get it, and I'm sure ill be kicking myself following you fixing it up I'm glad your using it. I will be following . Oooo why couldn't I have lived closer. LOL.
 

mr. limpid

Active Member
540 now that is a tank, what you going to use a 135 as a sump (the size of my DT) LOL. 108 gal water change, couldn't imagine.
 

deejeff442

Active Member
hey muse if you come get it before i start its still yours. ni just dont want to waste it.i am building a small (well not really small) 1700 sq ft home then i have plans to build my big house after i move in .the big house plans are for a big inwall tank with a 12 by 12 room behind it facing the living room so i dont think i have to polish this thing perfect. i think i will transfer what i put in it to the new house with a new big glass tank. i just have the bug to do an aggressive tank .i figure for a couple hundred bucks i can fix the seam and polish it.i have like 6 korilia #4 powerheads and a 2800 gpr pump sitting around.i have way too much lr in my 250 reef so i can use 100 lbs of that and add a couple hundred more. i figure maybe $1500 to get this thing going basic.i plan to build the stand out of 2 inch square tubing i can weld it myself no problem.so maybe within 3 months this thing will be cycling.as for the sump .probaby use the 55 i have in storage .i dont think i need something too big.
 

deejeff442

Active Member
well looking at the micro mesh stuff.i think doing it by hand it safer than my machine.gunna be alot of rubbin.hey acrylic what was the link for the weld glue and the acrylic triangle pieces.i figure i can fix the leak first.
 

acrylic51

Active Member
The micro mesh works good on a hand drill you just need a spray bottle of water......What thickness material is the tank constructed of......What exactly is wrong with the seal will vary on what solvent you want as well.
 

deejeff442

Active Member
i did research last time i was on about it .i will have to search for it.it is one inch thick.the bottom front seam let go so i figured i would put the triangle piece in the full length.i have noe put water in it yet but i can kick the bottom front seam and see it move.i plan to fix the seam first,fill it with water for a good month sitting out there.i think i will put a piece of 1 inch thick foam board on the concrete and the tank on top of that first .then glue the fix in place
 

muse1

Member
Deejeff I'll just have to live vicariously thru you and your build. lol. I am excited to see your build!
 

deejeff442

Active Member
it wont be much of a build.a small sump my small pool pump (snapper) some rock and sand. i go old school and simple.but i do plan a nice angel(emporer) puffer i am thinking cross hatch triggers .yep
 

acrylic51

Active Member
Hmmmmm 1" thick material is good.....What is the height of the tank and how is the top euro braced.......Again some rather important things to look at......
With you saying you can move the bottom seal, I'm very, very hesitant to even advise or suggest trying to repair that seam......IMHO asking for a bit of trouble, but it's possible to do.....The correct way would be to totally remove the bottom, because the problem your going to have is getting the solvent to flow evenly throughout the entire joint......You get a spot that only takes (wicks) a bit of the solvent, it will appear and hold, but it will eventually fail......That's why I'd honestly suggest the totally removal of the bottom panel.....
First thing you need to find out is can you gap the entire front seam.......I'm talking from corner to corner completely.......If you can't no guarantee at all on the fixing of the seam......
 

deejeff442

Active Member
42 inch tall. the top is solid flat piece with two 12 inch by 12 inch openings. it seems the bottom glue let go. how would i get the whole bottom panel off ? from the research i have done i sand the inside with 200 grit and them weld#2 i think it was maybe #4 the one inch triangle piece in the whole length
 

acrylic51

Active Member
I hate pissing on your parade, but I have to be honest.....I've played way to much with acrylic and solvent and anyone that has played enough and Corey will affirm what I'm saying.....If the joint came apart....Well the joint was never a solid joint to begin with IMO......When joints are solvent welded it is actually the strongest point of the structure or should be......You can take a properly glued joint and beat the crap out of it and 9 out of 10 times it will break elsewhere before your glue joint comes apart......How the tank is braced also plays a factor in stress on the joints as well...Is the top euro bracing squared in the corners or rounded radius cuts......
 

acrylic51

Active Member
To remove the bottom panel you'd have to literally use a router and make 4 cuts; cutting the bottom completely off the tank.....If the tank is 42" tall......
It's underbuilt......1" thick material is way thin for 42" tall tank........may I ask the length of the tank as well.......
You need to be able to get completely underneath that front panel from end to end.....I asked because all the gapping you really need under the front panel is the thickness of a twisty tie for a loaf of bread or trash bag......That is going to be the gluing technique you'll want to use......DO NOT take any sandpaper to the seam or joint.....You will do nothing for the joint by sanding.....Any glue joint you want smooth, not roughed up......
 

deejeff442

Active Member
ok here is the top i took the plastic off but the tape it on there pretty good.so 1 inch is not thick enough? there is no bracing.can i make a tight angle iron rim? that would be no problem.
how is it then silicone can hold glass and this weld that imo is much stronger fail?ok the top openings are bigger than 12 inch square
 
Top