silverado61. Rebuilding my 72g bow front and stand.

lagatbezan

Member
I agree, but I tried it a long time ago on my first tank about 15 years ago and within a few weeks there was algae growing on them and they started looking horrible. Caroline didnt even have a chance to start yet in the tank. someone told me that it would need to be pulled out every couple of months and brushed clean and maybe bleached... too much work so I pulled them out and replaced with live rock.
they do look amazing if you can keep them white or just caroline growing on it.
 

silverado61

Well-Known Member
For me white isn't the goal natural is. A nice coating of coraline and some darker coloration will look great on these.
Exactly Imforbis. A nice coralline build up is what the goal is. Keeping them white would defeat the purpose of a natural slice of ocean.
That huge piece of plate coral is going to look awesome once it's covered in coralline.
 
Last edited:

silverado61

Well-Known Member
I agree, but I tried it a long time ago on my first tank about 15 years ago and within a few weeks there was algae growing on them and they started looking horrible. Caroline didnt even have a chance to start yet in the tank. someone told me that it would need to be pulled out every couple of months and brushed clean and maybe bleached... too much work so I pulled them out and replaced with live rock.
they do look amazing if you can keep them white or just caroline growing on it.
With a good filtration system in the sump, (skimmer, algae scrubber, Chaeto) and a good CUC (hermits, etc), I won't have and algae problem. You can have an algae problem whether you use live rocks, dead rocks or dry coral. The trick is to keep a good filtration program going from day one.
 
Last edited:

lagatbezan

Member
I guess, but a lot of tanks go through the new tank algae bloom initially when started and takes a while before caroline can stat to grow. so probably what I was dealing with back then.
since then I only use rock and I setup in my 300g that way too and gave up on the coral skeletons and gave them all away for free lol.
 

silverado61

Well-Known Member
I guess, but a lot of tanks go through the new tank algae bloom initially when started and takes a while before caroline can stat to grow. so probably what I was dealing with back then.
since then I only use rock and I setup in my 300g that way too and gave up on the coral skeletons and gave them all away for free lol.
You should have cleaned and bleached them. Could have made a chunk of change off guys like me.
 

silverado61

Well-Known Member
Another update everybody.

After a lot of research I've decided on a design for my DIY up flow algae scrubber and I've begun the build.

Here is the list of equipment that I've received so far followed by a list of equipment still on order that I should receive in a couple of days

2) three gallon Rubbermaid totes
1) 0-10v dimmable Nano Driver with a Potentiometer
2) 4 solderless red LED's in the 660 nanometer range
3) 2 solderless blue LED's in the 440 nanometer range
6) 3in solderless wires to connect all the LED's in a loop
1) 20in solderless wire to connect the LED's to the driver
1) roll of aluminum reflective tape
1) Gorilla Glue 2 part epoxy to mount the LED's to the scrubber

Here's what I'm still waiting on to be delivered:
8) thermometer suction cups to attach the scrubber to the sump
4) airline suction cups to secure the airline
1) 3/16"x10' airline
1) 3/16x3' rigid airline to make the bubbler in the scrubber
1) AP30 air pump
1) check valve to control air flow
1) 24/7 digital timer power strip so I can keep the scrubber on a 8hr time schedule

DIY scrubber 0.jpg

The first thing I did was to cut off about 3in off the bottom of this 3 gallon tub. I discarded the top portion since I only needed the bottom ($5 for the tub at Home Depot).
DIY scrubber 03.jpg

Then I lined the inside with reflective aluminum tape which will not only intensify the brightness of the LED's but also act as a heat sink.
DIY scrubber 02.jpg

Next I drilled five holes in the end that will act as the top edge of the scrubber to allow more heat to escape.
DIY scrubber 1.jpg

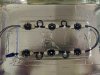
After assembling the wiring and the LED's I used the Gorilla Glue two part epoxy to glue the LED assembly to the taped surface of the scrubber. Two red LED's on the bottom, two blue LED's in the middle and two red LED's on top. I completely forgot to order a closed loop to finish the circuit so I had to improvise and used a piece of solderless wire and a wire nut to make my own closed loop. Next time I order anything from Rapid LED I'll have to remember to order one.
DIY scrubber01.jpg

Here's another view of the finished wiring.
DIY scrubber 04.jpg

Here's the finished LED side of the scrubber with the driver and potentiometer. I really need to get a soldering kit and some shrink tubing so I can finish off the connection between the driver and the wiring loop.
 

Attachments

silverado61

Well-Known Member
Now comes the testing phase of the LED scrubber. It was still day light out but I couldn't wait till night fall to test it so I took it into my bathroom to try it out. When I first plugged in the scrubber all the LED's flashed once and it scared the crap out of me. I thought I wired it wrong and just shorted out all the work I just put into this thing. But then I remembered that I had turned the potentiometer to the off position so I figured the driver goes through it's own testing phase when it gets powered up.

With fingers crossed I slowly turned the dial on the potentiometer.
DIY scrubber 3.jpg

This is at the lowest setting. Not too shabby if I do say so myself. So I turned the dial to the half way point.

DIY scrubber 4.jpg

This at about the half way point on the dial.

DIY scrubber 5.jpg

This is at full power. I know it doesn't look too impressive does it? So I waited till night fall to test it in my living room. OMG! What a difference! This damned thing lite up my entire apt! I was so thrilled I forgot to take photos of it so I'm going to have to do it again tonight and post the results.
Keep an eye out cause those photos are coming soon.

Well, that's it for now kids. I'm slowly but surely getting all the equipment together for the official rebuild when we get the house.
 

silverado61

Well-Known Member
Well here they are folks. The updated photos of the first completed half of my up flow algae scrubber.

Scrubber lites 1.jpg

This at low power.

Scrubber lites 3.jpg

This is at high power. I really should do a video of this.
 

silverado61

Well-Known Member
I'll probably never have to turn them up that high but at least I have the option to adjust the intensity depending on what type of algae starts growing.
 
Last edited:
You're putting quite a bit of effort into all this. It makes me excited to see the final result. :)

How long do you think it'll take to finish the whole thing?

-Kamran
 

silverado61

Well-Known Member
You're putting quite a bit of effort into all this. It makes me excited to see the final result. :)

How long do you think it'll take to finish the whole thing?

-Kamran
The goal is soon as we buy a house. Another 4-6 months but I'm going to do as much prep work as I can before hand. I can't wait to get this invert tank up and running.
 

snakeblitz33

Well-Known Member
Looks like you are having a lot of fun.

I've been seeing people stain their base rock with purple PVC primer and painting on with various reds and purple's with non-toxic acrylic paints. You know, if you can't wait.
 

silverado61

Well-Known Member
Looks like you are having a lot of fun.

I've been seeing people stain their base rock with purple PVC primer and painting on with various reds and purple's with non-toxic acrylic paints. You know, if you can't wait.
Thanks for the idea Seth but...nah. I want the tank to progress as naturally as possible. To watch all these dry coral become live is going to be awesome. I'm thinking of keeping a photographic record of the progress. I just have to get a house first. I don't want to set this big stand up in my apt just to have to tear it down in 6 months to move it. :)
 

jay0705

Well-Known Member
I had my new tank for over a yr , waiting to get stand built. Good things come to those who wait gents lol
 
Top