Acrylic Bonding Techniques & Aquarium Construction

phixer.

New Member
Mostly because of anti racking probably, thats the weakness Ive seen with some of the other I beam / H beam stands. Ive got to assemble the stand on site so would not be able to fit a 10ft welded steel stand down the stairs. Have drawn up plans one made of square steel tubing though but decided against it. Could do it in sections but then each section would have to be leveled and bolted together. Too much of a hassle.
Four W6X25 beams resting on two 16 x 16" concrete filled, rebar re-enforced walls 3ft tall and supported in the center by a 8x16" wall should provide enough anti racking stability. Front to back support comes from the beams being bolted into threaded hooked rods cast into the concrete that fills the cinderblocks.
Kind of like this except the one I have in mind will have (2) 10ft beams, (2) 9ft beams (2) 3ft beams to span the end gaps. The beams and the walls will be larger and wider than those in the photo and will include a center wall. Will also have the 3ft H beams on the ends. What do you think of this idea?
but
 

acrylic51

Active Member
That's the stand I was going to model mine after.......Actually a welded stand could be fabricated in pieces and then once inside could be assembled.....Depends how good your fabricator is and it's been done quite a few times....
 

phixer

Active Member
I looked at welding one up myself using 2" 3/16 boxed tubing with sleeved inserts where they join. A modular design similar to a wood mortise and tenon joint. There are a ton of good desings on another central located reef site. Just couldnt see any real advantage building a box tube stand over the H beam design. If someone could convince me Id like to compair the two, maybe Im missing something. From a cost stand point the boxed steel might be a little less expensive even with powder coating but I just didnt see it being any stronger or modular. The cemented blocks are heavy but when cemented together still weigh less than one beam and could be somewhat modular/mobile. Crumbling might be an issue but the rebar should mitigate that.
I havent seen too many builds using the 2 part stuff or beam stands documented before so it's been hard gathering information about them. Have had to figure out some strange mathmatical formulas along the way since there is so little information out there. You really have to dig.
 

acrylic51

Active Member
I love the I beam or H beam stand idea....It caught my attention right away and truly love the openness you could have.....I'm not sure about the beams being so cheap......
 

phixer

Active Member
Your right, they arent cheap. A steel tubular stand in materials is cheaper. To weld it is where the expense between the two starts to equalize. To powdercoat it makes the costs about even.
Shopping around I found the average cost of (4) W6X25 steel beams to be around $1000. To powdercoat them would cost several hundred more. Thats not counting the two 3ft end sections.
Sometimes DIY can cost more. I just like to make stuff.
 

acrylic51

Active Member
In all honesty the frame doesn't have to be powder coated.....I've seen where guys have used like Rhino liner paint and have had good success.....
 

phixer

Active Member
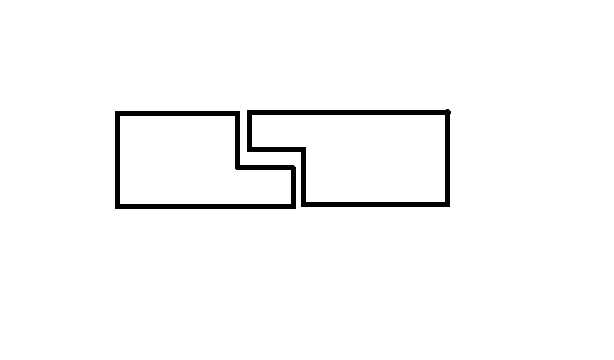
How about joining 2 panels end to end with #40 or 42 to make one longer panel? Are the ends simply butted together with a 1/8 gap and filled with cement or is each panel beveled to form a V groove when butted together? Have even heard of notching a step in each panel, butting them together then filling the void with cement.
Has anyone seen this done before?
 

acrylic51

Active Member
Yep......40.....I've done it myself and have seen it done....A good bit of work to a sense but if done correctly the seam or joint is invisible......No the ends of the panels wouldn't be seamed with a "butt joint". The ends would need to be beveled and then the seam filled and sanded down.....As far as notching a panel....Bad idea.....I had asked about that before and advised could compromise the integrity of the panel....I was still going to try it, because my panels were over sized anyway for what I was doing, but never got that far on the project to see if I was incorrect or not......
 

phixer

Active Member

Thanks Shawn, this is the type of joint I was referring too. Basically a 1/8 in gap between the each section that the cement is poured into. Each step is milled down enough to allow the gap when put end to end so that each side is level with the other and on the same plane.
I do see what your talking about regarding the the integrity of the panel and it wanting to tear apart in the middle under pressure (may craze here). I was thinking that since the gap would be filled in with cement it wouldnt matter, providing the cement has the same density and compression properties as the base material. On the other hand Im looking at less than half thicknes of the material holding back the pressure. Same principle as stacking boards vs one thicker board I suppose, especially when considering the long polymer links of cell cast acrylic. In retrospect I may have to build a sample of this joint and test it in a press.
Hard to decide between the V groove and this type.
What do you think? Still think the V groove would be better. The panels will be seamed in the middle. Two 4 x 8 sheets, this project is morphing into something much larger.
 

acrylic51

Active Member
My thinking is the "V" groove would be the way to go.......The "rabbetted" joint I think would be weak......
 

piiqmark

New Member
Quote:
Originally Posted by acrylic51 http:///t/196219/acrylic-bonding-techniques-aquarium-construction/40#post_3514581
Yep......40.....I've done it myself and have seen it done....A good bit of work to a sense but if done correctly the seam or joint is invisible......No the ends of the panels wouldn't be seamed with a "butt joint". The ends would need to be beveled and then the seam filled and sanded down.....As far as notching a panel....Bad idea.....I had asked about that before and advised could compromise the integrity of the panel....I was still going to try it, because my panels were over sized anyway for what I was doing, but never got that far on the project to see if I was incorrect or not......
i have been looking all over to see if this could be done! Thanks. I have 2 questions though. Lets assume I use the correct thickness for the type/size of tank build. Is there any chance of compromise on the seam or if done correct or would the seam need additional support - such as the support you would use along the top rim and cross braces? Lets say i use "weld on" and get the perfect water tight seal but i make a mess. Could I sand and polish the joint down (with enough effort and technique of course) to make it look like a factory finish?
Acrylic, I read through your Tank Build Thread - nice work!!!!
 

acrylic51

Active Member
Quote:
Originally Posted by piiqmark http:///t/196219/acrylic-bonding-techniques-aquarium-construction/40#post_3515861
i have been looking all over to see if this could be done! Thanks. I have 2 questions though. Lets assume I use the correct thickness for the type/size of tank build. Is there any chance of compromise on the seam or if done correct or would the seam need additional support - such as the support you would use along the top rim and cross braces? Lets say i use "weld on" and get the perfect water tight seal but i make a mess. Could I sand and polish the joint down (with enough effort and technique of course) to make it look like a factory finish?
Acrylic, I read through your Tank Build Thread - nice work!!!!
First what size is the tank your planning and what material thickness are you hinting of......Undersized material will undoubtedly lead to issues with bowing, some more severe than others depending on panel length and height......I've followed a thread on RC a while ago where a guy did a 10' panel with no issues, but I go back to my first question asking about size......
If proper material is selected being thickness and such for the application then no, no additional bracing would be needed at that seam point.....9/10 times when acrylic fails it's not at the seam it usually elsewhere....You can take a 1/2 decent joint that's been glued and try to destroy it with a sledge hammer and the acrylic will break before that joint.....Try it.......
You asked also about euro bracing.....Again this is very dependent on what the size of the tank is and what material thickness your using for the build....If your building something like a traditional 120 out of 1/2" material and want to go rimless.....No way.....The thing would bow like mad.....Now could you build the same tank with same thickness of material and use euro bracing.....Yes, but you'll still have bowing....Material will bow, but not as bad with no bracing.....Now keep in mind that acrylic will absorb some small ratio of water....Over what time period or span who knows, but if you do a little digging you'll see it will.....With that said if you were doing a 120 using 3/4" material you would still want to euro brace, but your bracing could get smaller possibly.....As you step up in material thickness your bracing would follow......Now lets say your building something on the lines of 48"x24"x12" and used 1" material.....Would bracing be required.....IMHO definitely not required......Now also keep in mind that most want aggressive water movement and waves in their tanks.....This is another area that you need to take into consideration when selecting material thickness as well.....
As far a removing mess from acrylic.....Yes and no.....Depending how bad the mess is probably not.....I have in the past been able to sand it out, but this was more a "sprits" when I finished up a joint from the bottle.....Now if your talking about oozing it across the panel, probably not.....I have also when it was so minor taken my torch and hit the spot really quick and gone.....This I don't recommend and it was something I was playing with out of curiosity..........
 

2quills

Well-Known Member
Phew...u guys are gamblers lol. I'd be scared to try and seem a tank together. I'm sure it could be done though. I think I saw the guys on tanked do it before.
My question is not so much that will the joint hold, but what about the integrity of the acrylic on either side of the joint? If memory serves me right doesn't the surounding material get stressed and permantly weakened to a degree durring the welding processes of the solvent?
Would it maybe be wise to maybe go with a thicker material than normal if you were to attempt this?
 

phixer

Active Member
No, if using solvent to bond think of it as melting the two sections together into one. On thicker material solvent just dosent cover as well, so 2 part cements such as PS30 or 40 or #42 are used. These cements are extremely strong, recommended by Cyro and are what are used to seam the large panels together for public tanks. They are more forgiving of surface irregularities. Machining can cause tension within the material if done improperly which is when annealing would be required to relieve the internal stresses....in a small nutshell.
Rant On:
When I first started in this hobby I was intimidated by the large tanks. Then I realized thru years of research and practice that building them isnt magic it's actually very simple with the right tools. Although heavy lifting involved in moving the sheets around, similar to stone fabrication. Educate yourself a little in engineering, physics and carpentry and you will be successful. I believe most people are capable of this if they take the time to learn and practice.
The more I learn, the more I realize how may crooks there are in this industry going under popular names who prey on the uninformed and constantly rip people off with their ridiculous prices and use of inferior materials. Many use material too thin or junk from china or mexico that bows like the bags fish come in. It's no different than any other industry. Knowledge is power and sharing it with others is what moves our hobby forward... of course the crooks dont like it when we learn how to do it ourselves.
Rant Off.
 

2quills

Well-Known Member
Quote:
Originally Posted by Phixer http:///t/196219/acrylic-bonding-techniques-aquarium-construction/40#post_3515913
When I first started in this hobby I was intimidated by the large tanks. Then I realized thru research that building them is not that hard. You do have to learn a little about engineering, physics, carpentry but I believe most people are capable of this if they take the time to learn and practice. The material is plenty strong when used right. One must take the time to learn how to build properly using the right materials.
What motivates me to DIY is the most, is now that I know how to do build correctly I clearly realize how may crooks there are in this industry who prey on the uninformed and rip them off with their ridiculous prices. Knowledge is power and sharing it with others moves our hobby forward. The crooks who rip folks off dont like this at all but IMO teaching others is more important.
Phixer, I feel like you just jumped inside of my head, pulled the words right out of my mouth and smeared them all over this post. I couldn't agree more.
Knowing the correct materials to use (in anything) is very important. My experience (which is limited) in toying around with plastics is that practice makes perfect and not everyone hits a home run right out of the box. And that proper products typically have likewise costs associated with them.
But I'm here to learn and grow as well. If I had to put a finger on it I'd say pick a joint that is going to provide you with the most amount of surface area for joining. But that's just a guess. Good luck with the build, hope you share your progress with us when you get this going.
 

acrylic51

Active Member
Corey I'm sure you saw the thread over on RC where the guy did it with a 10' tank....I actually followed that thread intently.......The joint area isn't stressed.....though you have to be very meticulous with finishing it though as to not overheat it or rush the sanding process......A big key to the joint not being compromised is it's not a simple butt joint, but a controlled cut something similar as to what I described to Phixer in an earlier post......Gambling.....possibly......I look at it as "faith" in my abilities.....Practice though....
Although it might be cheaper and more advantageous to just have 10' sheets brought in or whatever length you might need, but sometimes the cost just isn't worth it.......I wouldn't be using thin material as well for the project....Hopefully the other poster will chime in with more insight into what he's trying to accomplish.
 

2quills

Well-Known Member
Quote:
Originally Posted by Phixer http:///t/196219/acrylic-bonding-techniques-aquarium-construction/40#post_3515913
No, if using solvent to bond think of it as melting the two sections together into one. On thicker material solvent just dosent cover as well, so 2 part cements such as PS30 or 40 or #42 are used. These cements are extremely strong, recommended by Cyro and are what are used to seam the large panels together for public tanks. They are more forgiving of surface irregularities. Machining can cause tension within the material if done improperly which is when annealing would be required to relieve the internal stresses....in a small nutshell.
Actually that was another one of those questions in my head. Does using #40 or 42 negate some of the potential crazing that can often occur with a typical solvent joint such us with the more commonly used #3 or 4? Because for me if it can't be totally aesthetically pleasing after all that time, effort and cost that goes into a build then I'm not gonna be happy.
Man you're on par tonight lol.
Quote:
Originally Posted by acrylic51
http:///t/196219/acrylic-bonding-techniques-aquarium-construction/40#post_3515920
Corey I'm sure you saw the thread over on RC where the guy did it with a 10' tank....I actually followed that thread intently.......The joint area isn't stressed.....though you have to be very meticulous with finishing it though as to not overheat it or rush the sanding process......A big key to the joint not being compromised is it's not a simple butt joint, but a controlled cut something similar as to what I described to Phixer in an earlier post......Gambling.....possibly......I look at it as "faith" in my abilities.....Practice though....
Although it might be cheaper and more advantageous to just have 10' sheets brought in or whatever length you might need, but sometimes the cost just isn't worth it.......I wouldn't be using thin material as well for the project....Hopefully the other poster will chime in with more insight into what he's trying to accomplish.
Hey, Shawn. I do vaguely remember a build a while back I think where a guy did a 10 or 12 footer. But it's been a while so I don't remember the details. I do remember a bit of discussion on the big acrylic thread where James was providing a little of his insight as well. And a similar discussion came up but it wasn't very detailed. I do specifically remember James mentioning in regards to a miter joint vs the typical butt joint that a 45 degree miter joint (if done properly) is actually better because it provided more surface area for joining. I thought it made some sense to me in my head. But again, details are a tad hazy there as well.
My initial post wasn't so much questioning you guys as much as it was just about bringing up some more things to think about for anyone else who may be following along. This is one of the more interesting topics that I've seen brought up around here in a while. :)
 

acrylic51

Active Member
Indeed......Very interesting.....Your correct on the 45 bevel, but I'm going to have to hunt the thread down, but I think James did throw out a formula or calculation to determine the correct way or method to lay out the bevel cut......but yeah would give excellent bonding area......I'd still use thicker material and wouldn't skimp on the euro bracing either way......The tank were referring to only had a height of may 12" maybe a tad more......
As far as 40 or 42 and crazing....I can't give you a definite answer yes or no, but I can tell you that when using 40 when first mixed it does generate a tremendous amount of heat....With that said I allow my mix to stand a bit to allow the bubbles to work their way to the surface, but the container is still very warm.....Just as with epoxy when you pour the mixture out is what helps it dissipated heat, but I haven't really seen much crazing with either solvent....I think crazing comes more from the material being stressed by other means. I do think you'd have a slightly less chance of crazing with 40 or 42 vs the others....With that said now, you technically gain very little if any real strength by using 40, 42 vs 3 or 4.....The fact being is where 40 and 42 gain major strength is when it's annealed.....Not to many of us have an oven to do the final process, so very little structural gain......
Joints done with 40 or 42 are awesome; invisible looking if you take your time.....The joint almost appears to float.......
 

2quills

Well-Known Member
Quote:
Originally Posted by acrylic51 http:///t/196219/acrylic-bonding-techniques-aquarium-construction/40#post_3515938
As far as 40 or 42 and crazing....I can't give you a definite answer yes or no, but I can tell you that when using 40 when first mixed it does generate a tremendous amount of heat....With that said I allow my mix to stand a bit to allow the bubbles to work their way to the surface, but the container is still very warm.....Just as with epoxy when you pour the mixture out is what helps it dissipated heat, but I haven't really seen much crazing with either solvent....I think crazing comes more from the material being stressed by other means. I do think you'd have a slightly less chance of crazing with 40 or 42 vs the others....With that said now, you technically gain very little if any real strength by using 40, 42 vs 3 or 4.....The fact being is where 40 and 42 gain major strength is when it's annealed.....Not to many of us have an oven to do the final process, so very little structural gain......
Joints done with 40 or 42 are awesome; invisible looking if you take your time.....The joint almost appears to float.......
I've noticed some peculiarities in some of the joints that I've done. Can't remember how many I've done total but I've probably welded close to a few dozen test joints since I first started playing around with the #3 and 4 products. I'm definitely a proponent of the idea that atmospheric conditions do play a roll in ending up with either an ugly or a nice clean joint. Stay away from welding your joints in a non climate controlled environment on the south texas coast in mid summer lol.
I think the high humidity does promote some crazing or mico-crack looking defects in a solvent welded joint. Can't speak so much for cold temps, but I've already been advised to steer clear of those.
And, Shawn...you already known that I've played around with the idea of doing a bigger custom build since we've moved into the new house. That's been on my mind for quite a while and one of the reasons why I haven't rushed on finishing up the 120g build. I'd like to get my hands on a #42 applicator and experiment with that.
 
Top