Neptunes 72" Custom LED system.

king_neptune

Active Member
Originally Posted by AquaKnight
http:///forum/post/3274196
Thinking here, why does the heatsink need to be tapped? Couldn't you just use a nut on the back side?
the star boards dont really match the spacing of the fins, so its half on the fin on one side, and beetween the fin on the oposite.
Im honestly getting fed up with the whole drill and tap thing. I finished one panel, go them all epoxied in, and clamped down with the screws.
Truthfully, they really did do what I had hoped...that is make a nice secure fit, the epoxy was oozing out the sides...something that didnt happen when I pressed it in with my fingers. So in defence of it all, I can say I feel it was a tighter fit agasint the heatsink.
On the down side, the top of the sink looks ugly with screws splattered about. Is anyone gonna see it once the unit is in place? No not at all, but for those wanting a super clean look(especially if they arent putting it inside a canopy like I am)...I would consider just using the thermal adheasive.
I debate if the whole clamping really would have mattered in the long run in terms of efficancy. I think Ill just do the next panel w/out drill and tap... not for sure...Ill sleep on it.
Originally Posted by Jstdv8

http:///forum/post/3274219
Thats awesome!
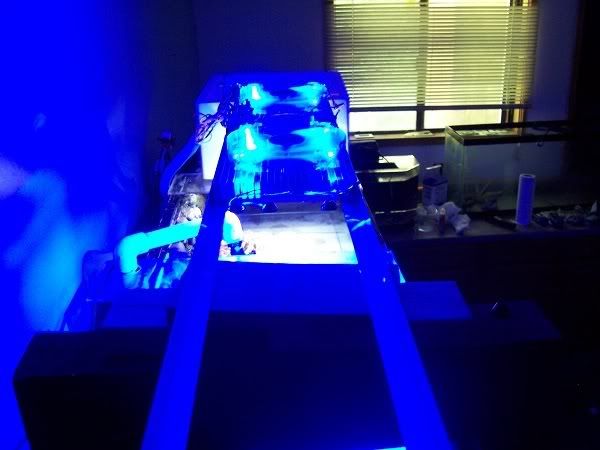
What is the overall wattage of your 72" fixture? roughly? somewhere around 384w?
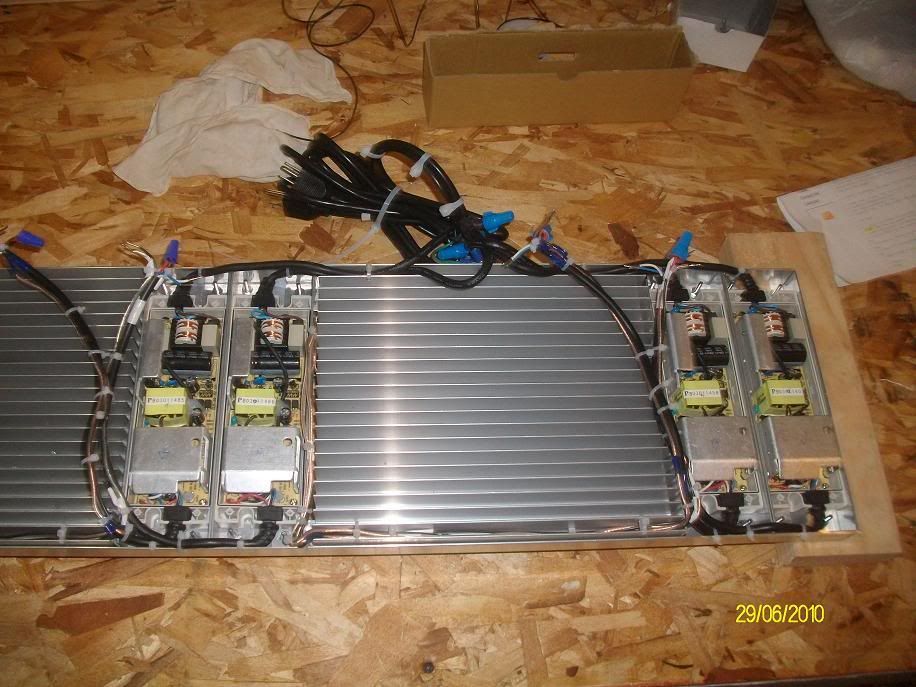
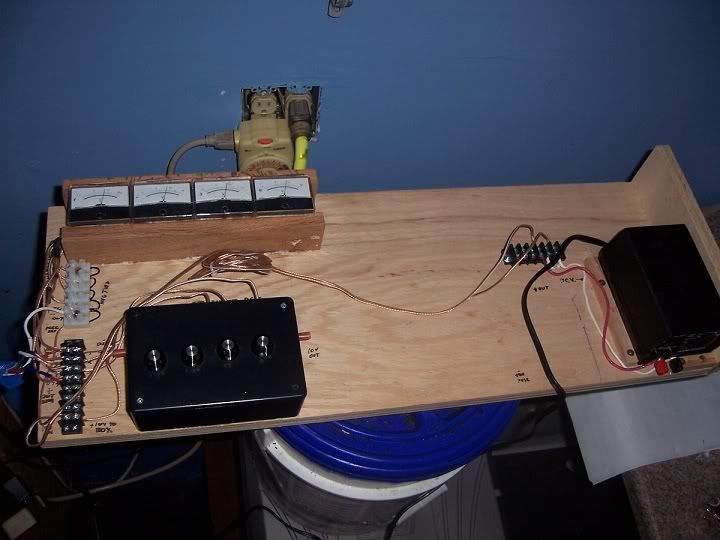
Ii never figured it out. It will be 96 LED's run by 8 mean well drivers.
According to the whole seller, it will pull around 3amps or so when its done. so thats what? 300 watts?
And consider that this will probably never go past 30-40% power anyways. So in reality it will be closer to 150watts. Deffinatly better than the 800 I was using with my MH and Actinics a few months ago.
~~~~~~~~~~~~~~~~~~~~~~~~~~~~~~~~~~~~~~~~~~~~~~~~~~~~~~~~~~~~~~~~~~~~~~~~~~~~
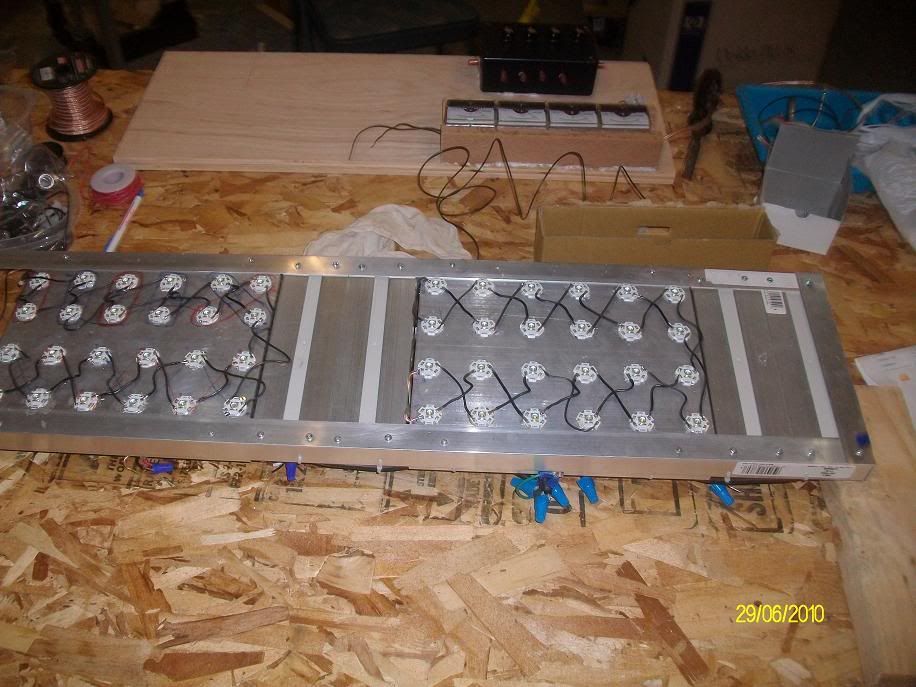
Oh and I screwed up when putting the LED's in :(
I did a hickup...the LED's i reached for the blue bin 2x in a row :(
Such a careless mistake I didnt catch it till 3 min into the epoxy...trust me, by then it was perminant. I couldnt even chisle it off

So withthe screw up went:
WBWBBW <--- dammmt!
WBWBWB <--- shoulda done this one "BWBWBW" to compensate...instead

BWBWBW <I got back on track row 3 and 4.
WBWBWB
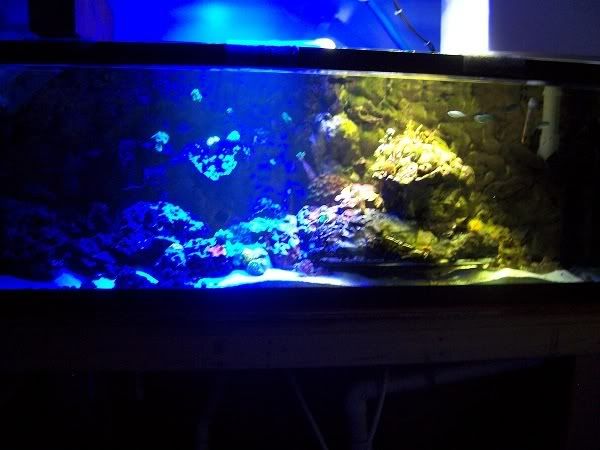
well...this is going to the ugly side of the tank...yes I have a darker lit section so hopefully it wont be seen once in place.
the worst part is it will really make wiring sloppy now as a result on the first two rows :(
 

king_neptune

Active Member
Sorry I havent updated in a while.
I been reallllyyyy busy lately. Playing video games.
I just been lazy and havent finished it.
I mounted all the remaining LED's and its ready to get wired in. I gave up on drill/tapp, a failed venture of frustration. I still maintain that it is the absolute best possible scenario, but it requires a degree of skill and dedication that turned out beyond my skill set. In short....getting 95% perfect with minimal effert vs 100% ideal and a world of hurt wasnt worth it IMO.
Ill get cracking on this system again with new found motivation.
I picked up some nice SPS today, and (even got a few freebies) from a local reefer, so I have new motivation to get the array finished. It would be really embarrasing to tell him that I killed some of his high demand SPS becuase of lack of proper lighting.
Next week my GI bill check should be deposited from the VA, so ill order the second half of the system.
Altogether it will be about $1400 total invested, but I have wasted on excess, and some parts that I didnt need(taps/bits/screws/glow in the dark tubing ect), so Im fully confidant myself/anyone can duplicate this exact system again for around $1250-$1300. Maybe even a little less if you cut even more corners...although what you will see in the end will be a pretty streamlined system with minimal else to reduce in cost. So take it at face value...if you want to duplicate me, plan to spend $1300.
 

king_neptune

Active Member
Actually I just started playing WoW 2 weeks ago.I had originally played it when it launched years ago, but left after 2months because It was a noob MMO that pretty much gave you everything for little to no effort. Trust me, it feels much more gratifying to achieve something that was difficult. WoW doesn't do that.
Fast forward to two weeks ago...Ive exhausted just about every major MMO out there, and still have 6 months till FFXIV hits the shelves. I need my MMO fix. I been playing DDO for 8 months, but Ive burned through the little content that game has long ago. So a friend convinced me to come back to WoW. 2 weeks later, I have a lvl 69 warlock. Capped First aid, 270+ tailoring and enchanting. And nice socket ed gear. Oh...and to top it off...no real sense of accomplishment.
Ya, WoW is just like I remember it...a noob kiddy MMO that gives you everything for little to no effort.
Sigh....maybe the endgame content will provide some stimulation. I doubt it, but Ill be there in a couple more weeks. Meanwhile Square just announced FF 14 beta begins next month! I already got my pass, so Ill be soaked into the development of that one for sure. FF11 was an amazing Gem of an MMO that was cast aside by many because it was way to hard and time consuming! Just my cup-o-tea!
~~~~~~~~~~~~~~~~~~~~~~~~~~~~~~~~~~~~~~~~~~~~~~~~~~~~~~~~~~~~~~~~~~~~~~~~~~~~~
Back to the array, almost finished with panels 1 & 2. Ill be firing it up in a few hours when the final wiring is done. Ill post some pictures in the next couple days if all goes well. I'm a little disappointed with the soldering, the wiring and all didn't look as neat as many of the other builds I'm mimicking. But I did the best I could, and learned a lot in the process. Panels 3/4 will look much better I'm sure! But it wont really matter, I'm covering it all with a nice acrylic panel before I hang it, and that will really hide a lot of the imperfections! Keep checking in for updates. Ill probably post them tomorrow if all is well *knock on wood*
 

handbanana

Member
+1
Surface of the sun status.
I took apart my mag-light and discover a LED that looked exactly like kings LED's
It is the brightest thing I have ever unfortunatly looked into.
So I cant wait to see this thing ignight!!!
 
J

jstdv8

Guest
I played WoW for about 2 years. Was guildmaster of a decent raiding guild on shandris server horde side. I had to get out. once I started raiding it got so addictive I couldnt pull myself off to spend time with my kid and wife. just glued to the keyboard and headset. We were pretty

[hr]
. I had a resto druid that was probably top 10 on the server dual specced DPS. Loved that game, but had to get the heck out before my wife divorced me.
Anyways, back to your light hehehehee
 

king_neptune

Active Member
Originally Posted by Handbanana
http:///forum/post/3281806
da hell is MMO?
You should try Fallout 3 for a sense of acomplishment.
Massively Multplayer Online
or MMORPG
Massively Multiplayer Online Role Playing Game
I did fallout in about 5 days. Not a tough game, breezed through it. I still enjoyed it, great story. Pretty descent sized game for a stand alone console title. I give it 9 out of 10. I was disappointed that they had a level cap. But overall the game was a unique experience.
========================================================
The array's coming along. Kinda left it sitting this week, got caught up cleaning out and re-doing the aquarium room in my free time. Im getting ready to link a spare tank sitting around to my system, and working out some new plumbing and what not.
I was hoping to have the array ready by now, sadly I couldn't get it finished last Thursday, but oh well, it's almost ready to fire up. Probably about 5 mor hours or so and it will be a working model.
Im a little ugly on the wiring,Ill trim it up a tad. And ill be putting an Acrylic splash shield over it, and by the time I add the lenses, it will cover up and look nice.

Up above....

Im ready to wire in the control panel, and wire in the drivers to power the strings.
The power supply cords and everything else is wired in and ready to plug in. I just need to finish the control panel.
Here is what I have so far on the control panel:

I picked up 4 volt meters from fry's. They read 0-15v, Ive already tested them out in a rough draft. tHey work as planned. By turning the dials, I can make them read from 0-10v, meaning I can monitor the specific power heading to each section of the array. I.E. 0%-100% and anything in between.
 

handbanana

Member

Holy moley.
So awesome.
The Voltmeters are a very nice touch.


[hr]
I only played that warcraft wher you build little citys and castles, create an army and destroy the opposing force, and maybe clubbed a baby seal or two along the way. Back in the day. Thanks for the Explanation, I always wondered what that meant.
 

king_neptune

Active Member
Hit a hitch. hooked up all 4 volt meters and the voltage dropped to 5v each.
Sigh.
I think its because its done in parallel. But I don't know how I'm gonna incorporate it into series.
Especially since the current has to continue on to the drivers and complete the circuit there. Thats a TON of extra wiring to do, and I'm not sure that's the way to go. Ill have my dad look at it later tonight when he gets home. Maybe he can figure something out.
The alternative is to wire them in anyways, and use the drives adjusting screw to read 0-5v instead of 0-10v. Effectively i make it 2x as sensitive.
The second option is to open up the pot inside, and make it push out more current. This is a risk since if something goes wrong (i.e gets unplugged). The control box will spread a higher voltage to the remaining 3 drivers. The way its set now...only 10v hits it period. weather 0 or all 4 are receiving it. And 10v is the max it can receive, otherwise ti blows the driver.
 

handbanana

Member
I agree it is because it is in parallel. I was think about a voltage drop after I saw the meters but thought maybe you worked around it.
Wireing it in series would essentally mean twice the wireing wouldnt it?
 

king_neptune

Active Member
Well Im baffled. I got a beefy power supply, wired it in. And the voltage was unaffected.
Its been done in parallel as well so I don't get why it worked this time.

Instead of running it through a "Pre-pot" to trim down the initial voltage to 10v.
I have a power supply with a dial that let you do it manually. So My dad re-did the system and has the power supply feed directly to a positive bank(black) and a negative bank (white). Note the two new banks on the far left of the close up picture. Thanks Dad! I know the colors were backwards. But just go with it :) The writing on the board should clear up any other questions if you look at it. Its a pretty simple design so anyone should be able to follow it.

This signal piggy basically piggy backs from one bank to the next along the board. Each is separate, so they can be controlled and monitored independently of one another. Its the same concept I originally had, but instead the new signal (which is 10v already) goes directly to each controlling pot. Instead of an initial pot that trims it down. For whatever reason...this worked and is the way to go.
The new power-supply was $60, and with taxes+misc extra wiring the new price tag for this unit will be $1,500 when completed.
 

king_neptune

Active Member
Note the extra room on the control board for a second panel at a later date. The control box will sit about 4 feet away and Ill have it on the wall. This should make controlling the unit clean and easy.
 

king_neptune

Active Member
OK folks. LONG LONG overdue, sorry for the procrastination.
I finished up the last of panels 1&2 last week.
My dad had a big hand in the final wireing.
I must say, I was almost ready to shed a tear when I first saw these over the tank.
It really exceeded my expectations in the looks department.
The best way to describe it is "vibrant colors".
All your color and shimmer comes out in a way that MH simply cant produce.
I really feel bad my camera is so dismal that I cant take focused pictures. Its almost not even worth putting up:


The blues light up the tank like nothing else:

really makes it look like an alien landscape. It practicly glows like radioactive or something.

All whites on the right, all blues on the left to give you a contrast:

I can control the dimmer to mix and match as I see fit. So If I want a slight increase to blue spectrum, I can dimm the white...or vice versa. Really opens things up. I can see myself in future builds adding red and green to the mix.
I dont have the fans mounted perma yet. Im still playing with placement a bit.

But this system does get hot, like putting your hand on a steel plate in 90 degree weather.
With the fans on, it cools within minutes. They do a greatjob keeping it cool, and run absolutly silent.
The control box works exactly as planned:


I can moniter the dimmer voltage, and that lets me fine tune the settings as I see fit.
Right now I have the meanwell drivers set to 350ma, at 9v from the dimmer switch. In other words 100% power on the dimmer(9v) gives me 350ma on the array. I chose this becuase I want to give the corals time to aclimate proper, as needed I can adjust them. So in essence the array is running at %30 power.
Ive been playing with optics, and height, so as you can see in the pic, they arent mounted permanently. Ultimatly I chose 80 degree optics onthe back two rows. With 60 degree in row 3(for slight increase in depth penetration in the center line of the tank). And 40degree optics on the row closest to the front.
Im going to order 12 more 80degree optics, so I can put them in the front row as well. Leaving me 3 rows of 80 degree, and one center row of 60degree's. Ill probably lower the array a few inch's from where its sitting now. I also need to add the splash guard, but at the moment, its fine without.
The optics tend to fall from time to time. So I once I choose a permanent placement, Ill put a tiny dab of superglue to hold them in place.
Within the first 25 hours I noticed an increase in polyp extension. I wasnt too supprised since I had already read from a few other builders that they too had an increase in polyp extension. A few of my corals had as much as a 25% increase in polyp length, so I was super pleased. I even had one coral produce polyps, since I had never seen them before so I was excited about that as well.
Since im running things at about 1/3 capacity I havent run into any burn, but this is week one, so I will update yall if something crazy happens. Overall the lights arent as bright looking as a MH system would be, this is where alot of people get impatient, and turn them up. They think that the lights arent bright enough, when in fact they are more than enough. But once I got past that, I prefered it, it lets the landscape of your tank take on a more "Organic" look.
For those who are still on the fence, I would deffinatly insist you at least use these as suplimental lighting. You dont have to get rid of your MH lights, but this way you can have the best of both worlds. Since the LED debate is still unfinished, obviously it is soemthing that needs to be watched closely. But truth is, if they were garbage for growing corals...people would be sure to let everyone know.
Hope yall enjoyed this project. I really am sorry I have such garbage for a camera. Its not fair to the people who want to try to at least get a taste of what these lights do.
 

king_neptune

Active Member
They've been up for a little over a week now. 10days time.
Ive seen no negative effects.
The only difference is the polyp's on half my corals have grown.
I now see polyps on corals I didn't know had polyps.
I haven't encountered the legendary "Burn" that is often associated with inital use of LED's.
I attribute this to the array only running at about 350ma, vs the 750 I plan to eventually up it to.
(they can go to 1000ma...but I dont want to stress the LED's).
So far everything seems really happy. The color looks so much better vs MH, its just instantly noticeable.
Under MH things look pale by comparison.
However, the long term effects I cant say.
Since LED's don't produce UV light, nobody really knows what will be long term. Ive talked ot some people who claim the color of corals slightly fades over time. Ill be the judge. A simple way around this is a cheap T5 track running along the length of the array. I can fill in the gaps in light spectrum that way.
 

king_neptune

Active Member
Originally Posted by 2Quills
http:///forum/post/3295815
The blue seems really instense...does it really look like that in person?
Even more so. Picture a blacklight in a room. They are a 460nm wave length, just like the blue LED's.
On my next build Ill do a 60/40-B/W ratio. The blue is so amazingly pretty. Its the main thing that draws out the color.
I feel that a slight increase to blue will enhance it all even further.
 
Top