415 Gallon Plywood Tank Build

snakeblitz33

Well-Known Member
Scrubber screen only has to dip down in the water 1/2" to keep it from splashing too much. Whatever part of the screen is underwater will not grow hair algae...
 

1snapple

Active Member
I did notice those on rapidled.com Shawn.
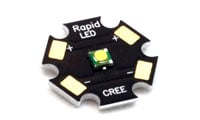
Apparently the XTs run 20% more efficient than the XP series. They run exactly the same, almost identical actually, just 20% more efficient. Not entirely sure on the UV though. Would it be a violet color or just UV? I need more info on them.
 

acrylic51

Active Member
Yeah I did notice the specs were identical on the XT's.....I too thought the same thing about needing more info on the violets, I was going to try to compare them to the stunners UV.
 

2quills

Well-Known Member
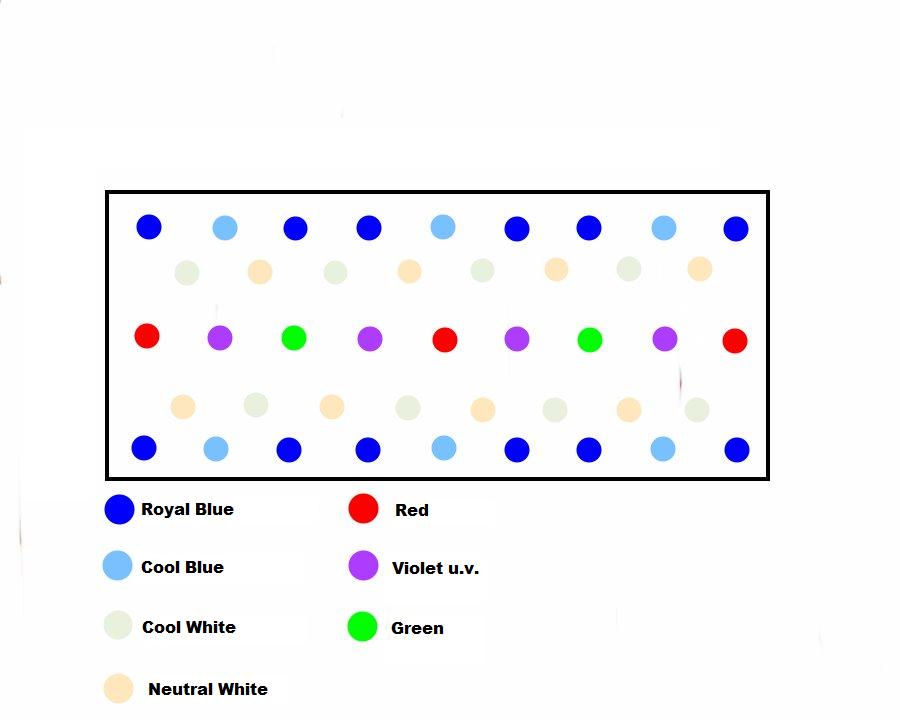
Speaking of leds. Here's the layout that I was talking about Shawn. I've got it figured at 43 leds per heatsink. The grouping will probably be a little tighter width wise once I actually start building it.
5 Separate Channels
Blues (80 degree optics)
Whites (80 degree optics)
Red
Green no optics
Violet


2quills

Well-Known Member
Yep, those will work. I don't have anything definite yet, but the leds for my display will probably come from a couple of different sources.
 

2quills

Well-Known Member
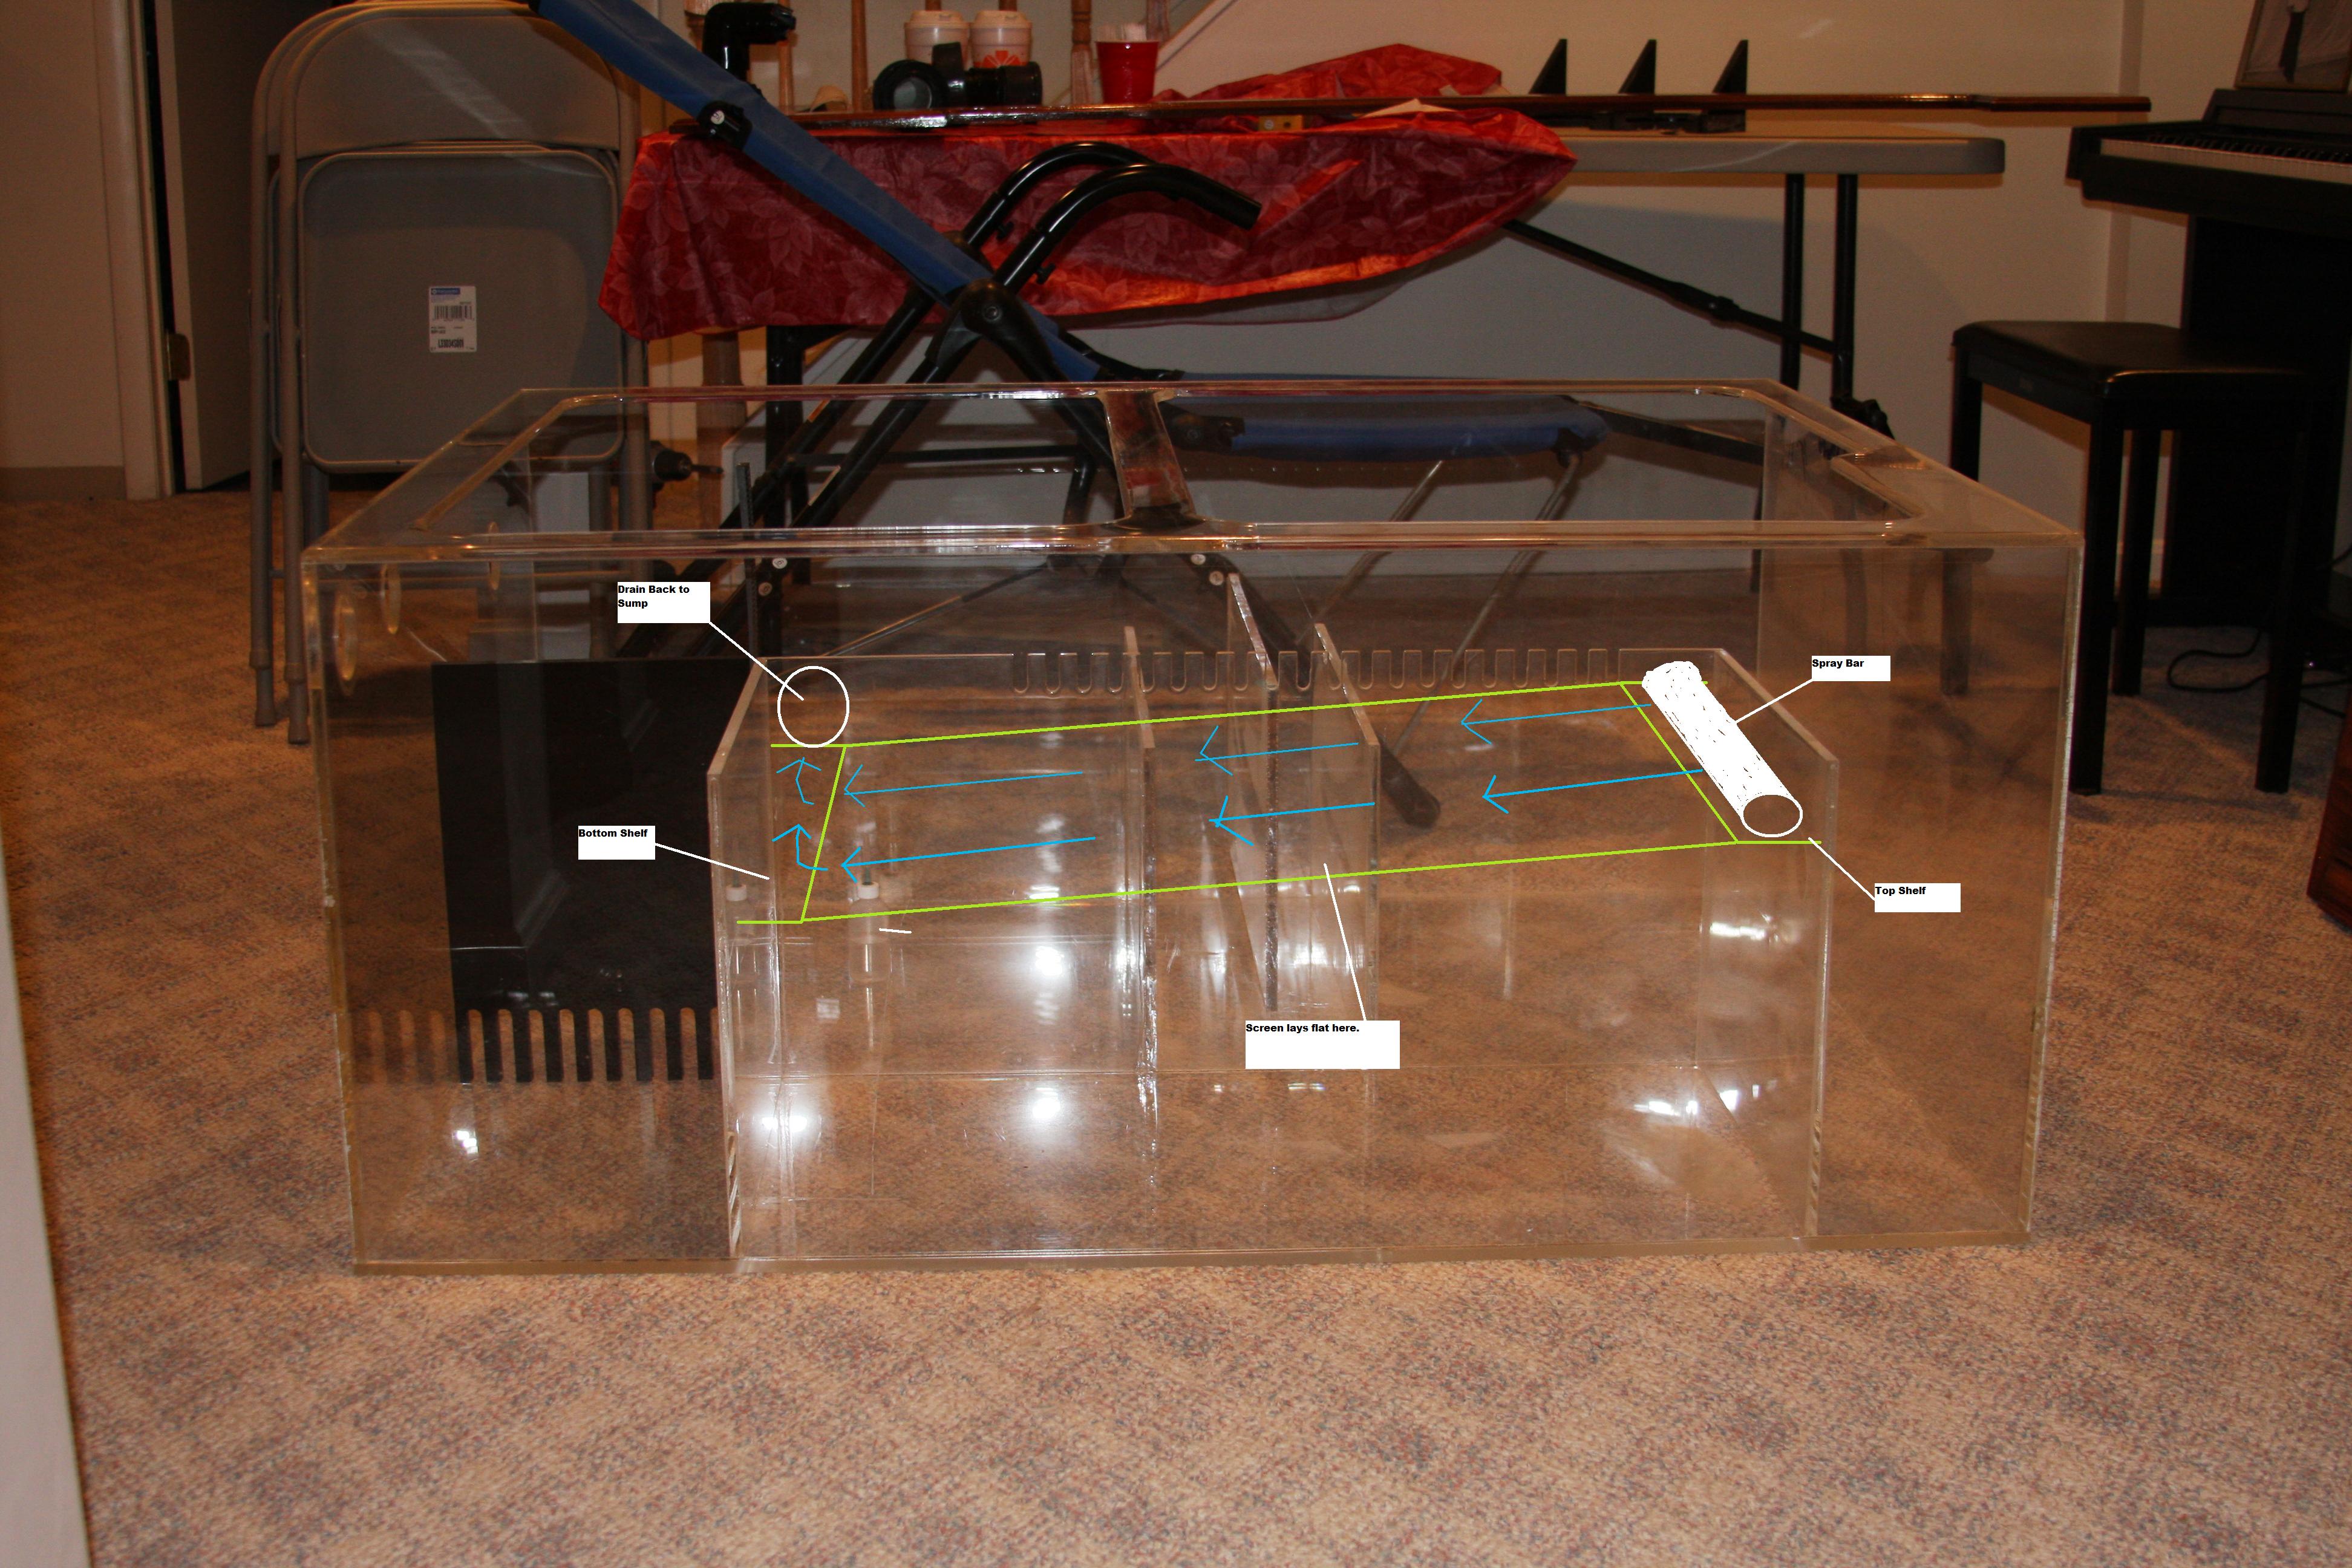
Not a fine tuned design/sketch but I think you'll get the general idea. Might have to blow it up to see it. You have a 30"x19" foot print to work with. Something like a 16"x26" screen would give you 416 square inches. Lit from above with some strong lighting and it might work. Only down side I see is the short pitch to the angle but shouldn't be a big issue if you can control the velocity/volume of flow across the screen.

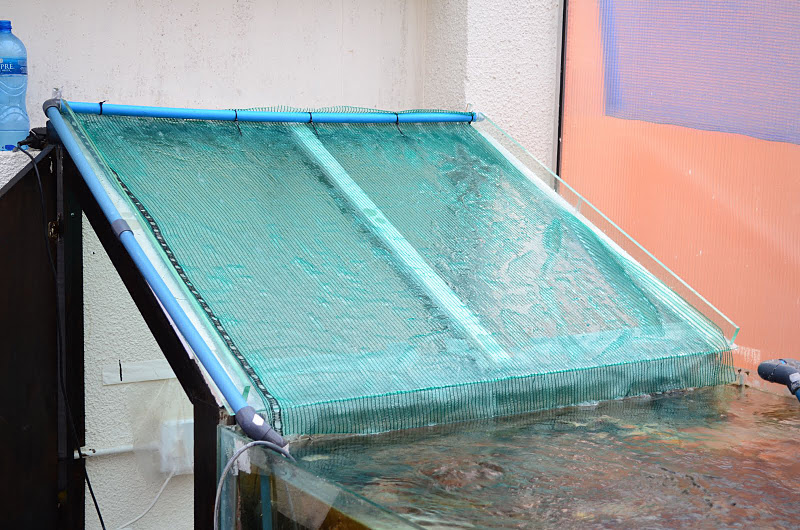
Similar design but larger in scale...

Or similar to Seth's first attempt. :p Seth what were the cons of this style of design in your opinion?
 

acrylic51

Active Member
Looks good Corey, Thank you.....Gonna have to really look at it and see how we an incorporate it into the sump.....What's your take Seth or anyone else.....
 

desertdawg

Member
I guess I'm behind the times, I thought the most efficant design was vertical, lit on bith sides and that sloped scrubbers were medicore.
But I;ve also seen just about every design work to some extent, If these sloped ones are worthy it will help me out cause I've been trying to retink my sump and scrubber...
 

acrylic51

Active Member
Something Corey had been working on..., waiting for some input from Snake. I'm not overly concerned with it running at full potentia. The skimmer choice is more than adequate for the job, just want to try both together!!!!!
 

acrylic51

Active Member
A little progress made......Finished up the sump project, but still debating whether to cut the first (front) baffle down to 6" to accomodate an internal skimmer. The sump was built with another skimmer in mind, but over time things change, and new skimmer has a different water height. I can/could easily build a stand for the skimmer to sit on, but raising the skimmer that far would make it impossible to remove the collection cup. So I'll have to decide whether to whack the baffles down or run the external Reef Octopus skimmer.....Opinions........Thoughts!!!!

Finally got the black acrylic sheet cut down and laminated on the bottom of the tank.....Still have to pull the masking off the other half. I cut the sheet in half to make installing it easier instead of trying to handle a big, flimsy sheet, and working with WeldOn 40 it gets sticky rather quickly......
Also had been debating about flow and decided to make the impeller swap from the Snapper to the Dart before the water test. I will have to do some modification to the plumbing, because I want to add a feed line it to run my reactors to eliminate the need for a separate pump for the dual reactors, and if I opt to forgo the scrubber and stick to my original fuge setup will need a feed line as well for the fuge.
Hopefully tomorrow I can get some pics uploaded, between painting the bedroom for my wife.....
 

snakeblitz33

Well-Known Member
Quote:
Originally Posted by 2Quills http:///t/376802/415-gallon-plywood-tank-build/1320#post_3447598
Corey, In your design, I would recommend to slope the screen the other way, from left to right. Then, I would cut the hole in the middle or underneath the end of the screen, so that when water rises when the pump is turned on, it doesn't submerge the screen at the end. By sloping it the other way, it lets it have a longer run to eliminate microbubbles and it lets water flow through the rest of the chamber through some live rock or other media.
Or similar to Seth's first attempt. :p Seth what were the cons of this style of design in your opinion?

The return pump baffle chamber that keeps the water level high in the scrubber section (the middle baffle) was way too high. I thought that I would put the end of the scrubber screen level with the water, but I didn't account for the water level rising a little once the return pump was turned on and a quarter of the screen was constantly submerged. So, that wouldn't have worked well. If the water was allowed to drop off of the screen into the water, it would have worked much better. Another problem I incurred was that it was difficult to attach the screen to anything to get even water flow across it. I'm sure one of you could figure something out but I got impatient. I'll return to this design one day and perfect it, but I didn't have time to do it since my tank was running on just powerheads at the time I re-built this sump!
Quote:
Originally Posted by acrylic51 http:///t/376802/415-gallon-plywood-tank-build/1320#post_3447616
What's your take Seth or anyone else.....
Quote:
Originally Posted by acrylic51
http:///t/376802/415-gallon-plywood-tank-build/1320#post_3447804
waiting for some input from Snake.
lol, wow you are patient! Thank you for waiting... I didn't know my opinion was valued so much. lol
I personally think that a horizontal algae scrubber would be pretty awesome, especially in those dimensions. You will have to cut a piece of acrylic out the same size as the scrubber to keep water from splashing over the sides. It's also better to not glue in the acrylic, and have it fully removable so that you can add or take away live rock, sand and anything else you want to keep under the screen. The only real problem that I had with it was that water was not allowed to completely run off the bottom of the screen. If it did, I probably would have used that design. Keep in mind that you have to have 2x the flow and 4x the amount of light for it to work to it's full potential. I would really like to see a horizontal scrubber on your tank. Of course, you know it won't be big enough to handle the entire bioload of the tank, but you're not really concerned about that.
1. design it where the water will fully run off the screen.
2. Attach the screen to the pipe or something somehow to keep the screen from sliding off the acrylic.
3. 2x the flow and 4x the light and it should grow perfectly.
4. The screen in Corey's design needs to slope from left to right, and the hole drilled needs to be in the middle or preferably under the end of the screen to let water drain completely off the bottom of the screen.
I hope this gave you some good ideas. If I can find the original pic of that sump, I'll draw you up a little diagram like Corey did. :D
 

acrylic51

Active Member
Thanks!!!!! Corey always sends me over to the scrubber site.....Just so much info and ideas over there floating around I get lost and side tracked. Anyways, what you had mentioned about the scrubber being submerged somewhat.....After looking thinking I had thought the same thing and wondered how that would affect the operation or productivity of the unit.
 

snakeblitz33

Well-Known Member
Yeah, I like the scrubber site too. But like you said, it's a ton of information. I would also definitely make the scrubber slope the other way so you can get more filtration out of live rock in that chamber.
 

snakeblitz33

Well-Known Member
I have a good idea of how to attach the screen to the acrylic to keep it in place. I'm at work now, so later I will have to draw you a diagram.
 

acrylic51

Active Member
Quote:
Originally Posted by SnakeBlitz33 http:///t/376802/415-gallon-plywood-tank-build/1320#post_3449334
The return pump baffle chamber that keeps the water level high in the scrubber section (the middle baffle) was way too high. I thought that I would put the end of the scrubber screen level with the water, but I didn't account for the water level rising a little once the return pump was turned on and a quarter of the screen was constantly submerged. So, that wouldn't have worked well. If the water was allowed to drop off of the screen into the water, it would have worked much better. Another problem I incurred was that it was difficult to attach the screen to anything to get even water flow across it. I'm sure one of you could figure something out but I got impatient. I'll return to this design one day and perfect it, but I didn't have time to do it since my tank was running on just powerheads at the time I re-built this sump!
lol, wow you are patient! Thank you for waiting... I didn't know my opinion was valued so much. lol
I personally think that a horizontal algae scrubber would be pretty awesome, especially in those dimensions. You will have to cut a piece of acrylic out the same size as the scrubber to keep water from splashing over the sides. It's also better to not glue in the acrylic, and have it fully removable so that you can add or take away live rock, sand and anything else you want to keep under the screen. The only real problem that I had with it was that water was not allowed to completely run off the bottom of the screen. If it did, I probably would have used that design. Keep in mind that you have to have 2x the flow and 4x the amount of light for it to work to it's full potential. I would really like to see a horizontal scrubber on your tank. Of course, you know it won't be big enough to handle the entire bioload of the tank, but you're not really concerned about that.
1. design it where the water will fully run off the screen.
2. Attach the screen to the pipe or something somehow to keep the screen from sliding off the acrylic.
3. 2x the flow and 4x the light and it should grow perfectly.
4. The screen in Corey's design needs to slope from left to right, and the hole drilled needs to be in the middle or preferably under the end of the screen to let water drain completely off the bottom of the screen.
I hope this gave you some good ideas. If I can find the original pic of that sump, I'll draw you up a little diagram like Corey did. :D
Looking forward to seeing the design.....Waiting patiently!!!!!!!

 

acrylic51

Active Member
Hey what's up buddy.....Have to sneak this in, suppose to be upstairs finishing taping off the room for wall paint tomorrow!!!!!!

Corey what I had in mind was when we had talked and discussed the cross bracing on my sump. What I was inquiring or curious about was or would it be possible to still utilize that space, but actually have (2) separate screens....Meaning basically 1 frame, but 2 separate screens. Basically putting a union in the middle over the cross bracing and starting the screen on the other side of the union.
 

acrylic51

Active Member
Sorry for no updates, but no real progress as of lately......Had other matters I had to attend to.......The wife needed the bedroom painted!!!!!!!

Regardless my buddy from work came over tonight and we started filling the tank ready to give it a good fresh water run.....Still need to tie up some loose ends on the plumbing for the return pump, but got the tank filled far enough, (roughly 3" from the bottom of the overflow), and we got the MP60's installed and fired up......I must say I was rather physched at first with the purchase, but currently my opinion is very mixed....I will be calling EcoMarine on Monday, and complaining.....The 3rd Vortech I removed from the box, which was never opened, the dump cheap metal label was loose from the PH....Again for $800.00 that is poor......I knew the size of the units, which isn't a big concern, I have to say I am in no means pleased with the magnetic ability of the pumps.....IMHO.....for $800 basically I'd give them a D compared to the Tunze magnets......As far as noise I must say they are pleasantly quiet IMHO........I think again for the price they cost, they could be better as far as cords and cabling......As far as flow......I do like, but compared to my (2) Tunze 6100 haphazardly place, I can see minimal improvement........As far as the modes.....Not bad, but I think the little instructional booklet and colors are poor......Overall I'd give them a B- rating so far....Again this isn't a bashing, but was expecting a little more, but I'm sure with a little time and tweaking it'll get better.
I've been going back and forth between the Nutrient Mode and the Tidal and I have to give the Tidal mode a bit more time and see what it produces, but I must say I was quite impressed with the Nutrient Removal Mode.....We actually had the tank rocking 2 1/2" -3" wave rather quickly, so quite impressed.......I have 2 MP60's under the overflow area of the tank, roughly 10"-12" from the bottom of the tank, and again positioning plays a major portion, but even at that depth, they do move a good bit of water......I have the 3rd MP60 on the opposite end of the tank, which I don't have synced with the other 2 MP60's. The 3rd pump runs opposite the others, which creates a nice movement, but I will monitor this weekend and see what how things progress. Hopefully I'll get some time to get some pics and videos posted......There definitely will have to be a lot of work done as far as cable management for these guys........
 

luvmyreef

Active Member
Hurry up and get some water in this thing Shawn!!!
LOL. I can't wait to see how this thing looks when you get done.....
 
Top