DIY 120 reef build......

turningtim

Active Member
I have the stand for the 80 almost done (framing) and I'm hoping to drill some holes in the tank today (Happy NOW!). The 80 is now the priority b/c that will get the 55 out of the way for the 120. I'll take some pics of progress today and post later.......
 

grubsnaek

Active Member
cant wait to seem these come together. are you going to keep track of both tanks on this thread or are you making a new thread for the 80?
 

turningtim

Active Member
grub, I think i'll just stick with this thread. I don't see a reason to start another. You guys seem to be the only ones interested anyway.
I emptied both tanks yesterday (no leaks) b/c the weather is starting to turn here so I need to get a move on! The 80 stand is framed and will get a couple of holes drilled in it today. grub I owe you some pics of the process.
I also want to get the decks done. But who knows kids still on break......
Oh yeah I got some new paint for the backs. Its called "Blue Tang" I couldn't resist!
 

ameno

Active Member
You seem to be moving pretty fast on the stand, When you get yours done will you finish mine for me, At the rate I'm going it could be this time next year before I finish.
 

grubsnaek

Active Member
damn multiple decks plus two stands and poss canopies for them, it all comes in bunches rite. oh i forgot entertaining the kids toooo. were here for ya tim
 

chuckcac

Member
Originally Posted by TurningTim
grub, I think i'll just stick with this thread. I don't see a reason to start another. You guys seem to be the only ones interested anyway.
I emptied both tanks yesterday (no leaks) b/c the weather is starting to turn here so I need to get a move on! The 80 stand is framed and will get a couple of holes drilled in it today. grub I owe you some pics of the process.
I also want to get the decks done. But who knows kids still on break......
Oh yeah I got some new paint for the backs. Its called "Blue Tang" I couldn't resist!
they're not the only ones interested...

nice job on the DIY stuff Tim - i wanted to comment to n the "L" shape stand - rock-on-man - what an awesome idea. I wish i had done something like that with enough room to set up a gravity fed ATO...
i hear ya about not knowing how to finish the stands... i went back n forth to lowes for stain 3 times before i decided i liked the first choice...
 

turningtim

Active Member
Well thanks Chuck!
Here are pics of drilling. I don't know how to place pics and comment in between so ask any questions please!
1. Here are the tools I use but I forgot the duct tape for the pics.
2. Holes are marked out (sharpie) with duct tape on the inside to help with chip out. Also helps with water flying everywhere when you get through the glass. I just peel the tape of and drain the water in a coffee can.
3. Set up with 4" PVC, Plumbers putty and filled half way with water.
Cont......


turningtim

Active Member
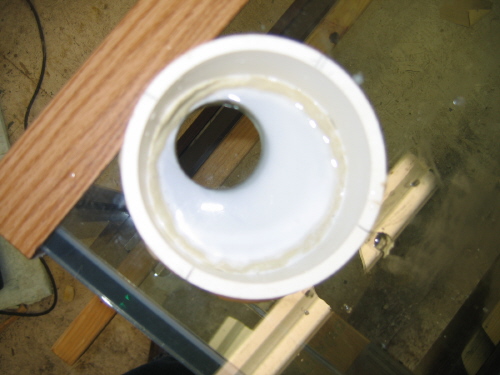
Here is the hole done and the 4 holes done!
A far as procedure: After marking placement
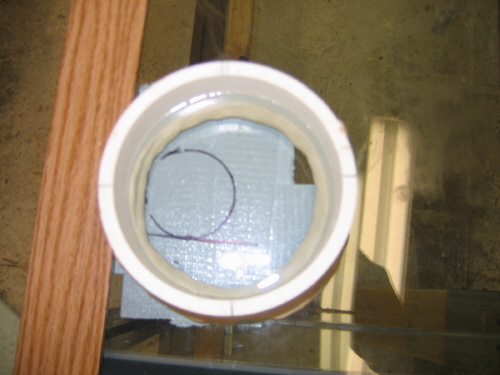
Trace the outline of the 4"pvc on to the glass.
Roll the plumbers putty into a snake (like play-doh) and try and place it on the trace line.
Place the PVC gently on top of the PP and make sure the PP is underneath. Then firmly press down and gush it!
Form the PP around the inside and out to make sure it will hold water.
Fill half way with water. You will still be able to see the sharpie through the water.
Line up the bit with the two square lines made in placement. Start the drill very slow and on a slight angle to get a groove going. When you feel comfortable that you have the bit where you want it and started on line you can increase the speed of the drill and slowly start to move to level.
Once you have a complete circle with the bit you can put the spurs to the drill. No force should be put down on the drill. The weight of the drill is more than enough. Make any movement very slowly b/c you don't want to jam the bit up and crack the glass.
Keep an eye on depth! Slow down when you think you're close to the end. Finish slow and make sure you have cut a complete circle or what remains will chip out and thats no good!
Peel the tape with a container underneath and drain the water. Pull up the pvc, reuse the PP, wipe down and your done!


turningtim

Active Member
Yup!. The 80 will pretty much stay LPS with some softies. The 120 I think will be full blown SPS. I may even have to a add a Korallia (sp?) PH for added flow.
I set on getting the OM 2 way (Thanks to you). I'm between 2 pumps mak4's or pan world px-x100's. Or a combo of both for the 120.
I'm not going to drill a cl in the 80. That will be the first out the door so I'll supplement with some nice PH's. I have a dp900 for return.
 

ameno

Active Member
sounds good, can't wait to see it up and running.
It seems like I will never get mine finished, I did get some of the stand finished this weekend but have a long way to go yet, The water has cycled and if I had lights I could start swapping things over, but don't know when I'll get lights. still got to build a kalk reactor, auto top-off and the closed loop. It's a never ending deal. When it's finished I will have a complete 80 gal. hex that I don't know what I'm gona do with.
 

ameno

Active Member
I was thinking more like finding some sucker to buy the whole set-up. Hex is not a good saltwater tank, 30" deep. I've almost drowned several times trying to get stuff moved on the bottom.
 

turningtim

Active Member
OK heres some glass cutting....
1. Tools I use. I found that the cutter isn't the expensive tool needed. Its the breaker, which if you buy one can run $200-300. So I found a pic of one and made my breaker with a pony clamp and some jigs out of wood.
2. Straight edge clamped on the 1/2" glass. Measure twice etc...
you only get one shot!
3. Line is scored with the cutter, keeping the cutter at 90 degrees with pressure downward onto the glass and guided with the straight edge.
Breaker in place and turn the clamp slowly and watch the break along the score.
4. Two pieces of 1/2" glass. These will be the sides for the 80 gal sump. I missed it by about 1/32" but its square and its just a sump!
Tim
4.


ameno

Active Member
Thanks for showing all the detail on how to work with glass. I'm learning some good pointers here. Don't know if I would ever try it though, glass scares me, breaks to easy. And I do tend to break things. This is gona be a big sump, is it just for the 120g. ?
 

wattsupdoc

Active Member
Awesome Tim. That 55 that I got free, well, it's bottom has been cracked. They say it doesnt leak, but I'm not going to trust it. It's been sitting out by my shed for the last few weeks.Trying to decide what to do with it.I'll probably disassembly it and rebuild. Now that I know how to cut glass!
I'll only need 1 piece of glass, other than for the baffles. And I can make it fit my stand better too!.
You are too cool dude!
 
Top