I have a question for this. So yopu are supposed to scrub the algae off the filter? It's that correct? and how often should I do this?
Originally Posted by
SantaMonica
http:///forum/post/2720369
Part 2 of 8
You might ask why you have not heard of turf algae filters before. Well turf algae is actually used quite a bit in commercial/industrial areas to clean lakes and rivers, but the units that were built for aquariums were just too big (as big as the tank itself) and expensive ($3,000+). So they never caught on. But all they do is move water across a screen, and have a light. So putting the turf in a bucket or your sump works just fine.
The only thing you need to decide is how big your screen needs to be, and if you want it to be in a bucket or your sump. The basic rule is one square inch of screen for each gallon of tank water. A 5 gallon bucket (like a salt bucket) can hold a screen about 12 X 12 inches = 144 square inches = 144 gal tank; a 2 gallon bucket can hold about 7 X 7 inches = 49 gal tank; a one gallon bucket about 6 X 6 = 36 gal tank. Turf filters get really small as you can see. A 12 gal nano tank needs just 3 X 4 inches in a tupperware container! This small thing replaces the skimmer, refugium, phosphate removers, nitrate removers, carbon, filtersocks, and possibly even waterchanges (if the purpose of the waterchanges is to reduce nitrate and phosphate.) If your tank is bigger than a 144, then just start with a 5 gallon bucket size and see how it goes. You can always add a second one, or build a bigger one later.
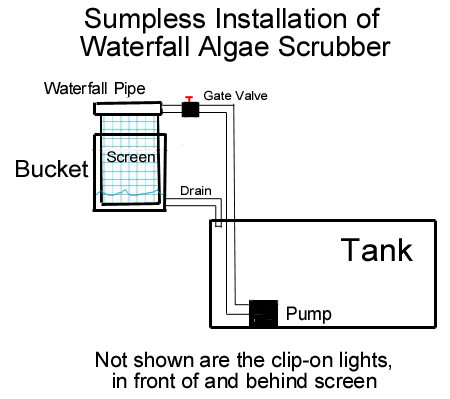
My example bucket version takes about a day to build. Water goes in the pvc pipe at the top, flows down over the screen, then drains out the bottom. That's it! Oh, and it has clip-on lights and a fan. I can feed the tank as much food as I want, and anything not eaten by the corals or fish eventually ends up as turf algae on the screen.
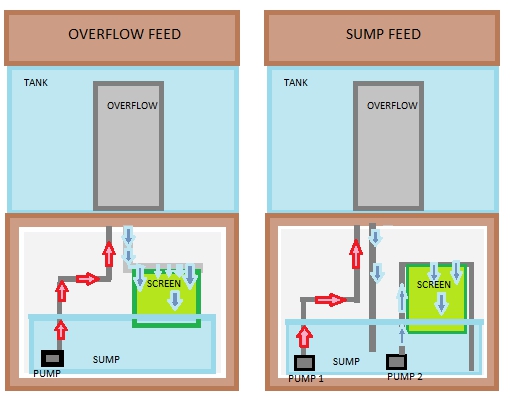
Here are the sump versions (putting turf in the sump was thought of by -- user "biomekanic")...
Good: Takes a few minutes to build:
Better: Takes about three hours to build:
Best: Takes about a day to build:
The advantages of the sump version are:
o No extra space needed.
o Version 1 can be set up in a few minutes.
o Can make use of the wasted space once used by bio balls.
o Is fed directly from the overflow, thus eliminating the pump entirely.
Disadvantages:
o Pods produced by the turf have to flow through your return pump to get you your tank.
o If the top of your sump is closed, it may need to be drilled or cut open for air/light.
Further down, I'll show how to build the bucket version since I made it myself (and have pics), then I'll show you drawings of how you'd do the in-sump versions (since I don't have pics). The bucket version is overall the most powerful, flexible, and even portable. The in-sump version (especially version 1) is easiest to build, but about half as powerful, and a little harder to access once installed. But for now, here's how a turf algae filter (bucket version) compares to other filtering options:
o Will wipe out most algae growth in the display, since nitrate and phosphate will be LOW.
o Allows you to feed very high amounts without causing nuisance algae growth in the tank.
o Will finally allow coralline to grow, since the phosphate will be too low stop it.
o Does not skim out coralline spores like a skimmer does.
o Can replace waterchanges, if the purpose of the waterchange is to reduce nitrate or
phosphate or algae growth.
o Has the highest nitrate and phosphate removing power of any macro algae (because of
the high air and light levels it gets).
o Is very quick to respond to excess nitrate and phosphate spikes (the turf "screen" always
stays the same size after it is trimmed); much quicker than refugiums/macros which have
smaller surface areas after they are trimmed.


