Mega-Powerful Nitrate and Phosphate Remover Replaces Skimmer, Refugium, Everything

santamonica

Member
Thanks, and hope you have a good storm :)
Here's another cool screen just built by someone, designed to be over the sump and drain down into it. He says after he adjusted adjusted the flow, there was no spraying or splattering, just a quiet flow down the screen:
 

fraggle_a

Member
See, its this kinda thing that makes me wana drill my tank!
Ill definatly keep this in mind when I build my kiddie pool / lagoon / shark tank.... :)
Maybe use it in the last stage of the filter system before the return into the ref.
 

santamonica

Member
Part 1 of 2:
Week 1 Screen Growth
Here's some results for the turf bucket that was built for the main (not nano) build thread. Below are the pics of the screen, day by day, for the first seven days. I had sanded both sides of the screen, and then "seeded" the screen by rubbing green algae HARD into it. After water flowed over it, only a couple visible specs remained (the rest are invisible spores) that grew a little by the Day 2 pic. It should be noted that this new bucket is working side-by-side on the same tank that my original test bucket is on:

This means that the new screen is sharing nutrients and competing directly against my established screen that I got pre-grown from IA over a month ago. Also, N and P were already zero, so nutrients were hard to come by. So this new screen had little to grow on, unlike the nano. Nevertheless, these pics show the growth progress you MIGHT expect if you decide to grow your own screen from scratch:
Day 2; the specs from seeding are visible:

Hi Res: http://www.radio-media.com/fish/ScreenBuildDay2.jpg
Day 3:

Hi Res: http://www.radio-media.com/fish/ScreenBuildDay3.jpg
Day 4; Brown diatoms have coated the screen:

Hi Res: http://www.radio-media.com/fish/ScreenBuildDay4.jpg
Day 5: Green hair algae specs are starting to lengthen:

Hi Res: http://www.radio-media.com/fish/ScreenBuildDay5.jpg
Day 6:

Hi Res: http://www.radio-media.com/fish/ScreenBuildDay6.jpg
Day 7: Some green hair is over two inches long:

Hi Res: http://www.radio-media.com/fish/ScreenBuildDay7.jpg
Day 7 Closeup; Some brown spots are lengthening, and some green hair is flowing past the bottom; And although it's hard to see, most of the holes are still open:

Hi Res: http://www.radio-media.com/fish/Scre...ay7closeup.jpg
 

santamonica

Member
Part 2 of 2:
Day 8:

Hi Res: http://www.radio-media.com/fish/ScreenBuildDay8.jpg
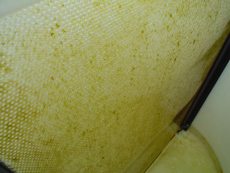
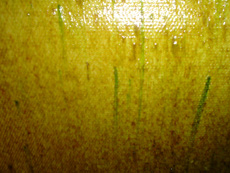
Day 9; Some brown spots are getting thick, and some green areas are starting to cover up other areas. Almost all holes are grown over; time to clean!

Hi Res: http://www.radio-media.com/fish/ScreenBuildDay9.jpg
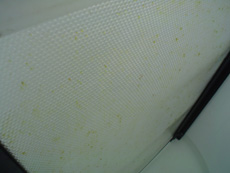
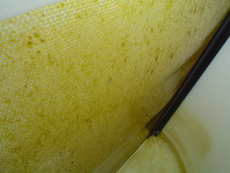
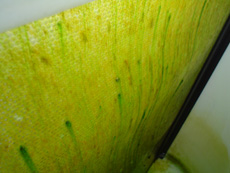
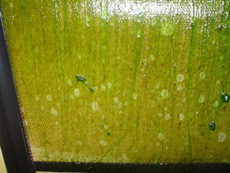
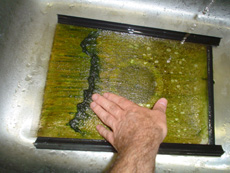
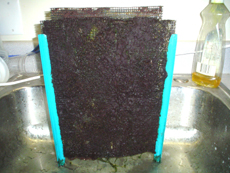
Day 9 Screen Removed; Note the light colored spots on the bottom half. These are probably copepods eating the algae, since I did not clean and freshwater-rinse in over a week:

Hi Res: http://www.radio-media.com/fish/ScreenBuildDay9out.jpg
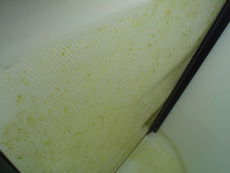
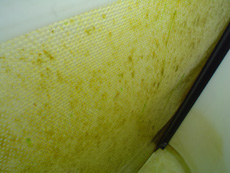
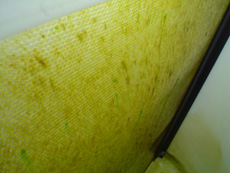
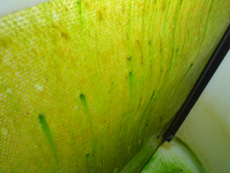
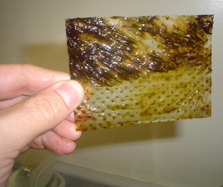
Day 9 Closeup of Spots:

Hi Res: http://www.radio-media.com/fish/Scre...dDay9spots.jpg
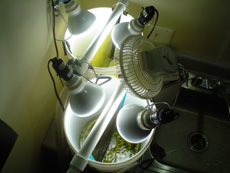
Day 9 Removing the green algae by hand first (used toothbruth second):

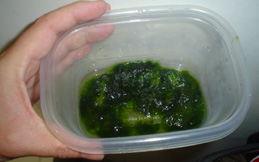
Day 9 Harvest of first week; Remember that this screen is getting what nutrients are leftover from my other screen:

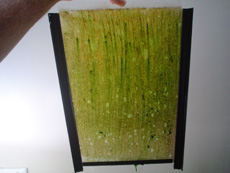
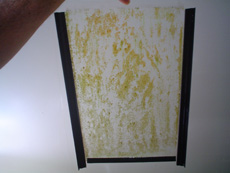
Day 9 After Cleaning; Note I cleaned both sides, which you only do the first cleaning (thereafter you only clean one side at a time):

Hi Res: http://www.radio-media.com/fish/Scre...dDay9after.jpg
So that takes us through the first cleaning cycle of a new screen. Was surprised to see the light spots on the screen since I never saw any on my established screen, but then this new screen is so thin right now that any spots become easily visible. You should not go more than a week between cleaning and a freshwater rinse (freshwater will kill the pods) like I just did; I just wanted to get a decent amount of algae to harvest so you would be able to see it.
Interesting that all the spots are on the lower half of the screen, which in my bucket is the part that stays underwater more often, since the bucket fills partially as the pump runs. (It shouldn't do this, but I have not connected a ball valve to the pump yet, so I can't slow it down). So apparently, the copepods can't survive well when the water flows away, leaving just air. This is a good reason to not submerge your screen, and also to consider having a timer on the pump to let the screen dry out for 30 or 60 seconds between "waves".
On the cleaning, note that I took off all the green, but left the brown. You always want to do this, in order to prepare the screen for developing real red/brown turf later.
Note on "Day 9 Screen Removed", that there is a bit more coverage on the right than on the left. That's because most of the flow has been going on the right side. But as you can see it does not change the coverage that much.
 

t-bone

Member
Great thread. I have a filter with 2 bio-wheels. They seem like perfect candidate to be turned into turf screens. They rotate in and out of water for surf motion and are easy to remove for cleaning. Also the shape give plenty of surface area. The only thing missing is a light and fan on the wheel.
Am I missing something in my assumptions there, it seems way to easy.
 

santamonica

Member
I have not tried it, but you may as well. Just use a very bright light almost touching the wheels, and take lots of pics.
 

t-bone

Member
I guess the big problem there could be putting that bright light so close to the DT(since light would be on hang on filter). bucket and sum concepts keep light/algae away from DT. How paranoid about blacking out the area do I need to be, to keep from creating an algae bloom in that corner of the tank?
 

santamonica

Member
Just use a clip on light like in my pics, and aim it down and away from the display. And especially for your first test, it's not that important if a little grows in there. If you like the results then do up a more precise setup.
 

santamonica

Member
Here's a neat screen that someone just built. Since there was no vertical room in his sump area, he asked about horizontal options and I showed him the commercial floating turf screens. He made one out of floating material:
 

michael1972

Member
so can i hang a few screens by my back door and let the sun light hit them as the water runs down them.

No i am only joking but i would if i could.
Thank you for putting out the info
I would like to see pic of your other screen.
Thank you
 

santamonica

Member
Other screen(s)? Well, here is the main pre-grown screen from IA that filters my 90:

And here is the screen I built for this thread, also now on my 90, at the end of it's first week:

And here is my test 5gal nano screen after about it's first week, and it's first cleaning:
 

guyerson

Member
This is a very interesting concept, thanks for making this info available to the boards! I've read over this a few times now and I think I am at a good understanding of the concept.
Quick question: If I wanted to create a bucket system and keep it underneath my tank, what would be the easiest way to plumb it from my sump into the bucket and back? Would I have to elevate the bucket?
 

stdreb27

Active Member
hmm, I'm smelling acrylic sump with about 4 inches gap between the bottom of the screen and the bottom of the sump, then putting several slots to put several screens in the future...
 

santamonica

Member
Guyerson: Glad you like the concept. If you want to know more in-depth, the technical post on -- covers it in detail. As for you your sump area, one way is to elevate it above the sump so thta it drains into the sump. You can get water to the bucket either by T-ing off the overflow pipe and adding a valve which flows to the waterfall pipe, or, by putting a pump in the sump which goes to the waterfall pipe. Or you can just not use a bucket at all, like the pic further up on this page. Regardless, here's a reminder: Very strong light is most important.
stdreb27: Yes that'll work as long as the screen stays above the sump waterline when it's running.
knight: I have not studied mangroves, but my reading has found turf to be more efficient per unit space, and more efficient overall, of any algae export for aquariums. Same concept, though.
 

santamonica

Member
Here the first pre-grown installation I've seen (except for mine)... jski711 on another board said: "I can't believe how well this DIY thing worked. It literally took all of 45 minutes once I had the materials. And I have noticed my pH raise up about .15 in a few hours since installing it."
 
W

winm70

Guest
Now I find this info, yesterday I just finished converting a 55g tank into a fugi/sump/skimmer for my 125g build. I like this and think I'll convert the wet/dry system that came with the 125 for this and figure a way to plumb it in to get full benefit from this also.
 

santamonica

Member
Just slap together a screen and hang it over your sump. If no room, use a bucket. This way you don't need surgery on your wet/dry area yet. And you probably haven't stocked your fuge yet, and your skimmer hasn't run for that long, so you can postpone these things and let your screen kick-in faster. It will be operational in a week.
 

bang guy

Moderator
Originally Posted by 1knight164
http:///forum/post/2731489
Is this comparable or better than mangroves? Same concept?

My experience with Mangroves is that even using 2 dozen plants under MH doesn't export a lot of nutrients.
Comparison wise, in the exact same amount of space with the same lighting Xenia exported 500% more nutrients in the two tests I performed.
I have nothing yet to compare to the algae scrubber.
 
Top