Photography School
- Thread starter southern wolf
- Start date
southern wolf
Member
The only other option is to physically back up a bit and utilize the zoom. What's happening is you're too close for it to focus.
geoj
Active Member
Ok so I can only zoom in or out so much before the camera can't focus on the subject. I would guess, then I need to just take a wider shot that was in focuses then crop it and zoom in with Adobe Photoshop? :%%:
Sound like you are saying this is the camera and not me :laughing: and that does make me feel good as someone with very little photography background. Would you think going from a Nikon Coolpix S220 with 3x zoom AF 10meg, too the Canon PowerShot SX260 HS with 20x zoom AF/MF 12.1meg get me closer to my goal of shooting in tank macros of my corals?
Sound like you are saying this is the camera and not me :laughing: and that does make me feel good as someone with very little photography background. Would you think going from a Nikon Coolpix S220 with 3x zoom AF 10meg, too the Canon PowerShot SX260 HS with 20x zoom AF/MF 12.1meg get me closer to my goal of shooting in tank macros of my corals?
snakeblitz33
Well-Known Member
It might sound cheesy coming from a written word,... but...
I would just like to say, Kevin, that you have really become an asset to the forum and I appreciate all of the help and advice that you are giving us. Thank you for being here and being a part of the community.
I would just like to say, Kevin, that you have really become an asset to the forum and I appreciate all of the help and advice that you are giving us. Thank you for being here and being a part of the community.
southern wolf
Member
Quote:
Originally Posted by GeoJ http:///t/391680/photography-school/40#post_3475362
Ok so I can only zoom in or out so much before the camera can't focus on the subject. I would guess, then I need to just take a wider shot that was in focuses then crop it and zoom in with Adobe Photoshop?

Sound like you are saying this is the camera and not me
 and that does make me feel good as someone with very little photography background. Would you think going from a Nikon Coolpix S220 with 3x zoom AF 10meg, too the Canon PowerShot SX260 HS with 20x zoom AF/MF 12.1meg get me closer to my goal of shooting in tank macros of my corals?
When I had my POS Kodak it wouldn't do macro to save it's life. I ended up having to back up from my subject and utilize the zoom. Then like you said... if I wanted it any closer I had to crop. There is however a drawback to cropping. You'll never get as nice a shot as someone who can get the same shot in camera.
When you crop something to bring it closer you're relying on the computer to interpret the pixels. Whereas if you are able to do it all in camera there is no interpretation... its all right there as you're seeing it. Basically this means that you get much better details in the finished product being able to capture it via the camera vs. having to crop to get they size you want.
I don't know anything about the Canon that you're referring to, but just by the characteristics you posted... it's a better camera than what you have. Best advise is to go to somewhere they have one on display and mess around with it. See what the macro function can do.
Originally Posted by GeoJ http:///t/391680/photography-school/40#post_3475362
Ok so I can only zoom in or out so much before the camera can't focus on the subject. I would guess, then I need to just take a wider shot that was in focuses then crop it and zoom in with Adobe Photoshop?
Sound like you are saying this is the camera and not me
When I had my POS Kodak it wouldn't do macro to save it's life. I ended up having to back up from my subject and utilize the zoom. Then like you said... if I wanted it any closer I had to crop. There is however a drawback to cropping. You'll never get as nice a shot as someone who can get the same shot in camera.
When you crop something to bring it closer you're relying on the computer to interpret the pixels. Whereas if you are able to do it all in camera there is no interpretation... its all right there as you're seeing it. Basically this means that you get much better details in the finished product being able to capture it via the camera vs. having to crop to get they size you want.
I don't know anything about the Canon that you're referring to, but just by the characteristics you posted... it's a better camera than what you have. Best advise is to go to somewhere they have one on display and mess around with it. See what the macro function can do.
southern wolf
Member
Quote:
Originally Posted by SnakeBlitz33 http:///t/391680/photography-school/40#post_3475382
It might sound cheesy coming from a written word,... but...
I would just like to say, Kevin, that you have really become an asset to the forum and I appreciate all of the help and advice that you are giving us. Thank you for being here and being a part of the community.
No problem... it's the least I can do for all the advice and help ya'll have given me on building my first SW tank.
southern wolf
Member
I've got two images I am looking for. They will really drive home the importance of how you set your aperture. Once I find them, I will do the next segment on the Aperture setting and how it relates to your photography. Keep in mind I am having to sort thru around 20,000+ images... so it may take me a day or two.
southern wolf
Member
no prob.... sorry I couldn't help you more. That is one of the reasons I finally broke down and bit the bullet and bought my first DSLR. Got tired of my digital not being able to do what my SLR could.
geoj
Active Member
You've been a big help, there is nothing like hearing it from someone that's has been there and done it. I have gone out an played with two or three point and shoot cameras and I see what your saying, It is hard to make them focuses. I would rather wait and spend a little more then buy a camera and it not do what I want. So we will see...
southern wolf
Member
When you're playing with those cameras... make sure it's in macro mode. Most point and shoot cameras you have to set it to macro... then while it's set to macro it wont focus to infinity.
southern wolf
Member
I am still looking for those images, and now I’m fearing that I deleted them. So while I look I’ll discuss a little bit more about ISO.
There is a couple of main things you need to know about ISO. Light and noise.
When it comes to the amount of noise at higher ISO… you have to take into consideration the camera. Point and shoot cameras will have a LOT more noise than higher end DSLR’s. Some of the high end DSLR’s from Nikon and Canon can achieve amazing levels of ISO without and noticeable noise.
Some may be asking… well what exactly is noise? Remember back in the old film days when the photo looked grainy. That was noise. Now in the digital days it looks similar to pixilation.
Most shots can be achieved just fine with an ISO of 400 or less. Occasionally I bump my ISO up to around 800 if I am shooting in a low light situation. Keep in mind my DSLR will handle noise differently than a point and shoot camera. I honestly don’t know what the outcome of ISO 800 would be on a point and shoot.
In comparison… I dream of having a Nikon D3X ($8,000 just for the body) and it can handle up to an ISO of 1600 with no noise and tops out at ISO 6400. I can’t even imagine shooting at ISO 6400.
Now some may be asking… why do you even need those high ISO settings? That leads me to the other characteristic of ISO. The higher the ISO the more light that gets let into the sensor (digital) or film (old cameras).
This really comes into play when you’re shooting sports or animals. Anything that you need a fast shutter speed on. It also comes into play in really low light situations (like photographing indoors without a flash (think wedding photography)
If you’ll remember the first analogy I used
ISO, Shutter Speed, and Apature are all related. The primary factor in photography is light.
So lets look at it this way......for this analogy we will fill a glass with water.
light = water
Apature = how much a water faucet is opened
Shutter Speed = how long the faucet is opened
ISO = a filter on the faucet to remove impurities
Let’s say that you’re shooting in a low light situation (indoors) and you’re shooting animals (moving fish). There are two ways to get enough light onto the sensor to produce the correct exposure for your image. You can either raise your ISO (depending on what it is set to) or you can use a flash.
There is drawbacks with using a flash for photographing something thru glass. We have all dealt with the annoying flash reflection in the glass that just ruined the shot. Another drawback is the flash may be too powerful and wash out the scene or give inaccurate colors.
/p>
This is where increasing the ISO comes into play. If your camera will allow you to increase it, then you increase the amount of light hitting the sensor. The more light you have hitting the sensor the greater your options are for setting your shutter speed and aperture to achieve the desired photo. With more light and you crank your shutter speed to freeze all movements of what you’re photographing.
In conclusion… the higher the ISO the more light that hits the sensor. HOWEVER the higher the ISO the more noise you introduce into the image. So you have to play around with your camera and see how high you can go before the images become unusable.
As always… if you have any questions… please feel free to ask them. If you don’t want to ask them here then PM me and I’ll be happy to respond.

southern wolf
Member
Ok... I couldn't find the images that I wanted to use to discuss aperture so I have to go to plan B.
I am using different photos but it should show you enough to explain what I am trying to get across.
Aperture controls two things in your photos. It is one of the settings that controls the amount of light that hits the sensor, but more importantly it controls your depth-of-field (DOF). Your DOF dictates how much of the image is in focus. In photography there is only one real true plane of focus. Anything in that plane is in razor sharp focus and everything out of that plane is either a complete blur or in decent focus. This of course depends on your DOF.
So what is this plane that I am talking about? For sake of this discussion lets say you're photographing something that is 2 foot away from you. IF you set your focus to razor sharp at 2 foot then everything exactly two foot away from you will be in razor sharp focus. However area's before the two foot mark and areas after the two foot mark will have less focus depending on your aperture setting.
Now time for the technical info on aperture.
Aperture is denoted in f stops. When written you'll see it denoted like f/4, f/5.6, etc.
The lower the number f/2.8 the more light that will hit the sensor. This is because the opening in the lens is larger. So the smaller the number the bigger the opening in the lens to let light thru.
And in reverse... the higher the number (f/32) the less light that hits the sensor. Now the opening is much smaller in the lens.
Now you can see why you have to change your shutter speed in correlation to your aperture setting. If your aperture is set at f/4 then you're letting in a lot more light and you need a faster shutter speed than if you were at f/32 and using a slow shutter speed.
With me so far?
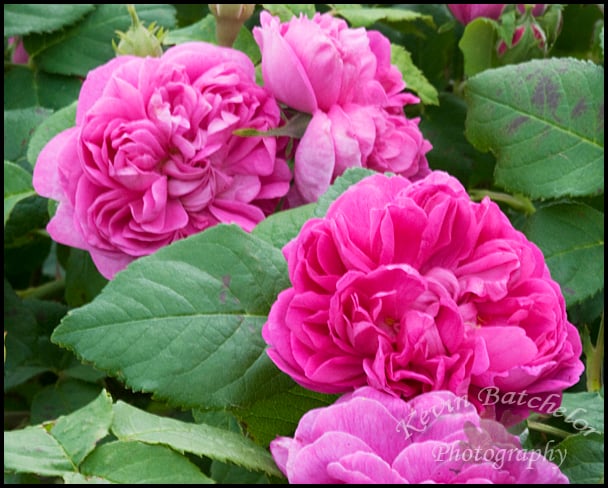
Lets talk about how those settings influence the DOF of your image. First I am going to start off with images I took at the Memphis Botanic Gardens.
In this image I wanted to get the ladybug in focus but have a nice blurred out background. To achieve that I had to have a lower f/stop. This is sometimes also refereed to as 'opening up the lens'. This is because at the lower numbers you have a larger hole for light to go thru.

In the above image I had the following settings. Shutter 1/160, aperture f/3.2, ISO 400
As you an see... the background is pretty well blurred thus focusing your attention on the ladybug. The reason for this is the f/3.2 aperture. The way I like to think about it is this. The larger the hole in the aperture, the more light that gets in. The more light that gets in... the less focused the light. Now all you have to remember is that larger holes = smaller numbers.
Now going back to the image above. The ladybug is in good focus but the rose bud to the left is not. It would have been an even better image if that rosebud was in focus. The only way to achieve that is to change your DOF. IF I would have 'stopped the lens down' a bit (larger f/stop number} then I could have gotten both the ladybug and rosebud in focus. This is because you're creating a smaller hole in the lens and thus focusing the light a little better which creates a deeper DOF.
Here is another image where I wanted a blurred background.
In this image I had the following settings: Shutter 1/1250, Aperture f/4, ISO 400
Now you may be asking... why did I go from shutter 1/160 to 1/1250 when I barely moved the f/stop setting. The simple answer is.... sunshine. More light was getting to the sensor so I had to change the settings accordingly. In this case.. I knew what I wanted the DOF to be so I had to change the shutter to compensate so I could get the correct exposure.
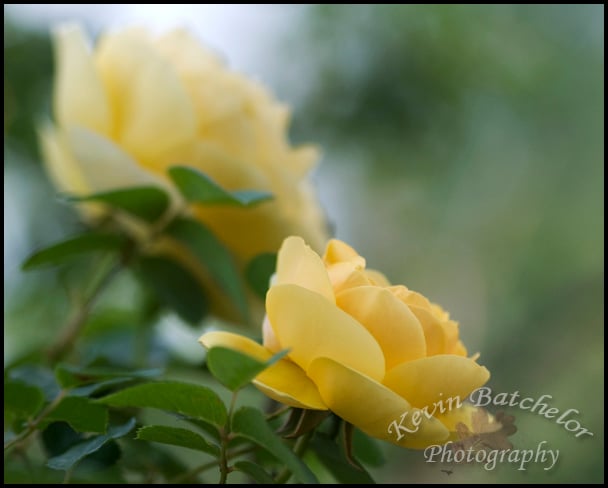
In the yellow rose image you'll notice that the front rose is in good focus and there is some focus to the back rose. It is blurred, but it's not just a yellow blob. There is a little bit of definition. Then of course the background shows no details at all. This puts the roses front and center in the image and there is no distractions behind them.
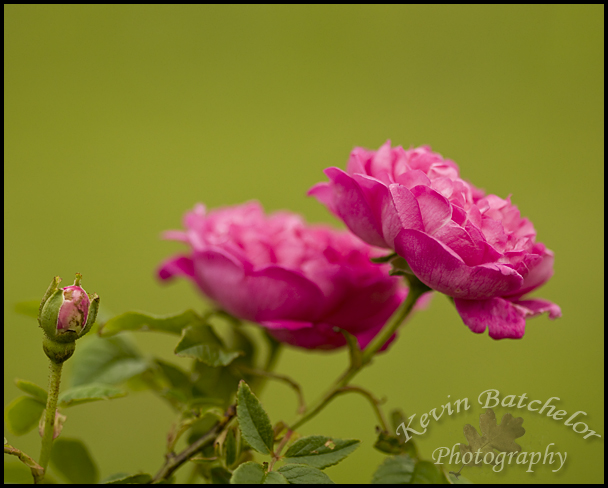
Now I'd like to take the blurred background to the extreme. Both of the following images were shot in my gardens. The background to the images is the grass in the yard... and in the case of the second photo, the grass and the woods. Both images were shot with an aperture of f/2.8
Now lets head the other direction. Let's say you want a LOT of the image in focus. To do this you have to stop down your lens (larger f/stop numbers). By stopping down your lens you create a smaller hole in the lens and thus gives you a more focused light pattern. (kinda like comparing a flood light to a spot light).
This image is of the flowers on my plum tree in April.
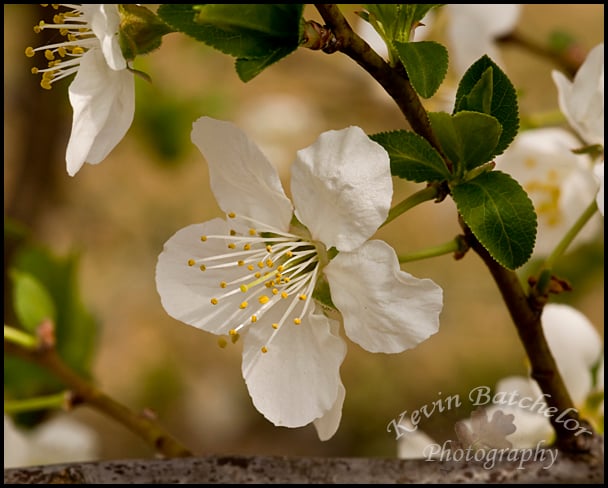
My goal was to get the closest two flowers in really good focus and then to have the ones in the background recognizable. In order to ensure I got the closest two in focus I stopped down my lens pretty good. The settings for this image are shutter 1/125, aperture f/16, ISO 400
The outcome was exactly what I was after.
Now if you'll recall the yellow rose image above. The front flower was in focus, but the one in the back was not. That is because I was shooting with an Aperture of f/4. I solved that problem in the next image.
In this image I wanted ALL the roses in focus. I knew the only way I could achieve that is to really stop down my lens. I took it all they way. The settings on this set of roses is: shutter 1/25, aperture f/32, ISO 400.
You'll notice that I had to slow the shutter WAY down. At 1/25 even a slight breeze would have knocked the image out of focus. It is times like this when you need to be utilizing a tripod. Because I had my lens stopped all the way down (f/32) I was able to get he whole clump of roses in focus. There is however a small trick to it. Focus in the middle area of where you're shooting. This way the area in front of your focus plane will be in focus along with the area behind your focus plane. In this image I most likely focused on the back side of the middle rose and let the DOF do the rest.
If you have any questions, or If I confused you... please ask. I want you to get the best images possible and I'm willing to discuss photography as long as it takes to get you there.
I am using different photos but it should show you enough to explain what I am trying to get across.
Aperture controls two things in your photos. It is one of the settings that controls the amount of light that hits the sensor, but more importantly it controls your depth-of-field (DOF). Your DOF dictates how much of the image is in focus. In photography there is only one real true plane of focus. Anything in that plane is in razor sharp focus and everything out of that plane is either a complete blur or in decent focus. This of course depends on your DOF.
So what is this plane that I am talking about? For sake of this discussion lets say you're photographing something that is 2 foot away from you. IF you set your focus to razor sharp at 2 foot then everything exactly two foot away from you will be in razor sharp focus. However area's before the two foot mark and areas after the two foot mark will have less focus depending on your aperture setting.
Now time for the technical info on aperture.
Aperture is denoted in f stops. When written you'll see it denoted like f/4, f/5.6, etc.
The lower the number f/2.8 the more light that will hit the sensor. This is because the opening in the lens is larger. So the smaller the number the bigger the opening in the lens to let light thru.
And in reverse... the higher the number (f/32) the less light that hits the sensor. Now the opening is much smaller in the lens.
Now you can see why you have to change your shutter speed in correlation to your aperture setting. If your aperture is set at f/4 then you're letting in a lot more light and you need a faster shutter speed than if you were at f/32 and using a slow shutter speed.
With me so far?
Lets talk about how those settings influence the DOF of your image. First I am going to start off with images I took at the Memphis Botanic Gardens.
In this image I wanted to get the ladybug in focus but have a nice blurred out background. To achieve that I had to have a lower f/stop. This is sometimes also refereed to as 'opening up the lens'. This is because at the lower numbers you have a larger hole for light to go thru.
In the above image I had the following settings. Shutter 1/160, aperture f/3.2, ISO 400
As you an see... the background is pretty well blurred thus focusing your attention on the ladybug. The reason for this is the f/3.2 aperture. The way I like to think about it is this. The larger the hole in the aperture, the more light that gets in. The more light that gets in... the less focused the light. Now all you have to remember is that larger holes = smaller numbers.
Now going back to the image above. The ladybug is in good focus but the rose bud to the left is not. It would have been an even better image if that rosebud was in focus. The only way to achieve that is to change your DOF. IF I would have 'stopped the lens down' a bit (larger f/stop number} then I could have gotten both the ladybug and rosebud in focus. This is because you're creating a smaller hole in the lens and thus focusing the light a little better which creates a deeper DOF.
Here is another image where I wanted a blurred background.
In this image I had the following settings: Shutter 1/1250, Aperture f/4, ISO 400
Now you may be asking... why did I go from shutter 1/160 to 1/1250 when I barely moved the f/stop setting. The simple answer is.... sunshine. More light was getting to the sensor so I had to change the settings accordingly. In this case.. I knew what I wanted the DOF to be so I had to change the shutter to compensate so I could get the correct exposure.
In the yellow rose image you'll notice that the front rose is in good focus and there is some focus to the back rose. It is blurred, but it's not just a yellow blob. There is a little bit of definition. Then of course the background shows no details at all. This puts the roses front and center in the image and there is no distractions behind them.
Now I'd like to take the blurred background to the extreme. Both of the following images were shot in my gardens. The background to the images is the grass in the yard... and in the case of the second photo, the grass and the woods. Both images were shot with an aperture of f/2.8
Now lets head the other direction. Let's say you want a LOT of the image in focus. To do this you have to stop down your lens (larger f/stop numbers). By stopping down your lens you create a smaller hole in the lens and thus gives you a more focused light pattern. (kinda like comparing a flood light to a spot light).
This image is of the flowers on my plum tree in April.
My goal was to get the closest two flowers in really good focus and then to have the ones in the background recognizable. In order to ensure I got the closest two in focus I stopped down my lens pretty good. The settings for this image are shutter 1/125, aperture f/16, ISO 400
The outcome was exactly what I was after.
Now if you'll recall the yellow rose image above. The front flower was in focus, but the one in the back was not. That is because I was shooting with an Aperture of f/4. I solved that problem in the next image.
In this image I wanted ALL the roses in focus. I knew the only way I could achieve that is to really stop down my lens. I took it all they way. The settings on this set of roses is: shutter 1/25, aperture f/32, ISO 400.
You'll notice that I had to slow the shutter WAY down. At 1/25 even a slight breeze would have knocked the image out of focus. It is times like this when you need to be utilizing a tripod. Because I had my lens stopped all the way down (f/32) I was able to get he whole clump of roses in focus. There is however a small trick to it. Focus in the middle area of where you're shooting. This way the area in front of your focus plane will be in focus along with the area behind your focus plane. In this image I most likely focused on the back side of the middle rose and let the DOF do the rest.
If you have any questions, or If I confused you... please ask. I want you to get the best images possible and I'm willing to discuss photography as long as it takes to get you there.
sweat90lx
Member
Kevin thanks for the knowledge you are sharing. I also have a Canon
, a Rebel XS. My mom has the next newer one than mine, an XSi maybe.
I took these two pictures last month on our trip to Cumberland Island. Mine was with the 18-55mm lens and with hers the 55-200mm lens. I missed the focus with hers and it got more of the bush in the forground, but maybe it can show what you mean on a beginner level(which I am at). Anyways, hope I contribute to your lessons.
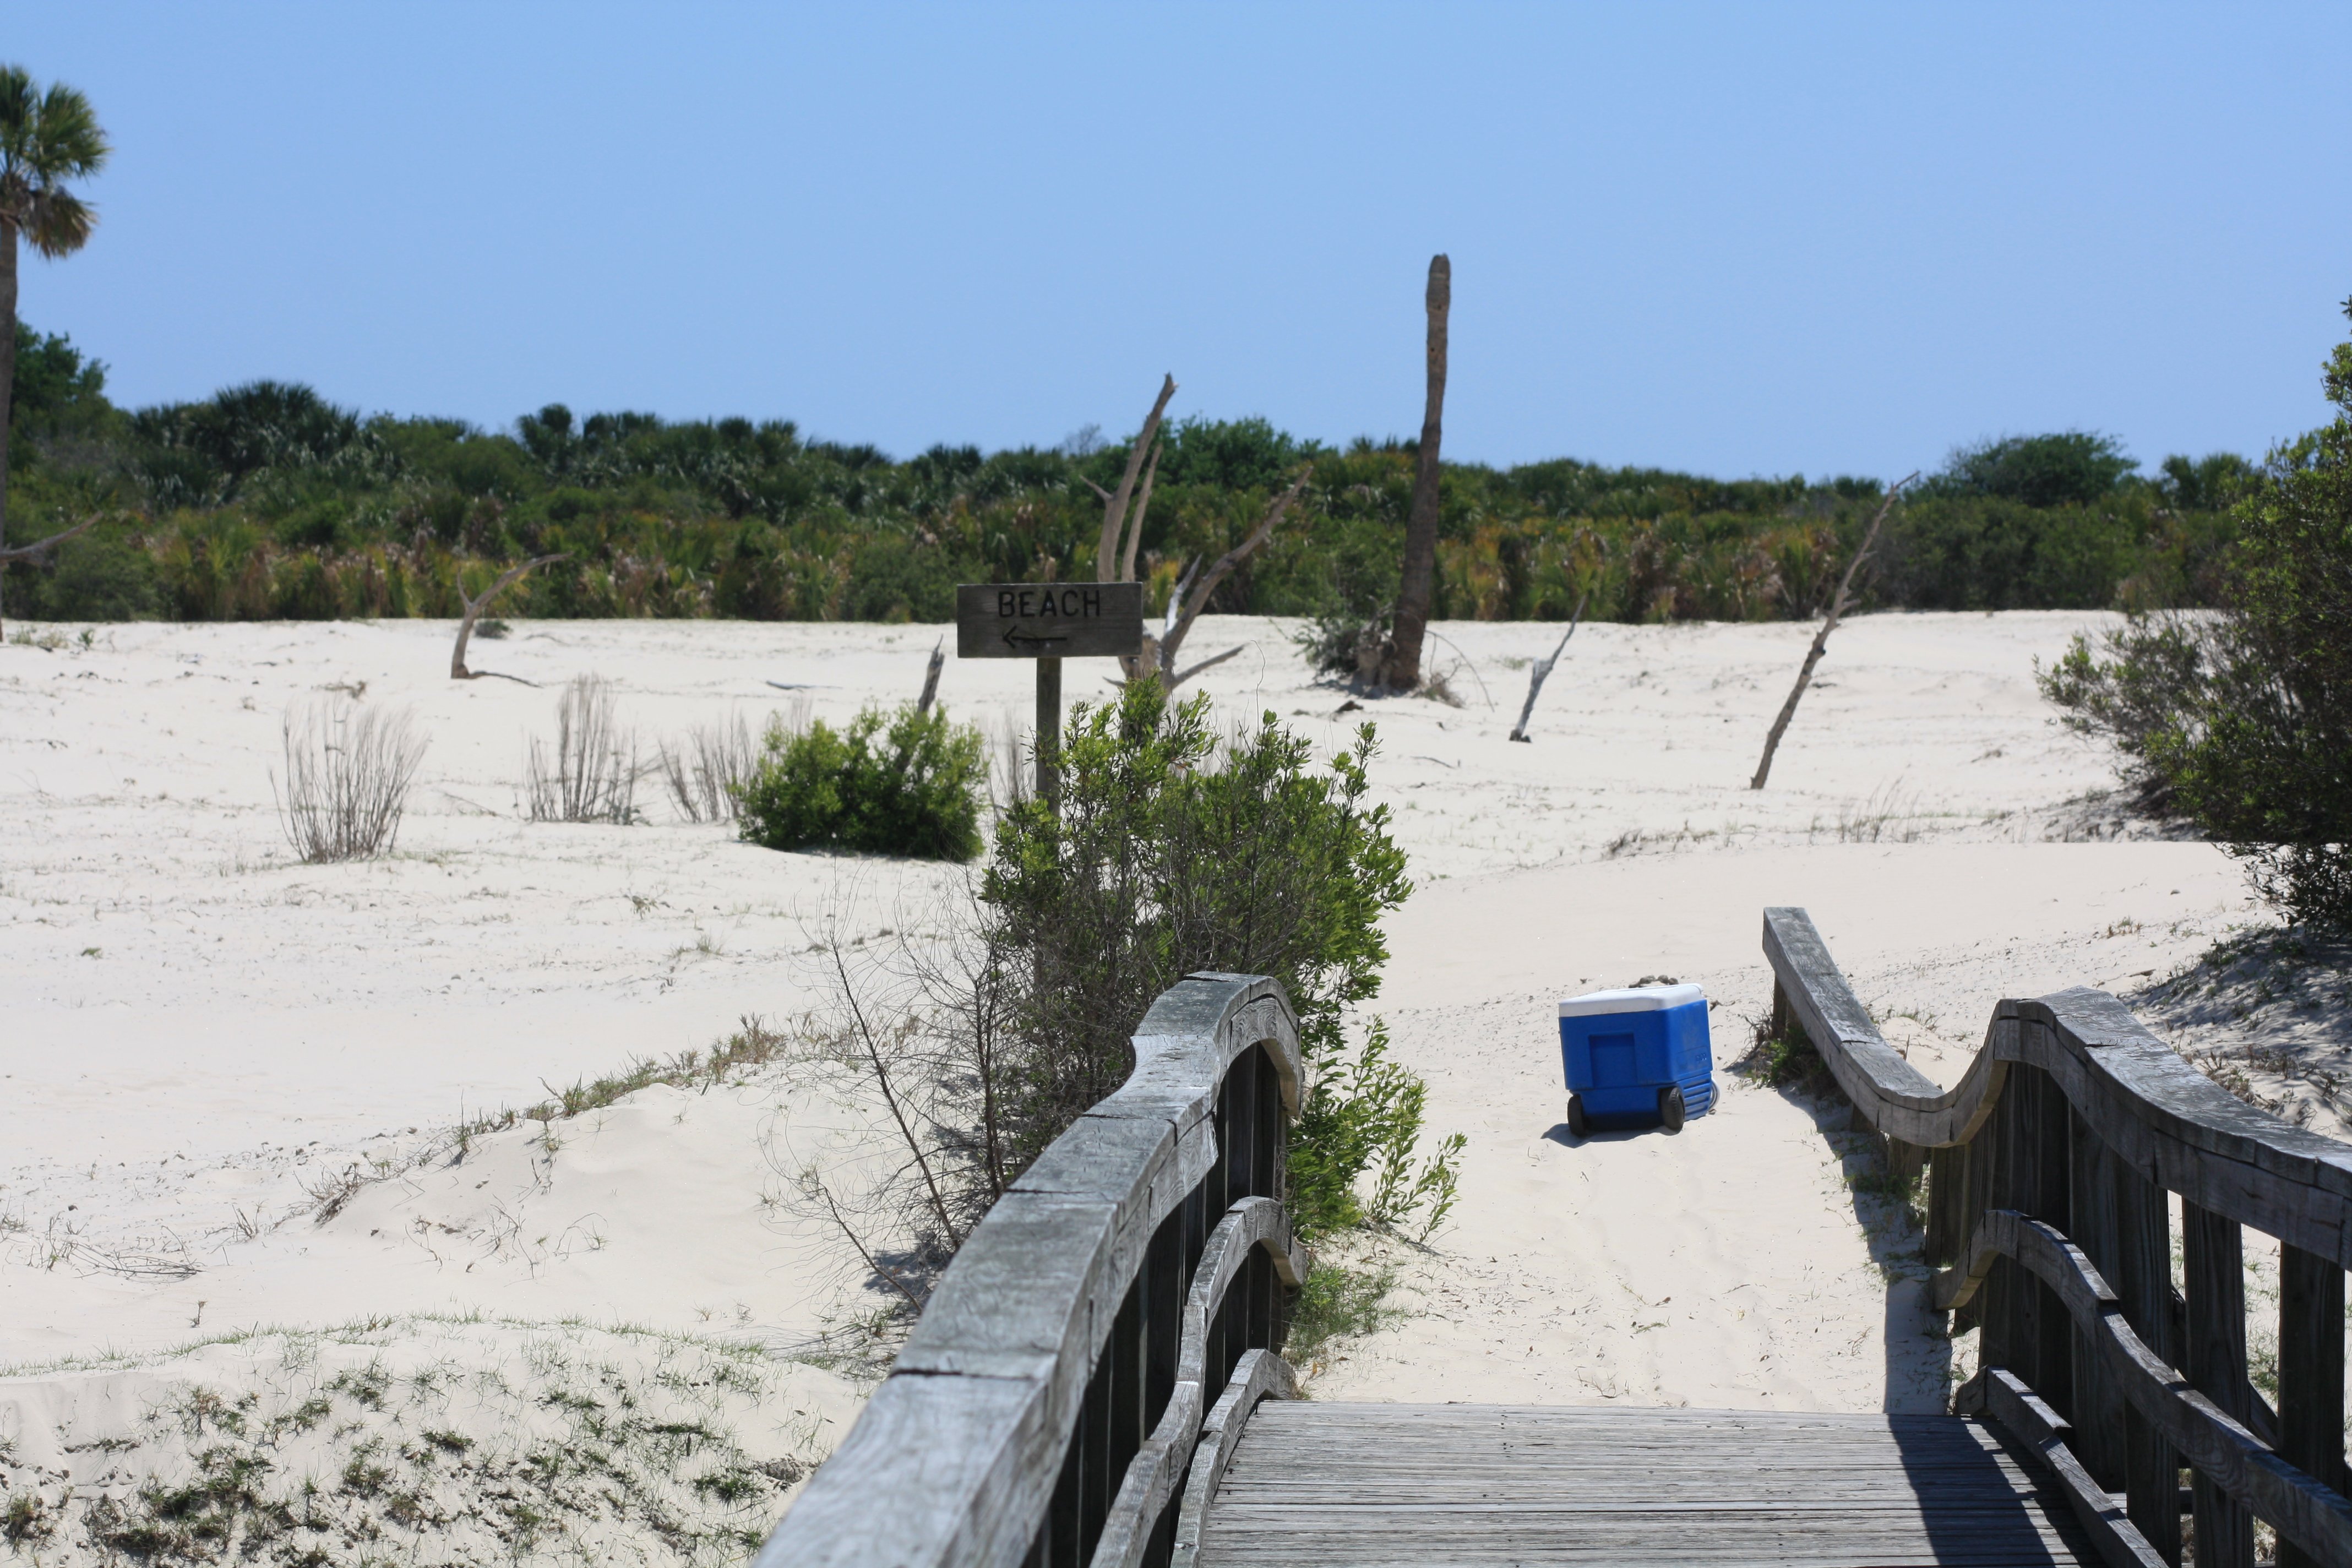
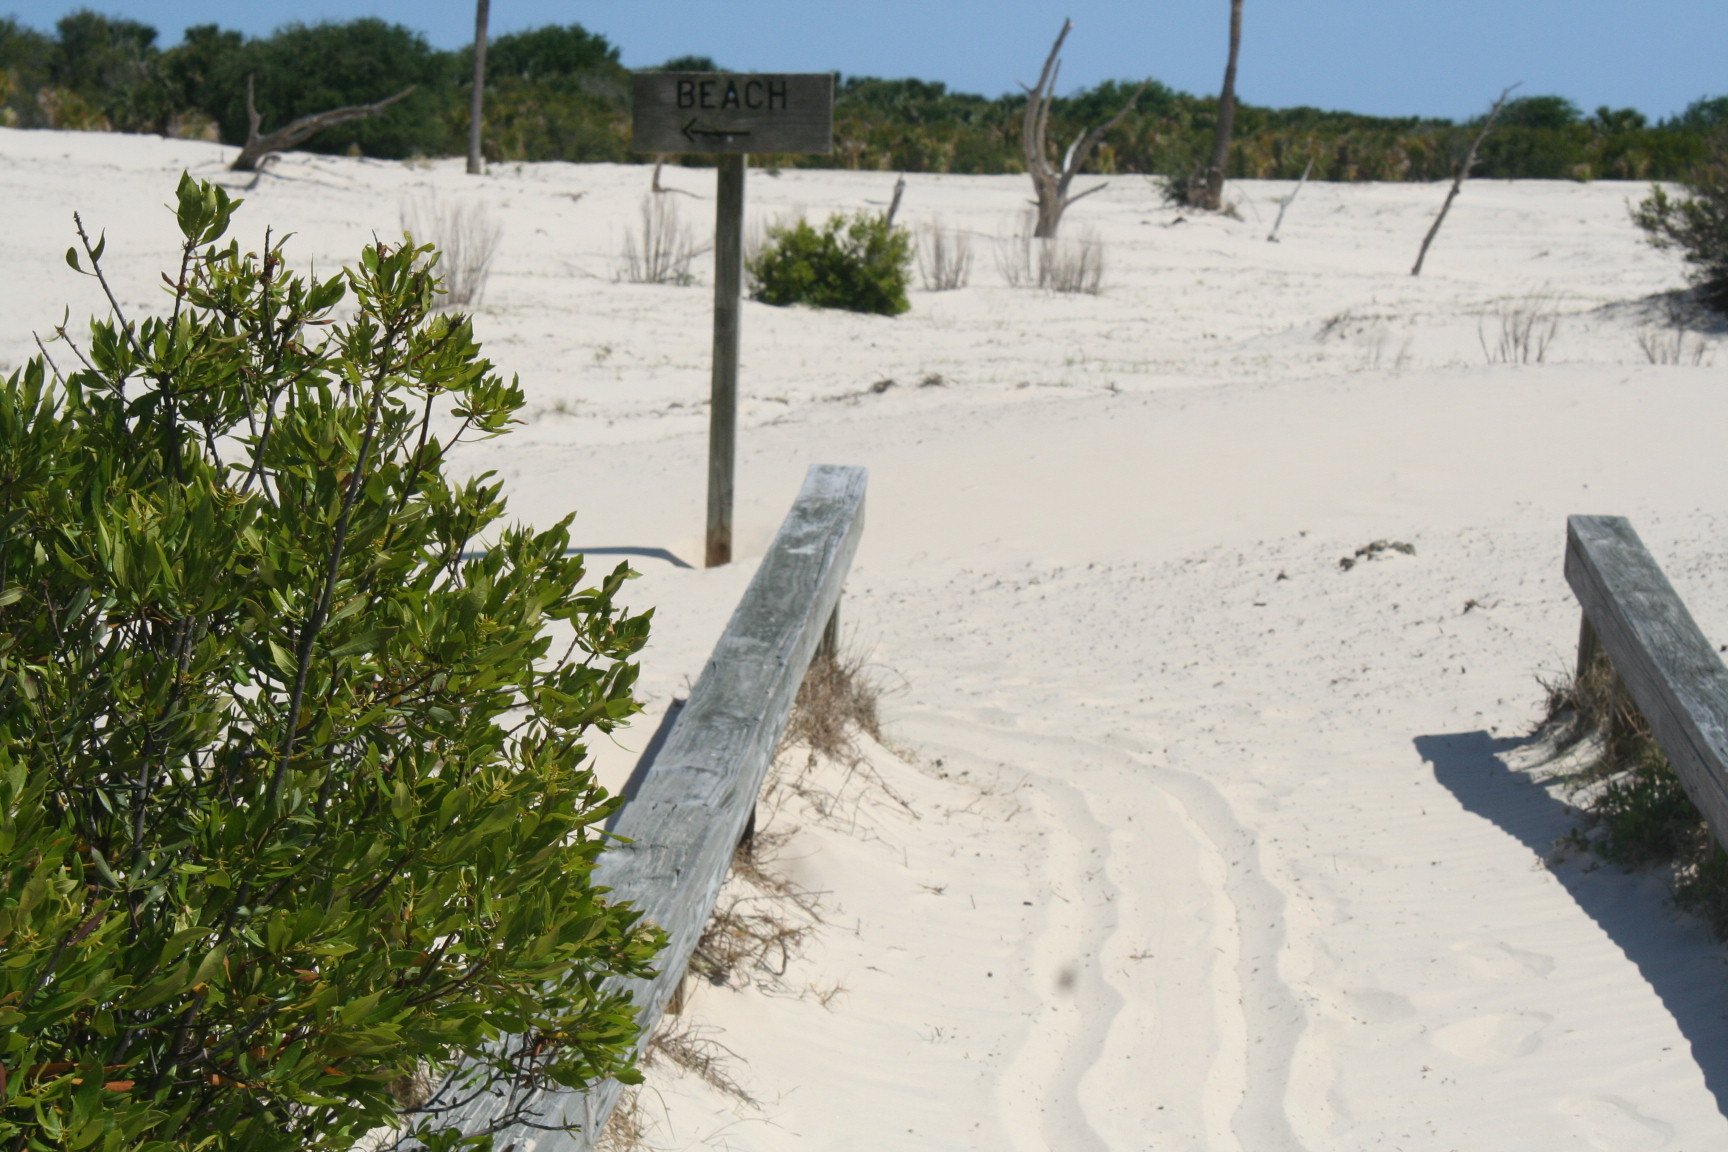
I took these two pictures last month on our trip to Cumberland Island. Mine was with the 18-55mm lens and with hers the 55-200mm lens. I missed the focus with hers and it got more of the bush in the forground, but maybe it can show what you mean on a beginner level(which I am at). Anyways, hope I contribute to your lessons.
southern wolf
Member
I'm not sure I understand what you mean when you say.... I missed the focus with hers and got more of the bush. The bush looks in focus (assuming the second shot was with hers). What I do see is the bottom image has a lot more zoom if you were standing in the same spot when you took them both.
southern wolf
Member
Any confusion or questions as of yet?
If everyone is with me so far... I'm going to move onto putting all this into practice.
If everyone is with me so far... I'm going to move onto putting all this into practice.
southern wolf
Member
Quote:
Originally Posted by sweat90lx http:///t/391680/photography-school/40#post_3476434
I was trying to focus on the beach sign. Guess I could have worded that better.
Ahhhh... I do plan on offering up some advice on composition before I'm done with this thread. Actually... once Im done with the technical aspect, I plan on diving deep into composition.
southern wolf
Member
Ok... I am going to leave this up to those of you who are following this thread because if you don't want to participate in this next idea I have then it will be useless.
I have thought about changing my camera settings from RAW to JPG. This way I don't have to process the images (aside from shrinking for web use). Then take a series of images that are off. I'll post them up and ask ya'll what settings needed to be changed to get the correct exposure or DOF and why. This will build on what has already been discussed. It will also get you to thinking about the settings (shutter, aperture, ISO) and how they relate to each other.
Do you want me to start doing a series of test images?