2Quills, 120G Re-build thread.
- Thread starter 2quills
- Start date
flower
Well-Known Member
Quote:
Originally Posted by 2Quills http:///t/378912/2quills-120g-re-build-thread/520#post_3413662
Wow looks like the whole calvalry showed up for this one. Thanks guys! So who's gonna help me tear it down and move it?

I do believe we have all been lurking around watching....I wish I lived closer and was a big strong guy..I would be happy to help because I want to see this tank all set in your house with some fish in it....and if you feel all empty with nothing to do when you are finished ...
You just feel free to come out by Illinois and make one of those for me...That is truely a beautiful work of art
Originally Posted by 2Quills http:///t/378912/2quills-120g-re-build-thread/520#post_3413662
Wow looks like the whole calvalry showed up for this one. Thanks guys! So who's gonna help me tear it down and move it?
I do believe we have all been lurking around watching....I wish I lived closer and was a big strong guy..I would be happy to help because I want to see this tank all set in your house with some fish in it....and if you feel all empty with nothing to do when you are finished ...
You just feel free to come out by Illinois and make one of those for me...That is truely a beautiful work of art
meowzer
Moderator
Quote:
Originally Posted by acrylic51 http:///t/378912/2quills-120g-re-build-thread/540#post_3413719
You know I'd be there in a heartbeat if I could!!!
ME TOO.....Don't think I'd be much help....BUT I WOULD LOVE to see some of the stuff you guys are building in person
Originally Posted by acrylic51 http:///t/378912/2quills-120g-re-build-thread/540#post_3413719
You know I'd be there in a heartbeat if I could!!!
ME TOO.....Don't think I'd be much help....BUT I WOULD LOVE to see some of the stuff you guys are building in person
2quills
Well-Known Member
Thanks guys. I know you would all help if you could because you are all awesome people. I really don't know what I'm going to do with all the extra room in the garage once this thing finally gets moved inside. Probably start a new project.
Things still left to do before I can move it inside are...
Take it down and finish staining.
Make some cut outs on the side cabinets for power heads to attach to the side of the tank.
Clear coat everything.
Build rock wall and rock formations for the tank.
Polish at least the front panel of the tank.
Run some new circuits to the wall where the tank is going to go.
I think that's about it. Not too much left. The Led lighting I can do later since I'll have time while the tank is being established. I'm in no rush to start throwing corals in there. In the mean time though I'm sure that my fish will appreciate the upgrade.
acrylic51
Active Member
Quote:
Originally Posted by 2Quills http:///t/378912/2quills-120g-re-build-thread/540#post_3413787
Thanks guys. I know you would all help if you could because you are all awesome people. I really don't know what I'm going to do with all the extra room in the garage once this thing finally gets moved inside. Probably start a new project.
Things still left to do before I can move it inside are...
Take it down and finish staining.
Make some cut outs on the side cabinets for power heads to attach to the side of the tank.
Clear coat everything.
Build rock wall and rock formations for the tank.
Polish at least the front panel of the tank.
Run some new circuits to the wall where the tank is going to go.
I think that's about it. Not too much left. The Led lighting I can do later since I'll have time while the tank is being established. I'm in no rush to start throwing corals in there. In the mean time though I'm sure that my fish will appreciate the upgrade.
Mines usually only stays clear and clean for about 24hrs.....
Originally Posted by 2Quills http:///t/378912/2quills-120g-re-build-thread/540#post_3413787
Thanks guys. I know you would all help if you could because you are all awesome people. I really don't know what I'm going to do with all the extra room in the garage once this thing finally gets moved inside. Probably start a new project.
Things still left to do before I can move it inside are...
Take it down and finish staining.
Make some cut outs on the side cabinets for power heads to attach to the side of the tank.
Clear coat everything.
Build rock wall and rock formations for the tank.
Polish at least the front panel of the tank.
Run some new circuits to the wall where the tank is going to go.
I think that's about it. Not too much left. The Led lighting I can do later since I'll have time while the tank is being established. I'm in no rush to start throwing corals in there. In the mean time though I'm sure that my fish will appreciate the upgrade.
kiefers
Active Member
Quote:
Originally Posted by 2Quills http:///t/378912/2quills-120g-re-build-thread/540#post_3413787
Thanks guys. I know you would all help if you could because you are all awesome people. I really don't know what I'm going to do with all the extra room in the garage once this thing finally gets moved inside. Probably start a new project.
Things still left to do before I can move it inside are...
Take it down and finish staining.
Make some cut outs on the side cabinets for power heads to attach to the side of the tank.
Clear coat everything.
Build rock wall and rock formations for the tank.
Polish at least the front panel of the tank.
Run some new circuits to the wall where the tank is going to go.
I think that's about it. Not too much left. The Led lighting I can do later since I'll have time while the tank is being established. I'm in no rush to start throwing corals in there. In the mean time though I'm sure that my fish will appreciate the upgrade.
Well.... I already volintered for this task!! Lol.......just add the beer and were ready to go,..... and uhm,,,,, fajita's?
sweetlillady
New Member
I agree with everyone else it looks FABULOUS
 but then I get the pleasure of seeing it first hand...I am very proud of you is truly a masterpiece of work you have created..~Knew you could do it though~ Smiles~
2quills
Well-Known Member
Quote:
Originally Posted by Kiefers http:///t/378912/2quills-120g-re-build-thread/540#post_3414234
Well.... I already volintered for this task!! Lol.......just add the beer and were ready to go,..... and uhm,,,,, fajita's?
Gotcha covered bro. Lots of beer and fajitas down here. All the fajitas you can stand.
Quote:
Originally Posted by sweetlillady http:///t/378912/2quills-120g-re-build-thread/540#post_3414416
I agree with everyone else it looks FABULOUS
but then I get the pleasure of seeing it first hand...I am very proud of you is truly a masterpiece of work you have created..~Knew you could do it though~ Smiles~
Thanks Darlin. You are a very patient and understanding woman. Thank you for that. Hey at least the miter saw is not on the dinning room table anymore. Gotta love that.
Originally Posted by Kiefers http:///t/378912/2quills-120g-re-build-thread/540#post_3414234
Well.... I already volintered for this task!! Lol.......just add the beer and were ready to go,..... and uhm,,,,, fajita's?
Gotcha covered bro. Lots of beer and fajitas down here. All the fajitas you can stand.
Quote:
Originally Posted by sweetlillady http:///t/378912/2quills-120g-re-build-thread/540#post_3414416
I agree with everyone else it looks FABULOUS
Thanks Darlin. You are a very patient and understanding woman. Thank you for that. Hey at least the miter saw is not on the dinning room table anymore. Gotta love that.
meowzer
Moderator
Quote:
Originally Posted by 2Quills http:///t/378912/2quills-120g-re-build-thread/540#post_3414597
Gotcha covered bro. Lots of beer and fajitas down here. All the fajitas you can stand.
Thanks Darlin. You are a very patient and understanding woman. Thank you for that. Hey at least the miter saw is not on the dinning room table anymore. Gotta love that.
BAHAHAHAHAH.....I was freaking out when Danny used a snack table to tin the LED's.......
2quills
Well-Known Member
Quote:
Originally Posted by Kiefers http:///t/378912/2quills-120g-re-build-thread/540#post_3415249
AWWWWW now thats love!!! Can she make fajita's? I like fajita's. (Lol)
Yeah man, come on down. We'll hook you up. Bring the kids. Were only blocks from the water down here.
Quote:
Originally Posted by meowzer http:///t/378912/2quills-120g-re-build-thread/540#post_3415251
BAHAHAHAHAH.....I was freaking out when Danny used a snack table to tin the LED's.......
Shhhh...she was supposed to get a new dinning room table out of the deal. That hasn't happened yet lol.
southern wolf
Member
It's taken me about 7 hours to read thru this thread. Man you got some crazy craftsman skillz going on there. I am loving the wood work and trim.
There were 28 pages to go thru and the closer I got to the end... the more I'm thinkin'.... I'm finally gonna get to see the finished project with rocks and fish and such.
Then I get to the end... and all I get............................
to be continued............

cant wait to see the finished project and you're right... it did give me a few ideas. Thanks for the link.
There were 28 pages to go thru and the closer I got to the end... the more I'm thinkin'.... I'm finally gonna get to see the finished project with rocks and fish and such.
Then I get to the end... and all I get............................
to be continued............
cant wait to see the finished project and you're right... it did give me a few ideas. Thanks for the link.
2quills
Well-Known Member
Dang, Dude!!! If you read through this whole thread you really deserve some kind of reward lol.
Thanks for the compliment. Sorry to disappoint ya at the end there. I'm ready for this thing to be finished just as much as anyone. But it's gettin close, just a few things left on the list to do before I can bring it in the house and fill it back up.
Thanks for the compliment. Sorry to disappoint ya at the end there. I'm ready for this thing to be finished just as much as anyone. But it's gettin close, just a few things left on the list to do before I can bring it in the house and fill it back up.
southern wolf
Member
figured... if ya dont read, then you wont learn nuttin. So I read it.
1snapple
Active Member
A lot to read, gotta keep up or you end up scrollin through pics and 30 pages like I do
.
Looks great Corey. I'm game to help with anything if you get me a flight, room and board. ;D
I would also give you help with LEDs but I think your covered there. Did you read that guys 210g upgrade?
Full LEDs and its amazing. If you haven't seen it on RC then I'll find it and link it here.
Looks great Corey. I'm game to help with anything if you get me a flight, room and board. ;D
I would also give you help with LEDs but I think your covered there. Did you read that guys 210g upgrade?
Full LEDs and its amazing. If you haven't seen it on RC then I'll find it and link it here.
2quills
Well-Known Member
Quote:
Originally Posted by 1Snapple http:///t/378912/2quills-120g-re-build-thread/540#post_3417981
A lot to read, gotta keep up or you end up scrollin through pics and 30 pages like I do
.
Looks great Corey. I'm game to help with anything if you get me a flight, room and board. ;D
I would also give you help with LEDs but I think your covered there. Did you read that guys 210g upgrade?
Full LEDs and its amazing. If you haven't seen it on RC then I'll find it and link it here.
Thanks Josh. Yeah I've caught Heli's build. I've posted on his thread a couple times. He did a real nice job with it. Did you happen to catch the latest upgrade to his fixture? He's started adding PLED's to the build. What they do is shunt the current if you have a blown led. In other words they act as a bypass for the current to travel around the blown led, and they use voltage like an led does. That way if one led blows all the rest stay on and it's not a huge deal to take the fixture down right away to fix it. Pretty cool.
Originally Posted by 1Snapple http:///t/378912/2quills-120g-re-build-thread/540#post_3417981
A lot to read, gotta keep up or you end up scrollin through pics and 30 pages like I do
Looks great Corey. I'm game to help with anything if you get me a flight, room and board. ;D
I would also give you help with LEDs but I think your covered there. Did you read that guys 210g upgrade?
Full LEDs and its amazing. If you haven't seen it on RC then I'll find it and link it here.
Thanks Josh. Yeah I've caught Heli's build. I've posted on his thread a couple times. He did a real nice job with it. Did you happen to catch the latest upgrade to his fixture? He's started adding PLED's to the build. What they do is shunt the current if you have a blown led. In other words they act as a bypass for the current to travel around the blown led, and they use voltage like an led does. That way if one led blows all the rest stay on and it's not a huge deal to take the fixture down right away to fix it. Pretty cool.
2quills
Well-Known Member
Wow 2 months and no updates. I'm slacking! I don't have a whole heck of a lot to report on in this post either. Just a small bit of progress, getting closer to breaking the stand down and clear coating it.
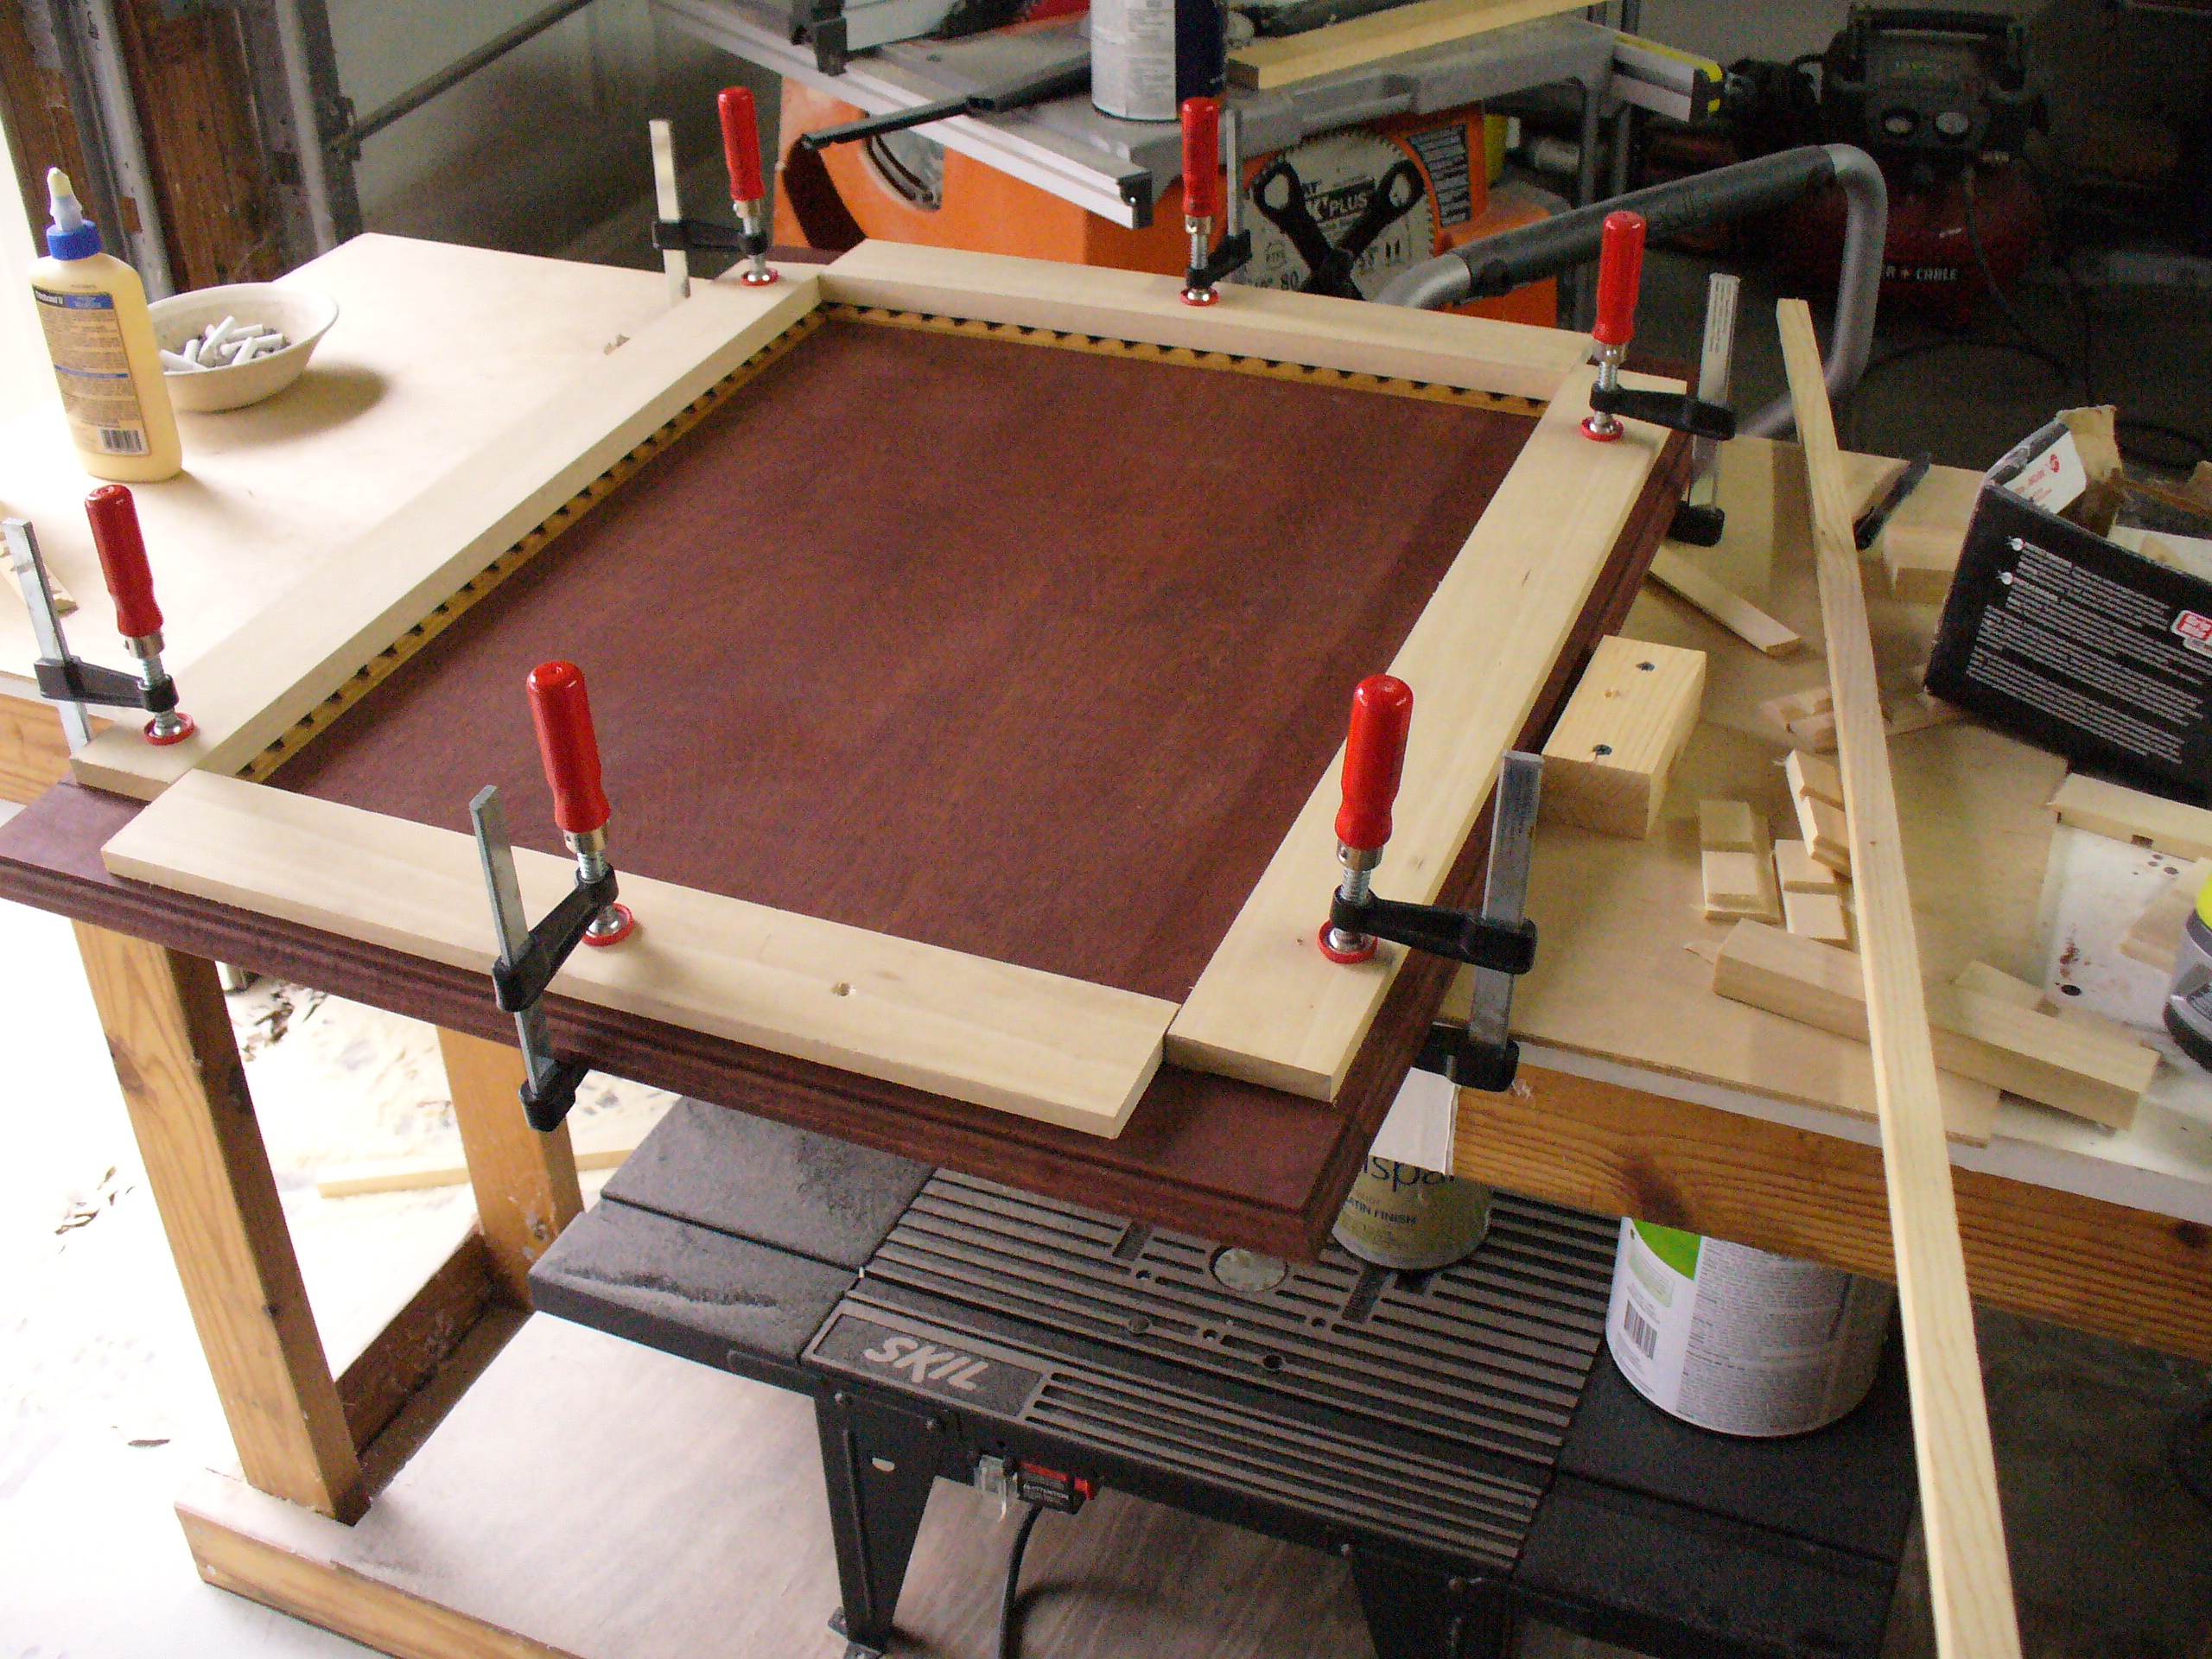
Glued the remaining trim pieces on to the doors. Had to cut some pieces with a lip on them that allowed me to pin the trim pieces flat so that I could clamp them down while the glue dried.

Permanently installed the pallister pieces....


I started fooling around with the fans for the canopy. I wasn't happy with the (pull style) fans that I had on their originally. I ended up finding some (push style) fans when I was up at the local auto parts store that I think will work better. I made some brackets for them out of aluminum flat bar...this allows my to tilt the fans up or down. More importantly I wanted them to point down so that they will be blowing across the waters surface.
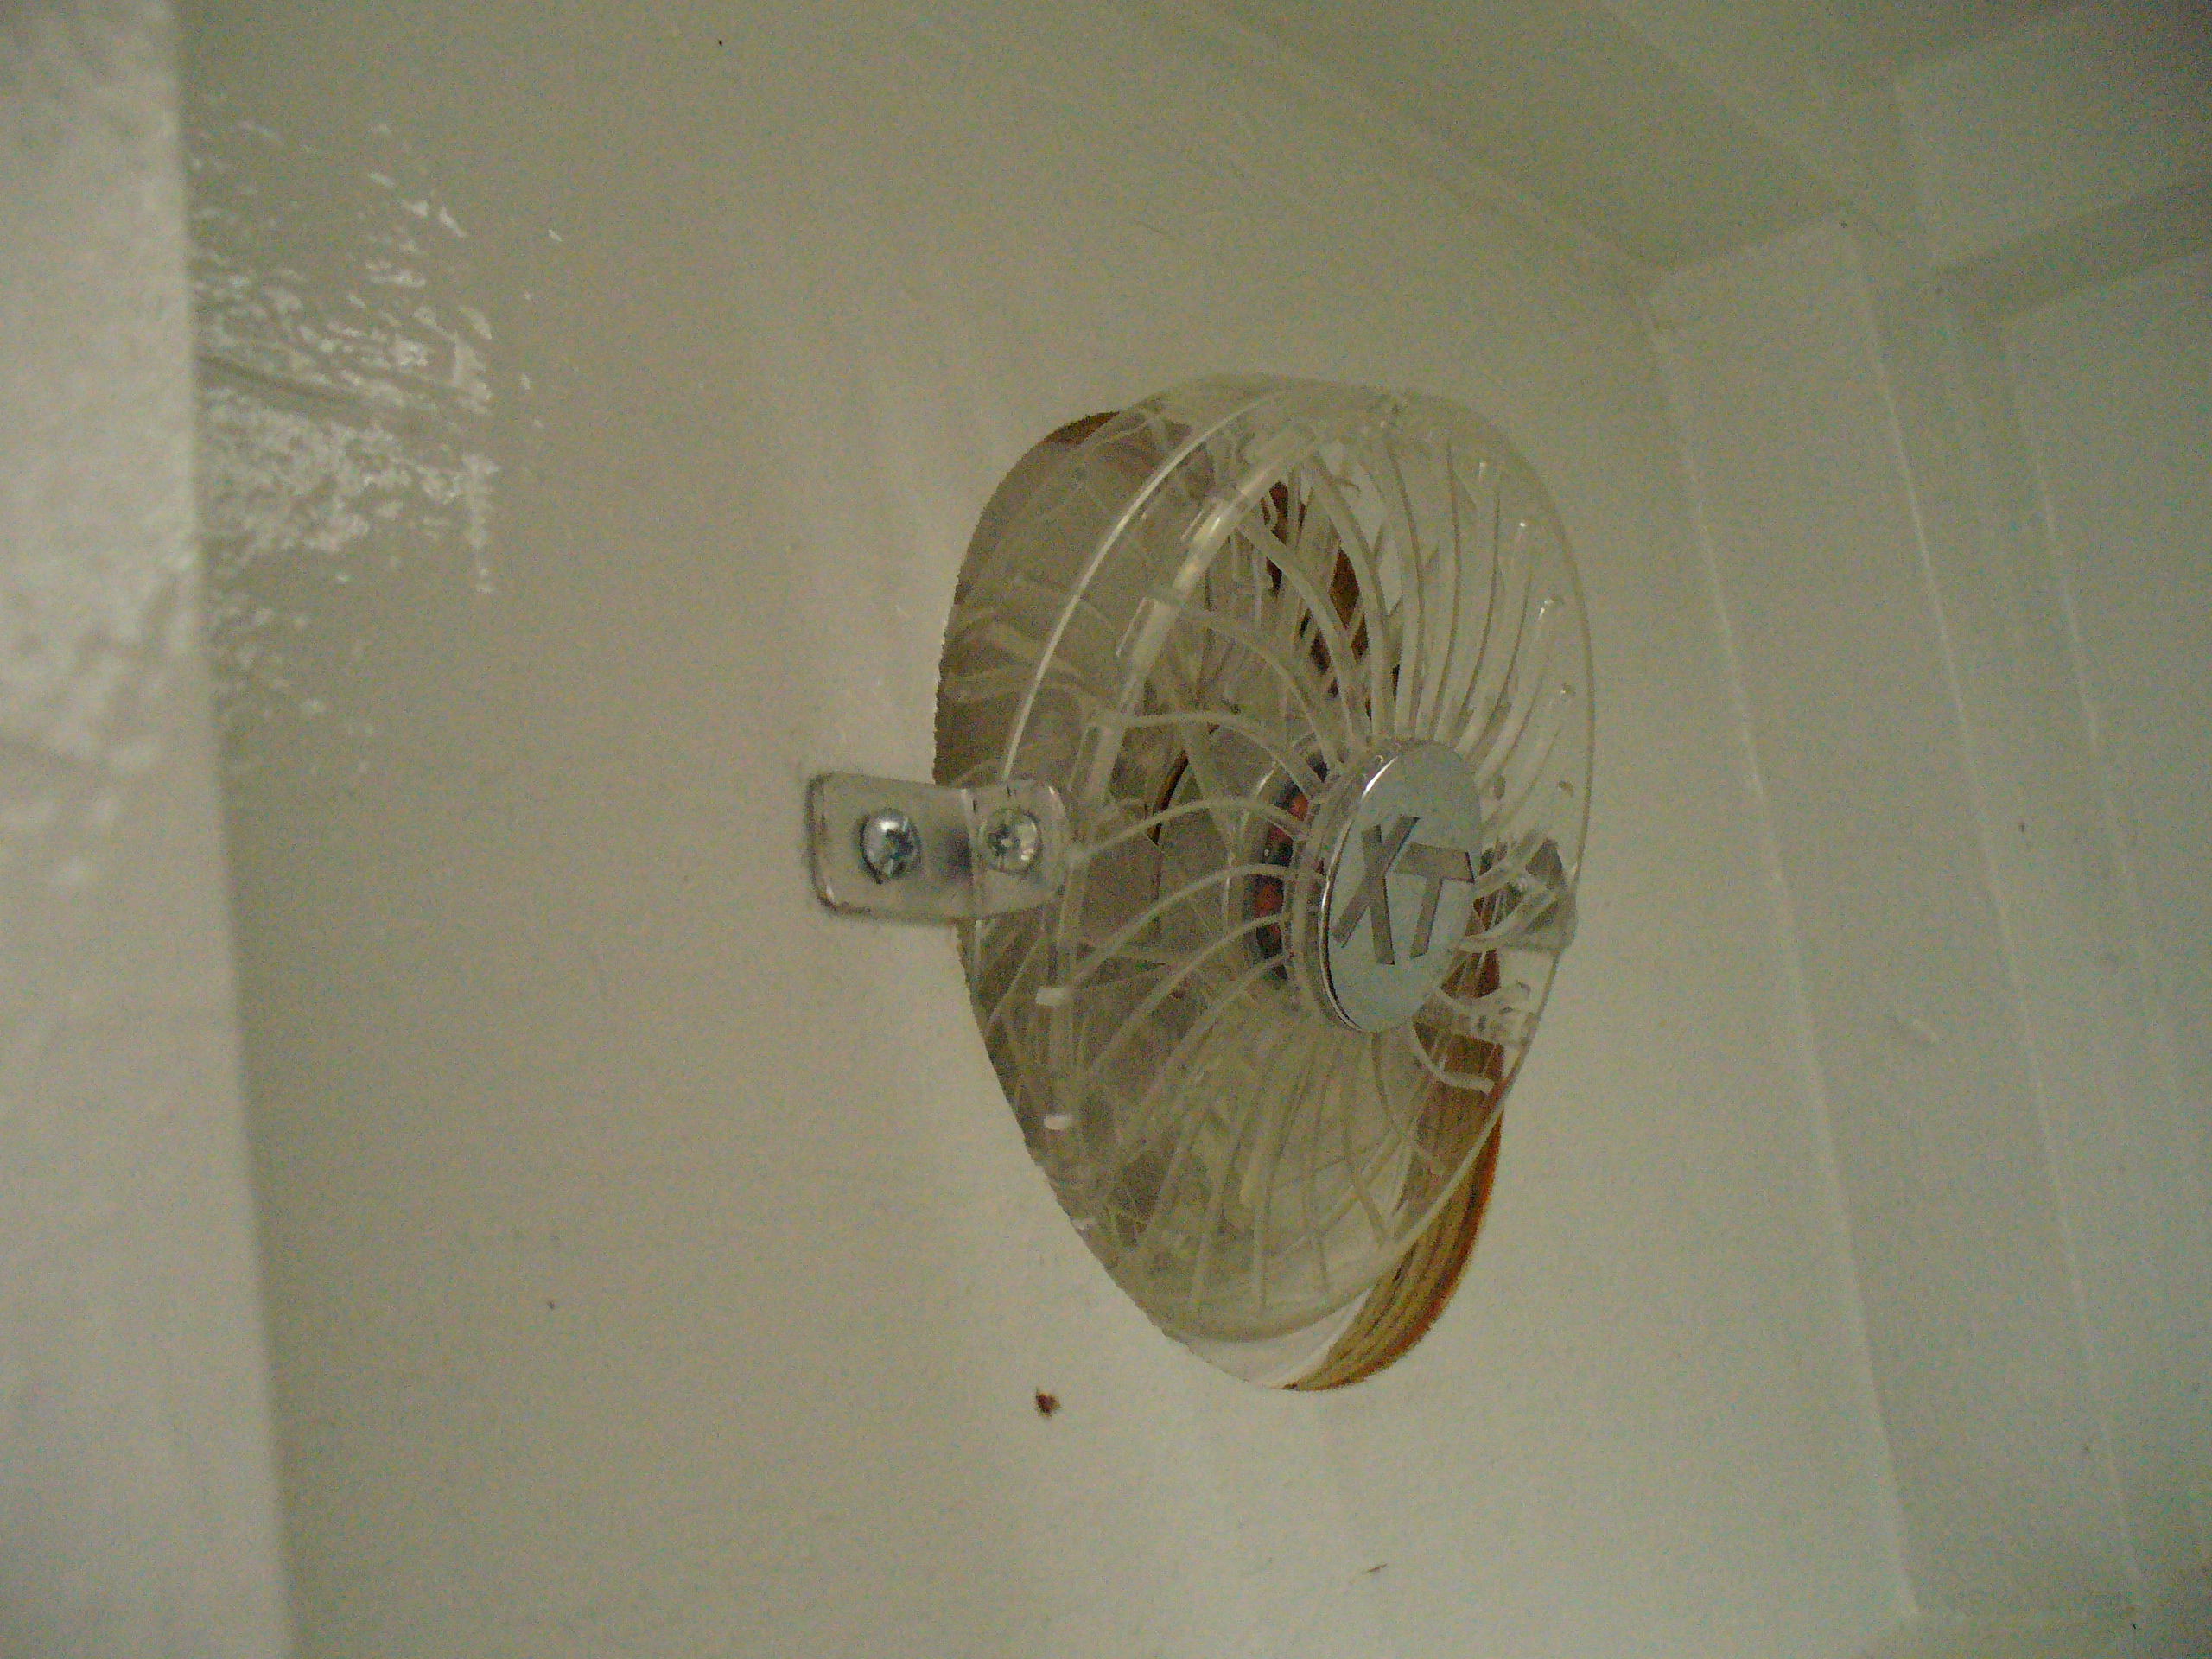
They pull fresh air into the canopy via the make shift duct work

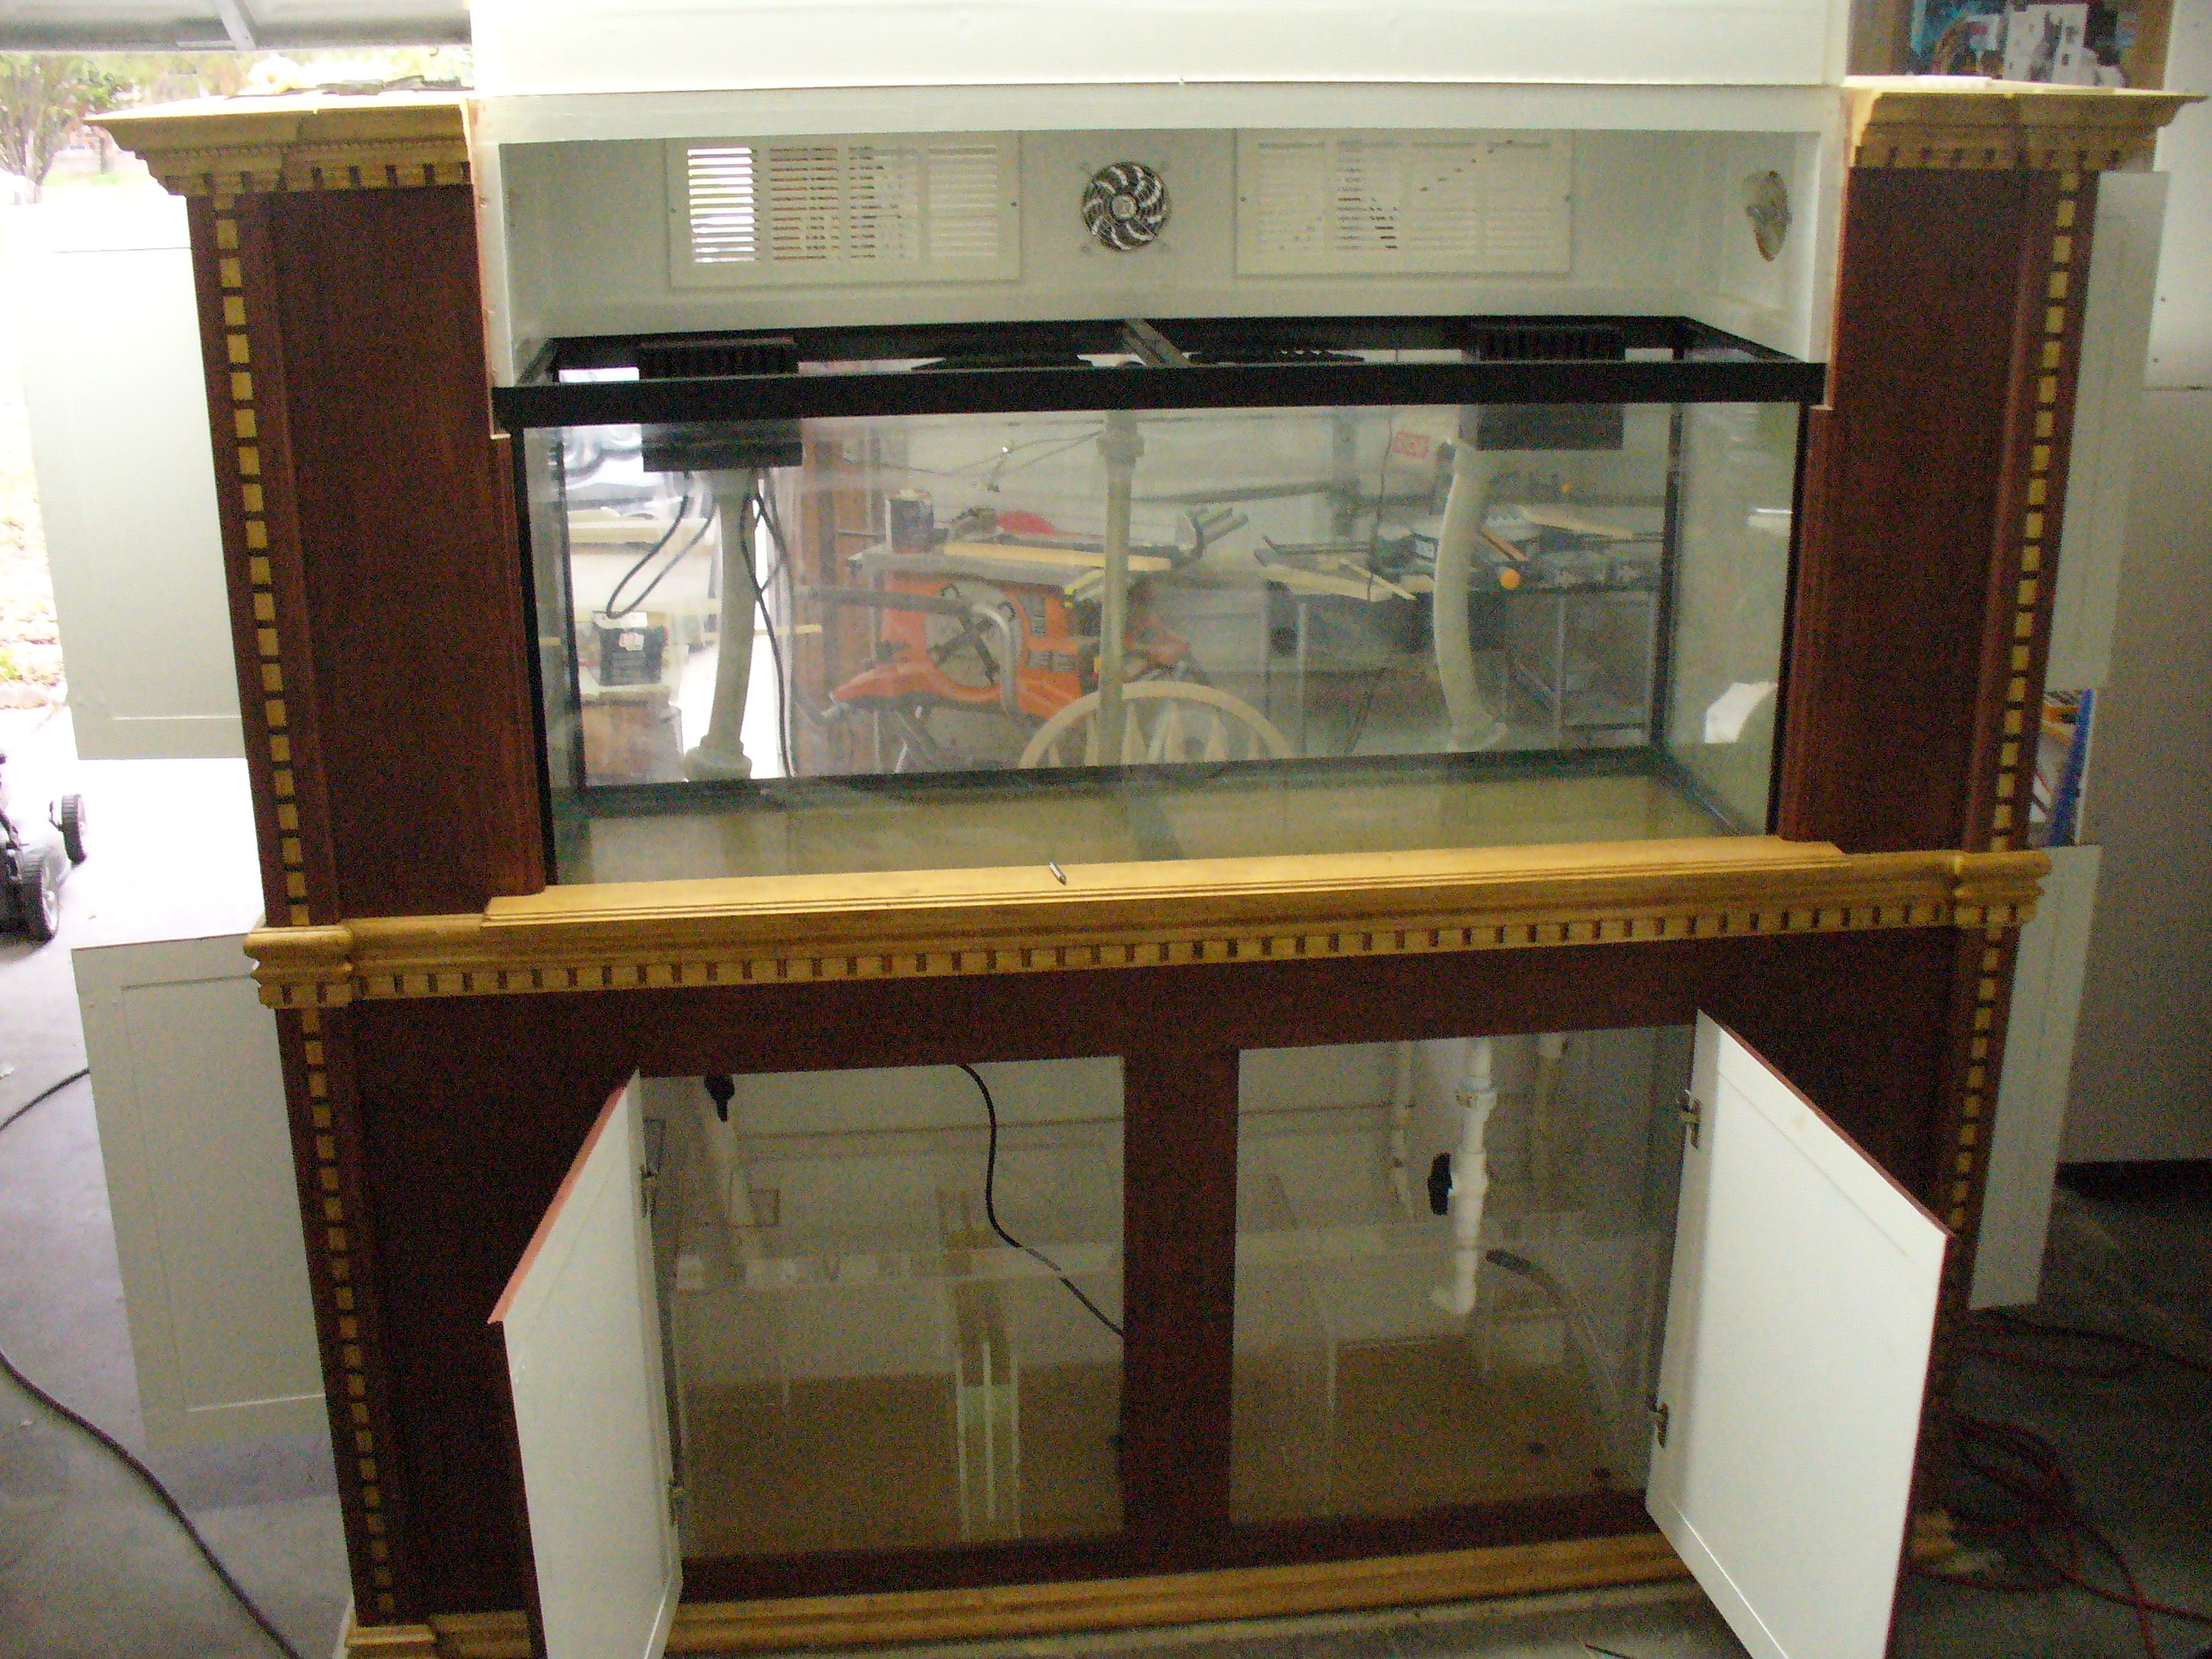
I then decided to take one of the (pull style) fans and add it to the back of the canopy. So I have two fans blowing fresh air IN and 1 fan plus 2 vents for exhausting air out. Hopefully this will help with oxygen levels, maintaining ph levels and hopefully help keep the tank running a little bit cooler in the summer time. I'm still looking into fan controllers to control all of the fans. As of now I have them on a variable voltage power supply which allows me to dim the leds and the fan speed over 6 different setting.

No need for additional Moon light.

Glued the remaining trim pieces on to the doors. Had to cut some pieces with a lip on them that allowed me to pin the trim pieces flat so that I could clamp them down while the glue dried.
Permanently installed the pallister pieces....
I started fooling around with the fans for the canopy. I wasn't happy with the (pull style) fans that I had on their originally. I ended up finding some (push style) fans when I was up at the local auto parts store that I think will work better. I made some brackets for them out of aluminum flat bar...this allows my to tilt the fans up or down. More importantly I wanted them to point down so that they will be blowing across the waters surface.
They pull fresh air into the canopy via the make shift duct work
I then decided to take one of the (pull style) fans and add it to the back of the canopy. So I have two fans blowing fresh air IN and 1 fan plus 2 vents for exhausting air out. Hopefully this will help with oxygen levels, maintaining ph levels and hopefully help keep the tank running a little bit cooler in the summer time. I'm still looking into fan controllers to control all of the fans. As of now I have them on a variable voltage power supply which allows me to dim the leds and the fan speed over 6 different setting.
No need for additional Moon light.