415 Gallon Plywood Tank Build

desertdawg

Member
I understand Shawn, if I were to try and build a tank I would be hounding you guys about every decisoin, it's something I have never done so it's been really educational following along with your build. I thought plywood tanks were cool, but building your own acrylic tank is awesome!
 

sweatervest13

Active Member
Quote:
I have to give some credit to Sweatervest. A while back we were discussing the overflow, and thought about what he said. Not real concerned about anything clogging the drains, but anythings possible. I actually built 2 overflows!!!! The first was more a practice and figure if it turned out well I would use it, but wasn't please with the 1 joint so, I built another!!!! I used balck acrylic for the sides, but opted to use clear for the back panel of the overflow. Again as Sweatervest suggested could at a quick glance see what's going on. Plus if any fish decides to go over it would be a little easier to locate as well. Thanks Sweatervest!!!!!!

I have been a way from this thread for a while, but today I finally caught up. I am super glad I was able to contribute something!!!! You and Corey helped me a ton on my little build so anything I can give back is my pleasure!!!!
This thing is coming along nicely (a bit slow, but better slow and right then fast and wrong). You don't seem too far from filling this with water. Are you going to do a tap water test first??
Love the water storage container. Great steal!!! I paid more then that for a 32g brute. And to tell you the truth I am already getting sick of looking at trash cans too. LOL
Keep up the good work Acrylic!!!!
 

acrylic51

Active Member
Quote:
Originally Posted by sweatervest13 http:///t/376802/415-gallon-plywood-tank-build/1060#post_3412034
I have been a way from this thread for a while, but today I finally caught up. I am super glad I was able to contribute something!!!! You and Corey helped me a ton on my little build so anything I can give back is my pleasure!!!!
This thing is coming along nicely (a bit slow, but better slow and right then fast and wrong). You don't seem too far from filling this with water. Are you going to do a tap water test first??
Love the water storage container. Great steal!!! I paid more then that for a 32g brute. And to tell you the truth I am already getting sick of looking at trash cans too. LOL
Keep up the good work Acrylic!!!!
Yeah it's moving along slower than I'd like as well, but as you stated once you cut, not very easy or pleasant to fix.......
Work is the big influencing factor......Some days I'm just to tired to tackle major work, so major work is delegated to Saturday and Sunday for me, and that's in between all the other household chores I couldn't get to during the week.......
I want to get the overflow glued into place and on the stand before I actually leak test it, but I'm dying to put water to it......I could leak test it where it sits, and wouldn't have any worries doing so, but as I had mentioned to Corey, I'm trying to leave all the paper on the tank till I get it back up on the stand in fear of something stupid like me dropping something while working or fabbing something for the tank.......
I'm still debating if I'm going to euro brace the overflow as how the tank is euro braced?????
If I can make up my mind I have to fabricate euro bracing for the overflow which would be a breeze, but the major work comes into cutting the euro bracing, which I left long on that end of the tank at a 45 degree, and then I'd have to use the WeldOn 40 I picked up Friday to seam the 2 pieces together....That is where some major work comes into play.....You have to then sand and make that seam disappear to make the piece appear as 1 solid panel.....That was my screw up during the initial cutting phase....I called my buddies about 20 minutes to late....Actually poor or planning or indecisiveness on my part!!!!!!!!
I guess I did forget to mention to you guys that I did purchase a gallon of WeldOn 40, and man is that stuff toxic smelling.....Fumes usually don't bother me, but when I popped that lid, and was hit with it, my first reaction was OOOHHHH SH** I have to get this out of the house before my wife comes yelling!!!!!!
It's that bad I even had to open the garage door all the way to mix and play with it last night at midnight......
 

2quills

Well-Known Member
Quote:
Originally Posted by acrylic51 http:///t/376802/415-gallon-plywood-tank-build/1080#post_3412158
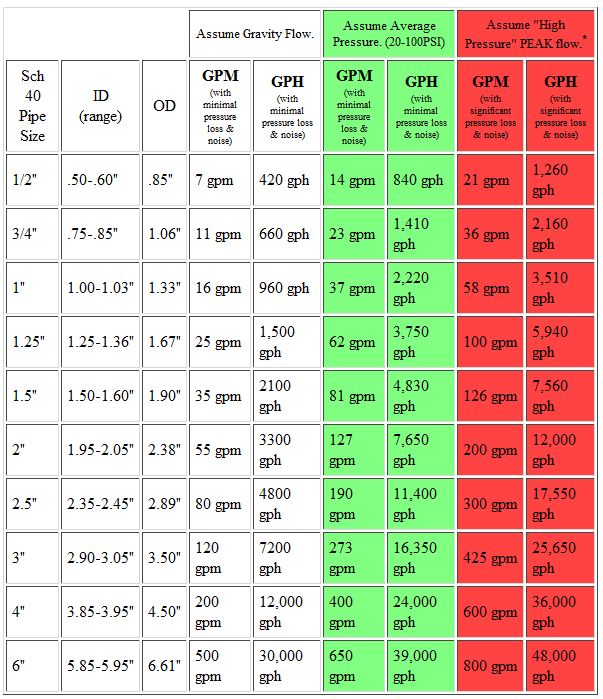
Thanks Corey!!!!! That's the same one I was looking at when I shot you the text this morning!!!!! I'm thinking I might be able to get away with 1" on the returns and should be able to push it anywhere between 1500gph - 1900gph......
Oh yeah I think so. I checked some other charts out as well and that one there seems to fall pretty much in line with the others. They would suggest you could easily push upwards of 3000+ through a 1" line. And you're looking around half. So I would think so.
 

acrylic51

Active Member
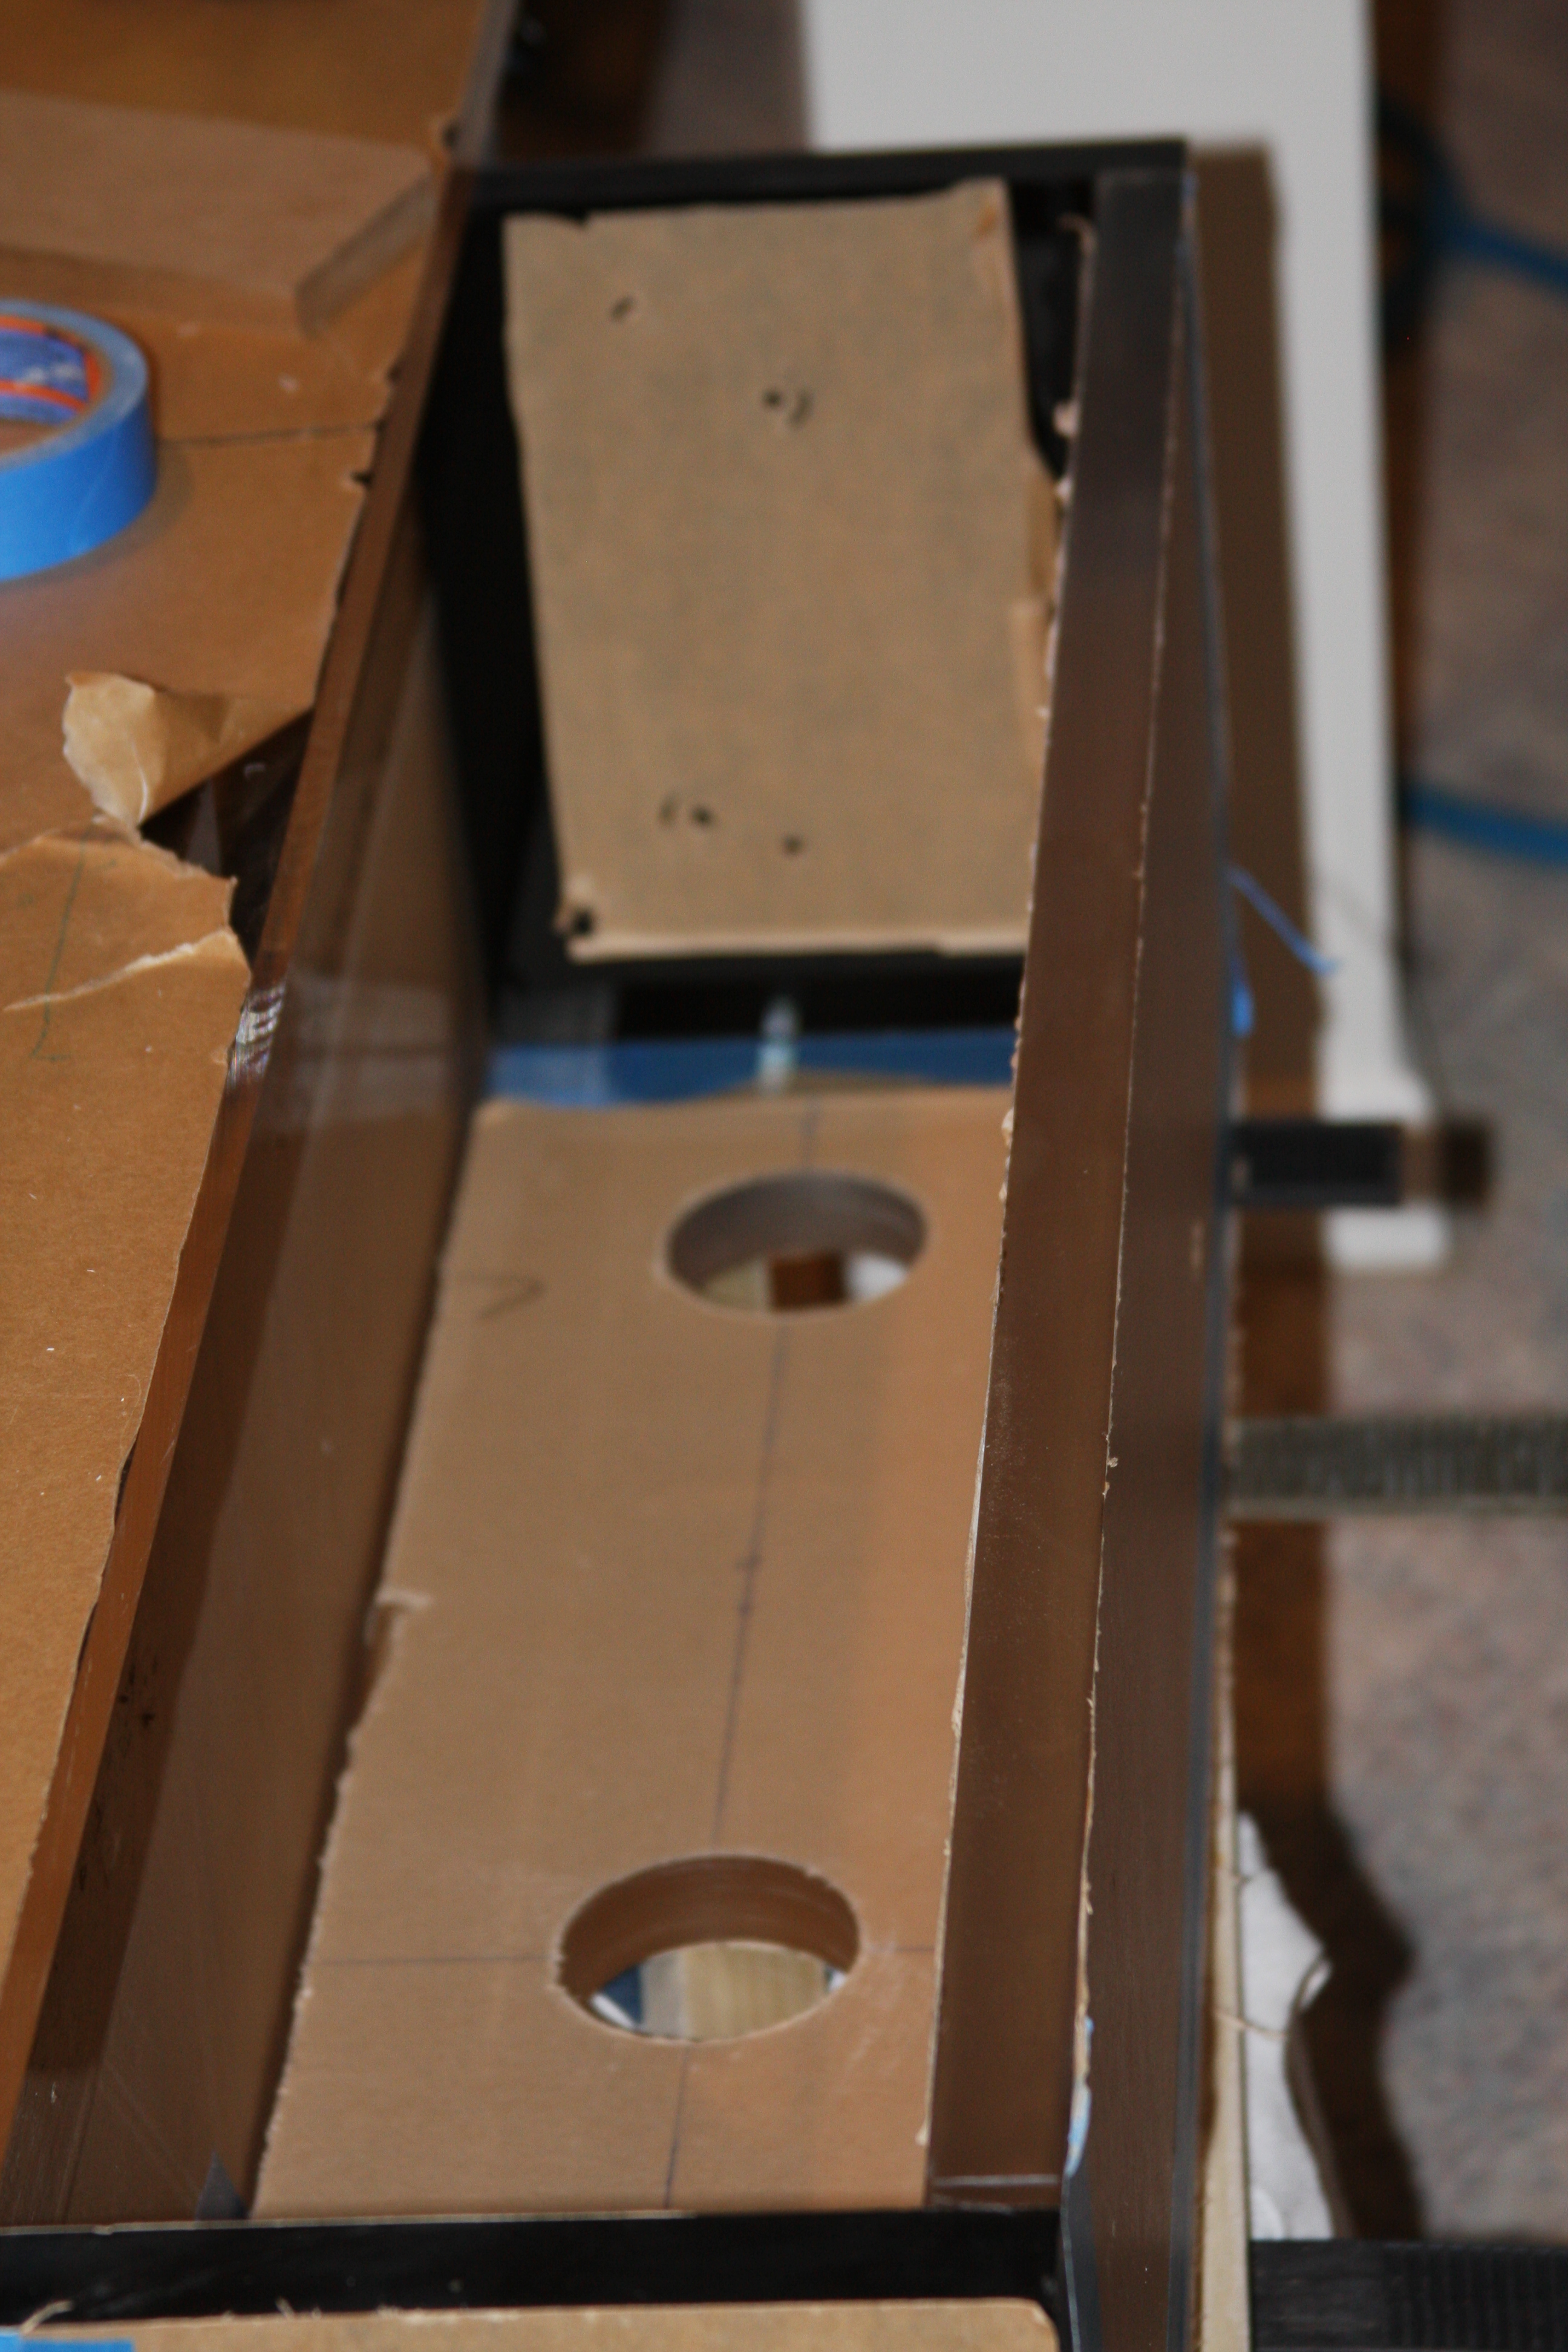
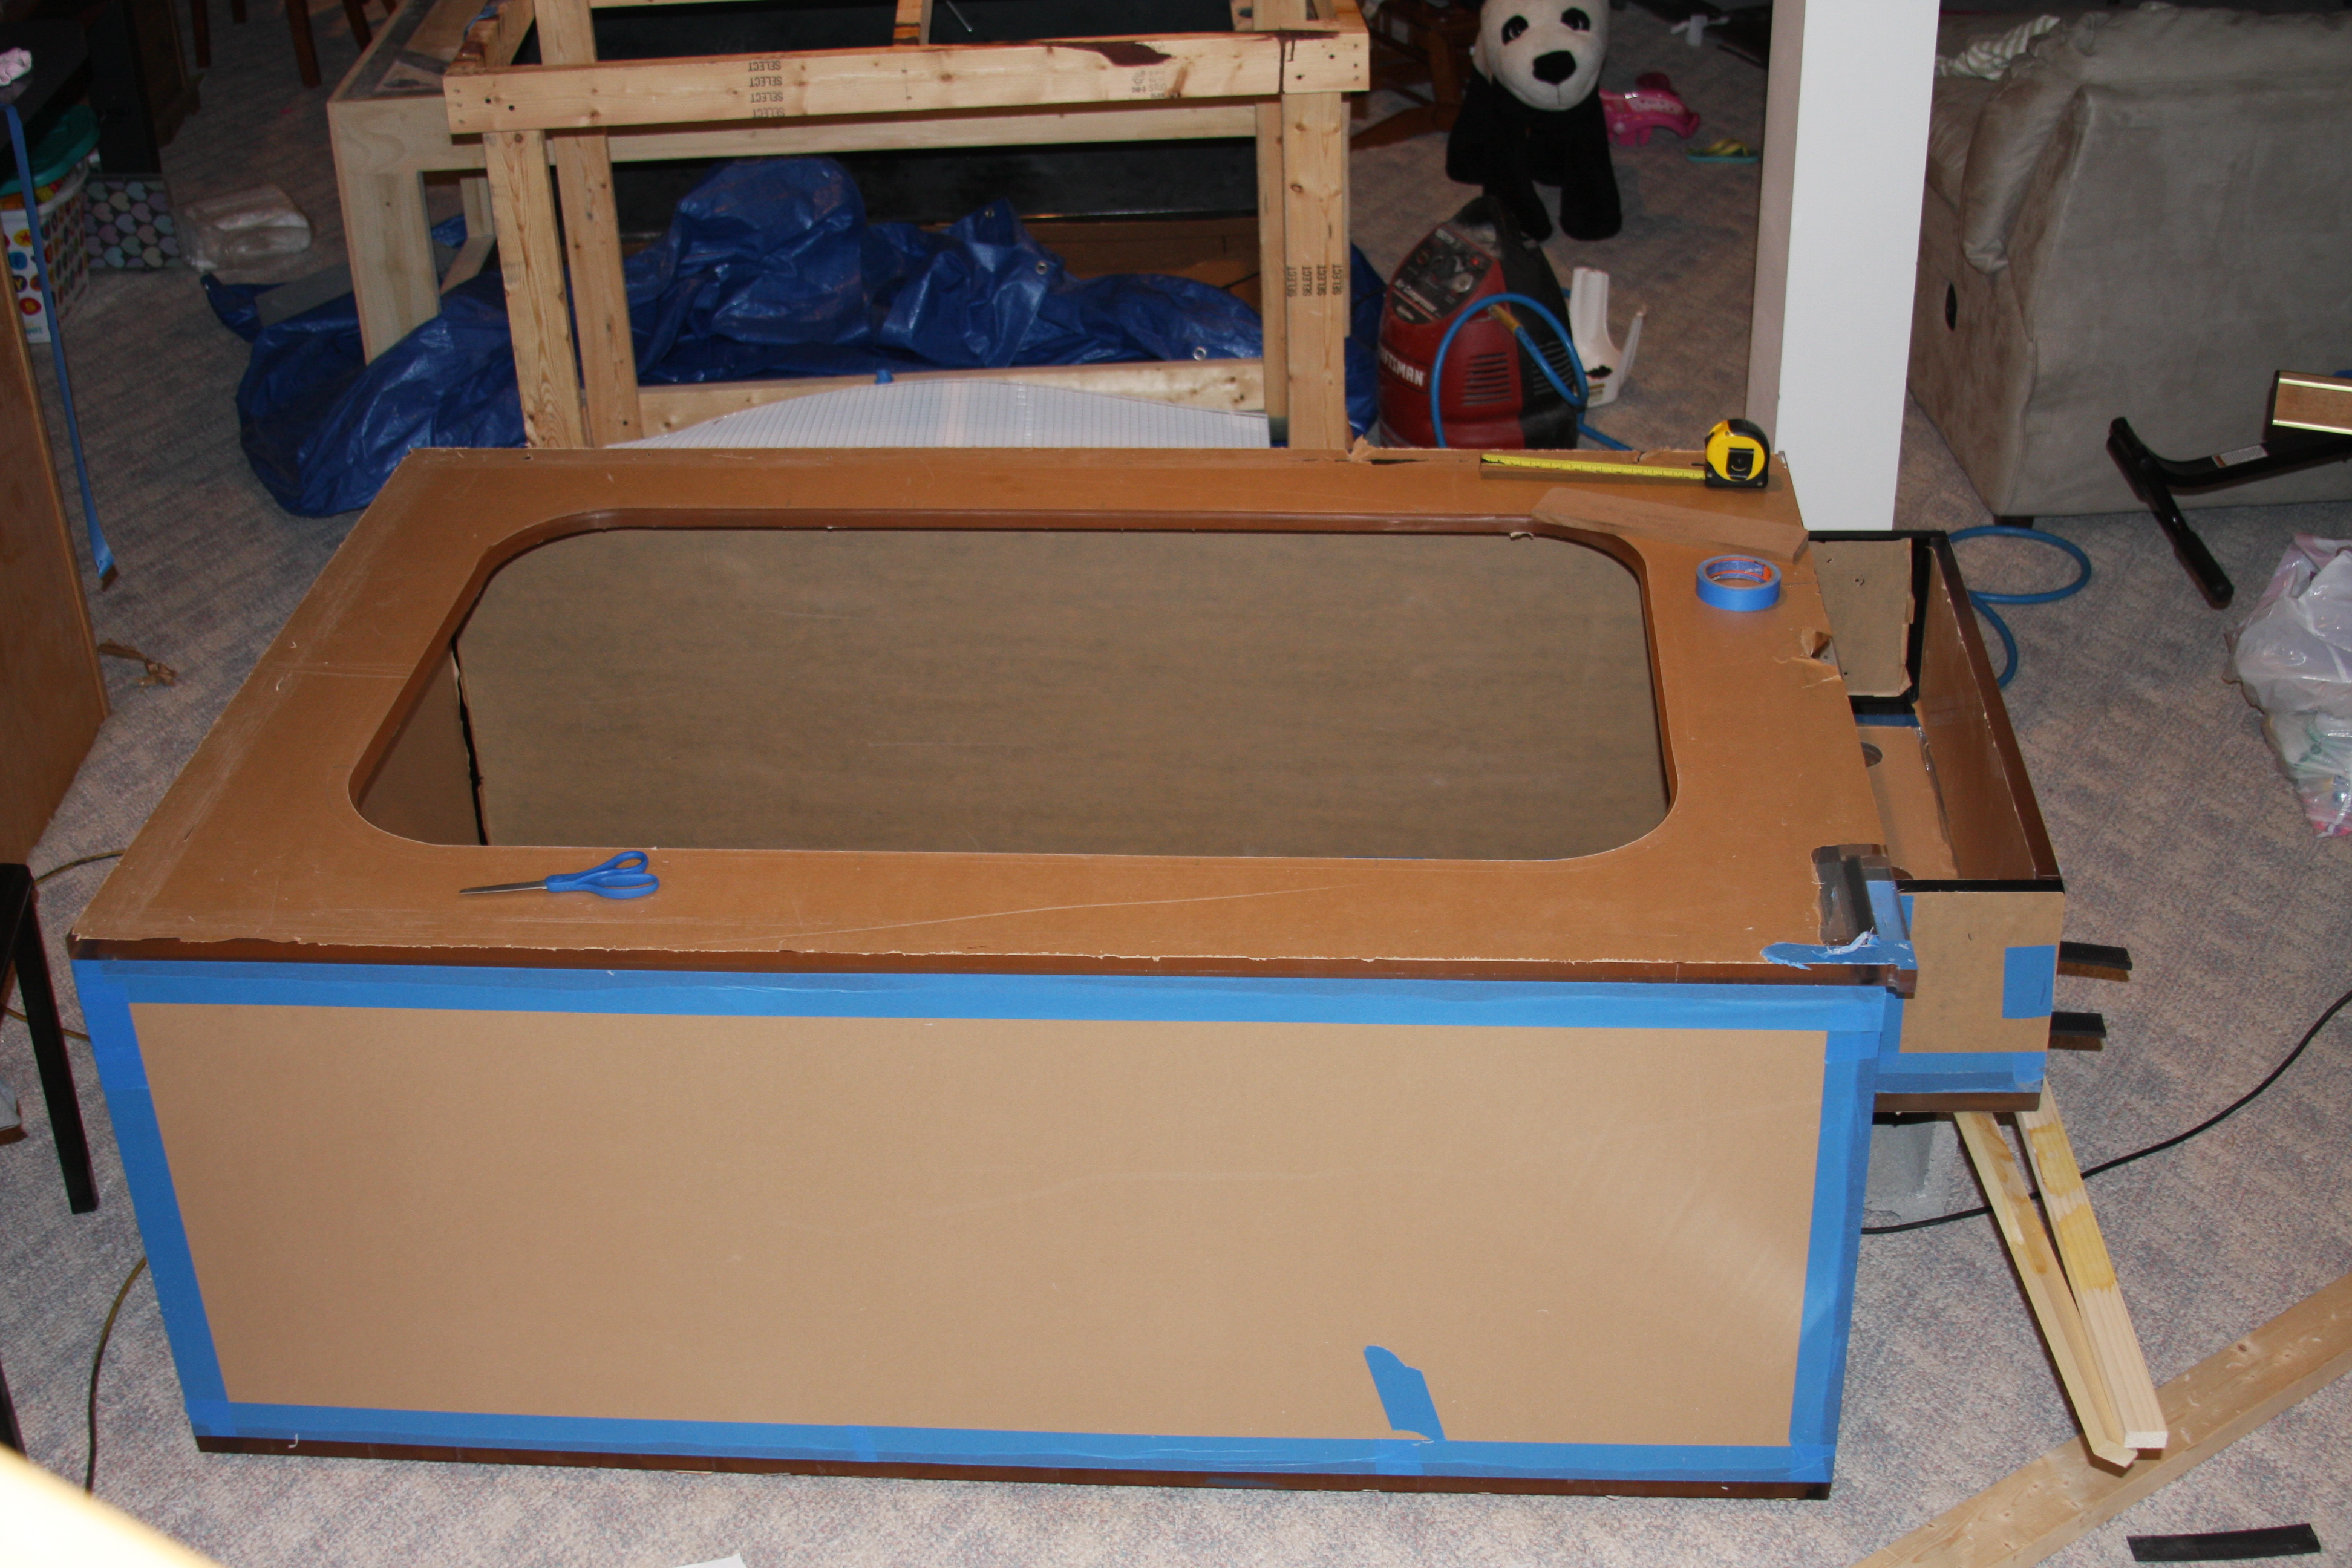
Some more updated pics.......

Shot of the overflow mocked up.....

Full tank shot with overflow mocked up in position.....Will have to actually stand tank on end to glue into place. Again still considering eurobracing the overflow to match the tank and tie everything together?????????
 

acrylic51

Active Member
I guess you have to truly feel/understand the weight of 1" acrylic and the weight of the over flow.....Couple that with adding the weight of the water when the tank is running and now you have the shear force of the the over flow and the water pulling against/away from the panel.....Just doesn't sit well in my mind.....Might be fine, but I don't like to sit and wonder "what if's"????
 

acrylic51

Active Member

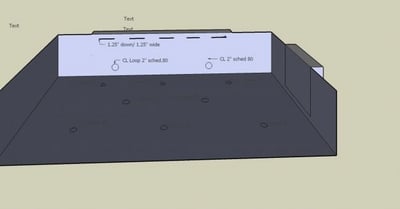
Ok Corey and everyone.......Corey and I were trying to talk flow through the course of the day through text messages.....Can be hard at times.....Here's a crude drawing from way back....Kind of outdated, but in general it should serve the purpose......You have to excuse the slots in the back panel, because that was changed and the overflow is on the right hand side looking at the tank....
The only thing definite at this stage of the build is where the CL drains will be located.....I'm opting to put them on the back wall as shown in the diagram. I had considered putting the drains in the bottom of the tank, where they can be hidden by rock work....The only issue I see with doing it there is if you need to clean the intakes or they become clogged you have an issue getting to them and actually seeing what's going on......The CL bulkheads will be 2".
I still am entertaining the idea of bulkheads in the bottom of the tank. I'd like to put bulkheads more towards the front panel, but the only issue I have with that is that they would be visible....The idea was tossed out there about burying PVC underneath the sand...That option isn't possible; due to considering going BB and even if I do a SSB it would never cover the PVC pipe work....
Corey and I were talking about putting bulkhead holes in the end panels and firing opposites of each other.....
 

gemmy

Active Member
If you want to hide the bulkheads, why not use pond foam to have them look like rock (sorta like a foam rock wall). Just a thought.
 

acrylic51

Active Member

If you want to hide the bulkheads, why not use pond foam to have them look like rock (sorta like a foam rock wall). Just a thought.
Hey Gemmy!!!! The issue with doing what you suggested doing towards the front panel would look rather out of place????
 

gemmy

Active Member
Quote:
Originally Posted by acrylic51 http:///t/376802/415-gallon-plywood-tank-build/1080#post_3412396
Hey Gemmy!!!! The issue with doing what you suggested doing towards the front panel would look rather out of place????
True, but it would also depend on how the rock is laid out and what your preference is...seeing the bulkhead or having it concealed under the foam. I can try to post a pic tomorrow of how my pvc came out on my foam wall to give you an idea of how it can look.
 

acrylic51

Active Member
Quote:
Originally Posted by acrylic51 http:///t/376802/415-gallon-plywood-tank-build/1040#post_3411208
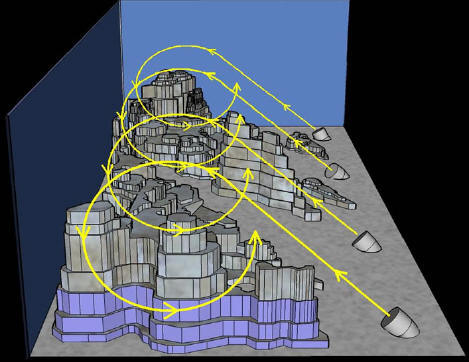
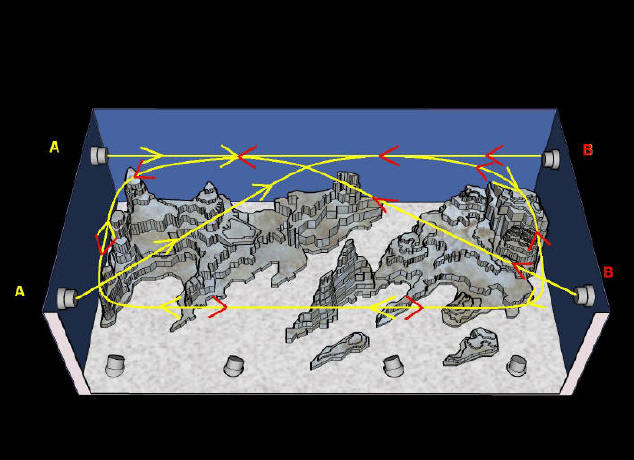
Hey Josh!!!!! Haven't seen you in awhile........Flow wise some things have changed from the original plan......No external waveboxes on the new design.....Trying to replicate something of this nature.........
.
This would/could create wave action......
This would create tidal and longshore drift....

The plan has changed from using external waveboxes to using OM either a 4Way or 8Way to create this type of flow pattern.....Some thought has to be developed as to how to hide or minimize intrusion of nozzles PVC into the viewing area; so not to take away from the tank. Here's a link on the whole layout. http://www.reef-eden.net/2006_reef_9.htm
The OM will be driven with either the Reeflo HammerHead or HammerHead Gold....I have to sit and look at both pumps a little closer though. Also need to start thinking hard about placement of return lines from the sump. That pump will be a Reeflo Hybrid Snapper/Dart pump, but will utilize a manifold to feed reactors and possibly other odds and ends.....
Corey and I had talked a bit a while ago about possible placements for returns and such, but nothing really hashed out solid in concrete, but getting to the stage where they could really be drilled.....So time has to be dedicated to that aspect. I think these little details are often over looked during a setup at times......
As far as weight???? Not really sure on total weight, but definitely lighter than the plywood tank. I have the tank assembled with the exception of the overflow, and I can bend over and get my hands underneath the tank and press it all the way up, and with my back it's not super bad, but I do feel it afterwards, but I couldn't do it with the plywood tank as it sits now, so definitely lighter. I'm not really sure what the weight is on a 1" thick panel......I used 1" for the complete build, so there wasn't any weight shaving anywhere except for the overflow covers/grills, that I'm still working on. Hopefully my computer will cooperate with me later on and I'll get some updated pics on here.....
Sorry guys!!!!! This diagram might help a bit rather than my first post on flow......The flow pattern I'm trying to replicate is exactly or similar to the above....Again want to try to replicate the ocean as it happens....The ocean has both, not just 1 type as we sometimes do in our closed systems......So both types of flow are important IMHO.
Gemmy if you look at the nozzles in the 2nd pic.....The 4 facing back towards the rock structures....These are the bulkheads that I was referring to trying to hide if possible.....The last thing I want or anyone else wants to see is unsightly white PVC in the viewing area......Those bulkheads fire up towards the surface and back will get us the circular; tumbling motion in 1 part of the equation.
 

2quills

Well-Known Member
Quote:
Originally Posted by acrylic51 http:///t/376802/415-gallon-plywood-tank-build/1080#post_3412383

Ok Corey and everyone.......Corey and I were trying to talk flow through the course of the day through text messages.....Can be hard at times.....Here's a crude drawing from way back....Kind of outdated, but in general it should serve the purpose......You have to excuse the slots in the back panel, because that was changed and the overflow is on the right hand side looking at the tank....
The only thing definite at this stage of the build is where the CL drains will be located.....I'm opting to put them on the back wall as shown in the diagram. I had considered putting the drains in the bottom of the tank, where they can be hidden by rock work....The only issue I see with doing it there is if you need to clean the intakes or they become clogged you have an issue getting to them and actually seeing what's going on......The CL bulkheads will be 2".
I still am entertaining the idea of bulkheads in the bottom of the tank. I'd like to put bulkheads more towards the front panel, but the only issue I have with that is that they would be visible....The idea was tossed out there about burying PVC underneath the sand...That option isn't possible; due to considering going BB and even if I do a SSB it would never cover the PVC pipe work....
Corey and I were talking about putting bulkhead holes in the end panels and firing opposites of each other.....
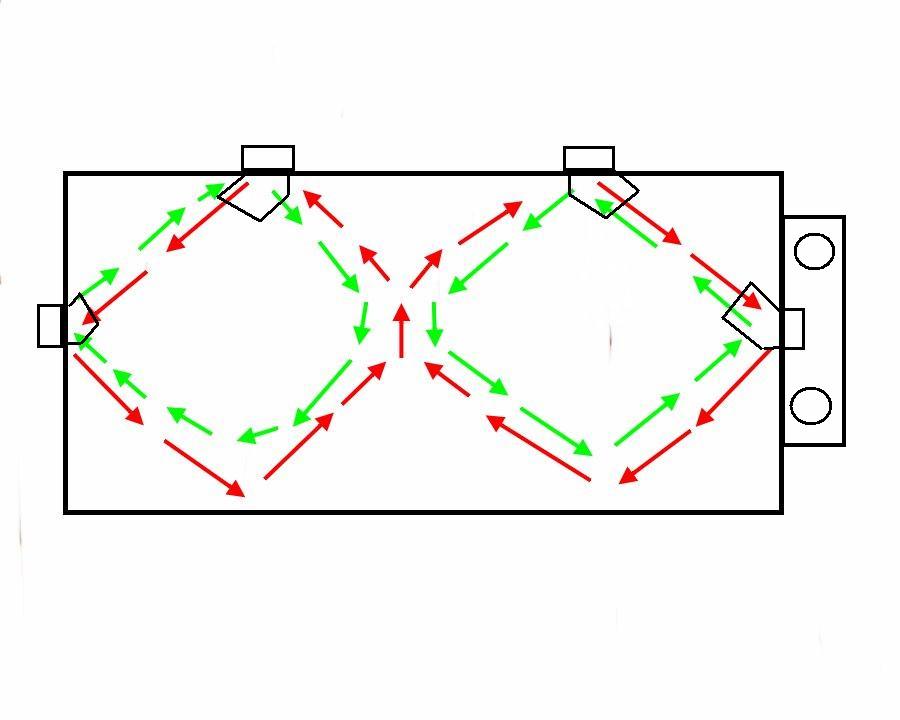
I'm looking at your tank Shawn and I'm wondering how practical it's going to be to try and achieve that barrel type flow given the limitations of bulkhead placement as well as the shape of the tank. Given the fact that your tank is more a rectangular box as apposed to more cube like dimensions.
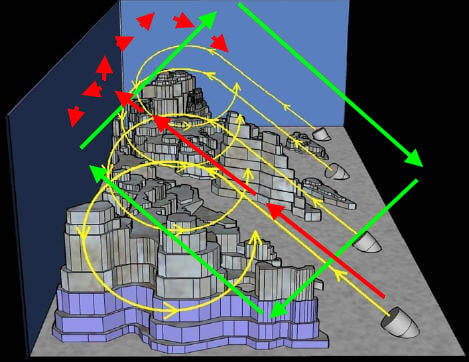
I'm thinking that in order to achieve the barrel roll type of flow you'd want to have your bulkheads placed in an area that would allow them to bounce off of one of the panels at a 45 degree angle. Or perhaps a more appropriate angle on your tank would be around a 22.5 degree angle. I'm finding it hard to believe that the original pattern illustrated in the picture below is really being achieved. I think with the angle that he has the bulkheads illustrated in the picture he is probably actually losing that rolling type of flow that he's looking for. And I think alot of it would be lost at the top of the tank since there is nothing really there to deflect the flow back downward. So alot of the flow would be lost at the top by simply creating a lot of turbulence at the waters surface in that corner. Thus losing a lot of energy and momentum
Arrows in green is what I think you should be looking at in order to achieve a roll. But the best way to do so would be to come in from the top. So that there would be 3 surfaces for the flow to deflect off of. I just don't think that aiming flow towards the top of the tank is going to yield the same result.
Red arrows are how I think the roll would be lost in the illustration.

And I think you could achieve virtually the same thing here, easier by just going in one big circular motion. Alternating the direction of the flow every so often. But are you going to want to put bulkheads on the small side of the tank where the short viewing panel is?
 

2quills

Well-Known Member
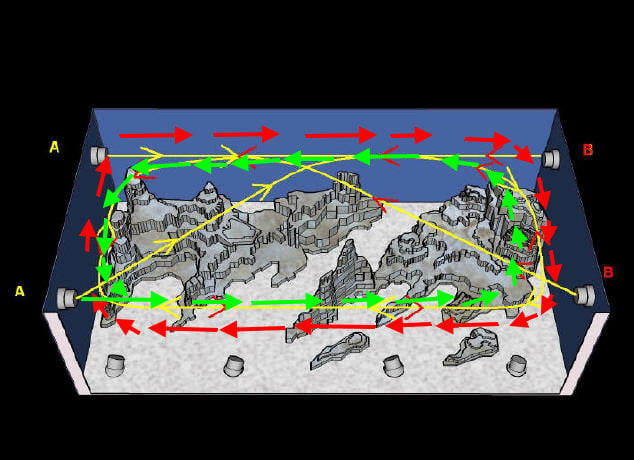
Another possibility would be....
I thought you had made mention one time about going with a two island rocks cape in the tank. I think this idea might be doable.
Top down view of the tank....Alternating flow patterns, of course.

Edit. So after giving it some thought. IMO you'd be best served with trying to use the side/vertical panels of the tank to achieve more specific types of flow patters. Trying to bounce flow patterns off the top of the tank would be inefficient as you would lose momentum. Bouncing them off the bottom would be good for stirring up organics to be filter out or eaten but would probably create issues if you ever wanted a sand bed and also probably be inefficient because of the rock work. Bouncing patterns off of the hard/flat surfaces would be the most efficient way of achieving more specific flow patterns. You could still do the barrel flow, it would just be vertical barrels instead of horizontal. Vertical barrels, Bro!!!
JMO
 

acrylic51

Active Member

True, but it would also depend on how the rock is laid out and what your preference is...seeing the bulkhead or having it concealed under the foam. I can try to post a pic tomorrow of how my pvc came out on my foam wall to give you an idea of how it can look.
Thanks Gemmy!!!! Would be glad to take a peak at what you have and can do with the foam!!!!!
 

sweatervest13

Active Member
Quote:
Originally Posted by 2Quills http:///t/376802/415-gallon-plywood-tank-build/1080#post_3412487
Another possibility would be....
I thought you had made mention one time about going with a two island rocks cape in the tank. I think this idea might be doable.
Top down view of the tank....Alternating flow patterns, of course.

Edit. So after giving it some thought. IMO you'd be best served with trying to use the side/vertical panels of the tank to achieve more specific types of flow patters. Trying to bounce flow patterns off the top of the tank would be inefficient as you would lose momentum. Bouncing them off the bottom would be good for stirring up organics to be filter out or eaten but would probably create issues if you ever wanted a sand bed and also probably be inefficient because of the rock work. Bouncing patterns off of the hard/flat surfaces would be the most efficient way of achieving more specific flow patterns. You could still do the barrel flow, it would just be vertical barrels instead of horizontal. Vertical barrels, Bro!!!
JMO
Shawn what is your plan for doing this? Are you going to cut out the bulkhead holes then test?
I would suggest doing some testing. You could tap water test the tank and use some regular powerheads and place them where you would think you would want the bulkheads for the CL to go. I by no means pretend to know a lot about hydro-dynamics but IDK exactly how it would work. Like Corey said the first illustration you used to show the barrel flow with the CL on the bottom of the tank (front mounted bulkheads pointing towards the back) might hit off the back wall then go upwards creating surface turbulence. But it might not. Why not do some easy testing to see before you drill one hole? That would be my suggestion. It might take some planning and creativity to get the test set up but it seemed to me that this concept was the genesis of this tank build. Why not take a little more time to get it the way you want it. HTH
Ryan.
 

2quills

Well-Known Member
Quote:
Originally Posted by sweatervest13 http:///t/376802/415-gallon-plywood-tank-build/1080#post_3412515
Shawn what is your plan for doing this? Are you going to cut out the bulkhead holes then test?
I would suggest doing some testing. You could tap water test the tank and use some regular powerheads and place them where you would think you would want the bulkheads for the CL to go. I by no means pretend to know a lot about hydro-dynamics but IDK exactly how it would work. Like Corey said the first illustration you used to show the barrel flow with the CL on the bottom of the tank (front mounted bulkheads pointing towards the back) might hit off the back wall then go upwards creating surface turbulence. But it might not. Why not do some easy testing to see before you drill one hole? That would be my suggestion. It might take some planning and creativity to get the test set up but it seemed to me that this concept was the genesis of this tank build. Why not take a little more time to get it the way you want it. HTH
Ryan.
That would deffinately be a good idea IMO. Couldn't hurt to try it out and see. I'm sure Shawn has some extra power heads laying around somewhere. My biggest thing is that even if you do achieve a certain pattern in an empty tank that doesn't necissarily mean it's going to stay that way once you have rock in there. So IMO you have to take the direction of flow and rock work into consideration if you're looking to achieve something specific.
Also have to remember that just because you direct water at a surface that it doesn't necissarily mean that it's going to deflect off of that surface at the same angle that it hits it. So it's not like light striking a reflector for instance. You can think of light as a tennis ball and water as a tomato. If you throw the tennis ball at a wall at a certain angle then it should bounce off of that wall at the same angle of degree that it hit at. But if you try thowing a tomato at a wall it's going to squash and go all over the place. Water does the same thing to a degree.
So even if Shawn put his bulkheads on the back of the tank and aimed them towards the front panel on an angle, I don't necissarily think that water is going to bounce or roll right backwards with out some other form of help. I think it would simply hit the front panel and create a bunch of random type of flow all along the front of the tank. Some may roll backwards, but not all. Maybe if he put bulkheads on the bottom front of the tank pointed towards the back then the two flows combined could help creat the roll effect. But again the rockwork is going to come into play.
I like the idea of trying to simulate nature. But it's not very easy. And we already know corals can grow well with random/chaotic flow. What we don't want is prolonged exposure to 1 way linear type of flow. You have to mix it up because it can be bad for corals if you don't. They should be hit with some flow from all sides throughout the day.
 

sweatervest13

Active Member
Agreed!!!
This is a tuff nut to crack. For the testing would say to try to mock up some rockwork and see how it goes. Now if I remember correctly Shawn is going to have two CL's and have them alternating? Maybe that is the trick to keep it from being that 1 way linear flow. Wasn't he going to overlap some time between the two CL's so that they are on at the same time for a little bit? That should get flow coming from different directions.
Either way you slice it the tank will have better flow then the standard tank with Koralia's. LOL I am very interested to see how this goes and I love the fact that we have people on this site that are willing to try new things to advance the hobby.
 
Top