415 Gallon Plywood Tank Build
- Thread starter acrylic51
- Start date
acrylic51
Active Member
It never fails when I do come up with something they never have it in stock, and their estimate on ordering time was iffy......I told them I needed it yesterday......I did look at "wing cutters", but those things look insane, but expensive, and for using it once not sure if it was worth the money I would have spent. He did try to talk me into buying the big 3 1/4hp router while I was in.....
While I was there I was looking around for other alternatives, and actually found that a rabbeting bit would work somewhat in the same fashion......
Hopefully tonight I will finish up early enough to take some pics and get them uploaded....Can't stay up super late tonight, have the guys coming over at 8:30 to help flip the tank over so I can glue up the eurobracing........
2quills
Well-Known Member
Quote:
Originally Posted by acrylic51 http:///t/376802/415-gallon-plywood-tank-build/1020#post_3409551
How much flex do you think I'd get with using 3/8" thick acrylic for the over flow grill covers???
Can't imagine it would be much if even measurable. Just wondering if they're going to stay put or would they want to float up?
acrylic51
Active Member
Yeah I'm thinking it would be minimal if anything, because of the slits cut into it allowing the water to bypass not really allowing pressure to be put on the piece???? Thinking might be all wrong though. I do have extra 1" laying around, but would be a PITA to cut the teeth into that material though.
Not a problem I don't think with the piece wanting to float up or stay put....I actually cut the lip, have to get a good pic of the cut, but the 3/8" piece would fit firmly into the slot, and remember it would also run tight up against the bottom of the eurobracing, so I don't think it would float up, and with water pressure against it, would/should keep it pressed into the lip. As you had mentioned before I little dab of silicone around the piece on the back side pressing it in would also mitigate it wanting to move and still allow easy removal if needed....
Not a problem I don't think with the piece wanting to float up or stay put....I actually cut the lip, have to get a good pic of the cut, but the 3/8" piece would fit firmly into the slot, and remember it would also run tight up against the bottom of the eurobracing, so I don't think it would float up, and with water pressure against it, would/should keep it pressed into the lip. As you had mentioned before I little dab of silicone around the piece on the back side pressing it in would also mitigate it wanting to move and still allow easy removal if needed....
acrylic51
Active Member
Finally got the group over this morning to help pull the tank off the stand onto the cart.....Finally got it flipped over on it's top on top of the eurobracing and got it shimmed up and started gluing the first seam.......Hopefully later this afternoon I can get the back edge of the eurobracing and the other end glued up as well. Decided this time to only work 2 edges at a time....Way to much scrambling for 1 person to glue and pull pins at the same time......
acrylic51
Active Member
Some progress made this weekend!!!!!
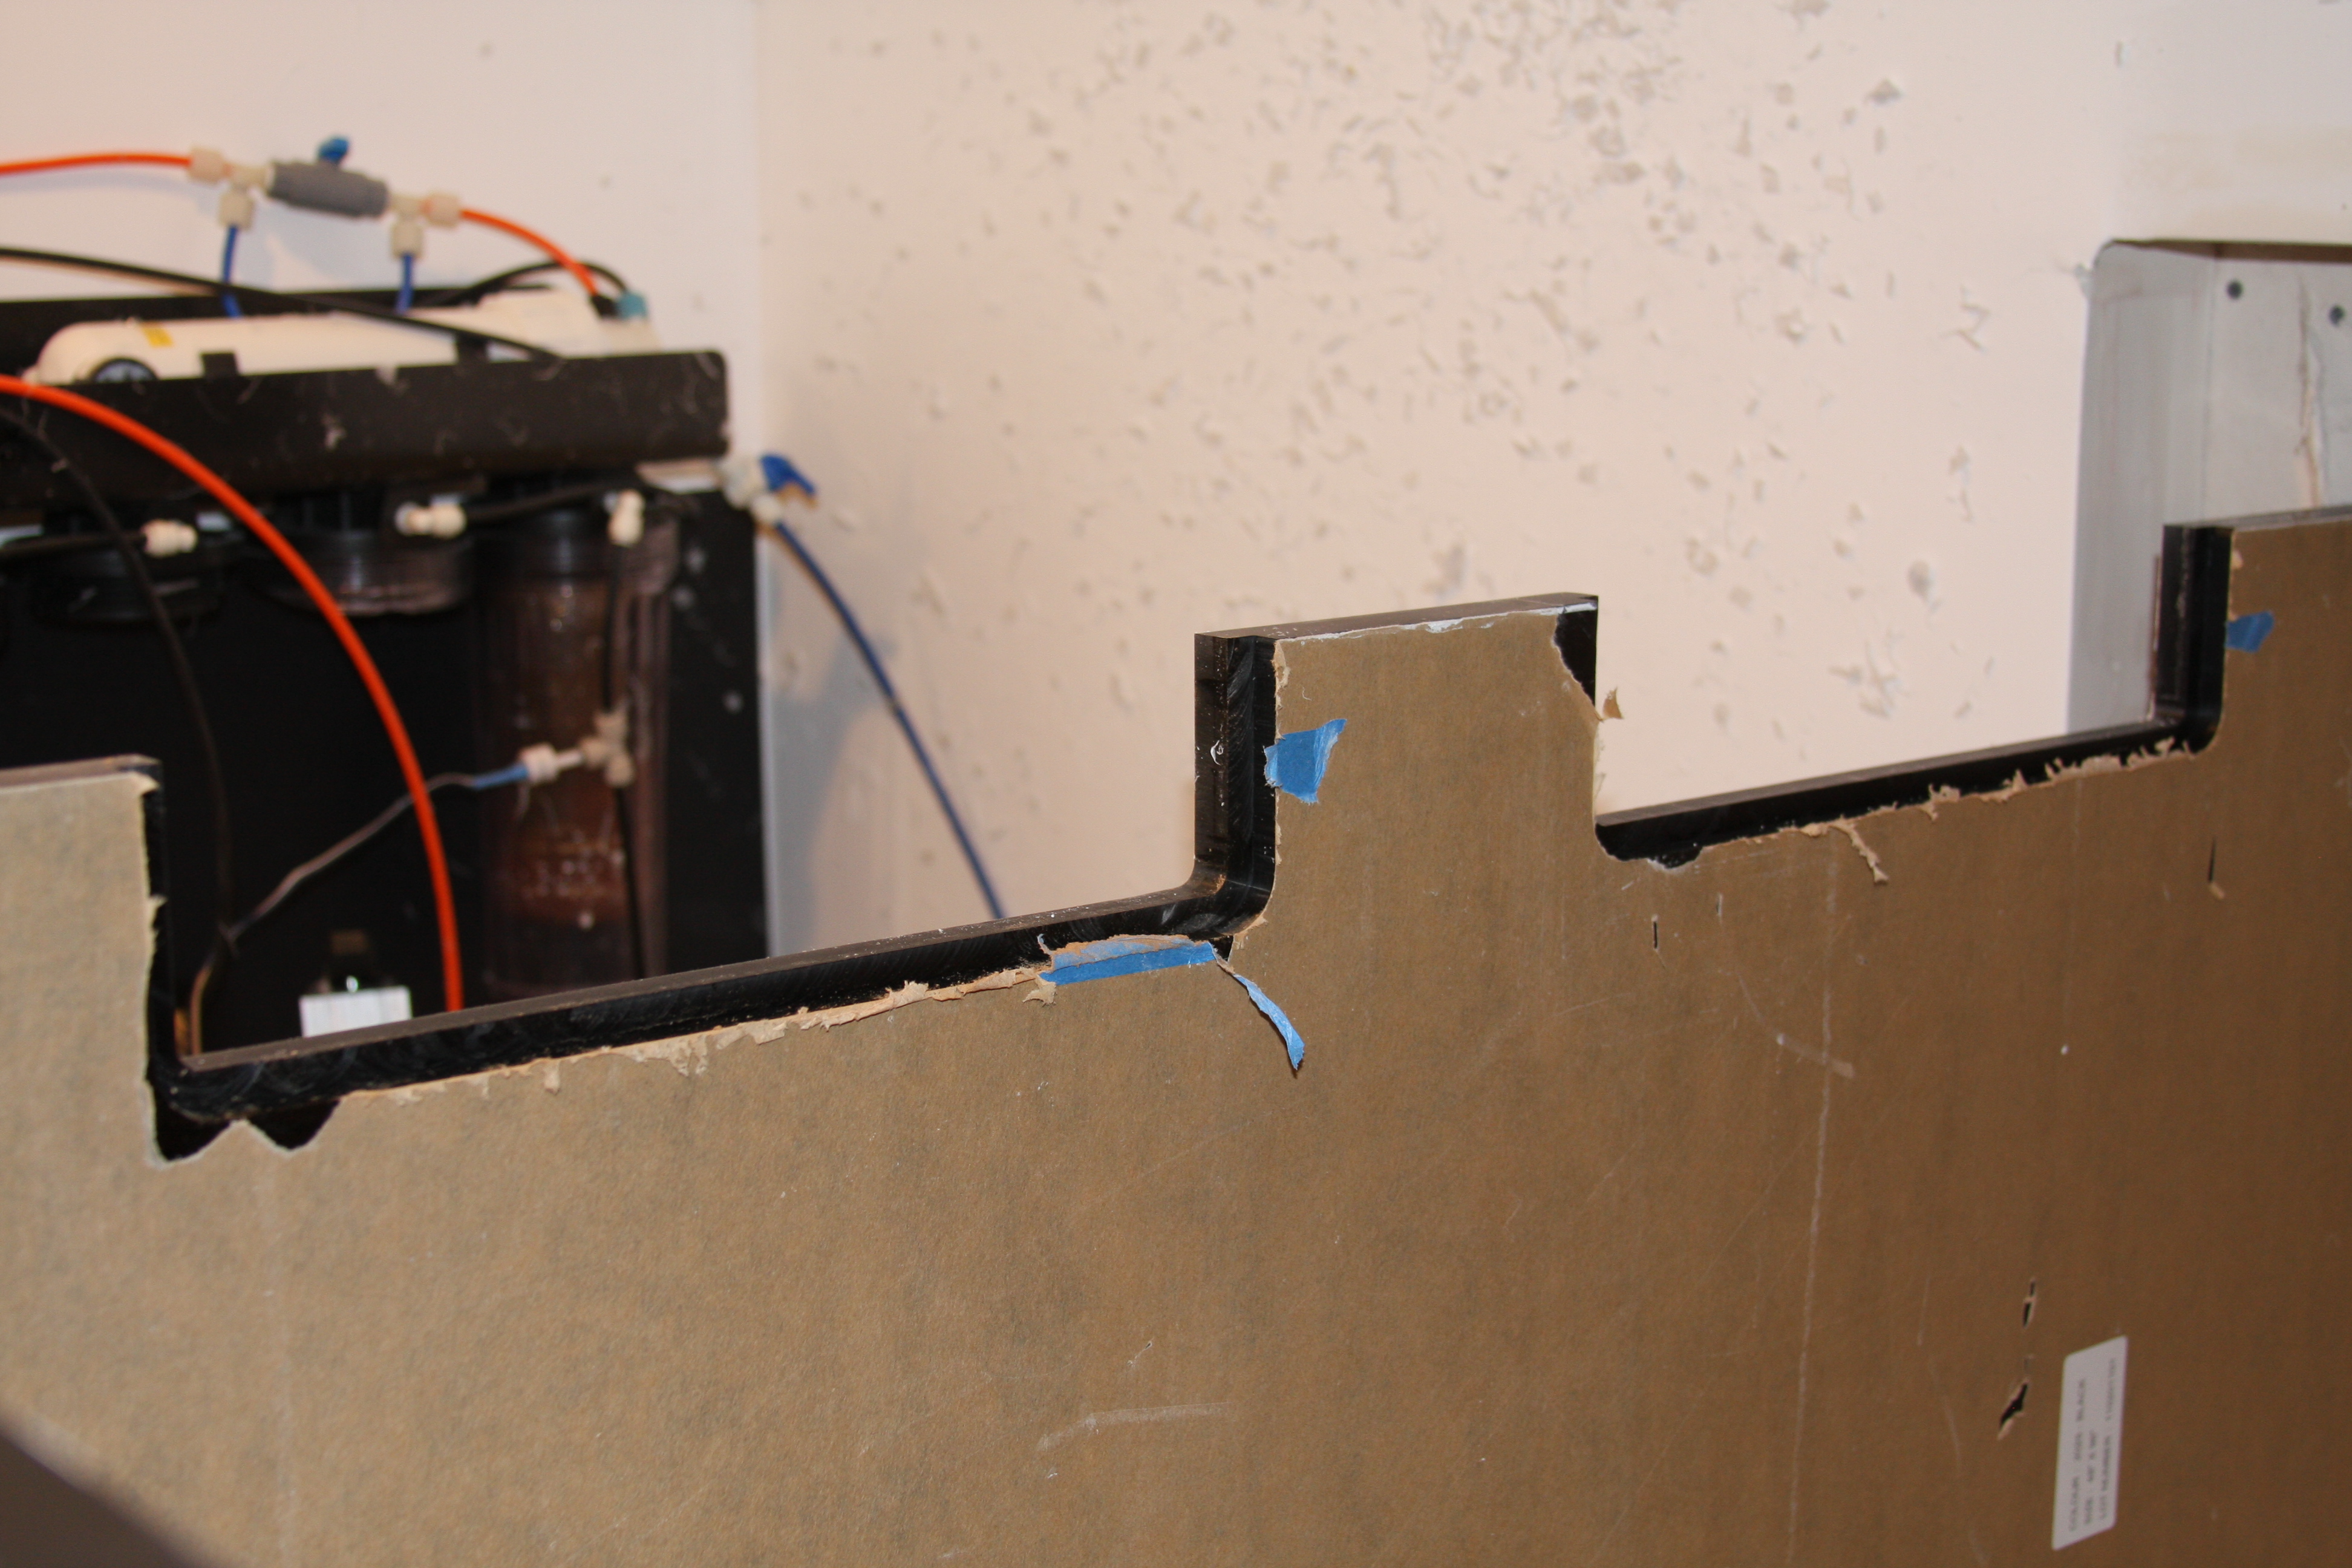
This was the original cutouts down on the side panel.....After a lot of discussions with Corey and Al about the removable overflow/grill panels, and I decided to take the plunge and go with a change.....You can see in this pic that I made my initial vertical cuts at the ends of the slot.....I did fabricate up a jig to keep everything level and square, but didn't get a shot of the jig mounted up to the tank. Again all cuts were made by taking small amounts at a time.......

This was the original cutouts down on the side panel.....After a lot of discussions with Corey and Al about the removable overflow/grill panels, and I decided to take the plunge and go with a change.....You can see in this pic that I made my initial vertical cuts at the ends of the slot.....I did fabricate up a jig to keep everything level and square, but didn't get a shot of the jig mounted up to the tank. Again all cuts were made by taking small amounts at a time.......

acrylic51
Active Member
I thought about our converstion about holding the overflow covers/grills in place, and I think with a good enough fit it should/would stay in place, and It really couldn't float IMO with it being run tight up against the bottom of the eurobracing......I did the rabbet cut on the cutouts, and then something kept bugging me and I kept looking at the corners of the cutouts aren't squared, they are actually rounded......Son of A Sea Biscuit......now it makes it a little more challenging to fit the covers.......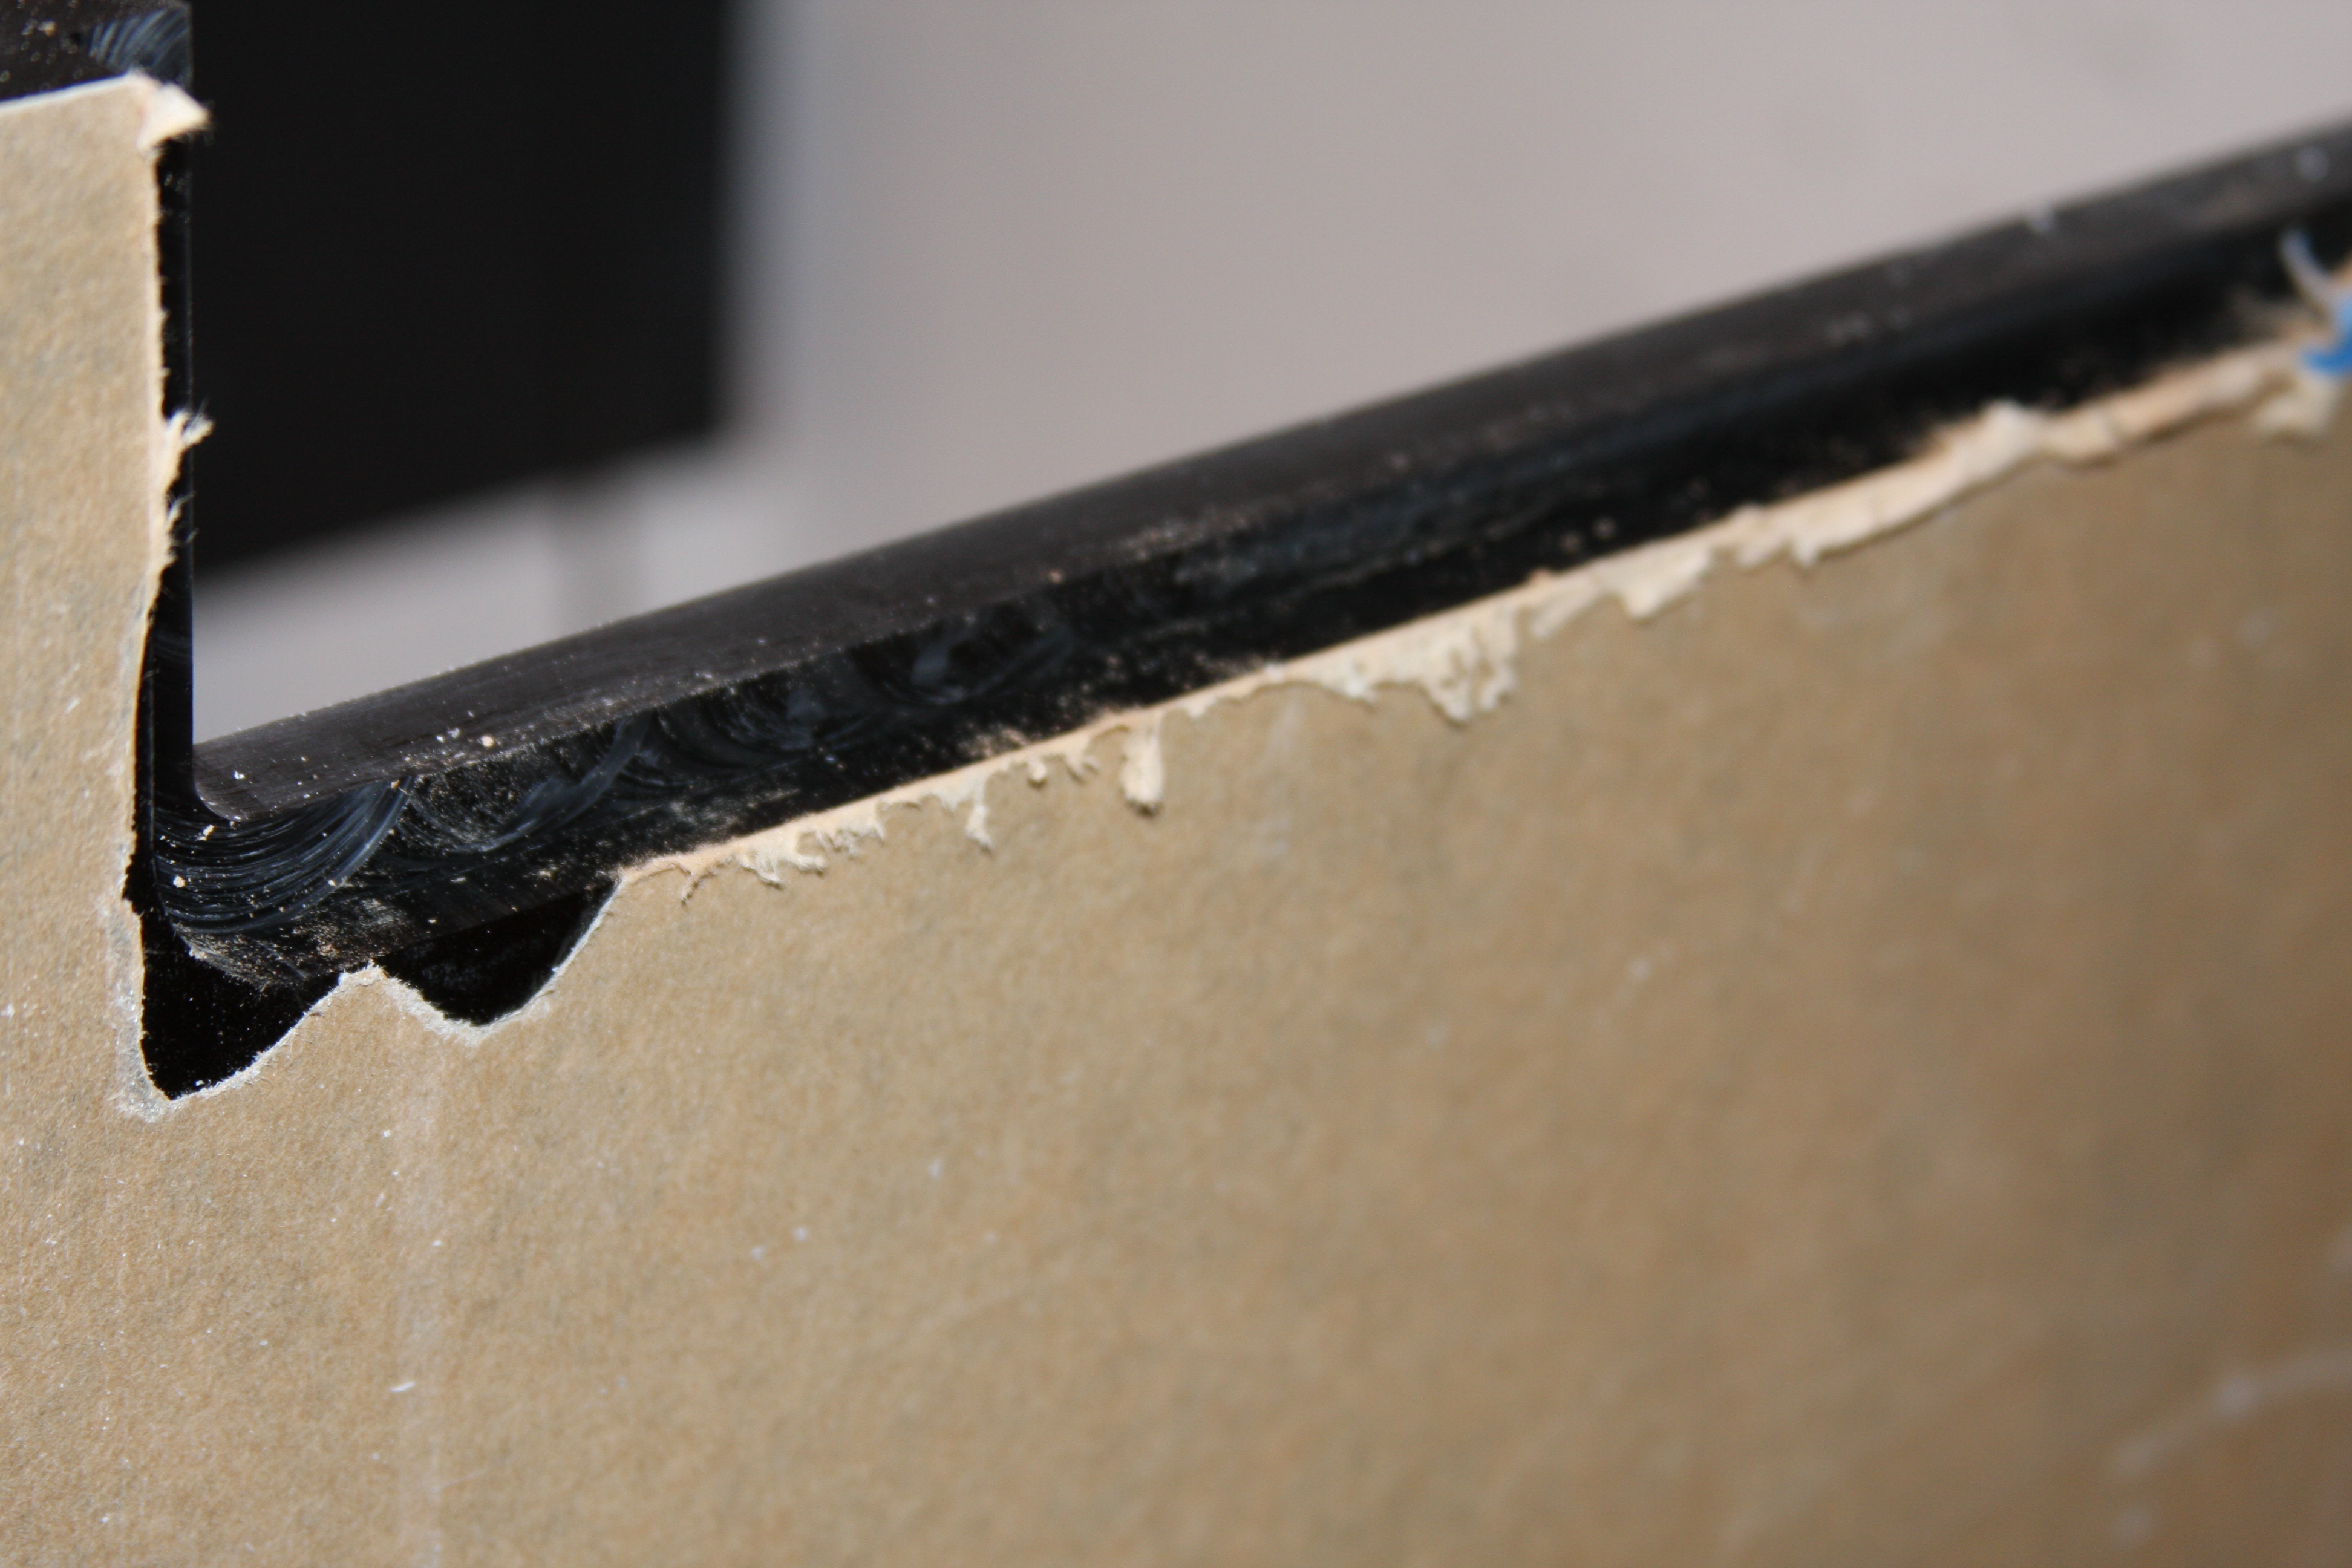
Should have pulled the paper away a bit more, to show the cut, but the corners at the bottom are rounded....After a little thinking I headed back to the garage knowing the measurement of the opening, and the bit used for the cut was 1/2" so I just added an 1" to the cut, and fabbed up a jig and made the cut......Again the piece I cut out was squared at the corners, but that was fine....I grabbed the orbital sander, and a piece of loose sandpaper and knocked it down close with the sander, and then started easing the curved radius of the piece till it fit, snug in the slot.......I have to either track down my double sided tape or pic some up after work tomorrow, so I can tape the pattern onto the acrylic and make the cuts using the router........I might buy a 1/4" flush/trim bit for the router table and do it on the table??????
I didn't take a pic of the jig I fabbed up for the covers yet, will get a pic tomorrow.....I still haven't fabbed up the jig yet for routing the overflow teeth as well, but that shouldn't take much time at all.....
acrylic51
Active Member
Here's a little more progress that was made today.......Still giving each joint 24hrs to dry.......the solvent/joint can off gas for roughly 7 days, so......I'm dying to get moving and water to it.....
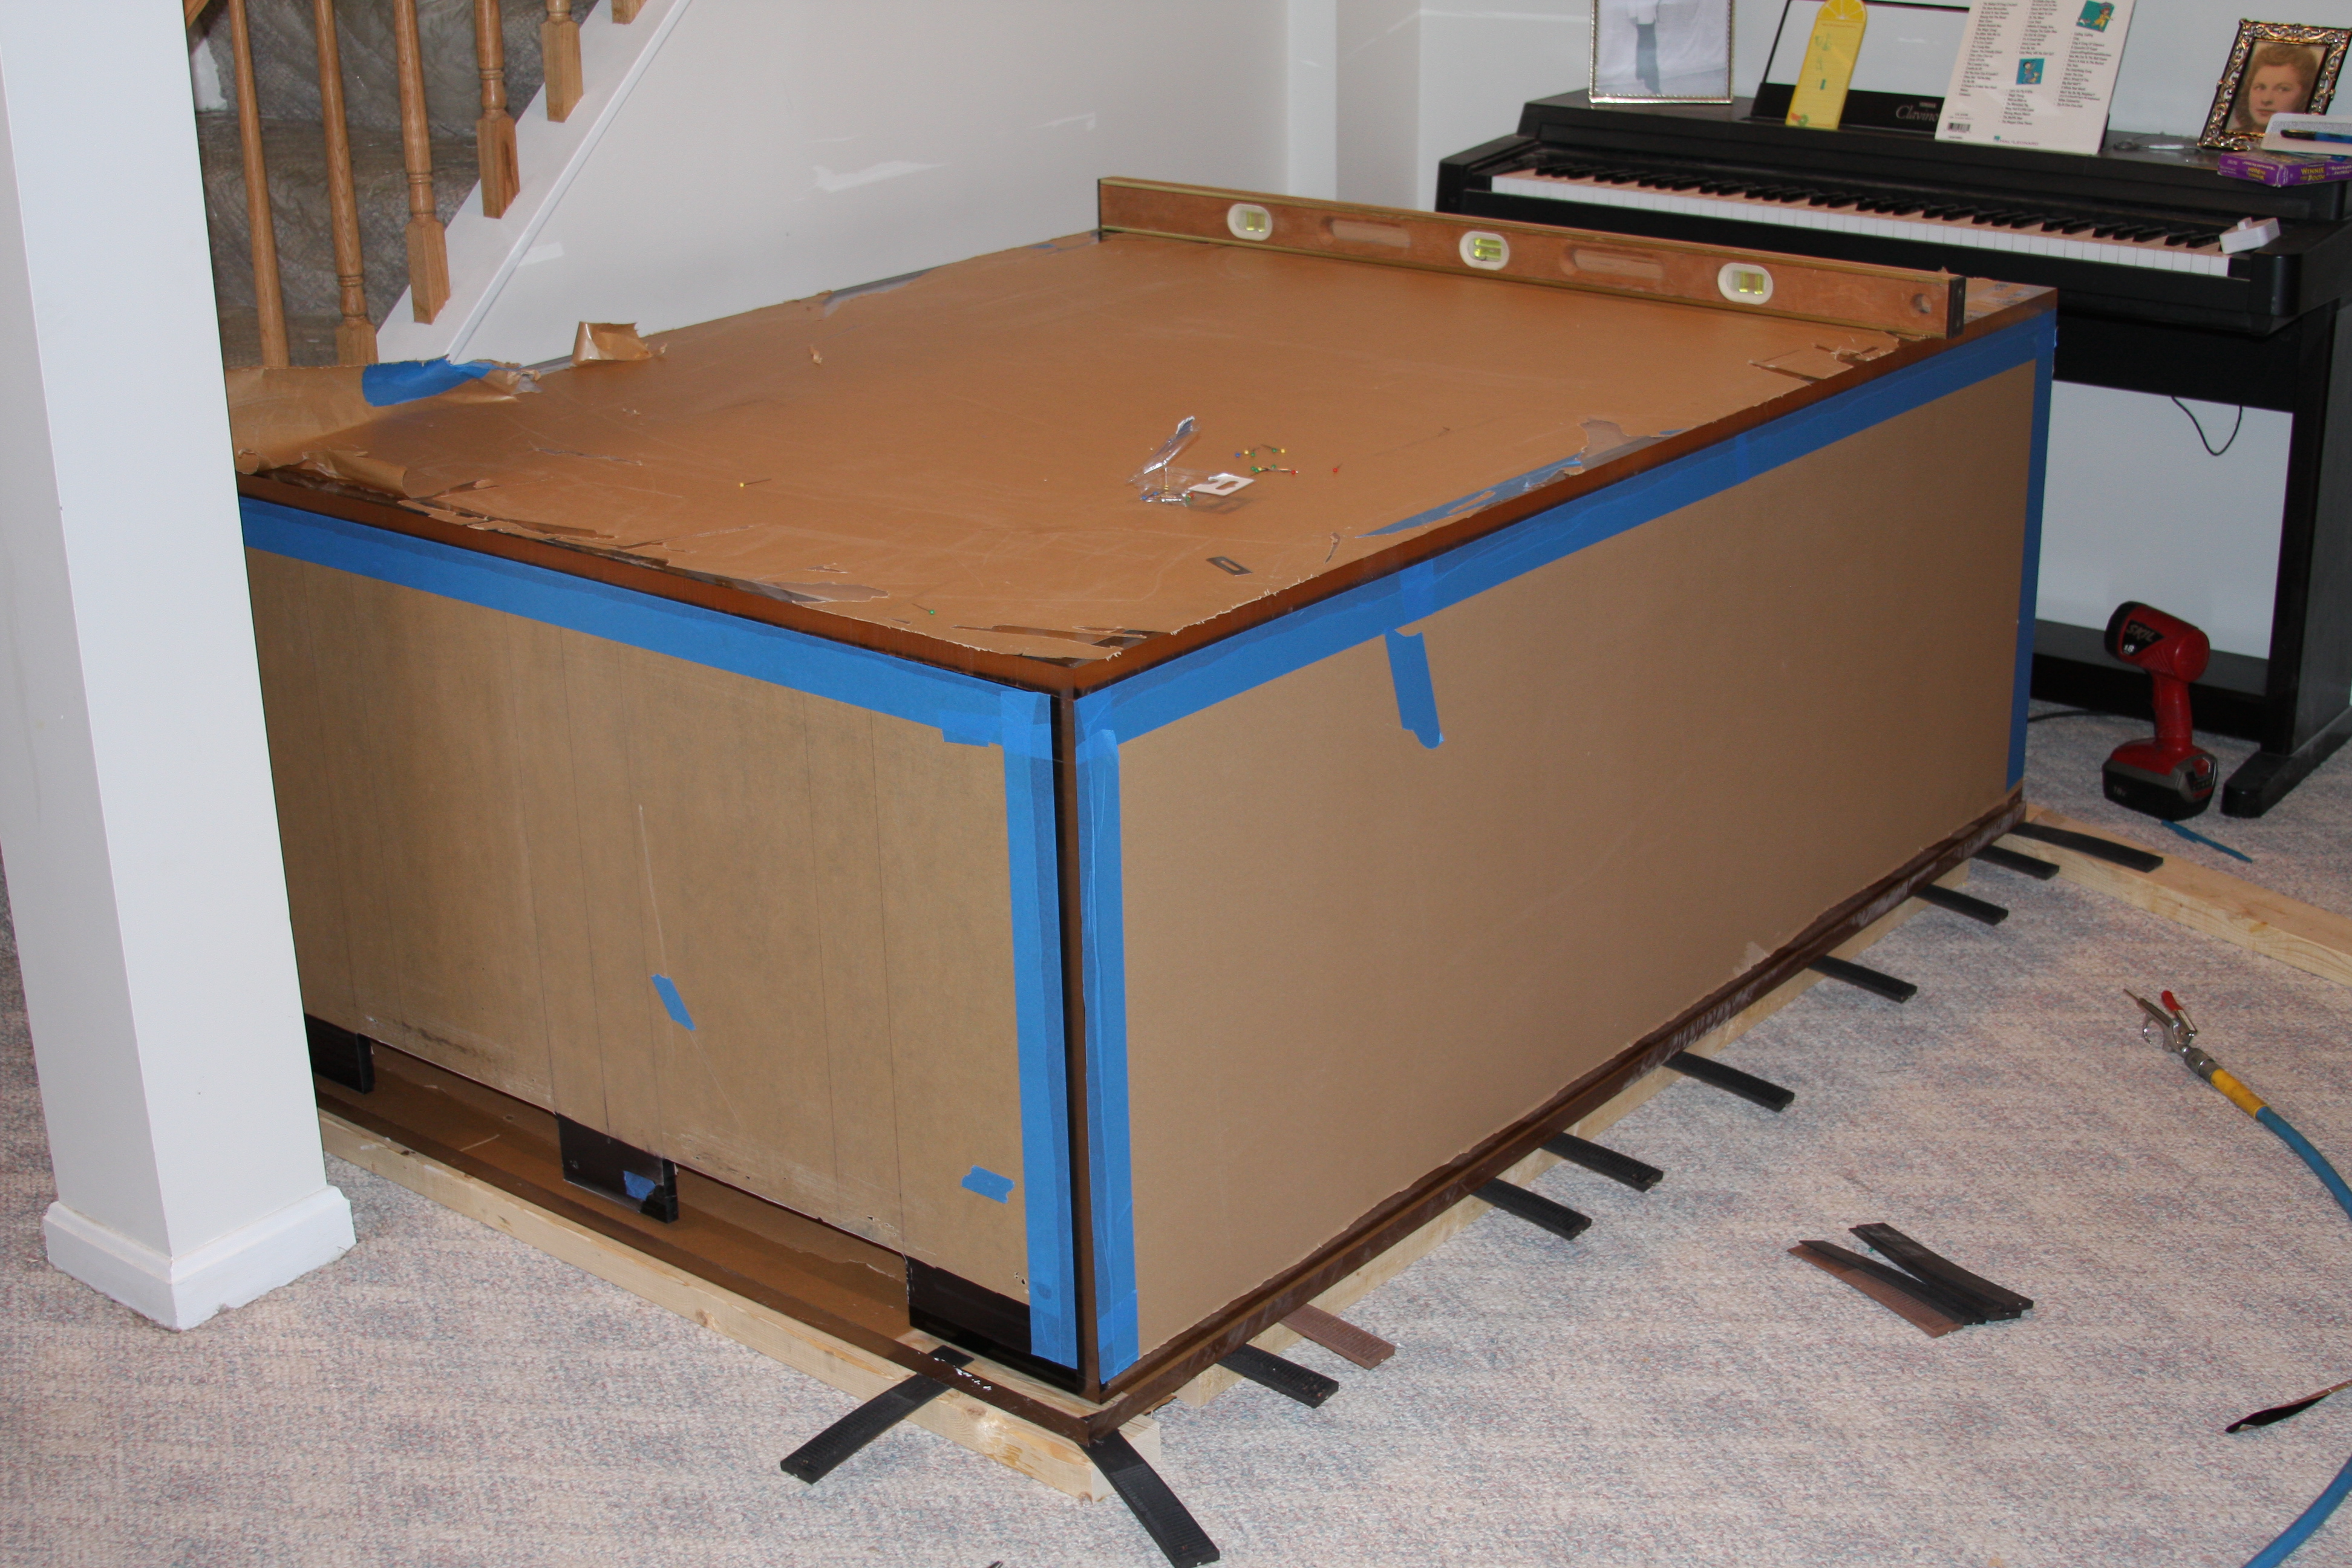
As we speak the eurobracing is glued on 2 sides, will tackle the other 2 sides hopefully tomorrow......I have the overflow in the garage now wet sanding the edges....I think I might round those corners as well.....That stuff is sharp when squared off.

As we speak the eurobracing is glued on 2 sides, will tackle the other 2 sides hopefully tomorrow......I have the overflow in the garage now wet sanding the edges....I think I might round those corners as well.....That stuff is sharp when squared off.
desertdawg
Member
Thats the first picture to show the overall size, very nice!!!
acrylic51
Active Member
I have to give some credit to Sweatervest. A while back we were discussing the overflow, and thought about what he said. Not real concerned about anything clogging the drains, but anythings possible. I actually built 2 overflows!!!! The first was more a practice and figure if it turned out well I would use it, but wasn't please with the 1 joint so, I built another!!!! I used balck acrylic for the sides, but opted to use clear for the back panel of the overflow. Again as Sweatervest suggested could at a quick glance see what's going on. Plus if any fish decides to go over it would be a little easier to locate as well. Thanks Sweatervest!!!!!!
I do have to thank Corey and Al. Both solid sounding boards. Trying to get the rest of the community involved in the process, but everyone seems a little gun shy!!!!
Hopefully this evening I can get the tank right side up and route everything flush and get a couple more pics and actually show the mock up of the overflow grills. Will have to then focus on hole placement and flow, so you guys better put on the thinking caps.
Gemmy haven't forgotten about you!!!! I have to PM you about a rock wall!!!
desertdawg
Member
I would get more involved in the suggestion area, but right I'm just a pupil reading what your doing and trying to comprehend the process of building something like this!
Desert (can I have a hall pass) dawg
Desert (can I have a hall pass) dawg
acrylic51
Active Member
Quote:
Originally Posted by Desertdawg http:///t/376802/415-gallon-plywood-tank-build/1040#post_3410179
I would get more involved in the suggestion area, but right I'm just a pupil reading what your doing and trying to comprehend the process of building something like this!
Desert (can I have a hall pass) dawg
Ahhhh don't be shy!!!!! Everyone brings a little something to the table.......Sometimes the minds get thinking to much, and to in depth and overlook the obvious or the simple things......Through your thoughts and ideas out there!!!!!!!
acrylic51
Active Member
Hey Josh!!!!! Haven't seen you in awhile........Flow wise some things have changed from the original plan......No external waveboxes on the new design.....Trying to replicate something of this nature.........
.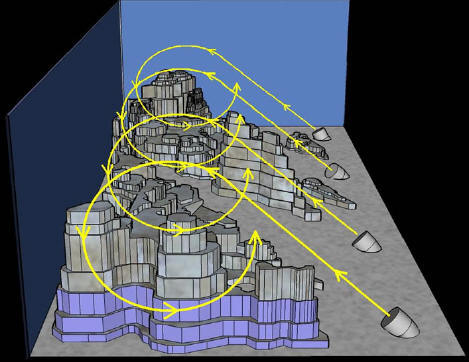
This would/could create wave action......
This would create tidal and longshore drift....
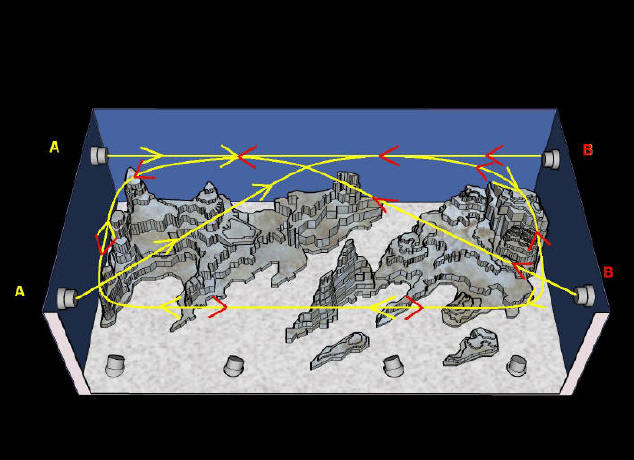
The plan has changed from using external waveboxes to using OM either a 4Way or 8Way to create this type of flow pattern.....Some thought has to be developed as to how to hide or minimize intrusion of nozzles PVC into the viewing area; so not to take away from the tank. Here's a link on the whole layout. http://www.reef-eden.net/2006_reef_9.htm
The OM will be driven with either the Reeflo HammerHead or HammerHead Gold....I have to sit and look at both pumps a little closer though. Also need to start thinking hard about placement of return lines from the sump. That pump will be a Reeflo Hybrid Snapper/Dart pump, but will utilize a manifold to feed reactors and possibly other odds and ends.....
Corey and I had talked a bit a while ago about possible placements for returns and such, but nothing really hashed out solid in concrete, but getting to the stage where they could really be drilled.....So time has to be dedicated to that aspect. I think these little details are often over looked during a setup at times......
As far as weight???? Not really sure on total weight, but definitely lighter than the plywood tank. I have the tank assembled with the exception of the overflow, and I can bend over and get my hands underneath the tank and press it all the way up, and with my back it's not super bad, but I do feel it afterwards, but I couldn't do it with the plywood tank as it sits now, so definitely lighter. I'm not really sure what the weight is on a 1" thick panel......I used 1" for the complete build, so there wasn't any weight shaving anywhere except for the overflow covers/grills, that I'm still working on. Hopefully my computer will cooperate with me later on and I'll get some updated pics on here.....
.

This would/could create wave action......
This would create tidal and longshore drift....

The plan has changed from using external waveboxes to using OM either a 4Way or 8Way to create this type of flow pattern.....Some thought has to be developed as to how to hide or minimize intrusion of nozzles PVC into the viewing area; so not to take away from the tank. Here's a link on the whole layout. http://www.reef-eden.net/2006_reef_9.htm
The OM will be driven with either the Reeflo HammerHead or HammerHead Gold....I have to sit and look at both pumps a little closer though. Also need to start thinking hard about placement of return lines from the sump. That pump will be a Reeflo Hybrid Snapper/Dart pump, but will utilize a manifold to feed reactors and possibly other odds and ends.....
Corey and I had talked a bit a while ago about possible placements for returns and such, but nothing really hashed out solid in concrete, but getting to the stage where they could really be drilled.....So time has to be dedicated to that aspect. I think these little details are often over looked during a setup at times......
As far as weight???? Not really sure on total weight, but definitely lighter than the plywood tank. I have the tank assembled with the exception of the overflow, and I can bend over and get my hands underneath the tank and press it all the way up, and with my back it's not super bad, but I do feel it afterwards, but I couldn't do it with the plywood tank as it sits now, so definitely lighter. I'm not really sure what the weight is on a 1" thick panel......I used 1" for the complete build, so there wasn't any weight shaving anywhere except for the overflow covers/grills, that I'm still working on. Hopefully my computer will cooperate with me later on and I'll get some updated pics on here.....

