Flower's Sump/Fuge Build

2quills

Well-Known Member
Quote:
Originally Posted by Flower http:///forum/thread/380517/flower-s-sump-fuge-build/620#post_3322504

Fantastic!
I thought a hose connects to the overflow... with a barbed thingy.. It's late, I have to go to work, I can't go look now... but I will to get out the overflow tomorrow and see how it attaches. Looking at your pictures with what I have here will help allot.
Does it have to be glued...and if so what exact type of glue? How long to let it set before I can use it?
You are correct, it does connect with a hose barb fitting. In CPR's video of their overflows they make mention on how they actually recommend going with a larger size drain line if you can. It just increases efficiency and will hopefully help in the area of quieter operation. So what we've done is come up with an adapter that increases the diameter of the drain size so that we can incorporate it easily into the bulkhead that CPR has provided for you. Since they sell slip style bulkheads then this is how we can adapt it, by glueing it to the bulkhead.
And this is that adapter. I used a 3/4" bulkhead and pipe next to the 1-1/4" adapter as a reference to how it will connect.
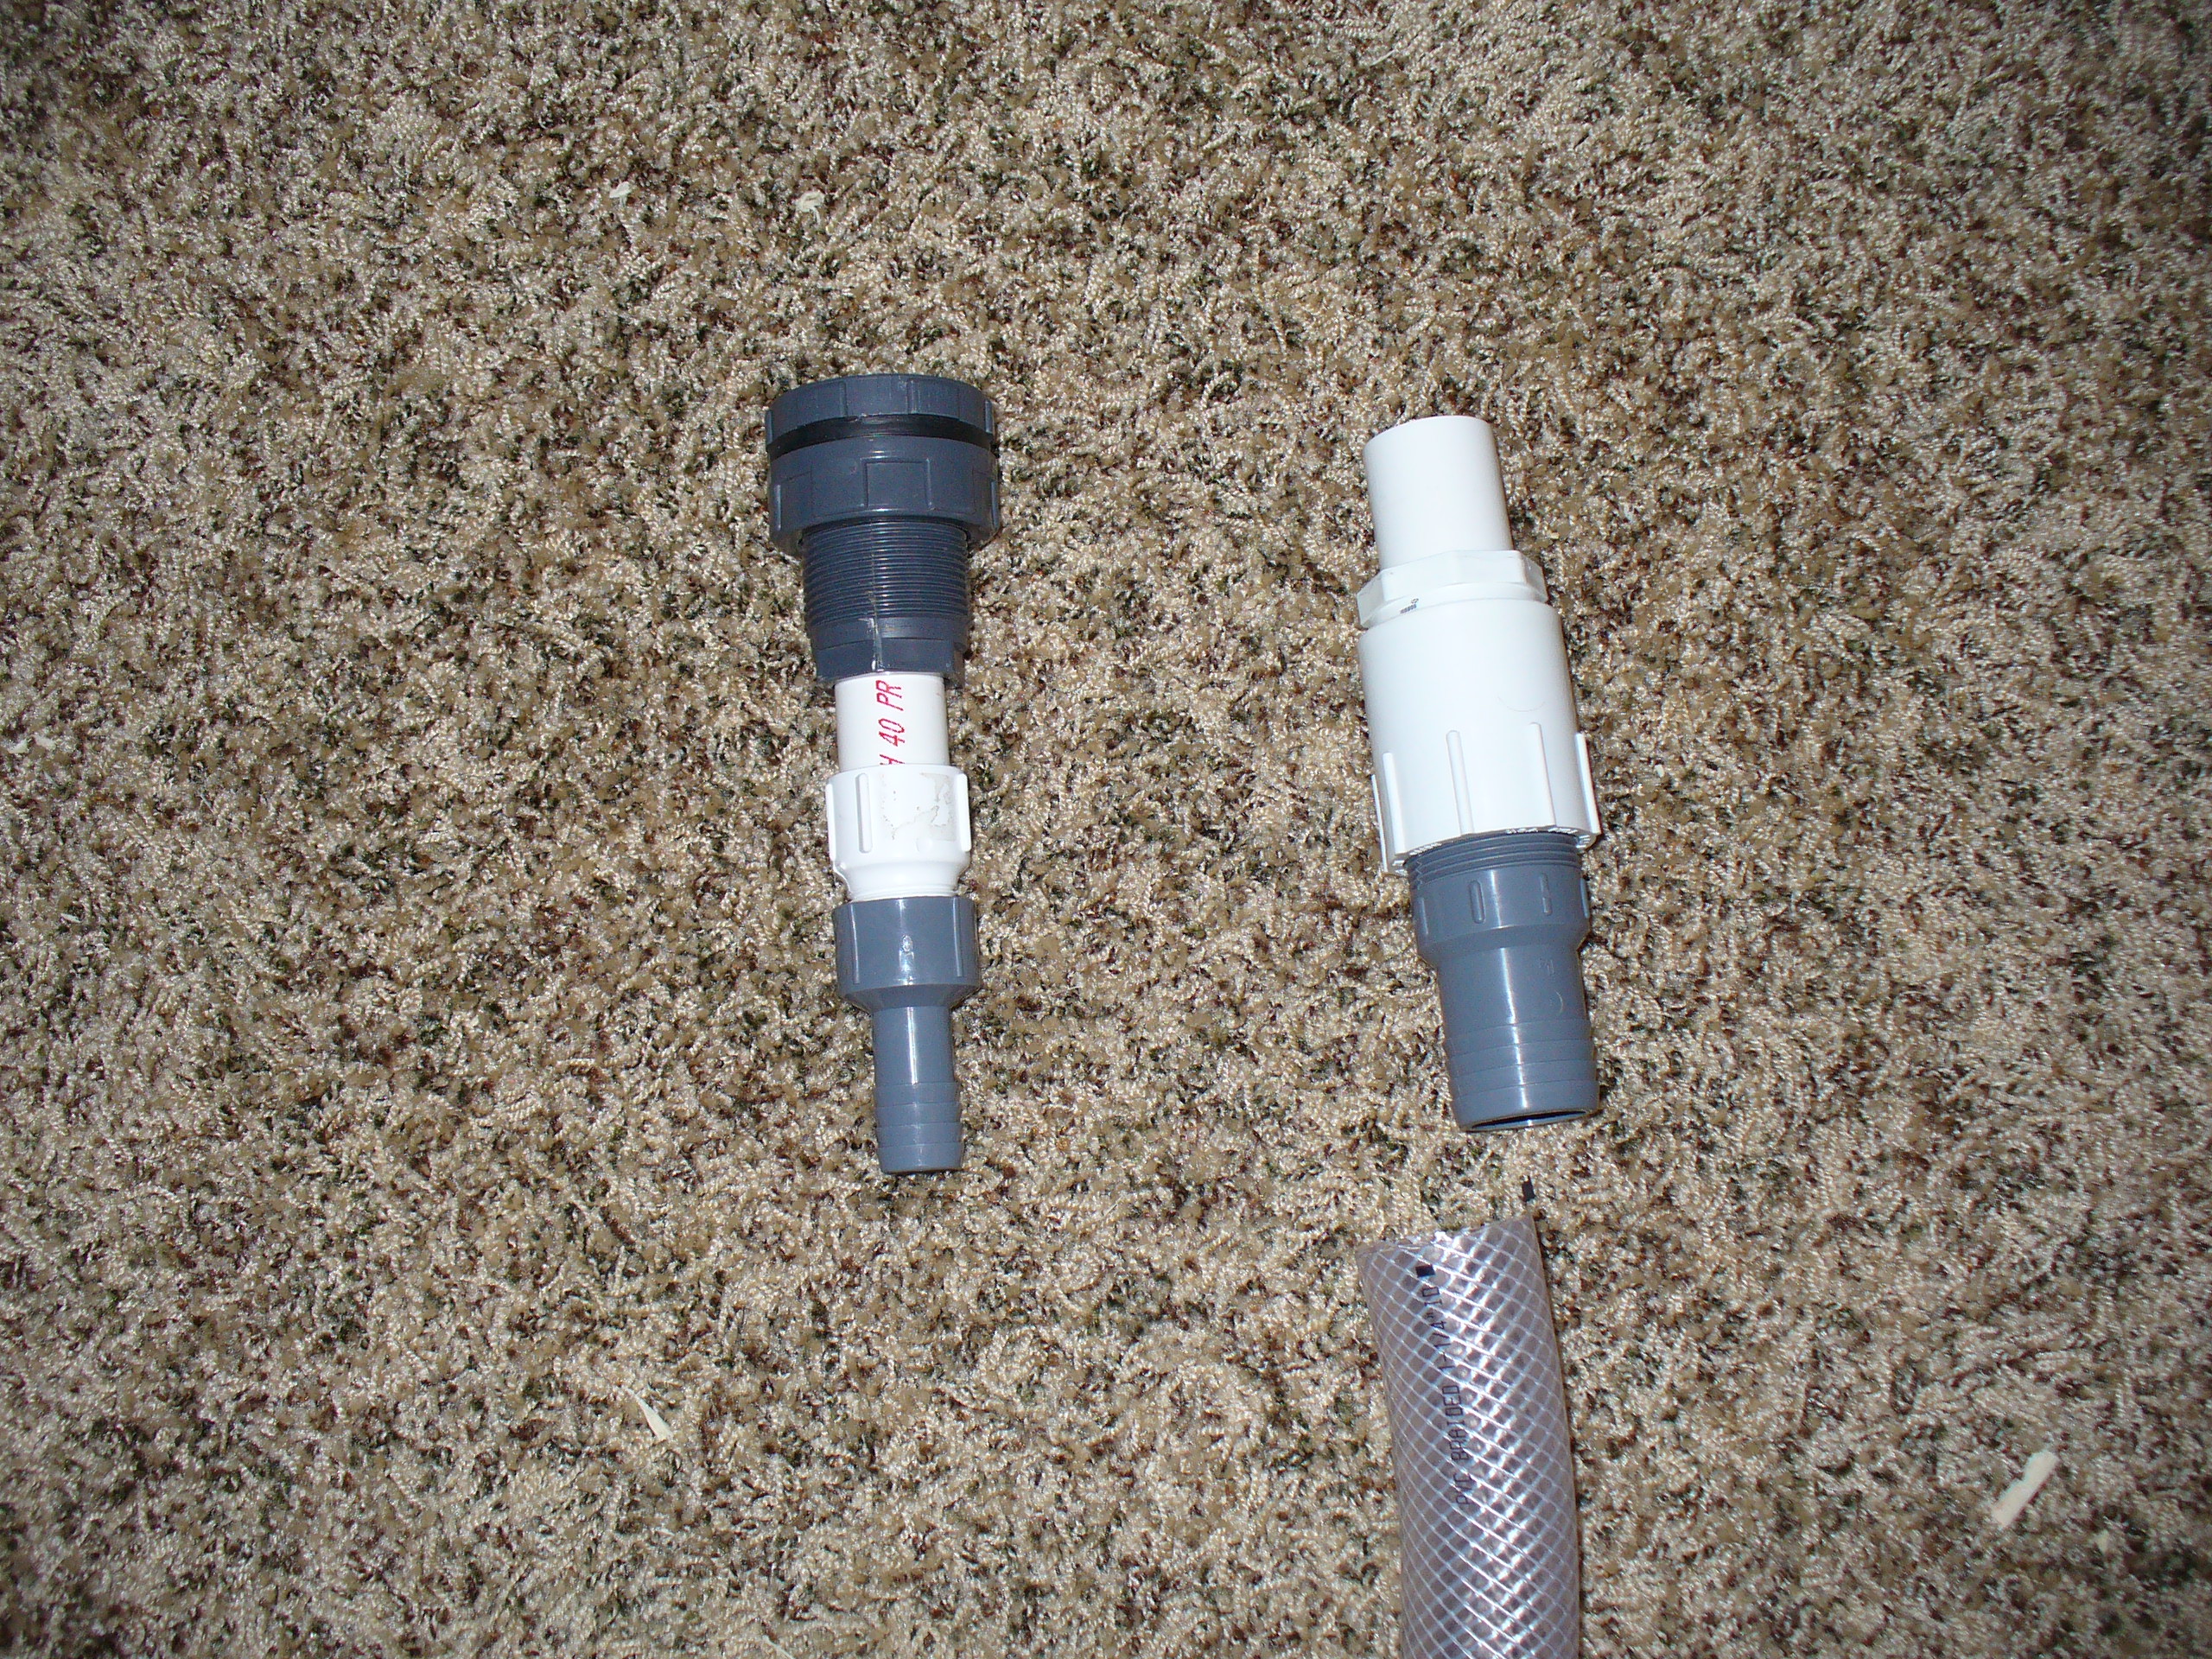
The areas in red here are where you'll need to glue. PVC glue and primer.
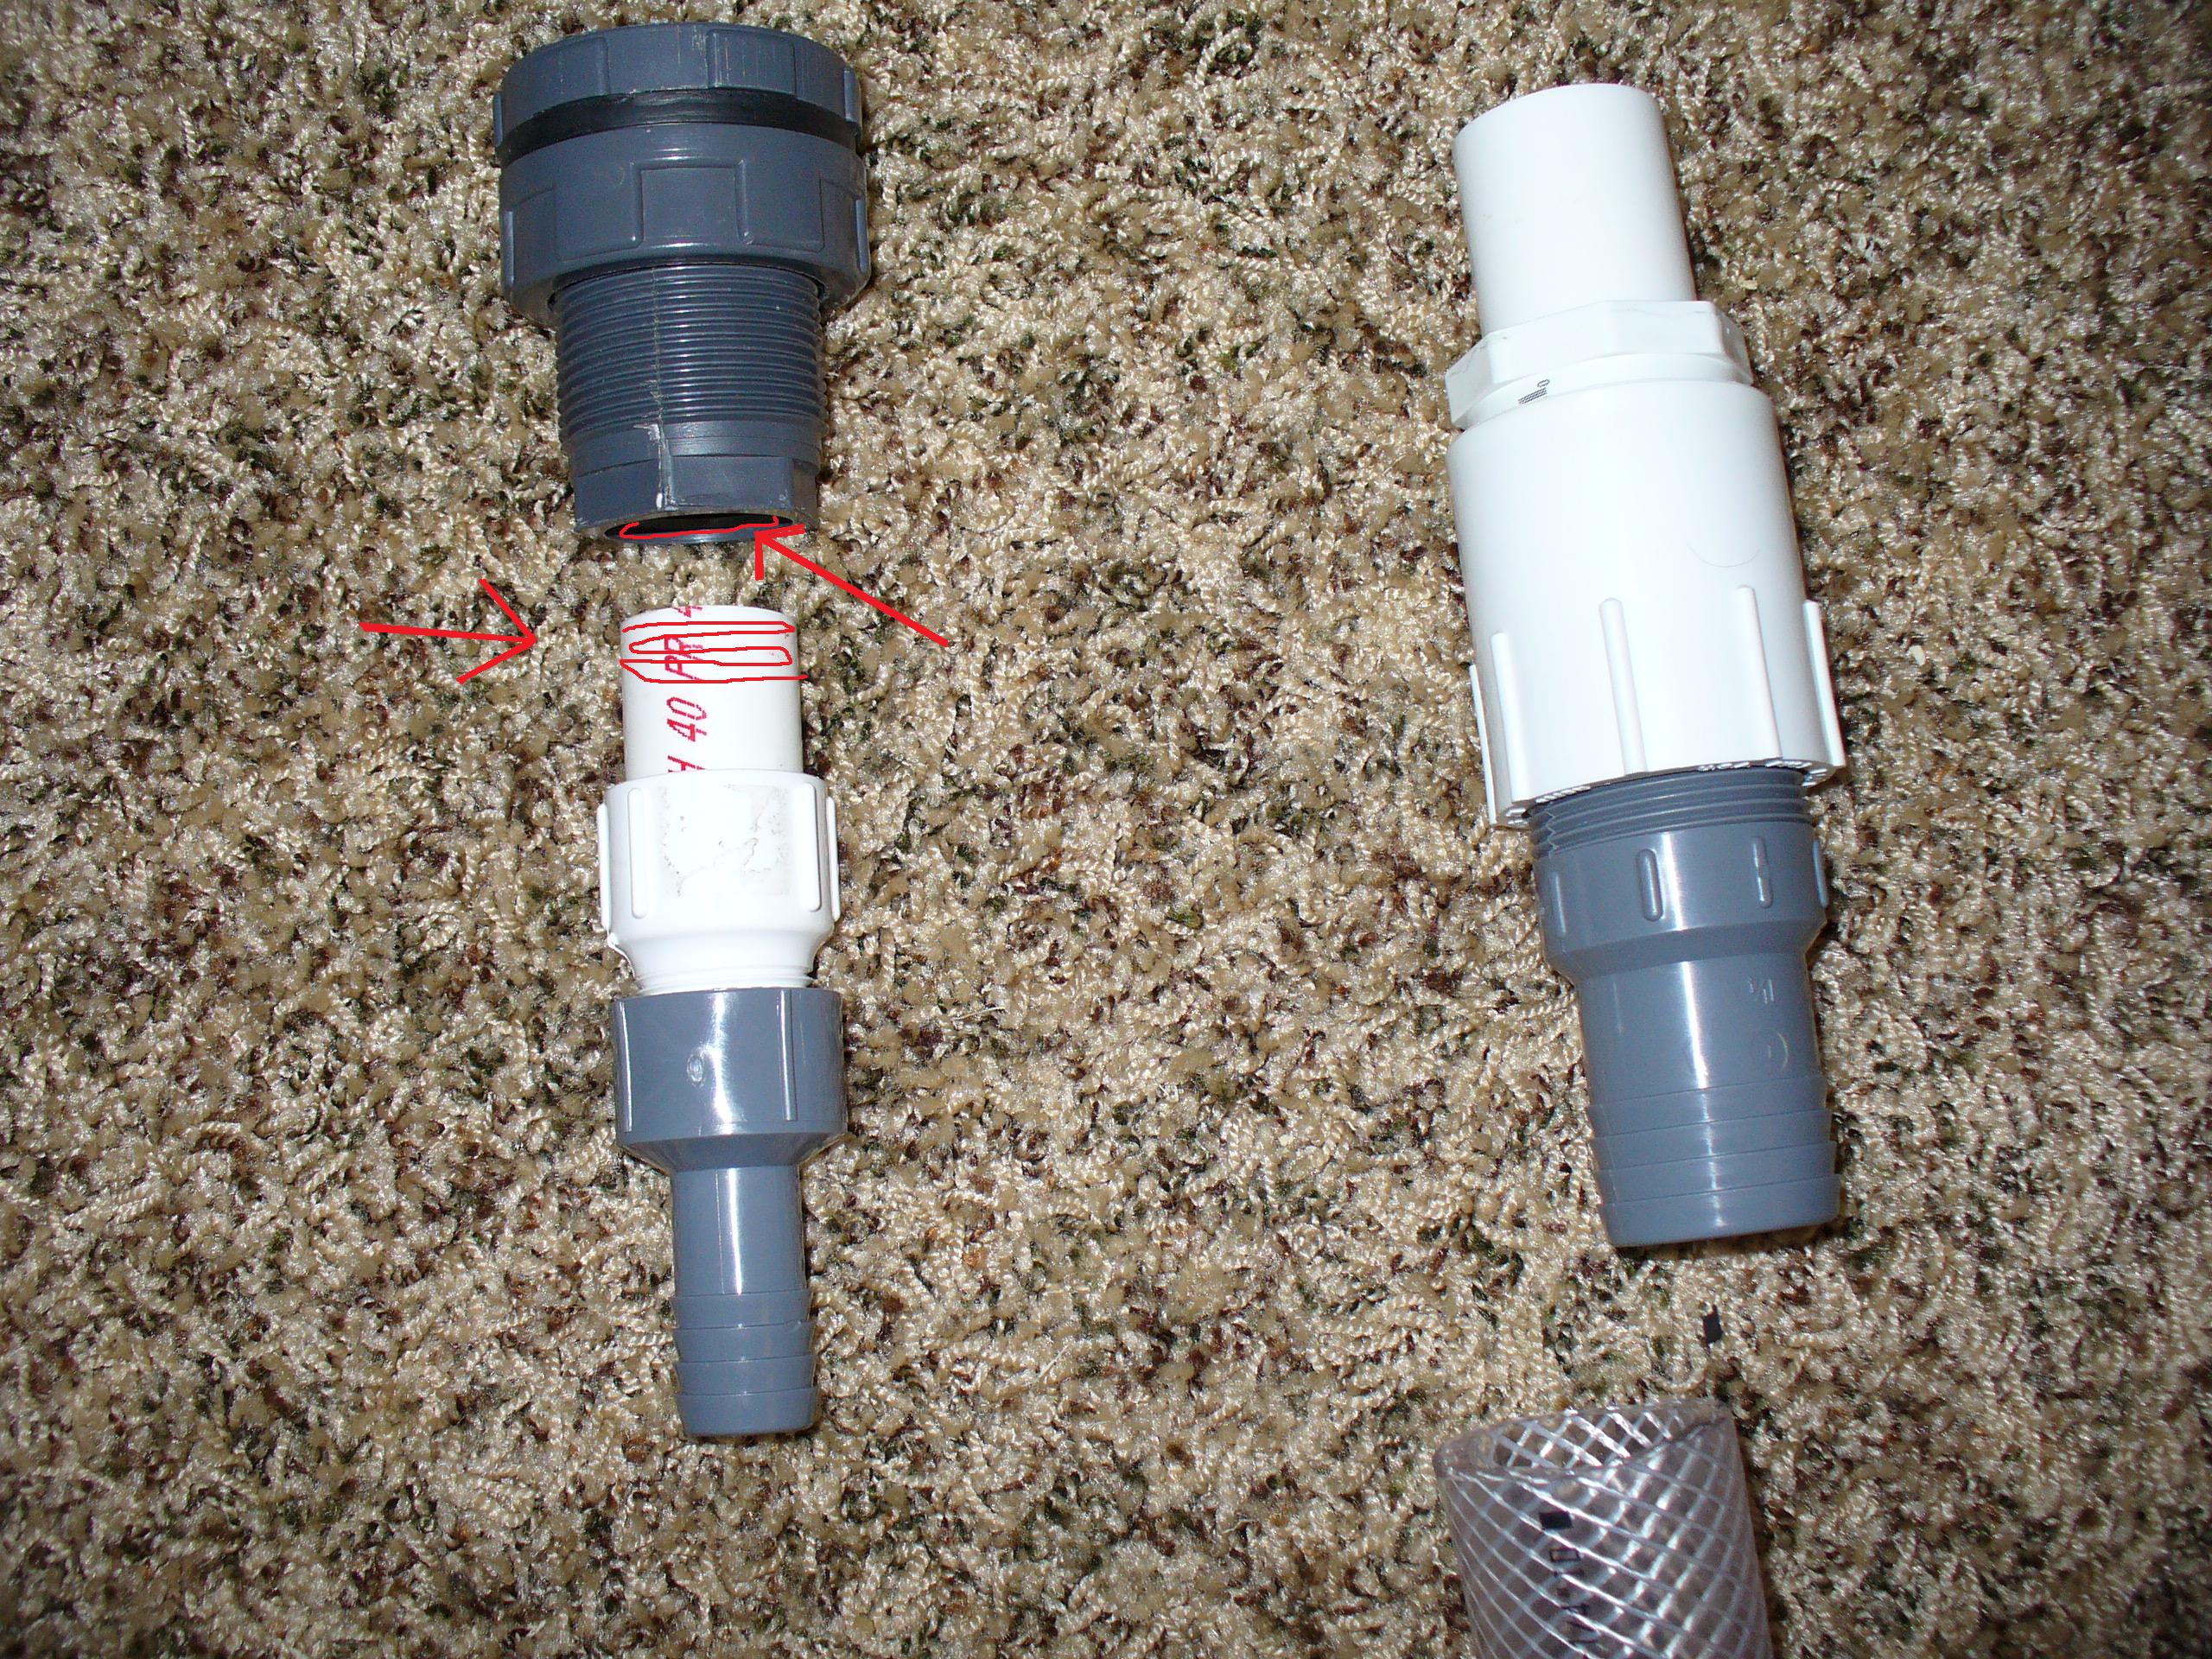
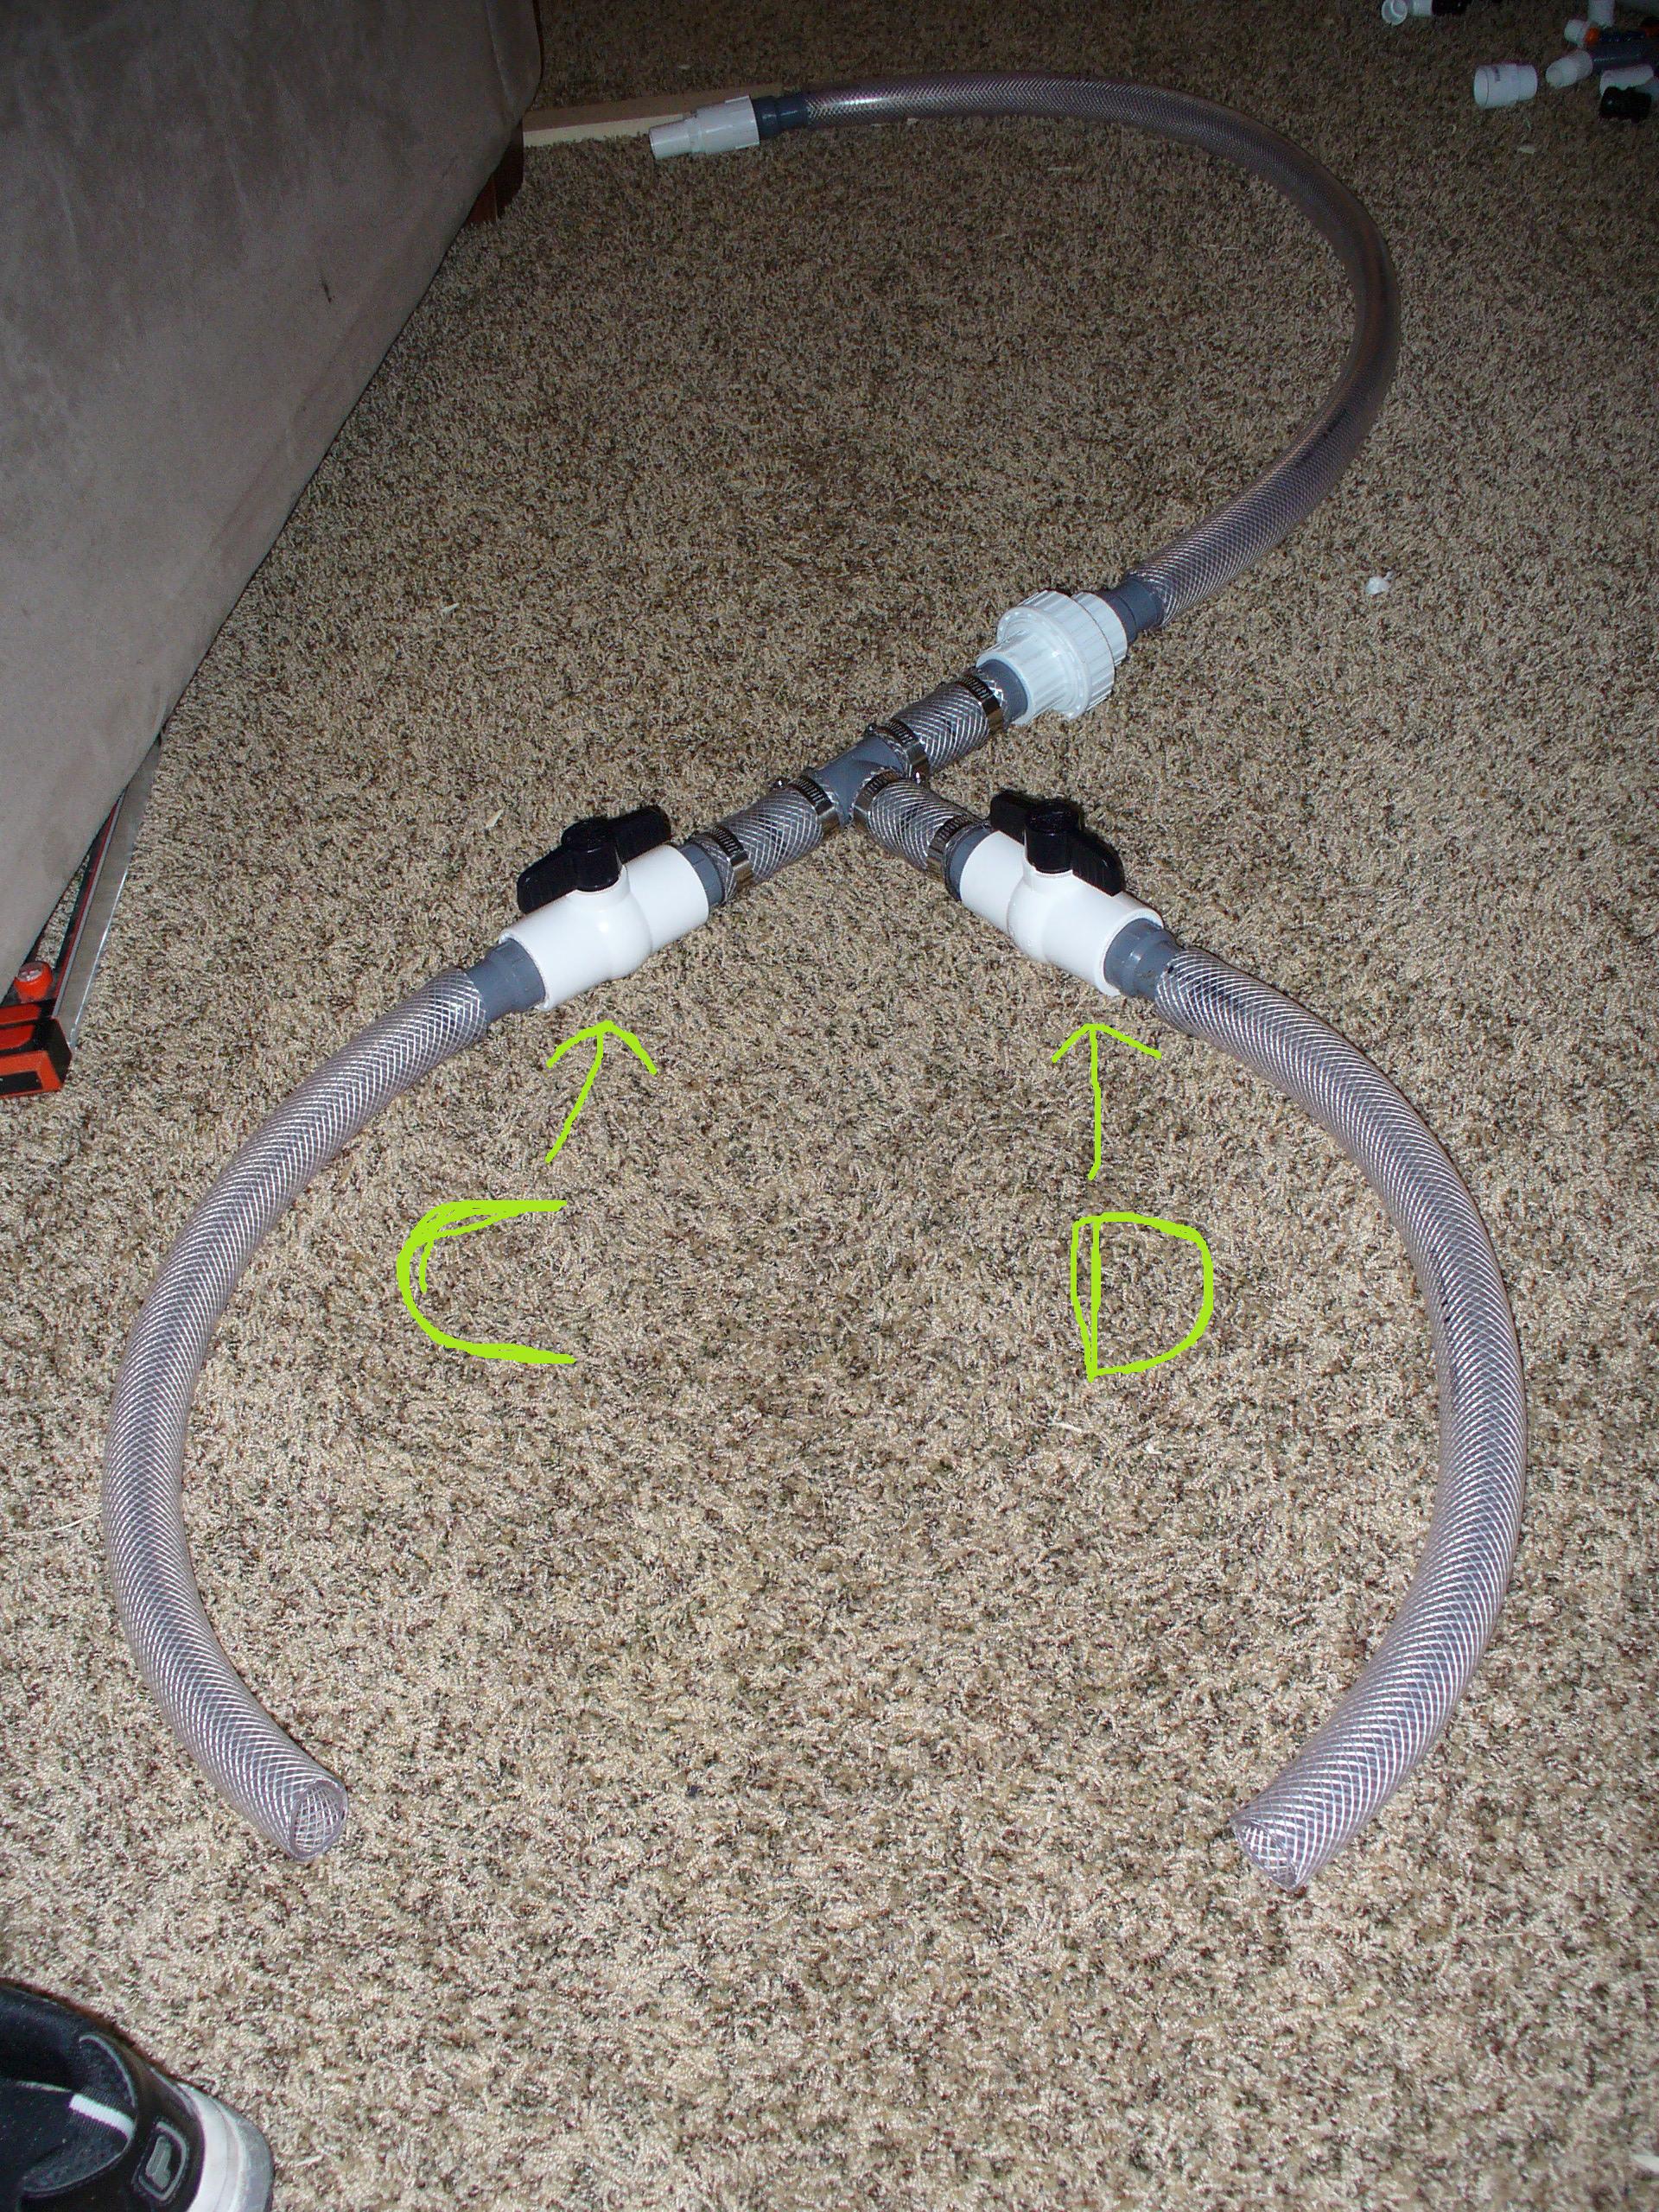
You'll take this hole piece with the hose and everything and then glue "A" to the bulkhead. Then you'll attach "B" together underneath that stand.
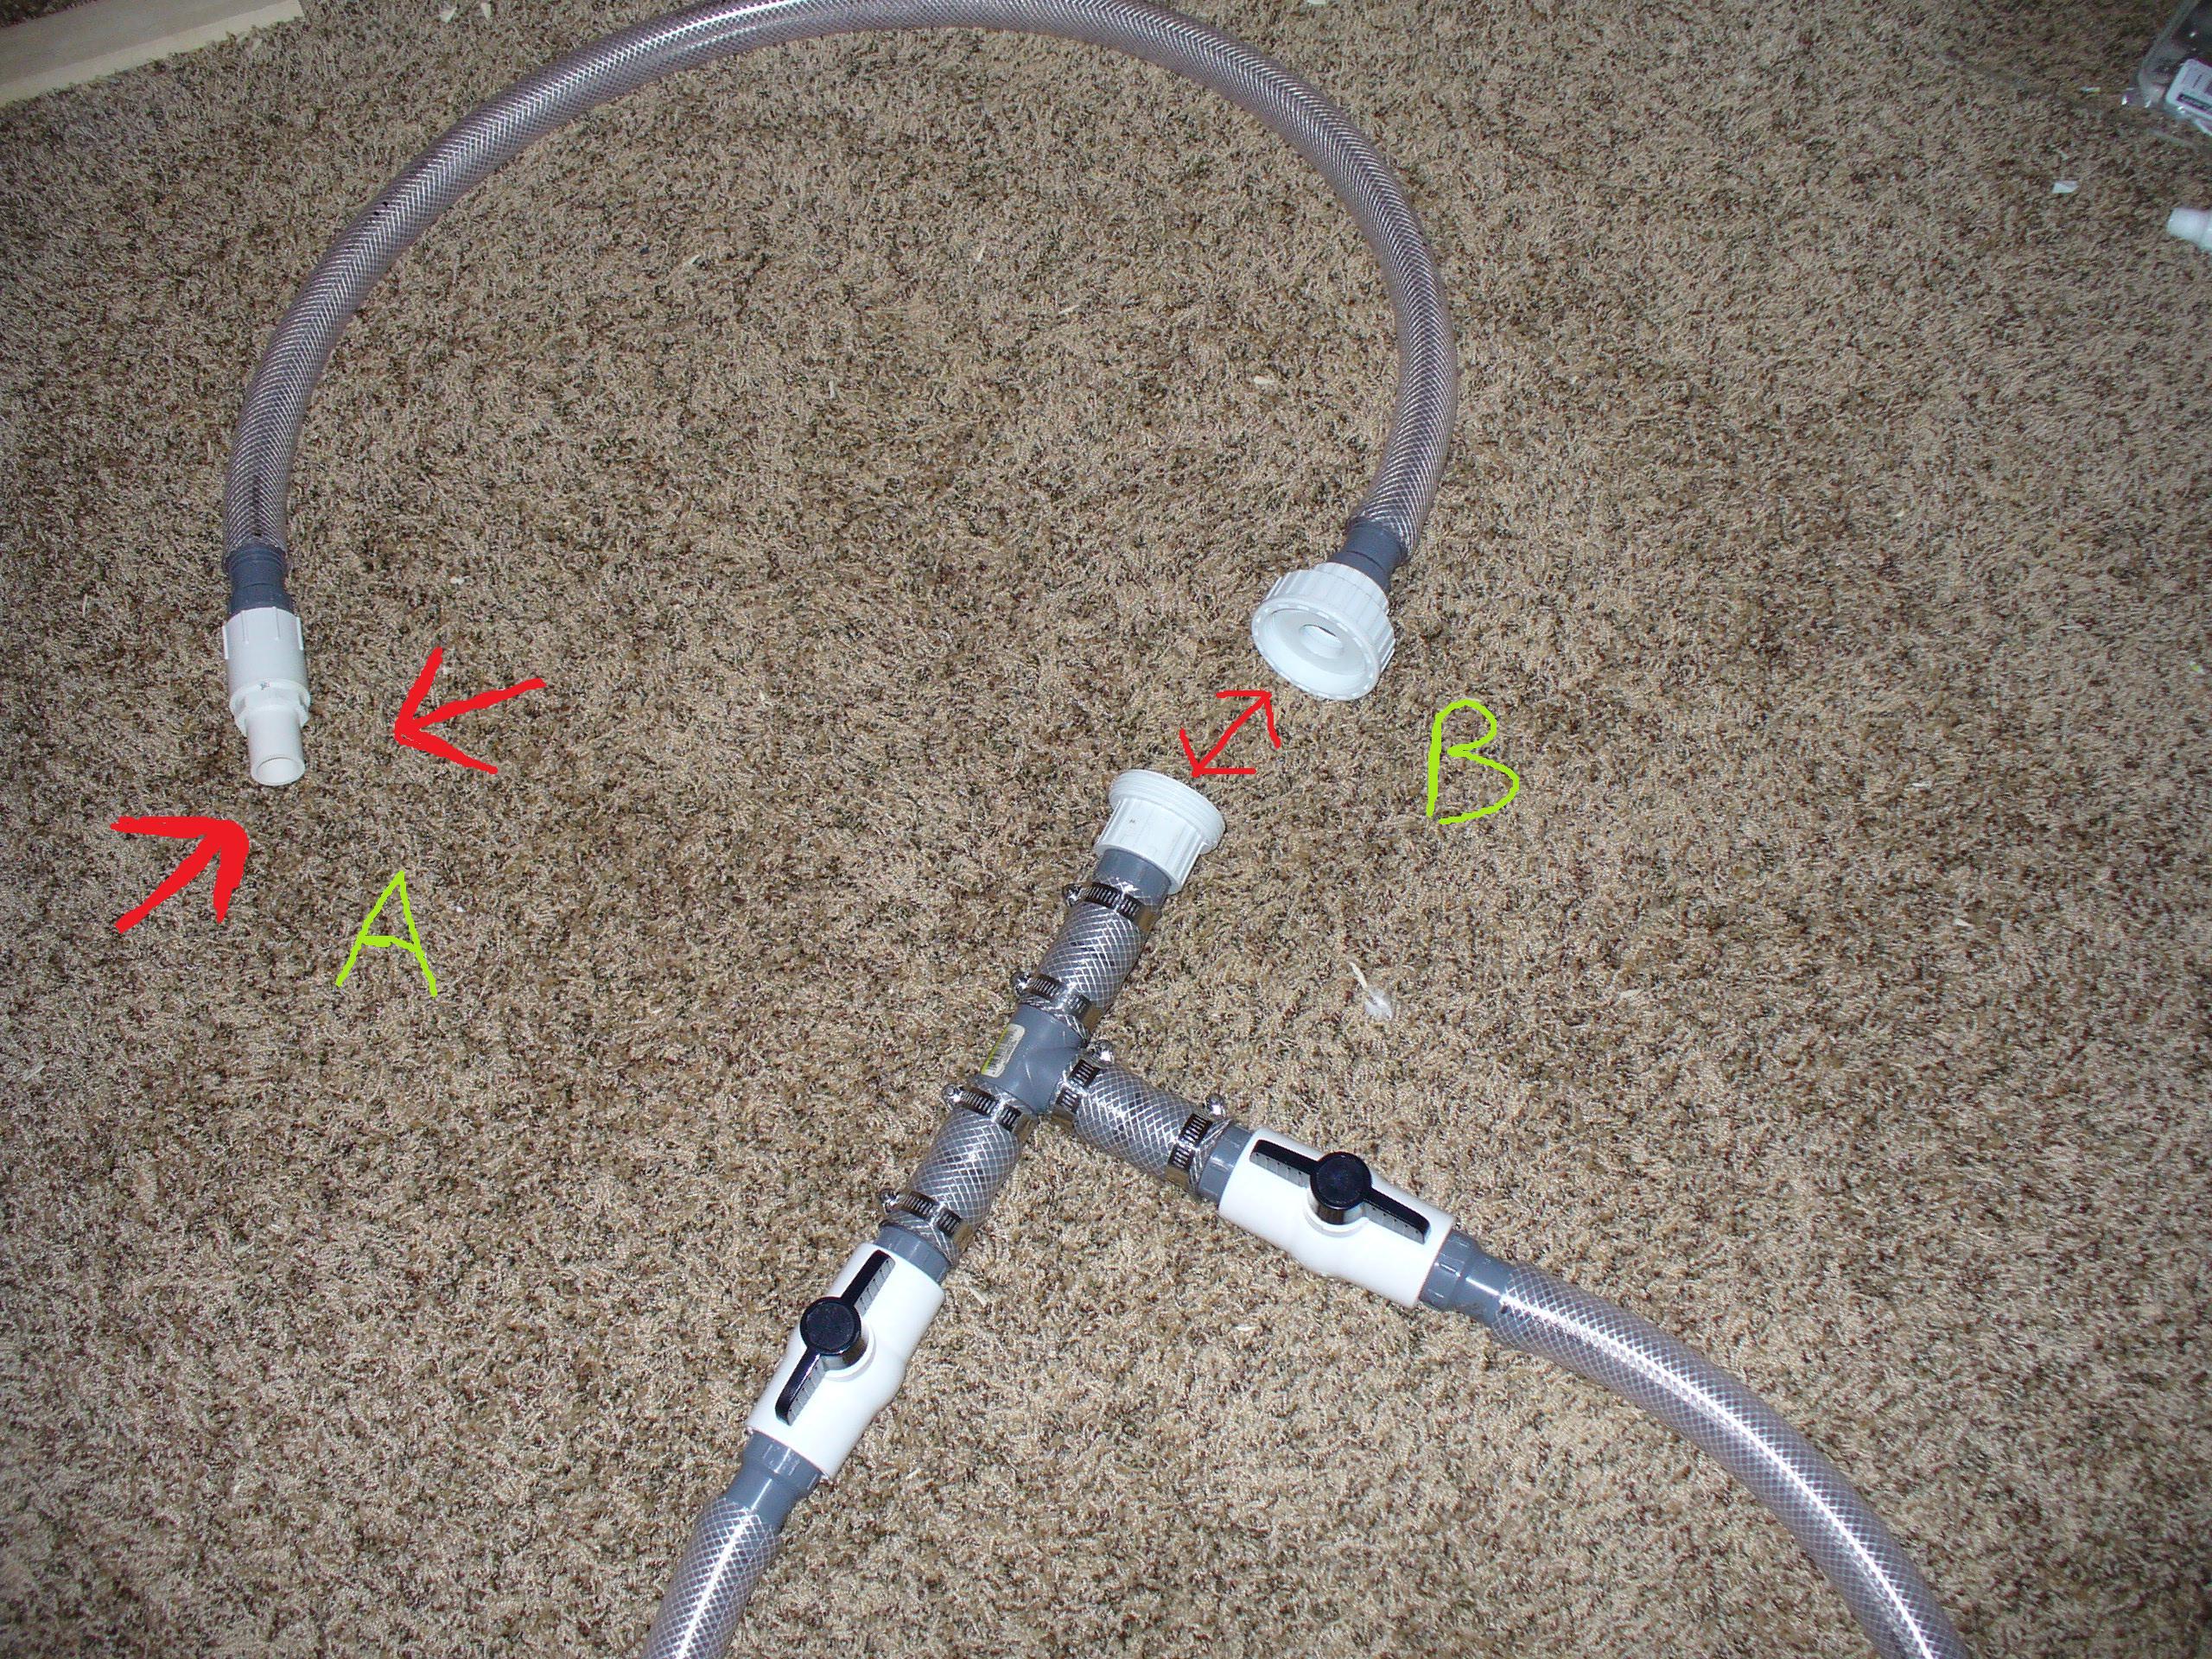
And these two "C" and "D" is where your drain splits...."C" goes to the sump side with the skimmer and "D" goes to your fuge. The "C" valve (depending on how the plumbing ends up laying out) should always remain fully open. Valve "D" will be kept aproximately three quarters of the way closed. This should alow for less/slower flow going to the fuge...and more going to the sump. There will probably be a little fine tuning that you'll have to do by openeing or closing the fuge valve a little bit once you get things going.
 

2quills

Well-Known Member
Here's a closer shot of the valves.....
This is a shot of the skimmer/sump valve in the full open position...and the fuge valve is fully closed. The way I like to think of it is...when the valve looks like a minus sign then it's open. If the valve looks like a pluss sign then it's closed.

Skimmer/Sump side open......................................Fuge side...half open. You'll be running it with the fuge side somewhere between half way open and fully closed. You'll have to do some fine tuning by opening it or closing it a little bit once you get things going.

Just a shot of both fully open...Dual minus signs.


flower

Well-Known Member

Corey, you're so smart you can even explain things clearly to me so I can fully understand. So once I glue that piece, the hose fits on a barb thingy like it originally was but larger for a better and quieter running sump.
Those valves so that I can control water flow is perfect.
I see you even purchased the hose. That along with the Fantastic gizmo you made I'm all set. LOL, now we have to figure out the best way to get it here to me.
Oh and I have one last question on plumbing...Does a hose run from the refugium to the sump, or is it a piece of PVC pipe? When I look at the picture Shawn gave of the sump in two pieces (Melevesreef) I see the holes, but how does it actually flow over to the sump?
 

2quills

Well-Known Member
I think Shawn is going to be handling the fuge drain part...it should just be 2 pipes that slip or screw into the bulkheads on the fuge that hang over and drain into the return pump area.
I know I wasn't going to get the hose at first but I had picked up a little small piece just to put the valve section together and realized how much of a bear it can be to put connect the hose to the barbed fittings...especially hose that size. So I figured it would make your life a heck of a lot easier if I just put it all together for ya. Or 90% of it anyway.
 

flower

Well-Known Member
Quote:
Originally Posted by 2Quills http:///forum/thread/380517/flower-s-sump-fuge-build/640#post_3322659
I think Shawn is going to be handling the fuge drain part...it should just be 2 pipes that slip or screw into the bulkheads on the fuge that hang over and drain into the return pump area.
I know I wasn't going to get the hose at first but I had picked up a little small piece just to put the valve section together and realized how much of a bear it can be to put connect the hose to the barbed fittings...especially hose that size. So I figured it would make your life a heck of a lot easier if I just put it all together for ya. Or 90% of it anyway.

AWWW... I could hug you! I was looking at that type of hose too...the hardware store guy said it was for a dishwasher, so I figured for a fish tank it would be perfect. Wait, did I say Thank You?
THANK YOU!
 

2quills

Well-Known Member
Quote:
Originally Posted by Flower http:///forum/thread/380517/flower-s-sump-fuge-build/640#post_3322663

AWWW... I could hug you! I was looking at that type of hose too...the hardware store guy said it was for a dishwasher, so I figured for a fish tank it would be perfect. Wait, did I say Thank You?
THANK YOU!

You're very welcome, Flower!
Yep, it's pretty good hose. It's nylon braided for extra strength. Not that there's going to be alot of pressure on it as it's being used for the drain, it's just a little stronger, therefore nicer to have. I'd highly recommend picking some up for your return line as well.
Should be getting a shipment of air filters in at work this week, I think I can snag one of those boxes that should be big enough to fit everything into without cramming the hose in there to the point where it kinks. I'll have to shoot you a picture tonight of the other idea that I have for the fabulous corey gizmo, in regards to supporting it on the tank.
 

flower

Well-Known Member
Quote:
Originally Posted by 2Quills http:///forum/thread/380517/flower-s-sump-fuge-build/640#post_3322745
You're very welcome, Flower!
Yep, it's pretty good hose. It's nylon braided for extra strength. Not that there's going to be alot of pressure on it as it's being used for the drain, it's just a little stronger, therefore nicer to have. I'd highly recommend picking some up for your return line as well.
Should be getting a shipment of air filters in at work this week, I think I can snag one of those boxes that should be big enough to fit everything into without cramming the hose in there to the point where it kinks. I'll have to shoot you a picture tonight of the other idea that I have for the fabulous corey gizmo, in regards to supporting it on the tank.

I can't wait! I love your gizmos, I even didn't think of supporting it, it won't do me much good if I can't get the hoses to stay in place....and I will be getting that type of hose too. They have it here for $1.69 what did they ding you on your side of the world for it?
 

2quills

Well-Known Member
Quote:
Originally Posted by Flower http:///forum/thread/380517/flower-s-sump-fuge-build/640#post_3322817

I can't wait! I love your gizmos, I even didn't think of supporting it, it won't do me much good if I can't get the hoses to stay in place....and I will be getting that type of hose too. They have it here for $1.69 what did they ding you on your side of the world for it?
Cool!
I think you'll be able to support it fairly easily with an industrial sized zip tie or two and secure it to the vertical support in the back of the cabinet. It wasn't too bad I think it was around $4 for the 1.25" stuff. With that being said though, I'm still working out some of the logistics of the set up. Our size restraints are kind of limiting and it almost has me thinking about dropping the size down to 1" and staying with the same drain size as the bulk head size. It would just be alot easier to work with and maneuver. But I'm still working on it...I believe it can still be down with what we have already. It's just going to be tight under that stand and I don't want to have any issues with you being able to install the skimmer in there.
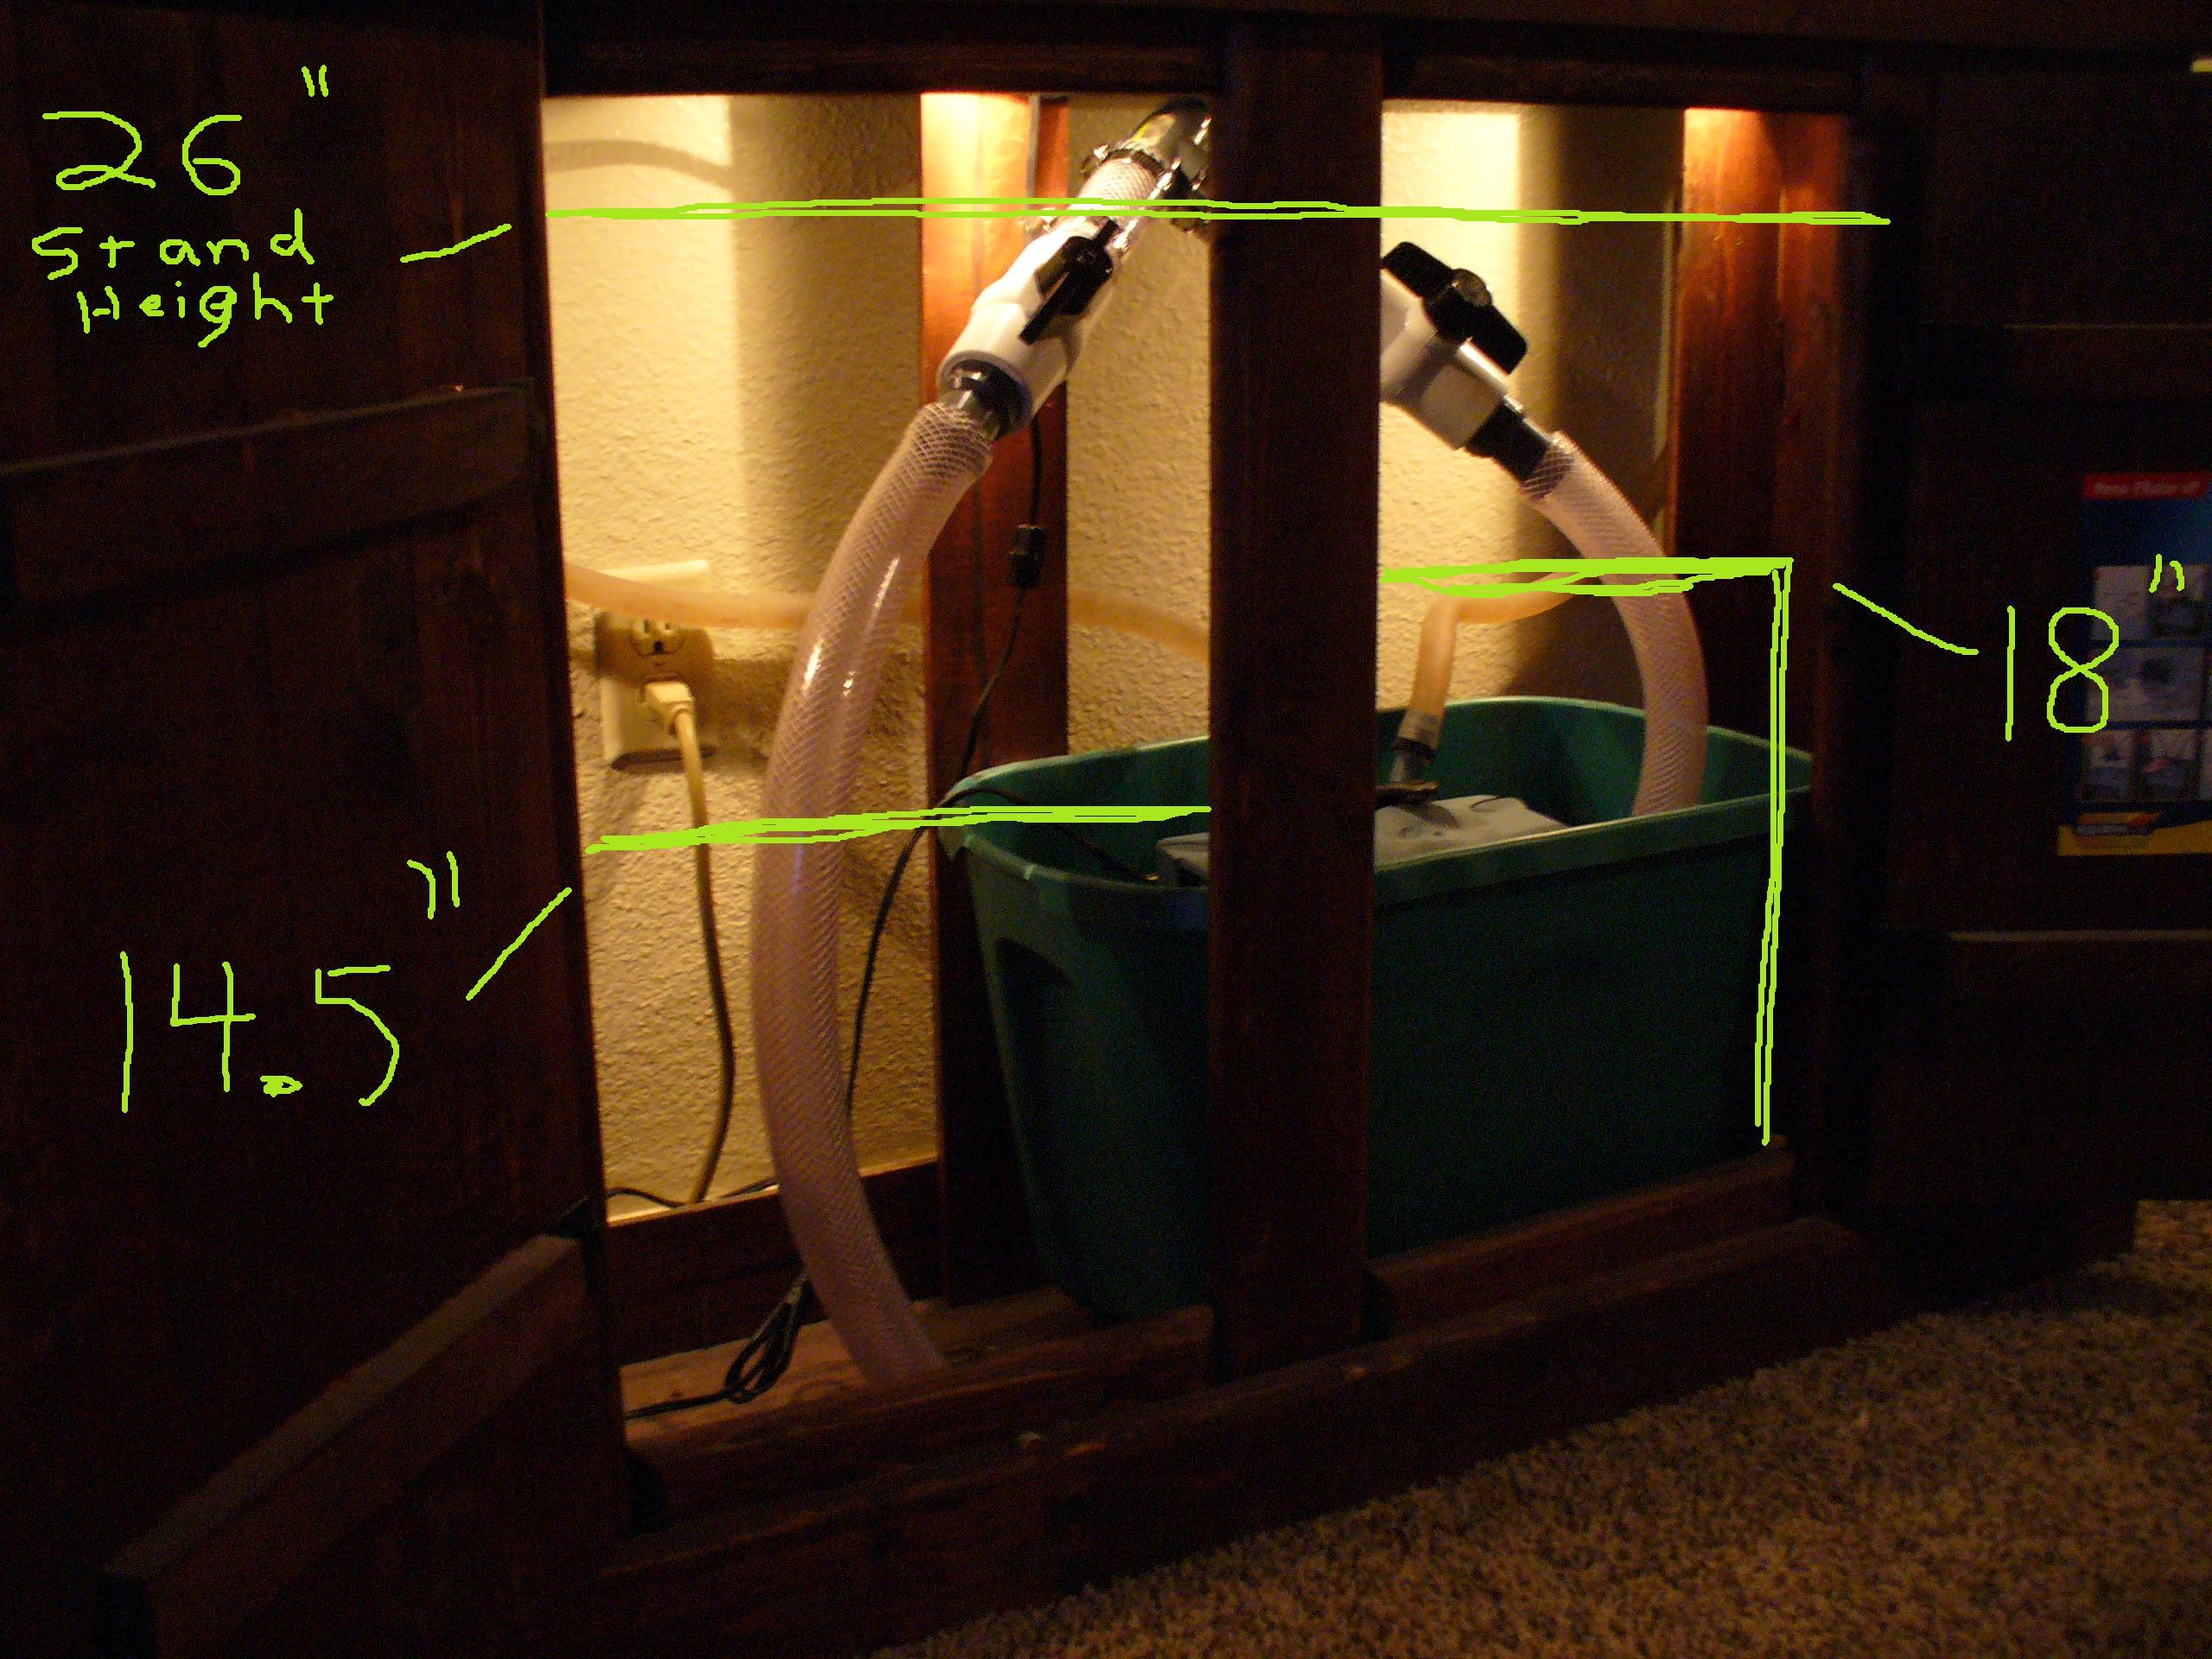
I did sort of a mock up of the drain today on one of my 55G set ups. The dimensions are pretty close to the same. Your tank is a couple of inches taller but my stand is a couple of inches taller so the over all height is pretty much the same. I've already decided to move the "union" piece which was exhibit "A" in the previous photos because I realized that you wouldn't be able to reach it where it was at and where it would be once it's installed.
I took a picture...imagine the stand is your stand but picture it about 6" inches shorter than the one in the picture.
Flower, I'm wondering if I make the hoses a little bit longer between the valves and the "T" where the drain splits if you'd be able to wrap the skimmer/fuge valve around the back vertical support on the cabinet???
What do you guys think...I need some more opinion on this. Since non of us are going to be able to be there to tweak it I'd like to hear some others thoughts or ideas.
 

flower

Well-Known Member

Okay I see what you’re saying. I want the center single hose to be secured to the back center panel.
So to me it looks like the center single hose needs to be longer… enough to come down and attach to that white screw on connection inside the cabinet. Right now it looks like that connection is behind the tank. I can secure it with a zip tie just above that. So I think the divided hoses are fine as is, I can cut them to the length I need once I see where it will go into the sump…better too long than too short. The valves as close to the “T” as possible is best, so I think they are fine. JMO
I'm off to work... will check this post in th mornig first thing...Those hoses look so big, like they could drain my tank in minutes. "shiver" just the thought.
 

2quills

Well-Known Member
Yeah, they are rather large for a set up this size but that's ok.
I tried it a different way to see. I know that you have a good amount of room behind your tank so I think this way of running it will be ok...

You could wrap some zip ties around it like this...
 

acrylic51

Active Member
Looks very good Corey.....Did you ever decided on clamps (style) being used on the fittings? Corey's the master plumber Flower, but all you would need to glue it into place would be PVC glue primer, and regular PVC glue.....I recommend using the primer to get a good clean glue joint.....You would need to prime both the PVC piece of the plumbing work of Corey's, and also on the inside of the bulkhead (bottom) of the bulkhead on the overflow.....The area where the PVC pipe will slide into. Apply the glue after the primer has dried, and as your inserting the PVC pipe inside the bulkhead give it a bit of a twisting motion, and apply pressure inward for a bit. I don't know if most people have noticed, but if you don't apply inward pressure on your glue joint, one of the pieces will walk or back out a hair.....Weird, but it does slightly......Dry time isn't excessive.....
On a bad note.....had a terrible morning in the shop.....
everything was glued up, had my initial cutouts done in the top, and took it over to the fancy dancy router table at the shop, and got half way through the initial cut, and I thought I had seen the router bit jump up a bit, but it was early still sleepy, and next thing I know the router bit came up out of the collet, and smack.....cracked the top euro bracing and scared the you know what out of me......Needless to say Friday morning will be re cutting and starting from scratch....I could cut the top off and shorten, but it would bother me to detour from the original dimensions.....Trust me next time I won't rely on someone else setting up my bits for me.....I should have double checked to make sure it was tight before I started.....
 

flower

Well-Known Member
Quote:
Originally Posted by acrylic51 http:///forum/thread/380517/flower-s-sump-fuge-build/640#post_3323079
Looks very good Corey.....Did you ever decided on clamps (style) being used on the fittings? Corey's the master plumber Flower, but all you would need to glue it into place would be PVC glue primer, and regular PVC glue.....I recommend using the primer to get a good clean glue joint.....You would need to prime both the PVC piece of the plumbing work of Corey's, and also on the inside of the bulkhead (bottom) of the bulkhead on the overflow.....The area where the PVC pipe will slide into. Apply the glue after the primer has dried, and as your inserting the PVC pipe inside the bulkhead give it a bit of a twisting motion, and apply pressure inward for a bit. I don't know if most people have noticed, but if you don't apply inward pressure on your glue joint, one of the pieces will walk or back out a hair.....Weird, but it does slightly......Dry time isn't excessive.....
On a bad note.....had a terrible morning in the shop.....
everything was glued up, had my initial cutouts done in the top, and took it over to the fancy dancy router table at the shop, and got half way through the initial cut, and I thought I had seen the router bit jump up a bit, but it was early still sleepy, and next thing I know the router bit came up out of the collet, and smack.....cracked the top euro bracing and scared the you know what out of me......Needless to say Friday morning will be re cutting and starting from scratch....I could cut the top off and shorten, but it would bother me to detour from the original dimensions.....Trust me next time I won't rely on someone else setting up my bits for me.....I should have double checked to make sure it was tight before I started.....


You have to start the whole project over? The whole thing Or just the refugium, stand or the sump part? I thought the sump part was finished, you were working on the stand and had not yet started the refugium...
 

2quills

Well-Known Member
Ouchy...it sounds like just the refugium, Flower.
That is scary, I hate when that happens, or you when you have a board kick out on you using the table or miter saw.
I picked up some stainless clamps for all of the fittings Shawn. And I think Flower found those plastic clip ones that she can use for the return.
Definately, when you glue pvc together I like to hold the fittings tight for about 15 seconds so they don't back out.
 

flower

Well-Known Member

Corey,
I can zip tie it like that without a problem. The sump has a bubble trap where the hose sits, so it should not be at all in the way of the skimmer. I already have a box of zip ties, from tiny to huge.
 

2quills

Well-Known Member
Awesome...yeah I think it will work just fine with having it sit behind the wood piece in the center of the stand. There just wasn't a whole lot of room when I had it sitting the other way before. Since you have about 7-8" of play behind your stand we should be good to go.
 

flower

Well-Known Member
Quote:
Originally Posted by 2Quills http:///forum/thread/380517/flower-s-sump-fuge-build/640#post_3323107
Ouchy...it sounds like just the refugium, Flower.
That is scary, I hate when that happens, or you when you have a board kick out on you using the table or miter saw.
I picked up some stainless clamps for all of the fittings Shawn. And I think Flower found those plastic clip ones that she can use for the return.
Definately, when you glue pvc together I like to hold the fittings tight for about 15 seconds so they don't back out.

On a possitive note...it hit the top euro thing and not his eye or hand. He could have been badly hurt, or his little helper could have been nearby.
I will make sure to hold it in place when I glue it..with a little twist to make sure it's good and snug. Let me know when you want my address so I can send you a PM with all the information you need.
 

monsinour

Active Member
Agree, better to break some plastic than your eye. I have seen shop accidents and let me tell you, if these things rip through wood like a hot knife through butter, flesh and bone dont stand a chance.
 

flower

Well-Known Member
Quote:
Originally Posted by Monsinour http:///forum/thread/380517/flower-s-sump-fuge-build/640#post_3323144
Agree, better to break some plastic than your eye. I have seen shop accidents and let me tell you, if these things rip through wood like a hot knife through butter, flesh and bone dont stand a chance.

Shawn I know you're most likely mad at yourself for breaking the piece, at least it sounded that way from your post. I was trying to let you know it was actually a blessing, so you might feel better about the whole thing.
Forgive this mother hen response:
Please, please don't work in your shop when you are even a little sleepy. If not for your sake then for mine. How could I live with myself if you were hurt making me a sump? I'm sure everyone agrees, we don't want anything to happen to you.
 

al&burke

Active Member
Shawn sorry about your luck, I am glad you didn't get hurt. Sounds like you are burning the candle from both ends. We all have been there and we are only to blame. One time i was building a deck at my first house, last cut of the day, really tired - table saw blade to the end of the thumb. Take care of yourself, sounds like there are alot of people that need you.
 
Top