Neptunes 125 Reef Diary.

king_neptune

Active Member
This series shows the "Lava Bulge" It looks a lot like lava that seeped out of the ground, I like the effect it gave. You can really tell the porousness effect of the salt in these shots...


king_neptune

Active Member
Just some more shots...


All in all it came out great. The total cost of this beast was about $200-$220. Worth every penny! This will reduce the need for alot of live rock as beneficial bacteria loves to soak into the foam.
I have read from several people who do this that don't have any LR in their DT, just in the sump.
They say the filtration is better than their systems with LR in both sump and DT.
Ill put LR to decorate the bottom, but I wont need to do the "Great wall of china look". Ill probably start with a 50lb purchase of fiji hear on SWF.com. It seems to be the best deal around. If I feel I need more...then Ill add as time goes on.
 

king_neptune

Active Member
Ok, I touched up on the bald spots. I'll flip in in a few hours to see the results. I heated the glue a little in some boiling water. this made application go MUCH faster as it was a more liquid form, however this also set the glue faster. I had to do it in smaller patches. Another downside is it was more runny and therefore you had to put the sand on it asap, before it ran off the mound you wanted to glue.
If I had to do it all over again...I wouldn't heat the glue as long...I would still heat it...but I would let it be a little more stiff.

I added the yellow sand to the opposite side. I like the color better than the white colored sand. Plus it had a lot of crushed pieces of shell and other coral bits in it.
 

king_neptune

Active Member
Ok I flipped it and the looks are promising. I used the last batch of epoxy for a third round. I touched up almost all the bald spots and also re did the spots that came out shiny from glue that dried before I sanded it. I'll post some pics of the final produce in a couple hours when I'm happy it's dried off good.
Altogether I used 10 packs of epoxy at $11 each. 20lbs of sand at .27lb, 7 cans of foam $11 each(I could have done this with 4 no problem if I used the Great stuff brand throughout), $18 for egg crate. 30lbs of Base rock $45, $5 for salt. It was a little higher than my initial estimate of $220, it came out to just over $258.
Worth it when you consider I get a great background, that provides pleasing looks, and lots of space to mount corals, plus a fantastic addition of filtration!
 
E

eric b 125

Guest
man you did an amazing job on that. how deep do you think it is? i like that you'll have an entire textured wall and it wont take up all of the internal footprint of the tank. should leave you with a bunch of swimming room. the design layout reminds me of this 1,000 gal at a lfs up here that did a foam wall. i'll have to take pics next time i go all the way out there (it's the least local of all LFS). i have one question, that is probably really elementary: adding base rock doesn't start a new cycle does it? this question has to be so old, but i have no idea. either way, lookin good! how long till you move? cause as far as i can see, you're pretty close to being done, eh? your lights and skimmer (?) are coming this weekend. you could theoretically cycle while you wait.
 

king_neptune

Active Member
Originally Posted by Eric B 125
http:///forum/post/2961719
man you did an amazing job on that. how deep do you think it is? i like that you'll have an entire textured wall and it wont take up all of the internal footprint of the tank. should leave you with a bunch of swimming room. the design layout reminds me of this 1,000 gal at a lfs up here that did a foam wall. i'll have to take pics next time i go all the way out there (it's the least local of all LFS). i have one question, that is probably really elementary: adding base rock doesn't start a new cycle does it? this question has to be so old, but i have no idea. either way, lookin good! how long till you move? cause as far as i can see, you're pretty close to being done, eh? your lights and skimmer (?) are coming this weekend. you could theoretically cycle while you wait.
Its shallow. About 2-5 inches deep. What the camera doesn't really show is the protruding rocks throughout. They extend another 3-6 inches. This will let me put stuff all the way up the rock work. And how grainy it looks. I added a few shells hear and there to give nice texture as well. The "Tripod" is about 12inches tall and 6 inches wide.
Base rock wont add another cycle. It will simply be populated with good bacteria over the next 2 years. The foam will be populated much sooner.
The lights are comming this weekend, but you don't cycle with lights on. This just speeds up the algae growth. A tank will cycle fine without light. I wouldn't be able to cycle till the stand is made, and the plumbing is in. I haven't evin started on that yet. I got a few ideas swimming in my head and haven't finalized anything. If it turns out I might get to keep the house...I'll cycle hear and now. But as it stands, I probably will lose it, when I know for sure Ill make final plans.
 

king_neptune

Active Member
ok the final product:

Hear is a closeup, shows some of the snail shells I glued into place.


This shows the grit and sand up close.

All together this came out better than I hoped. I still debate if Ill put it in my tank before or after the move. It weighs at least 50lbs. And a 125 gal tank is hard enough to move on its own.
 

posiden

Active Member
Originally Posted by wattsupdoc
http:///forum/post/2961088
I understand that's what weld on states. But from my experience it doesn't do well at all on pvc. In fact if you google sandiegoplastics, you'll find a list of various weld on products and what they will adhere to. They mention pvc's etc in some not in others. However I have had poor luck myself trying to use it on anything else except acrylic. Many people have reported poor results with cell cast over extruded acrylics. How is your experience with it and materials of different characteristics?
Well I would say,
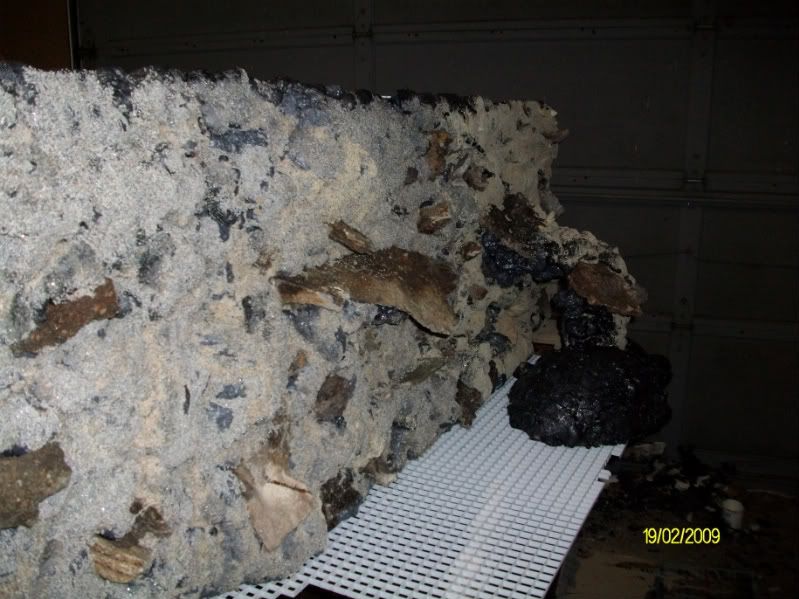
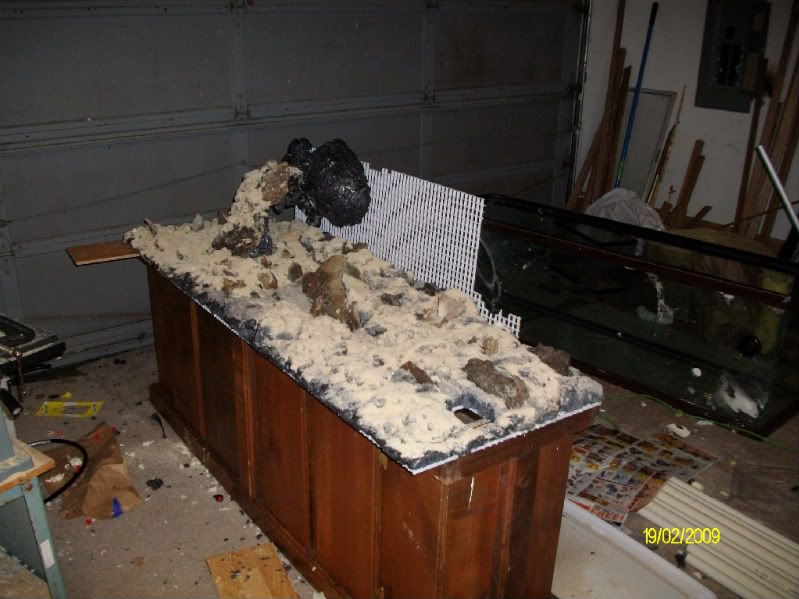
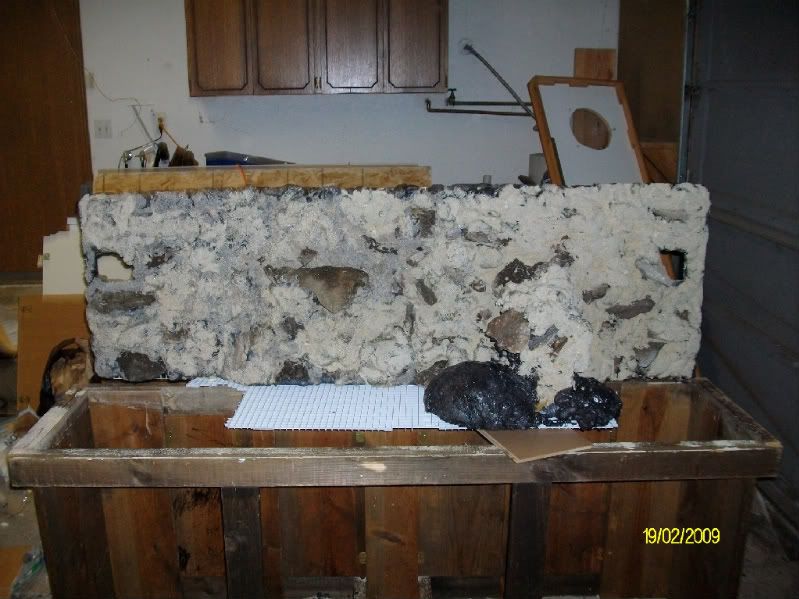
I have not really had super luck in gluing any plastic to speak of. I mean the PVC work has all gone without a hitch but, I used the PVC glue. On anything else, not so good. That is why I try to make every thing, and do everything out of glass. It is also why I suggested to silicone in pieces of glass to strengthen the tank. On a side note to that......if NEPTUNE were to use glass in the manner I had suggested he would be able to remove the foam wall with out having to ruin the tank. After he glues on those pieces of acrylic (witch will have to be after he installs the wall) he will not be able to get the wall out. For me that is a big problem, maybe it isn't for NEPTUNE.
Now then, I would glue PVC fittings with WO#16 in a pinch. I would bond PVC to acrylic in a non stress situation. In NEPTUNES situation, I don't think the glue is going to do any real work, as he is going to be bending the edges over the trim. The glue just has to hold the acrylic to the top, and not do any real work. So what ever it is he has might work?? I would scratch up the surfaces of the two bonding pieces, using 80 grit sand paper.
If it were my tank, I would look at siliconing in a piece of glass on the front and back pains. The glass would also help the floating issue that the foam wall is going to have. Heck I don't see why it could not be lower in the tank and covered in foam as well giving a shelf for frags to be placed upon.
 

posiden

Active Member
Sorry NEPTUNE,
I am not trying to talk at you, or about you.
P.S. I like the new avitar, I have seen that one before. Funny.
 
E

eric b 125

Guest
IMO you should put this together in a way that you can take out the wall in case you dont want it, or if something should go wrong and you need to fix it.
 

king_neptune

Active Member
Originally Posted by Eric B 125
http:///forum/post/2964779
IMO you should put this together in a way that you can take out the wall in case you dont want it, or if something should go wrong and you need to fix it.
I honestly don't really see too many options....
A. Don't silicone it, and let the gunk buildup reach critical mass behind the wall and I have problems, which force me to pull it out and clean.
B. Silicone it and seal off anything from getting back there. But now it becomes a permanent fixture.
This tank is the first of many. My next one will be a minimum of 300 gallons, that will be my graduation present when I get my Grad School complete. And one day I hope to have my dream house with my entire study wall a wrap around fish tank.
Having a rock wall that's permanently fixed into a disposable 125 tank isn't that much of a concern.
But I do see your advice as good, it makes logical sense to me, so thanks for your input
 
E

eric b 125

Guest
i wasnt even thinking of build-up behind the wall. i guess that's the beauty of this forum, eh? it makes sense to silicone it in.
 

king_neptune

Active Member
Originally Posted by Eric B 125
http:///forum/post/2965148
i wasnt even thinking of build-up behind the wall. i guess that's the beauty of this forum, eh? it makes sense to silicone it in.
Ya i mulled it over a lot. I know people who have blowers vent water behind their wall...but that's just a waste IMO.
It will be sealed in permanently once I fit the plumbing in and make sure Its all measured properly, Ill test it w/out the wall as a "Freshwater" simulation for a few days, or weeks.
Once I'm happy and sure of how/when Ill be making the move. Ill decide what to do.....If I stay here for the next 6 months...Ill set it up now and begin cycling.
I can always transport it via rubber maid bins to my new living arrangements in 6 months time. But if its only a matter of weeks before the bank boots me...then Ill just wait. And cycle in my parents rental. I can lift the tank to the second floor via Dads Backhoe, so carrying it to the second floor wont be so bad, if I have the foam wall build siliconed inside. But just the same, If its a matter of a couple weeks, Ill just wait it out and transport it empty.
 
E

eric b 125

Guest
have you thought about your plumbing at all? are your returns going to be plumbed in, or are you planning on going over the top?
 

king_neptune

Active Member
Originally Posted by Eric B 125
http:///forum/post/2965398
have you thought about your plumbing at all? are your returns going to be plumbed in, or are you planning on going over the top?
One return line. 1" will go up the middle, split into a 4 way. one to the left one to the right, one to the middle. each of the three will dead end into a 3/4" locline that will split into a "Y". And yes, they will go over the top.
And that sweet idea I told you about...I just had a guy who's got 15 years experience in saltwater stop by and deliver some equipment I bought from him second hand...I showed him a mock up of what I'm doing...he said it was a great idea! And he's never seen or heard anything like it. I'm so pumped about it :)
I already began the patent process^^ And will take a few more weeks to finalize.I cant wait to show you all.
 
Top