SCSInet's 180g Reef Build!
- Thread starter scsinet
- Start date
wattsupdoc
Active Member
Plumbing section at lowes. They have red rubber pads you can cut your own out of. There are 2 thicknesses of it. Get the thicker ones. There only a few bucks. There not a soft as the bulkhead gaskets. But you can cut the outside diameter larger than the bulkhead itself. So it has a larger "footprint" to seal up. I had the same problem with my 135 recently. I found it was leaking through the threads. Cut one for both sides of the bulkhead then use some teflon on the threads of it. Also you can get a locknut wrench from the same section. They are like a big adjustable wrench. I tightened mine up pretty tight BTW.


hefner413
Active Member
SCSInet... I thank you. I am following and taking notes - lots of them. When my 210 project starts, I'll sure be glad that you took the time to share with us your method and all the lessons learned from past that you're implementing on this tank. Bravo.
As of now - my hood probably will look identical to yours, if you don't mind (and if I'm able). The electronics - there's no way I'll ever even begin to try to understand what you've done. And with the rest... I'm on the edge of my seat with pen in hand... haha - it feels like waiting on the next week's episode of Lost or Prison break.. gimme more, can't wait for more.. But truly - Thanks man.
As of now - my hood probably will look identical to yours, if you don't mind (and if I'm able). The electronics - there's no way I'll ever even begin to try to understand what you've done. And with the rest... I'm on the edge of my seat with pen in hand... haha - it feels like waiting on the next week's episode of Lost or Prison break.. gimme more, can't wait for more.. But truly - Thanks man.
al mc
Active Member
Originally Posted by SCSInet
Well then I guess my question would be where can I get the better gasket material from?
In my most recent sump I used the 1/4" thick 'pink' styrofoam insulation (the stuff we all put under DIY acrylic sumps to help with any mild inperfections) for this application. I cut a piece for both sides of the bulkhead area that gave me a 2" overlap on all sides of the hole. I then glued (weldon) Only about 1/2" of the perimeter to give me a water tight seal. This allowed me to hand tighten the bulk head fitting for a nice seal and I can easily remove the bulk head in the future and 'shave off' the foam, if needed.
My old way was to simply glue the bulkhead in place with weldon. I know that I can't remove the bulkhead, but at the time it was the only way I could get a seal without a leak and I just hope (hoped) that I would not have to remove it...
scsinet
Active Member
Originally Posted by wattsupdoc
Plumbing section at lowes. They have red rubber pads you can cut your own out of. There are 2 thicknesses of it. Get the thicker ones. There only a few bucks. There not a soft as the bulkhead gaskets. But you can cut the outside diameter larger than the bulkhead itself. So it has a larger "footprint" to seal up. I had the same problem with my 135 recently. I found it was leaking through the threads. Cut one for both sides of the bulkhead then use some teflon on the threads of it. Also you can get a locknut wrench from the same section. They are like a big adjustable wrench. I tightened mine up pretty tight BTW.
I've got to go to Lowe's today to get some parts to replace a section of pipe I made too short, so I'll check it out.
I read last night that apparently tempered glass is insanely strong - to the tune of 10 times as strong as non-tempered glass of the same thickness - so I'd imagine with the 1/2" tempered glass that this tank uses I can go as tight as I want... as Tommy Boy would say "Sure, all you can handle bro!"
groupergenius
Active Member
I really like the way you did the canopy and lighting. Awsome idea with the moving lights. I am in process right now of building the canopy for my 75 reef. My guy at the LFS says to run the MH with spider reflectors front to back because of the reflectors??? I would like to have them left to right like yours. Have you ever noticed any big difference in the past on which way they are set up?
scsinet
Active Member
Originally Posted by GrouperGenius
I really like the way you did the canopy and lighting. Awsome idea with the moving lights. I am in process right now of building the canopy for my 75 reef. My guy at the LFS says to run the MH with spider reflectors front to back because of the reflectors??? I would like to have them left to right like yours. Have you ever noticed any big difference in the past on which way they are set up?
No, but I haven't fired the system yet with water in the tank. Plan to do so today. As I've got freshwater in the tank for some trial runs. I'll let you know.
scsinet
Active Member
Originally Posted by SCSInet
I've got to go to Lowe's today to get some parts to replace a section of pipe I made too short, so I'll check it out.
I read last night that apparently tempered glass is insanely strong - to the tune of 10 times as strong as non-tempered glass of the same thickness - so I'd imagine with the 1/2" tempered glass that this tank uses I can go as tight as I want... as Tommy Boy would say "Sure, all you can handle bro!"
Found the gasket material. I had no idea lowe's sold that stuff. 6x6" sheets of it. It should work perfect.
scsinet
Active Member
Ballasts, Version 2
After the 400w halides didn't work right due to two of my ballasts being unknowingly defective, I decided to build a more appropriate and robust system.
I chose to do (3) 250w halides and (2) 54w Actinic T5's.
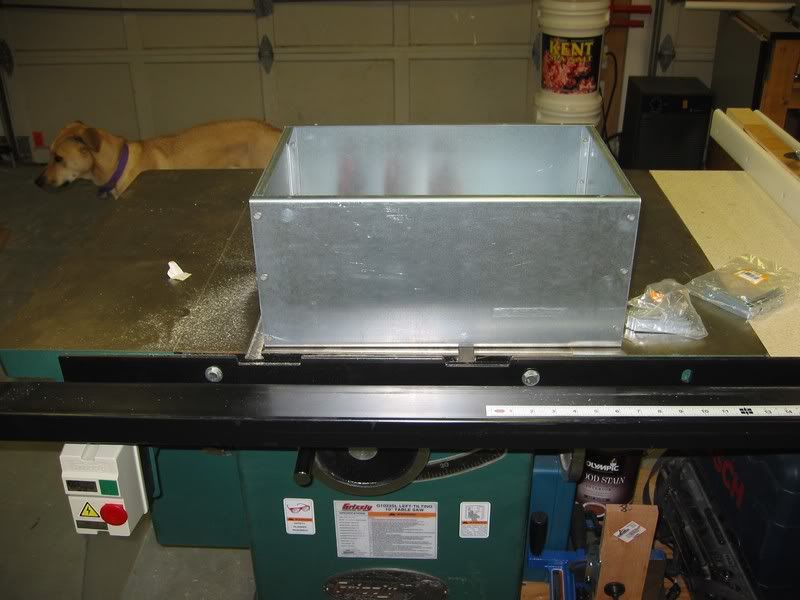
I started by purchasing a new enclosure that was much more roomy. Should the fans fail, this ballast enclosure is not likely to overheat.
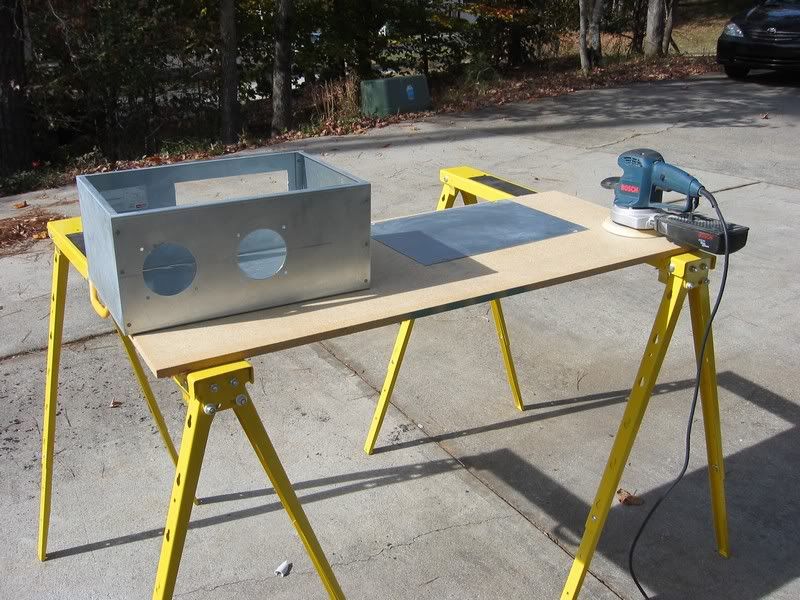
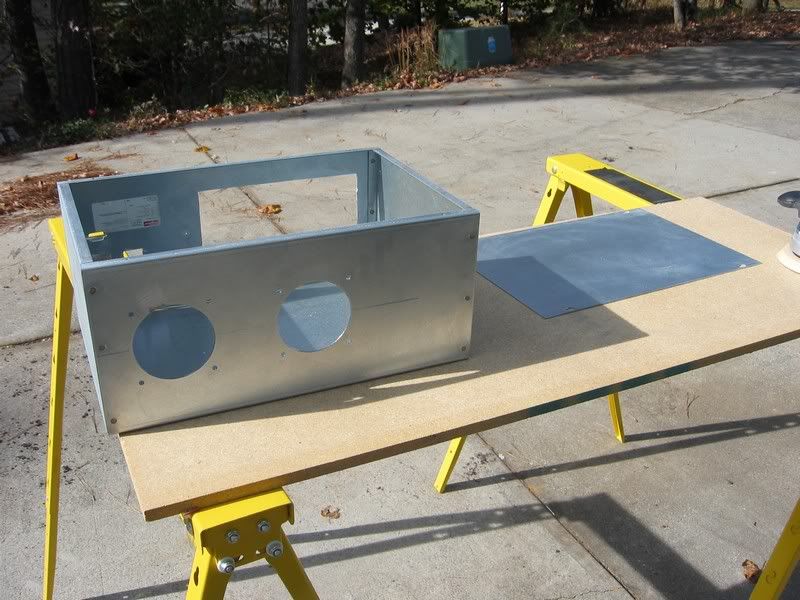
I punched and drilled holes for various fans, vents, connectors, etc.
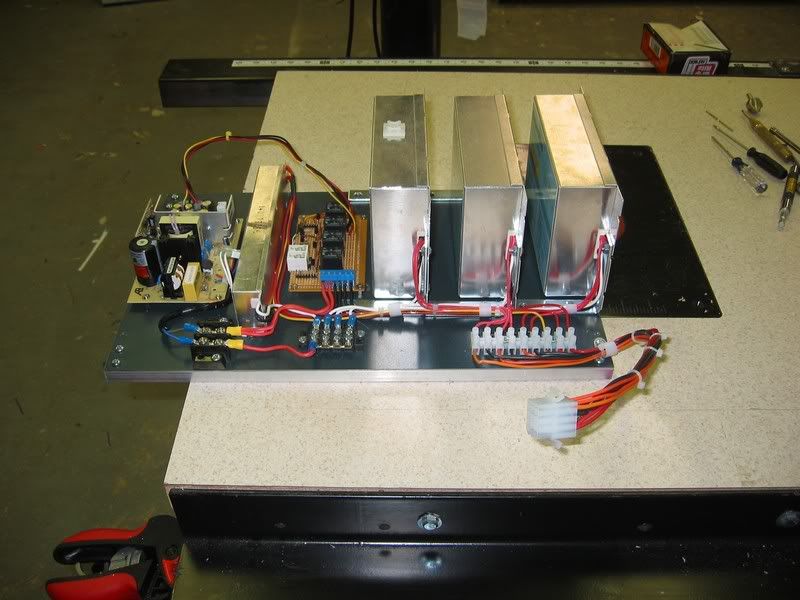
I mounted angle brackets on the ballasts so they could be mounted upright, to save space and enhance cooling.
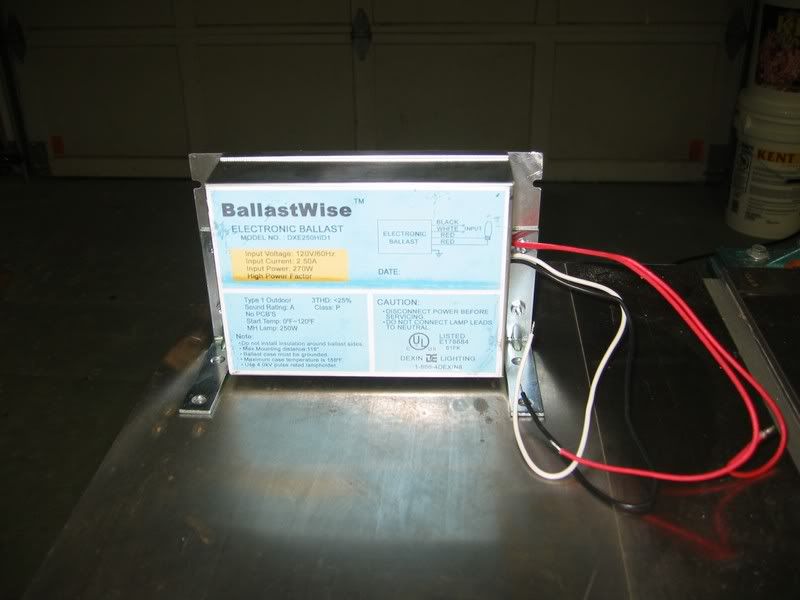
I mounted the ballasts, along with a Workhorse 5 to run the actinics, and started wiring them up.

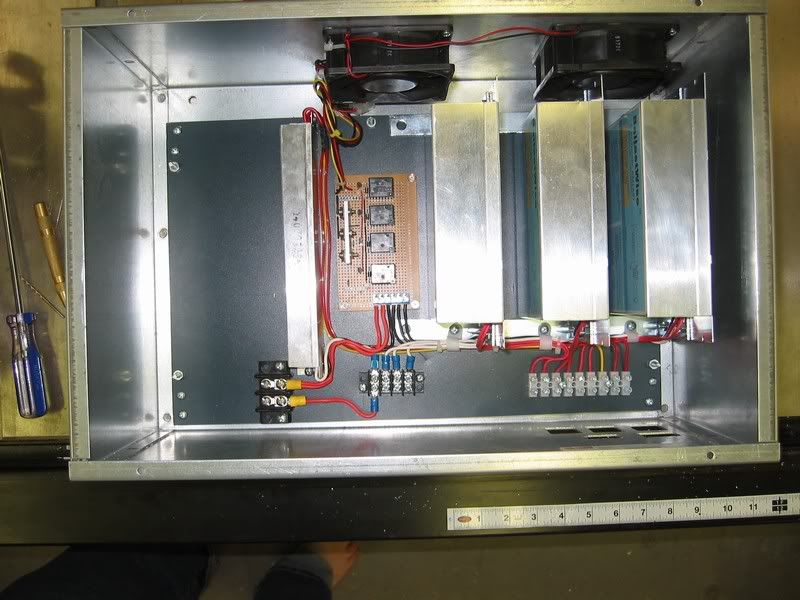

The low voltage power supply came next...
After the 400w halides didn't work right due to two of my ballasts being unknowingly defective, I decided to build a more appropriate and robust system.
I chose to do (3) 250w halides and (2) 54w Actinic T5's.
I started by purchasing a new enclosure that was much more roomy. Should the fans fail, this ballast enclosure is not likely to overheat.
I punched and drilled holes for various fans, vents, connectors, etc.
I mounted angle brackets on the ballasts so they could be mounted upright, to save space and enhance cooling.
I mounted the ballasts, along with a Workhorse 5 to run the actinics, and started wiring them up.
The low voltage power supply came next...
scsinet
Active Member
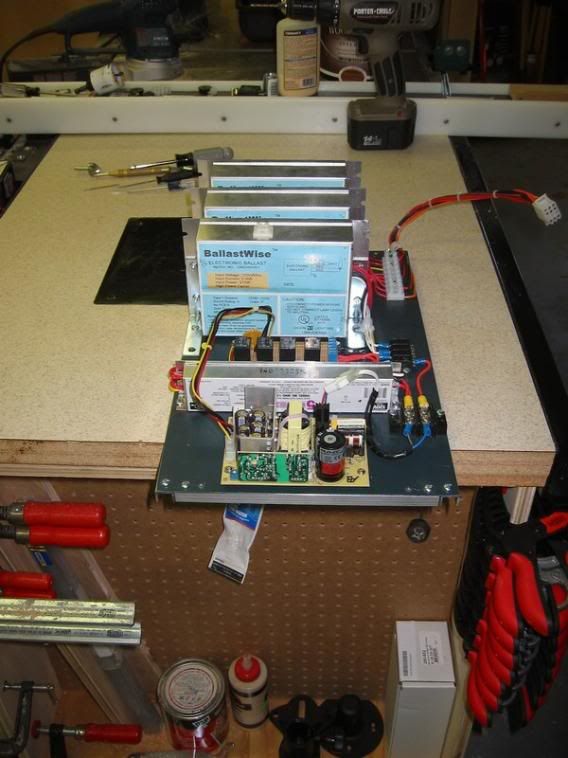
The output of all ballasts was run through a Molex connector, allowing the entire chassis to be removed from the enclosure for maintenance, without having to rip out the connectors mounted for the lights to connect.
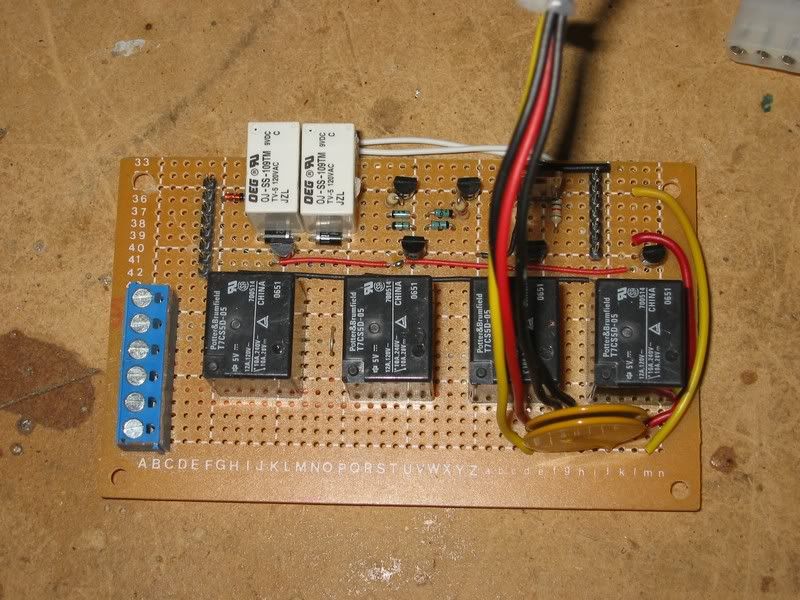
I made some circuit changes to make the fans operate better, which they do. They use relays to run the fans, rather than transistors. I thought the transistor solution was a little more elegant, but I didn't have time to figure out why it didn't work, so this was the better solution for me.
I also added a polyswitch (a solid state, auto-resetting fuse) on the 5 and 12 volt power lines to protect the system. You can see those in the bottom right corner near where the red and yellow wires come in.
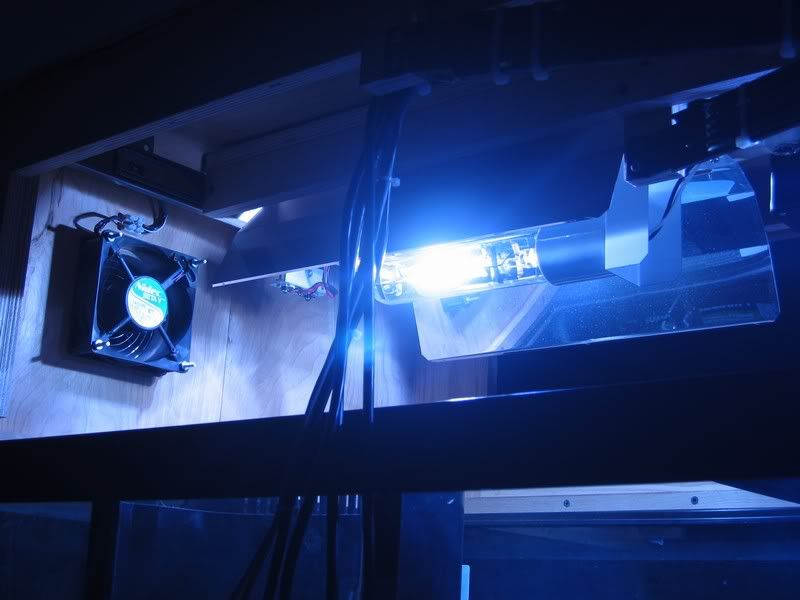
Here's the ballast during it's test run. The bunch of loose wires hanging out is a test jig that's connected to fire up the system without the controller attached.

Fans and lights, powered up.

That's it for now. The ballasts are working perfectly, so I'm ready to go with lighting. I don't have the actinics mounted yet, and I don't plan to until sometime after startup. There isn't a convenient place to mount them in the canopy, and given that I'm not sure I'll need them, I don't want to put in the effort until I'm sure.
When I have some pictures of the tank with the lighting in operation, I'll post them.
I made some circuit changes to make the fans operate better, which they do. They use relays to run the fans, rather than transistors. I thought the transistor solution was a little more elegant, but I didn't have time to figure out why it didn't work, so this was the better solution for me.
I also added a polyswitch (a solid state, auto-resetting fuse) on the 5 and 12 volt power lines to protect the system. You can see those in the bottom right corner near where the red and yellow wires come in.
Here's the ballast during it's test run. The bunch of loose wires hanging out is a test jig that's connected to fire up the system without the controller attached.
Fans and lights, powered up.
That's it for now. The ballasts are working perfectly, so I'm ready to go with lighting. I don't have the actinics mounted yet, and I don't plan to until sometime after startup. There isn't a convenient place to mount them in the canopy, and given that I'm not sure I'll need them, I don't want to put in the effort until I'm sure.
When I have some pictures of the tank with the lighting in operation, I'll post them.
stdreb27
Active Member
Originally Posted by SCSInet
Well then I guess my question would be where can I get the better gasket material from?
I tried auto parts stores once for the bulk gasket material, but all they could come up with were basically rolls of cork, obviously not what I want.
I had that problem with my skimmer, I used vaseline. That worked and is still working great.
stevechouinard
Member
Woodwork = AMAZING!!!
Metal Work = AMAZING!!!
ELECTRICAL WORK = Hands down some of the best I have seen...
Can you please open your own bussiness cause I'd buy your work in a heartbeat
Metal Work = AMAZING!!!
ELECTRICAL WORK = Hands down some of the best I have seen...
Can you please open your own bussiness cause I'd buy your work in a heartbeat
scsinet
Active Member
Originally Posted by TriGa22
As always a nice work of art you got there. Really good job with everything. When do you plan to have water and such in it?
Well the timeline I'm putting forth here is behind the actual build timeline. The tank's startup is actually coming in the next couple weeks. I'm posting weeks worth of progress almost daily, so hopefully the timelines will merge around the time I start it up, and we'll be realtime from there.
reefkprz
Active Member
Originally Posted by SCSInet
Well then I guess my question would be where can I get the better gasket material from?
check with (you'll have to google search for it) "metrogasket" its metro industries they are the gasket GURU's.
they are who I wen through for a custom gasket for a customer of mine and both my customer and I were 100% satisfied pricey but worth it.
