Sweatervest's 125g reef build!!

sweatervest13

Active Member
Quote:
Originally Posted by 2Quills http:///forum/thread/385156/sweatervest-s-125g-reef-build/60#post_3393827
Sure, post up the picks and lets see what you got. Bushings/adapters it's all the same to me, technically they are called bushings. I don't remember if I asked or not but are your bulkheads threaded or slip type? Slip type means the kind you glue. The purple stuff you are talking about is actually primer, so you need the purple primer and glue.
Contrary to what the "expert" at Lowes told you they do make unions that are the threaded type as well as the slip type. And yes, they sell them both there. But you should only need to slip type unions, those are what I'm using.
The reef octo skimmer is a descent skimmer. I think the swc 180 is probably better, or even the super reef octopus 2000. For the money the swc 180 is a good choice. That's the one I'm shooting for anyways.
Deffinately go with at least two of the 1400gph koralias if not four. Or two of the 1400's and two 1050's.
LASCO 1 1/2" X 1" PVC Pressure Sch 40 Bushing Ssoihoihoih
LASCO 1 1/2 ELBOW

AMERICAN VALVE 1 1/2" PVC Union SCH40 Socket
AMERICAN VALVE 1-1/2" PVC Union Valve

AMERICAN VALVE 1-1/2" PVC Union Valve

AMERICAN VALVE 1-1/2" PVC Ball Valve


AMERICAN VALVE 1-1/2" PVC Ball Socket Valve


I know that I need the bushing 1" to 1 1/2". This would allow me to increase the pipe size to 1.5". I am not sure what the difference is with the three union's I listed? Socket or valve?

Also I am not sure what the difference is between the ball valves? One is a socket valve and one is just a valve?
Should I have the bushing attached right to the overflow drain line? Or should I attach an elbow to the overflow drain to turn towards the back wall? Then do the bushing?
Which way would the bushing work best? Vertical or turned horizontal? I would think vertical. I will have a little over a foot to travel from the tank to the back wall where the pipes and fittings will be secured to the wall. I know that I need a 1" to 1.5" bushing to increase the drain size,Then a 90 degree elbow to a pipe about 12" going to the wall, then another 90 degree elbow to turn so the pipe can run along the wall. A 1.5" union (probably a sip union) and a 1.5" ball valve.
I will need to figure out how to get the 1.5" pipe and fittings on that media box. RIght now it is set up to accept 1" fittings. I am sure using a bushing to go back to 1" defeats the purpose. All this is just for the drain line.
For the return line I want to try to use that spa flex pvc line. The expert at lowes said that you can not use pvc fittings on flexable line. I don't think he knew what kind of Spa flex line I was talking about. If I do use the spa flex do I need to put unions and ball valves on? Or should I just have one big long flex tube to the return pipe on the tank? Will it flex that much or does it need elbows too?
I think that this is going to be a project that requires me to just dig in and try things out myself. We will see. I think that I want to stop at lowes tonight and toy around with all the pvc.
BTW, what is the difference between PVC and CPVC??
 

2quills

Well-Known Member
Ill shoot you some more pics when I get home. Still curious to know if your drain bulkheads are threaded inside like your return bulkhead is. Socket unions are the slip type that you glue. Union valves are simply valves that are unions so both in one. Cpvc is just rated for higher temperatures than pvc for use on hotwater lines. Not needed in this case.
 

sweatervest13

Active Member
Quote:
Originally Posted by 2Quills http:///forum/thread/385156/sweatervest-s-125g-reef-build/80#post_3393883
Ill shoot you some more pics when I get home. Still curious to know if your drain bulkheads are threaded inside like your return bulkhead is. Socket unions are the slip type that you glue. Union valves are simply valves that are unions so both in one. Cpvc is just rated for higher temperatures than pvc for use on hotwater lines. Not needed in this case.
I am planning on getting a bunch of stuff done tonight. I will move the tank and take off the bulkheads and get some pics of them so you can see. So I do not need CPVC. The only reason I ask is at Lowes they had Cpvc 90 degree sweep elbows for 1.5". I thought it would be less restrictive.
I am getting excited and I can almost see filling up the tank and getting it going. But I still want to make sure that I get the plumbing done and get the new fish room stand painted. I did purchase some stuff yesterday. I ended up getting the Reef Octopus extreme XS160 skimmer. Two 1400's, I may need to get more later, but two should get me started. I ended up finding a Mag 18 pump for $1.00 more then the Mag12 so I picked that up. I hope it is not too much flow going to the return and it fits in the return chamber. I am pretty sure that it should fit no problem and don't know why it could be too much flow to the return. We will see.
 

2quills

Well-Known Member
Quote:
Originally Posted by sweatervest13 http:///forum/thread/385156/sweatervest-s-125g-reef-build/80#post_3393893
I am planning on getting a bunch of stuff done tonight. I will move the tank and take off the bulkheads and get some pics of them so you can see. So I do not need CPVC. The only reason I ask is at Lowes they had Cpvc 90 degree sweep elbows for 1.5". I thought it would be less restrictive.
I am getting excited and I can almost see filling up the tank and getting it going. But I still want to make sure that I get the plumbing done and get the new fish room stand painted. I did purchase some stuff yesterday. I ended up getting the Reef Octopus extreme XS160 skimmer. Two 1400's, I may need to get more later, but two should get me started. I ended up finding a Mag 18 pump for $1.00 more then the Mag12 so I picked that up. I hope it is not too much flow going to the return and it fits in the return chamber. I am pretty sure that it should fit no problem and don't know why it could be too much flow to the return. We will see.
If you go down the section with all of the large diameter waste pipe you'll find the long sweep 90's in regular pvc. I know that you're return bulkhead is threaded inside on the bottom because you said it came with a threaded barbed fitting screwed into it so that's what I'm currious about is if the drain bulkhead is the same. If so then I'd get a 1" threaded x 1.5" slip bushing. After that you can glue all of your pieces together. The mag will probably be much stronger than what you need or really even want but you can work around that, it's no big deal.
 

sweatervest13

Active Member
Quote:
Originally Posted by 2Quills http:///forum/thread/385156/sweatervest-s-125g-reef-build/80#post_3393937
If you go down the section with all of the large diameter waste pipe you'll find the long sweep 90's in regular pvc. I know that you're return bulkhead is threaded inside on the bottom because you said it came with a threaded barbed fitting screwed into it so that's what I'm currious about is if the drain bulkhead is the same. If so then I'd get a 1" threaded x 1.5" slip bushing. After that you can glue all of your pieces together. The mag will probably be much stronger than what you need or really even want but you can work around that, it's no big deal.
Yes the return bulkhead is threaded AND the drain bulkhead is threaded as well. I was confussed. Both are threaded and get tightened underneath to the glass. Is that what you mean? So I could just attach a threaded 1" to 1.5" bushing with the 1.5" end being a slip? Then I am 1.5" pipe and fittings the rest of the way.
 

acrylic51

Active Member

I am planning on getting a bunch of stuff done tonight.  I will move the tank and take off the bulkheads and get some pics of them so you can see.  So I do not need CPVC.  The only reason I ask is at Lowes they had Cpvc 90 degree sweep elbows for 1.5".  I thought it would be less restrictive. 
 
I am getting excited and I can almost see filling up the tank and getting it going.  But I still want to make sure that I get the plumbing done and get the new fish room stand painted.  I did purchase some stuff yesterday.  I ended up getting the Reef Octopus extreme XS160 skimmer.  Two 1400's,  I may need to get more later, but two should get me started.  I ended up finding a Mag 18 pump for $1.00 more then the Mag12 so I picked that up.  I hope it is not too much flow going to the return and it fits in the return chamber.  I am pretty sure that it should fit no problem and don't know why it could be too much flow to the return.  We will see.  
 
Don't worry about to much return pump. Fingers crossed it fits the area, but could easily "T" off and funnel some back through the sump.
 

2quills

Well-Known Member
Quote:
Originally Posted by sweatervest13 http:///forum/thread/385156/sweatervest-s-125g-reef-build/80#post_3393954
Yes the return bulkhead is threaded AND the drain bulkhead is threaded as well. I was confussed. Both are threaded and get tightened underneath to the glass. Is that what you mean? So I could just attach a threaded 1" to 1.5" bushing with the 1.5" end being a slip? Then I am 1.5" pipe and fittings the rest of the way.
Check it out brother...
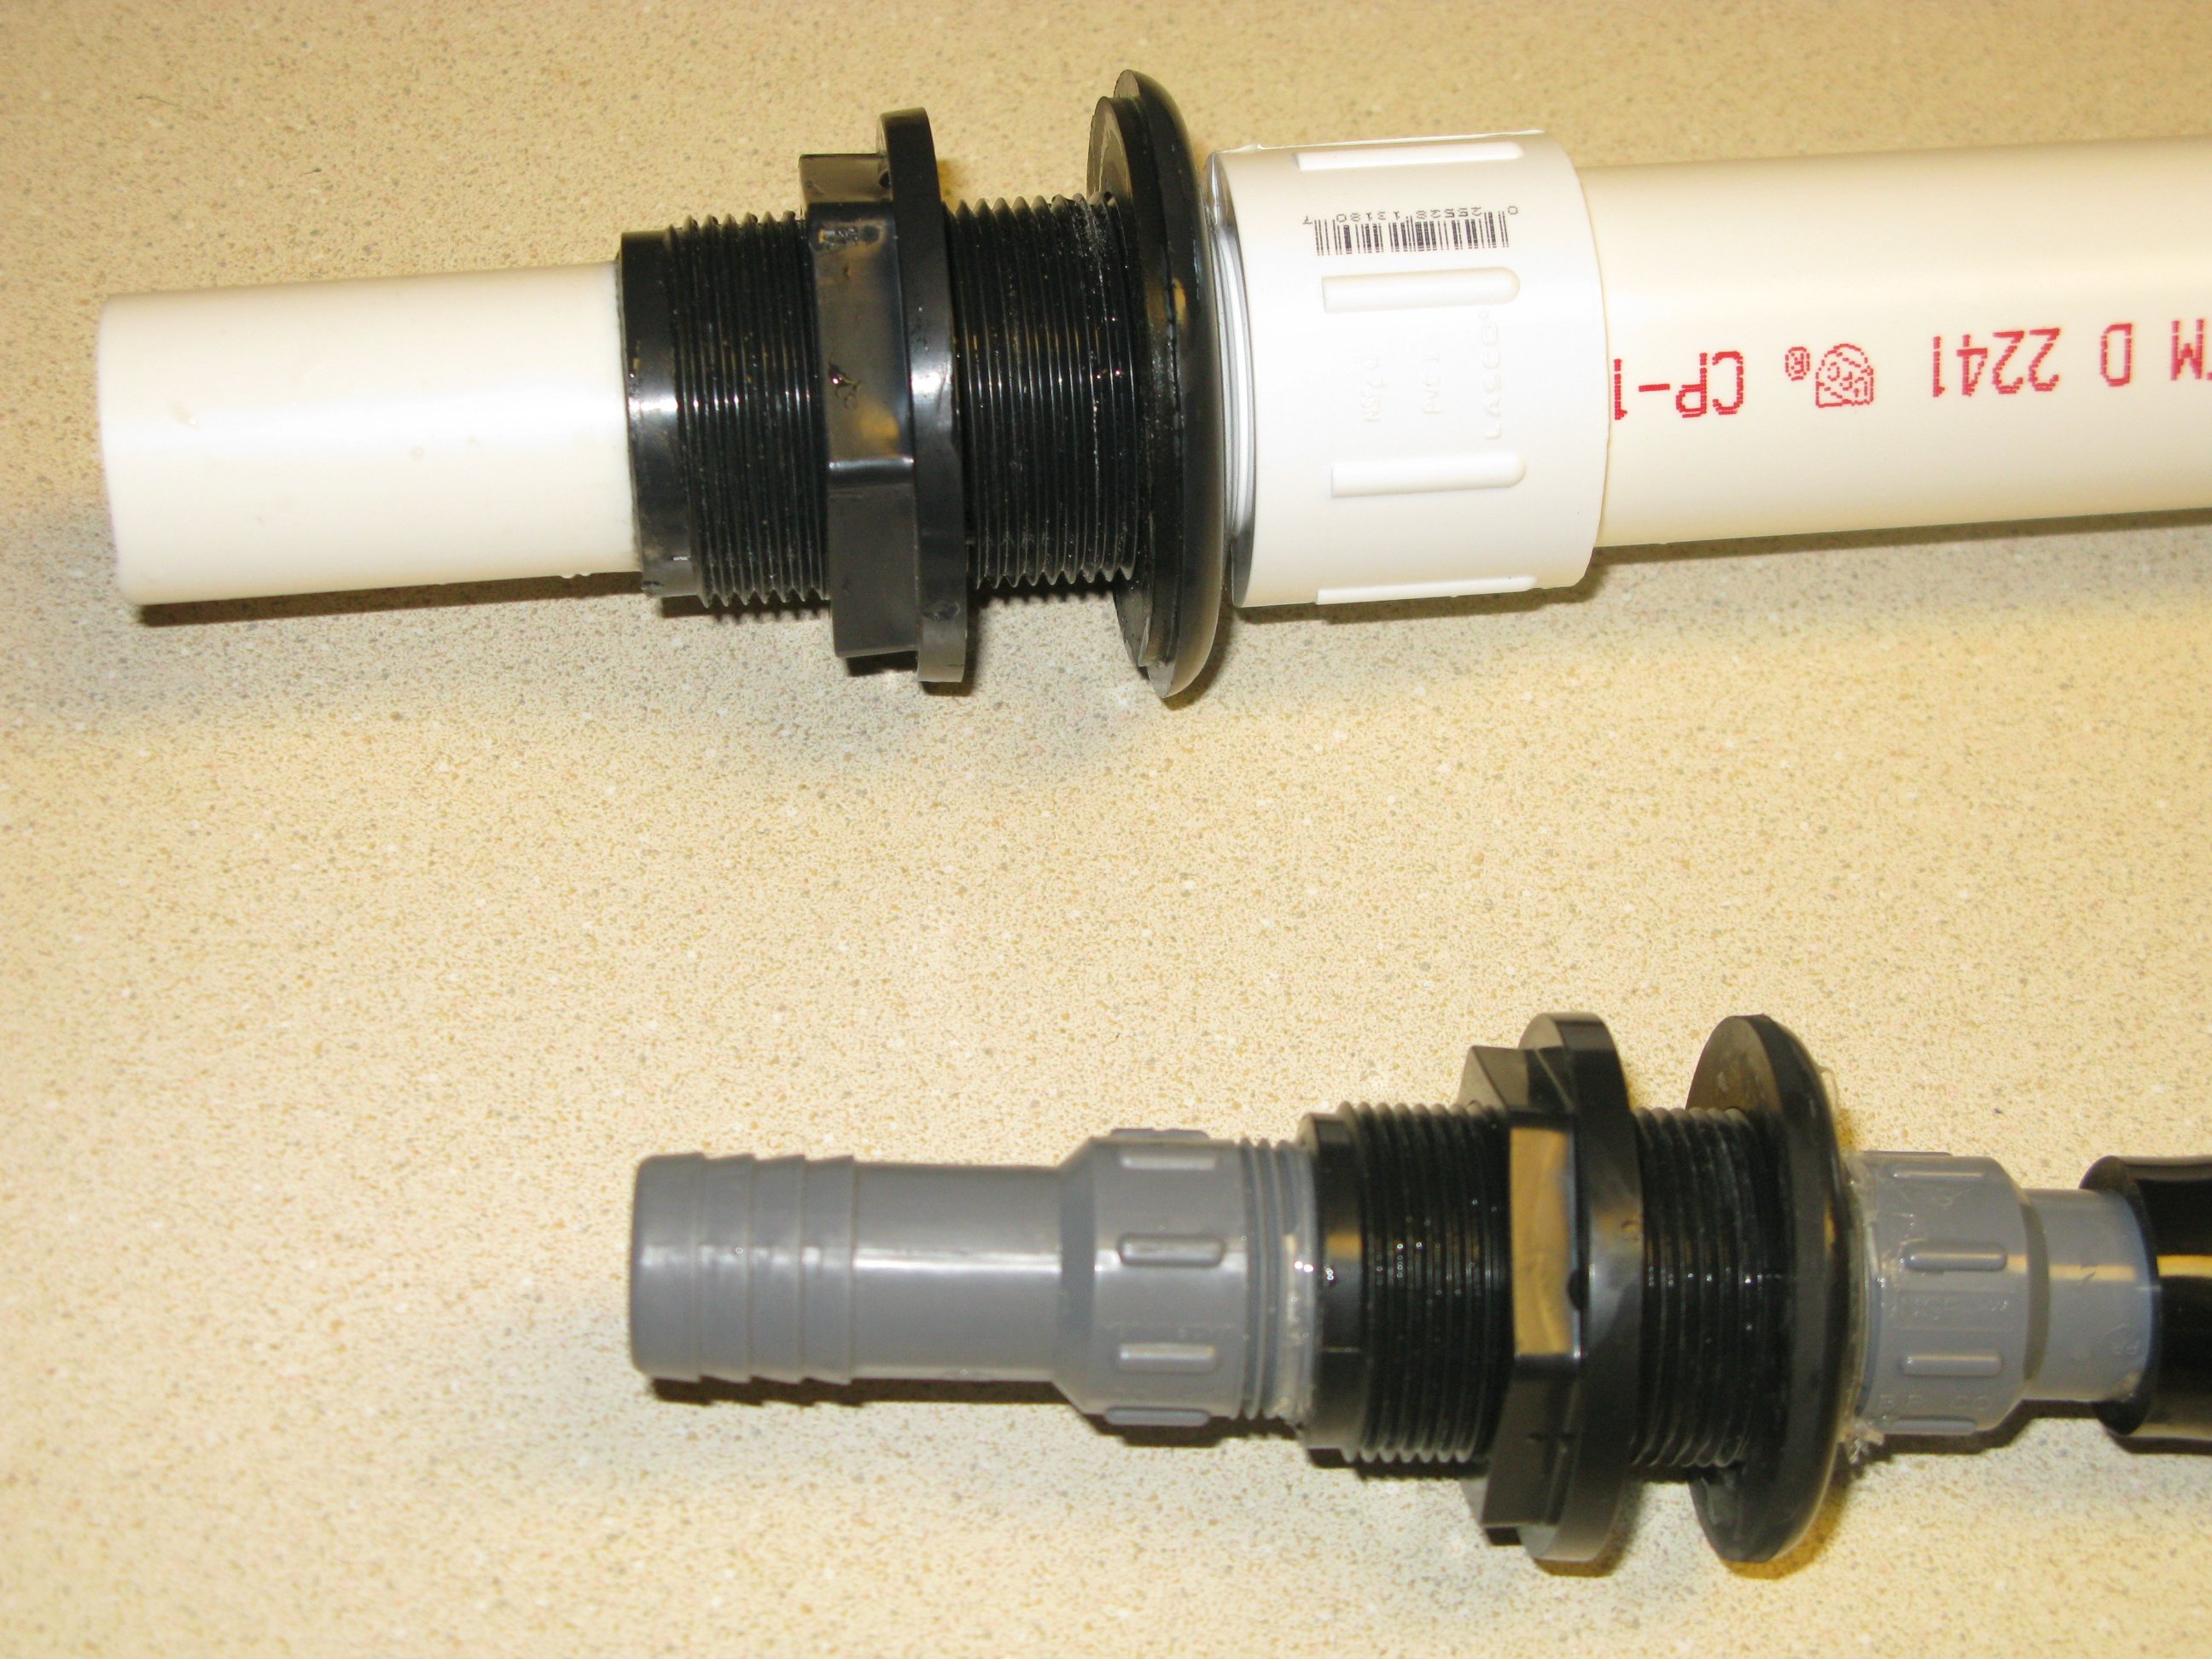
Threaded bulkhead (means threaded on the inside) so fittings can screw into them and are removable later...

Socket (slip style) bulkhead, means pipe gets glued into them instead of screwed..

This is why I was wondering if you drain bulkhead is threaded inside so you could do something like this...Imagine it screwed into the bottom of your tank, coming out of the back and then turning and running down the wall...


Or maybe even something like this if it will fit this way...


sweatervest13

Active Member
Thanks Corey!!! That helps a ton.
I went to lowes last night and dropped a bunch of $$ on some stuff. I have to upload pics still, but I can tell you what I got.
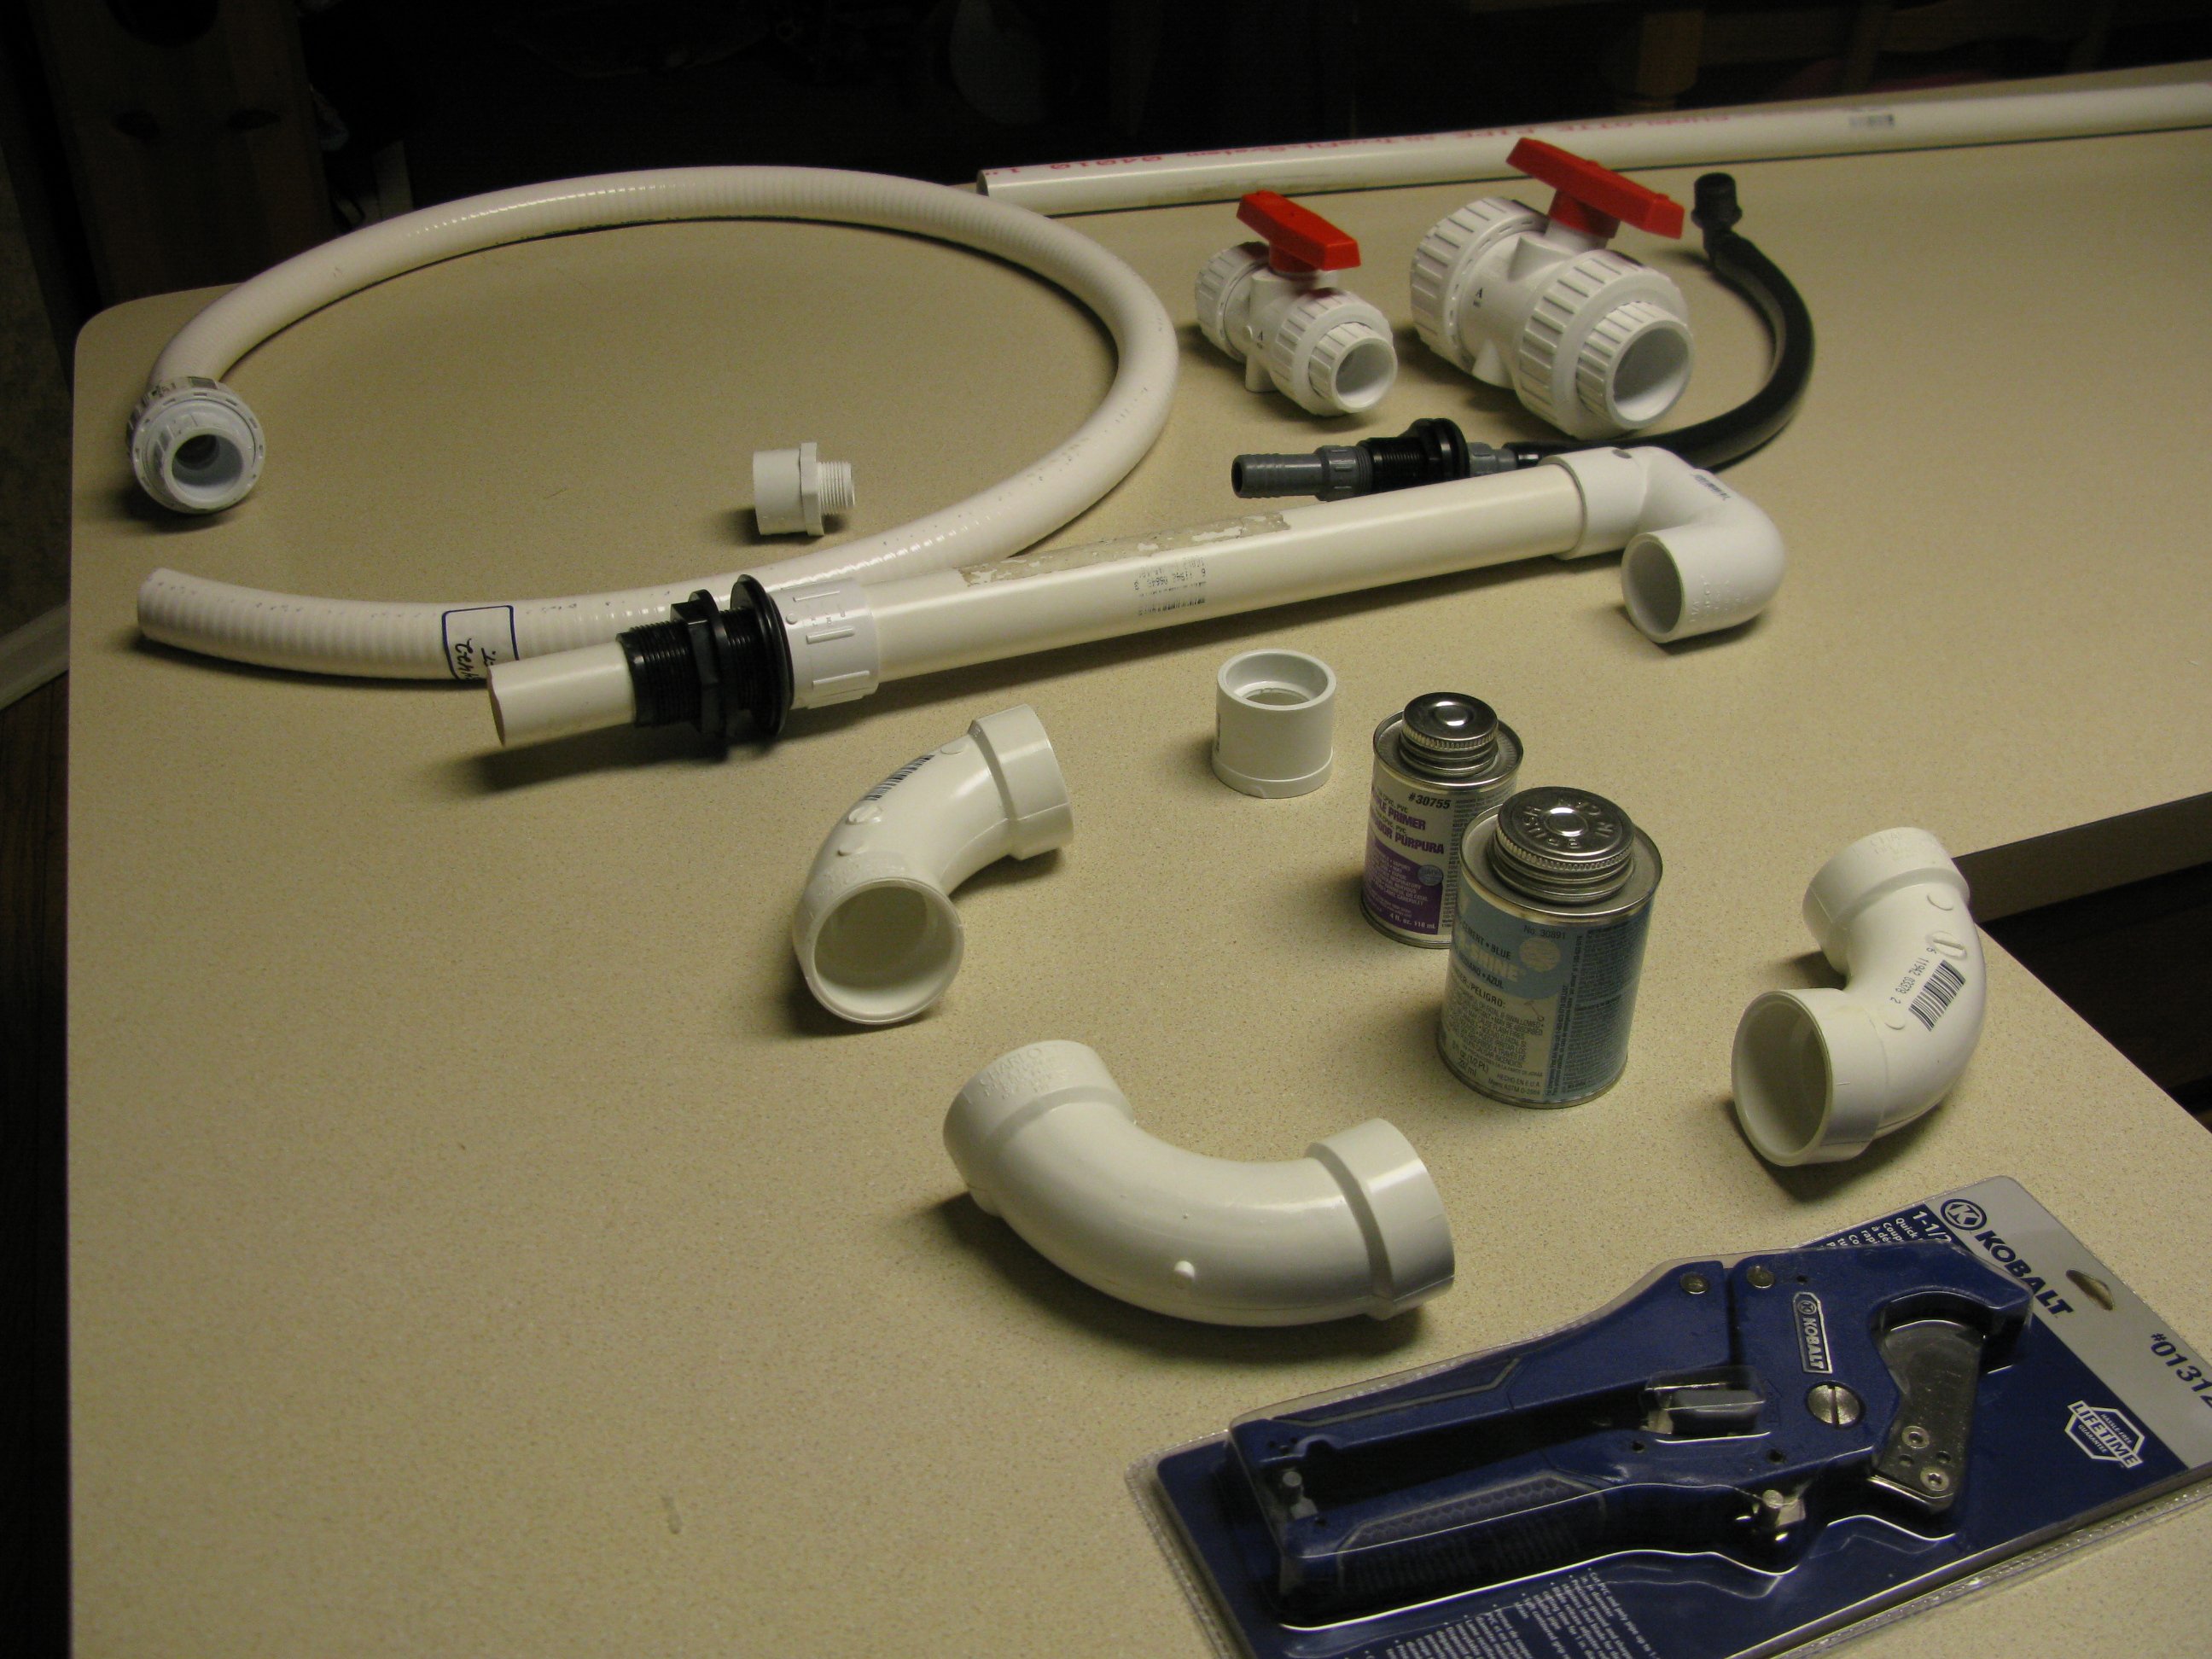
For the drain line the bulkhead is not threaded. It has a 1" thin walled pvc pipe coming out of the bulkhead. So I got a 1" to 1.5" slip bushing to go right into that thin walled pipe. Then I got a 90 degree elbow (longer street elbow, but I may change to a reg 90 elbow) that will go to the (approx) 12" long 1.5" pvc pipe going the the back wall (the 90 degree elbows are slip on both sides). Then another 90 degree street elbow to make the turn along the back wall. The Lowes I went to was out of 1.5" unions, but I found a double union with a ball valve so I picked that up instead (Is the a good choice instead of doing a union and ball valve?). I picked up a 10', 1.5" sch 40 pipe and some pvc cutters so I can just cut to length my own stuff. I still need to figure out how I want the drain line to go into the sump. I can get a coupling to have it all go into that media box, or I can split the line and have some go into the media box and some directly into the skimmer chamber. I think I might wait to get the skimmer in and see how I want it.
For the return line I took your advice and got the spa flex pvc 1" ID. I am going to use that for the turns, and also use hard 1"pvc pipe as well for the long section that will be on the wall (I figured that trying to get the spa flex to straighten out on the wall would be a huge PITA). The specs for the Mag 18 say that it has a 1" MPT outlet so I hope the spa flex fits right on to that. I would need some sort of clamp to tighten it on there right?
So from the return pump to goes like this: 1"ID spa flex tubing that will gently make a sweeping turn through the hole in the wall to the DT cove where it will go from the spa flex to a hard 1"pvc pipe via a 1" union (slip). Then a length of the hard 1" pvc (maybe 3'-4') to a double union with ball valve. The other side of the double union will be more of the spa flex to make the turn(s) back to the tank where it will attach to the return bulkhead using a 1" to 3/4" adaptor (slip on the 1" and threaded on the 3/4" side) this will screw right into the return bulkhead. Presto!!!
I think that should work. I got some of the purple primer and asked the guy at Lowes (much more helpful at this different location then the guy at the other store) what glue to get. He gave me some glue that is used for like hot tub plumbing something like rain or shine cement. Again I have pics to put up here soon.
Let me know if you think that would work. It was much more fun at Lowes this time around, knowing a bit more about how all the fittings work. I must say I love the feeling of a good DIY project. Even if it did cost me $97 for some pipes. LOL
Thanks
Ryan
 

sweatervest13

Active Member
Quote:
Originally Posted by sweatervest13 http:///forum/thread/385156/sweatervest-s-125g-reef-build/80#post_3394228
Thanks Corey!!! That helps a ton.
I went to lowes last night and dropped a bunch of $$ on some stuff. I have to upload pics still, but I can tell you what I got.
For the drain line the bulkhead is not threaded. It has a 1" thin walled pvc pipe coming out of the bulkhead. So I got a 1" to 1.5" slip bushing to go right into that thin walled pipe. Then I got a 90 degree elbow (longer street elbow, but I may change to a reg 90 elbow) that will go to the (approx) 12" long 1.5" pvc pipe going the the back wall (the 90 degree elbows are slip on both sides). Then another 90 degree street elbow to make the turn along the back wall. The Lowes I went to was out of 1.5" unions, but I found a double union with a ball valve so I picked that up instead (Is the a good choice instead of doing a union and ball valve?). I picked up a 10', 1.5" sch 40 pipe and some pvc cutters so I can just cut to length my own stuff. I still need to figure out how I want the drain line to go into the sump. I can get a coupling to have it all go into that media box, or I can split the line and have some go into the media box and some directly into the skimmer chamber. I think I might wait to get the skimmer in and see how I want it.
For the return line I took your advice and got the spa flex pvc 1" ID. I am going to use that for the turns, and also use hard 1"pvc pipe as well for the long section that will be on the wall (I figured that trying to get the spa flex to straighten out on the wall would be a huge PITA). The specs for the Mag 18 say that it has a 1" MPT outlet so I hope the spa flex fits right on to that. I would need some sort of clamp to tighten it on there right?
So from the return pump to goes like this: 1"ID spa flex tubing that will gently make a sweeping turn through the hole in the wall to the DT cove where it will go from the spa flex to a hard 1"pvc pipe via a 1" union (slip). Then a length of the hard 1" pvc (maybe 3'-4') to a double union with ball valve. The other side of the double union will be more of the spa flex to make the turn(s) back to the tank where it will attach to the return bulkhead using a 1" to 3/4" adaptor (slip on the 1" and threaded on the 3/4" side) this will screw right into the return bulkhead. Presto!!!
I think that should work. I got some of the purple primer and asked the guy at Lowes (much more helpful at this different location then the guy at the other store) what glue to get. He gave me some glue that is used for like hot tub plumbing something like rain or shine cement. Again I have pics to put up here soon.
Let me know if you think that would work. It was much more fun at Lowes this time around, knowing a bit more about how all the fittings work. I must say I love the feeling of a good DIY project. Even if it did cost me $97 for some pipes. LOL
Thanks
Ryan
Okay lets try this again. Third time is the charm right? Picsaterfish.com/image/id/512995/width/1000/height/800" target="_blank">
 

2quills

Well-Known Member
Any time, bud. The price tag really starts to add up with all the unions and valves and stuff. But it's all worth it once you finally are able to sit back and enjoy your creation.
 

sweatervest13

Active Member
**Update***
Things are going a little slow, but I have gotten some stuff done. I build a stand/bench for the fish room. It is 6'x2' and about 44" high. I wanted to have as much room as I could on the bottom shelf. The top is a bit high but I have a step stool that I can use if needed. I plan on having a QT tank up and running on the top and maybe a frag tank. I still need to do the plumbing on the tank but I am waiting on a few things regarding the sump ( I am seeing about exchanging it and getting a bigger one {50g}). I hope to get the plumbing done this weeked.
One thing I am thinking about is raising my DT stand up a littel bit. It is very close with the pipes running along the back wall to the fish room, so I would like to go up a few more inches. I am thinking about just mounting some 2x4's on the bottom of the stand. I would mount them double stacked (so around 3 1/2 inches, 1.75x2=3.5) to the bottom frame of the stand. I was thinking about five sets, one on each end and three braces in the middle. How does that sound? Is this something that would work? Or is it trouble? It is kind of like putting feet on the stand. Let me know what you guys think. I would cover the "feet" with trim stained to match. it would look a bit weird but I really think I need the extra height to let gravity do its thing on the plumbing.
I will snap some pics soon and let everyone see how the build is coming.
 

2quills

Well-Known Member
Sounds like a plan and should work fine. That would be good if they will let you exchange the sump, something a little bigger would deffinately be better. Keep us posted!
 

sweatervest13

Active Member
Quote:
Originally Posted by 2Quills http:///forum/thread/385156/sweatervest-s-125g-reef-build/80#post_3398896
Sounds like a plan and should work fine. That would be good if they will let you exchange the sump, something a little bigger would deffinately be better. Keep us posted!
Cool. I thought it should work but I did not feel good about it until I could run it by some other people. I gotta call the guy about the sump. I have an email into him but no answer yet. Shoot even if I have to pay an extra $15.00 for a restock fee. I am okay with that.
 

sweatervest13

Active Member
Quote:
Next time you'll have to build you one from scratch.


YUP!!!
I already need to plan on a small sump for a frag tank. But I would like to get the DT up and running. I am getting sick of seeing it empty knowing how much $$ has already been spent. I think my plan on slow playing this worked on the wife. She has given me carte blanche to get it up and running. Now the lighting she is not so cool with. That is the next step. LOL.
 

sweatervest13

Active Member
Once again this site is giving me issues with uploading photos. So I will just have a text post THEN a pic post. Cause I am tired of retyping all this stuff.
Got busy getting things done on the tank this weekend. The wife and kids were out of town so I was able to get to it. I had a helping hand from my buddy Jeff (not a SW tank owner but he's cool, lol) together we were hell bent on getting RO/DI, rocks, and sand in it by last night to start the cycle. Did not happen. But sometimes things take time to do it right, and when it comes to 150+ gallons of H2O you really want to do it right. I was able to upgrade my sump from a 32g (36X12X18) unit to a 67g (48X18X18) unit thanks to Steve at Great Lakes Aquarium. I have to say I love the size of the new sump.
Then it was off to a different LFS to get dry base rock and aragonite. I was able to work out a deal with the owner to bring the price of the base rock down to compare with the online retailers. I ordered 100 lbs, but he needed to restock as well, so when I got there I was able to pick up 110lbs. I picked through about 300lbs to get the peices I liked. I was happy to get first look!! For the sand I went with dry aragonite sugar sized grains, I went with 4 30lb bags. I hope that is enough.
The next task was working on plumbing the system together. As I mentioned before I was going to upsize the drain line to 1.5" and the return line to 1.0" (from 1.0" and 3/4" respectively). The first thing I figured out with plumbing is UNIONS ARE AWESOME. They make thing so much easier. First up was the drain line; that went pretty good. I figured that since it was not a pressurized system that It may be able to just be hand tightened. WRONG!!!. I ended up having to glue everything. The return line is spa flex pvc coming from the pump (Mag 18) to a 1" union, then to a reg PVC 1" pipe to a double union ball valve. From that it goes back to spa flex into a third union for the connection to the bulk head.
The return bulkhead is where most of the problems occured. I was told/read online that the first time you set up the plumbing if you don't see any leaks you are not looking hard enough. And that I should see at least 3 leaks. True to plan, we had three leaks the first time out. Glued eveything and then 2 leaks. Fixed those and finally down to just one leak. That's when things got a little messy. The return bulk head got mangled trying to tighten it to the tank and trying to tighten the fitting to the bulk head for the return line. So need a new bulk head, but of course we figured this out Sunday after 5pm when all the LFS are closed. BOO!!! There were some other thing that got messed up but not too bad. A couple things need to be replaced.
I started to make RO/DI water to fill this sucker up, but did not use any of it yet. I hope its okay to leave it out for a few more days.
For the rock I made little pvc bases so the rock is not on the bottom of the tank. I just took 3/4" pvc and some 90 degree elbows and made a couple of rectangles. I will mount eggcrate on top using zip ties (I know the pvc and eggcrate are fine in the tank, but will the zip ties leach anything into the water?) then I will have my bases. It should give me an inch above the bottom glass. I just hate the fact that if I did not put the rock on the base I am covering the bottom 20% of all the rock. This is not going to have the rock stick out of the sand but it should help not waste live rock as much.
My work PC is not loading pics well right now so I will wait to get home and upload them.
Thanks
Ryan
 
Top