2Quills, 120G Re-build thread.
- Thread starter 2quills
- Start date
al&burke
Active Member
Quote:
Originally Posted by 2Quills http:///forum/thread/378912/2quills-120g-re-build-thread/420#post_3385425
Quote:
Thanks guys. I appreciate that. Al it will go in the bottom stand on the left side of the sump. Right were it is in the last two pics in post 435. I think I'll snag your nifty idea for keeping the tube above water level.

Right on Corey - just drill a hole in your euro bracing that will accept the pipe and hold it good. I would have drilled a hole but I was worried about all the shavings in the water.
Originally Posted by 2Quills http:///forum/thread/378912/2quills-120g-re-build-thread/420#post_3385425
Quote:
Thanks guys. I appreciate that. Al it will go in the bottom stand on the left side of the sump. Right were it is in the last two pics in post 435. I think I'll snag your nifty idea for keeping the tube above water level.
Right on Corey - just drill a hole in your euro bracing that will accept the pipe and hold it good. I would have drilled a hole but I was worried about all the shavings in the water.
2quills
Well-Known Member
Quote:
Originally Posted by 1Snapple http:///forum/thread/378912/2quills-120g-re-build-thread/440#post_3385441
Joints look good
how big of a sump? And do you use the pin method?

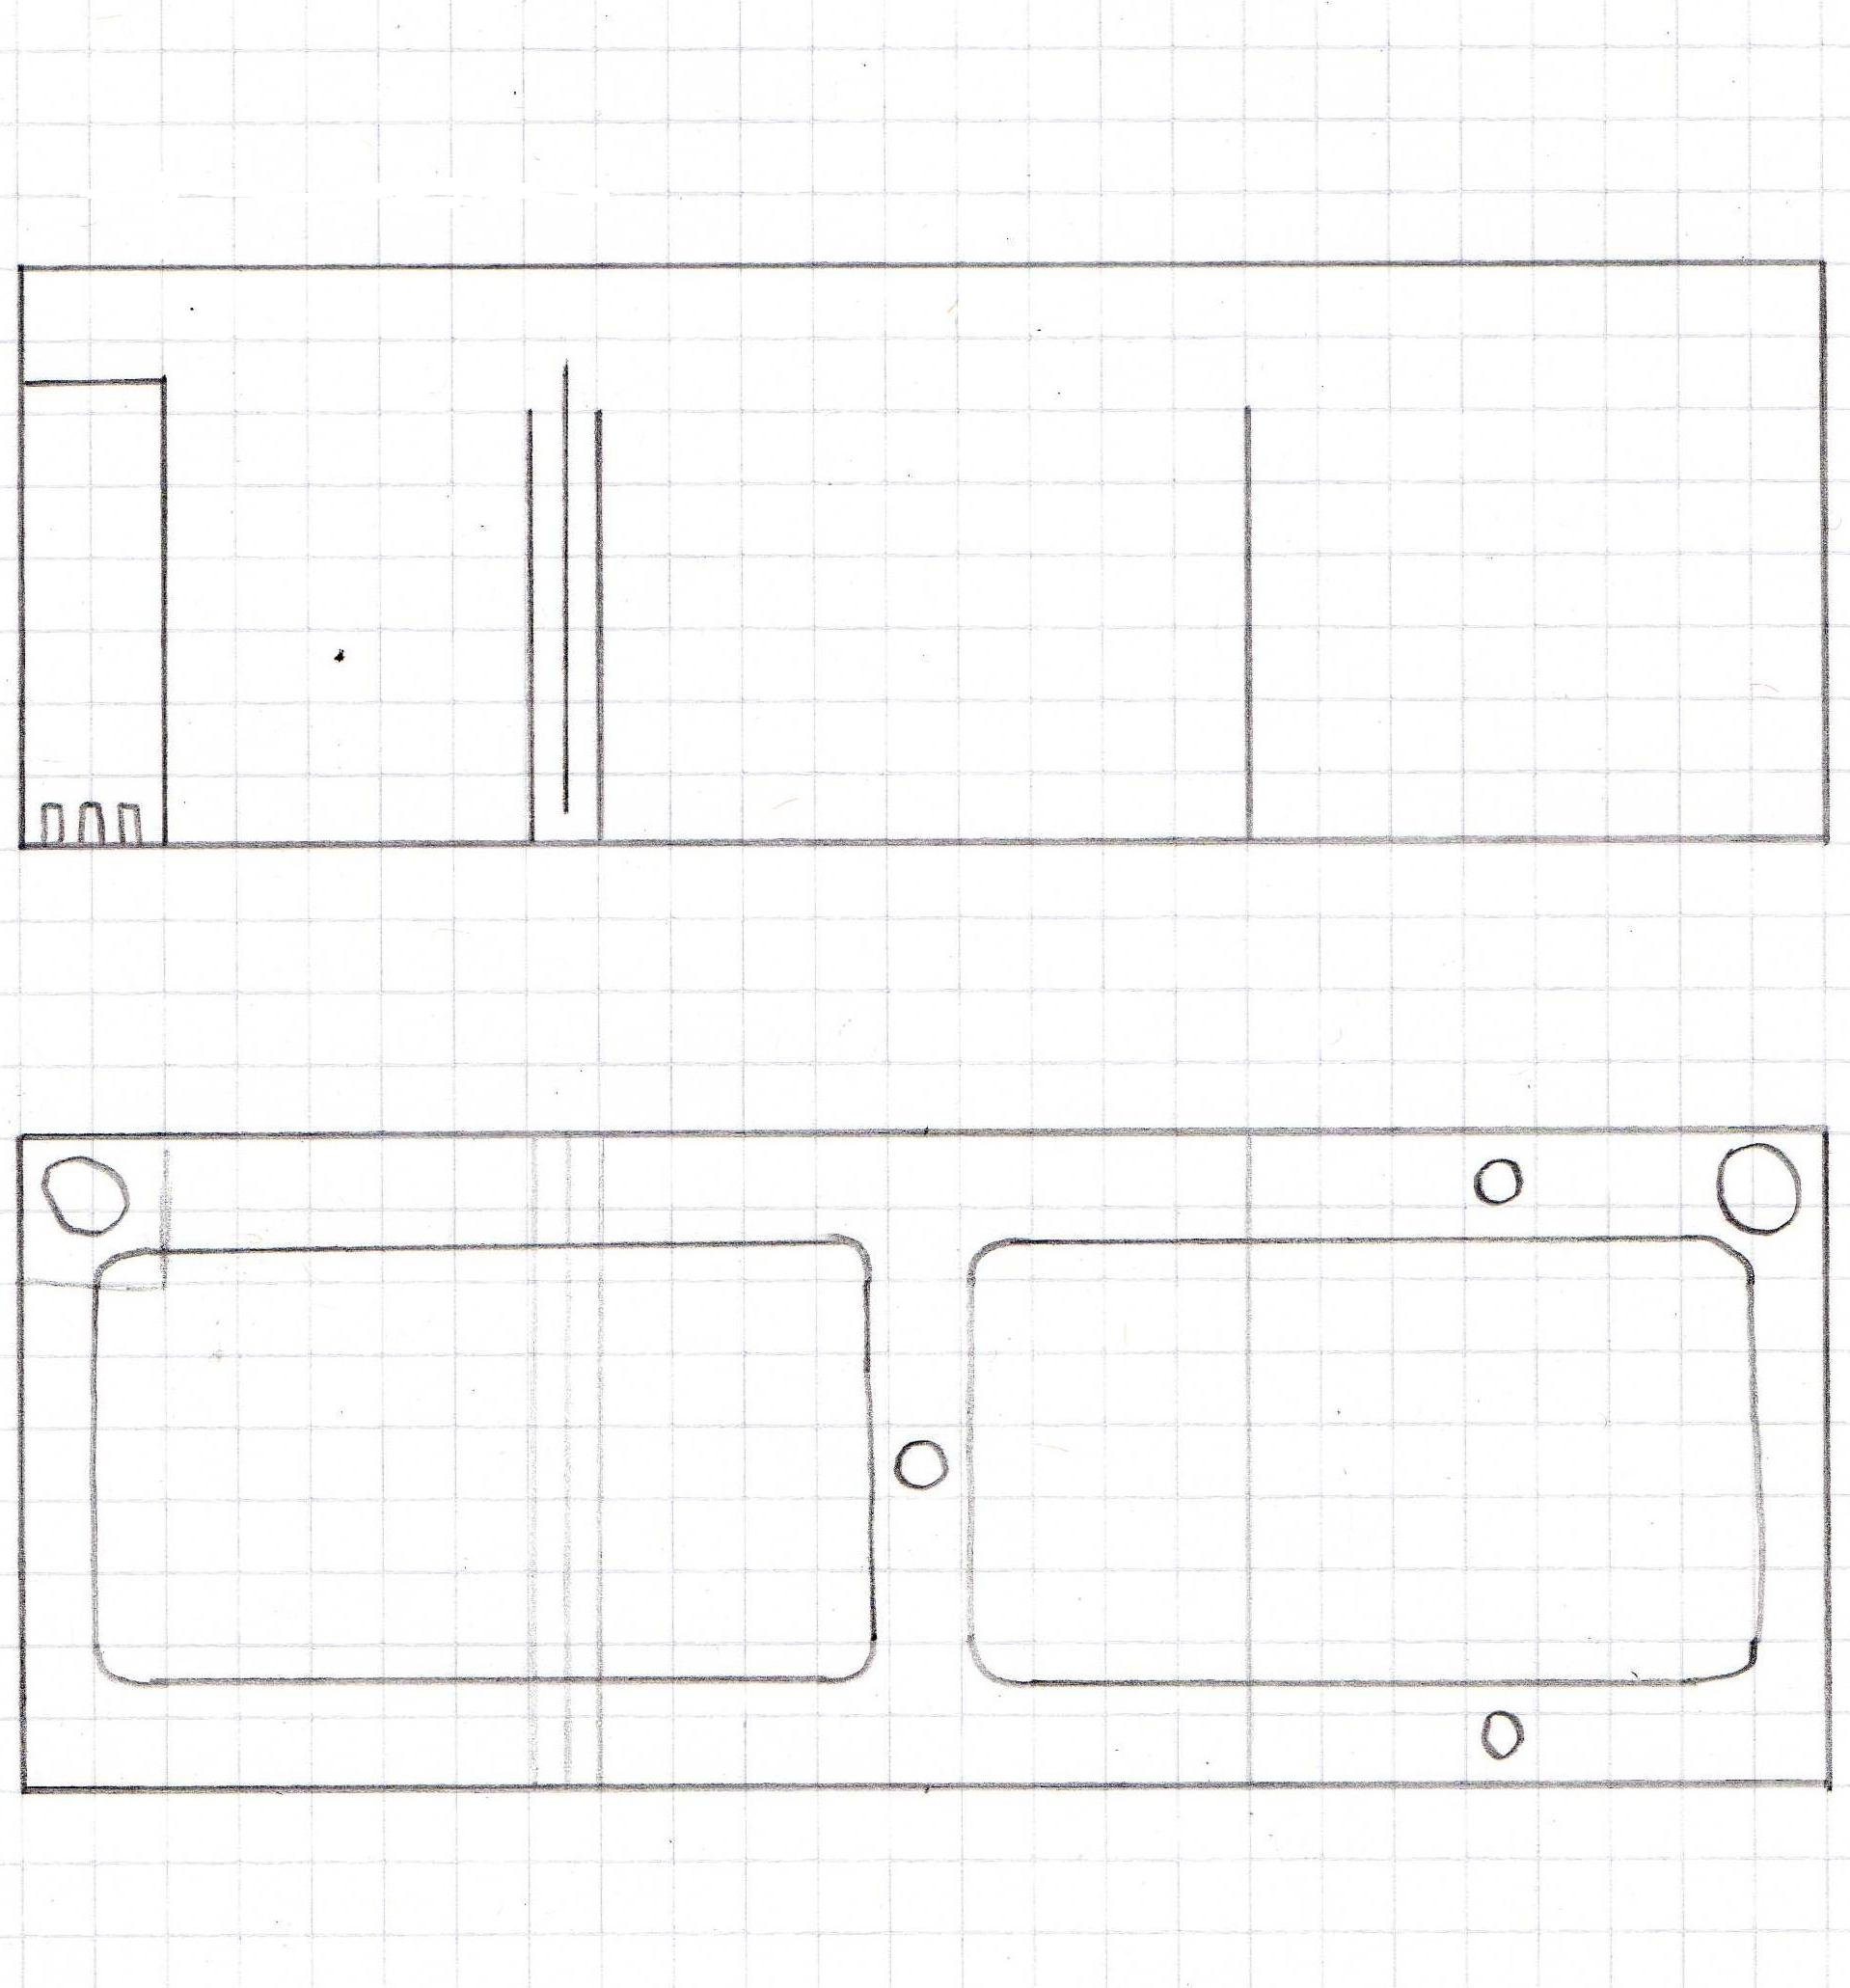
62 gallon sump. 50" x 18" x 16". It will hold 42gallons when it's running.
Quote:
Originally Posted by Al&Burke http:///forum/thread/378912/2quills-120g-re-build-thread/440#post_3385468
Right on Corey - just drill a hole in your euro bracing that will accept the pipe and hold it good. I would have drilled a hole but I was worried about all the shavings in the water.
Yep that's a good idea Al. Is it not possible to still drill a hole in yours? Can you maybe hold some type of container under it or something to catch the shavings? Hey what do you think is a good amount of time to let the solvent cure before I leak test? I've read anywhere from 24 hours to a week. The guy down here at the local plastics shop sold me a mixed bottle of weld-on 3 and 4. 50/50 mix. He said that's the best thing to use down here with our temps and humidity.
Originally Posted by 1Snapple http:///forum/thread/378912/2quills-120g-re-build-thread/440#post_3385441
Joints look good
how big of a sump? And do you use the pin method?
62 gallon sump. 50" x 18" x 16". It will hold 42gallons when it's running.
Quote:
Originally Posted by Al&Burke http:///forum/thread/378912/2quills-120g-re-build-thread/440#post_3385468
Right on Corey - just drill a hole in your euro bracing that will accept the pipe and hold it good. I would have drilled a hole but I was worried about all the shavings in the water.
Yep that's a good idea Al. Is it not possible to still drill a hole in yours? Can you maybe hold some type of container under it or something to catch the shavings? Hey what do you think is a good amount of time to let the solvent cure before I leak test? I've read anywhere from 24 hours to a week. The guy down here at the local plastics shop sold me a mixed bottle of weld-on 3 and 4. 50/50 mix. He said that's the best thing to use down here with our temps and humidity.
2quills
Well-Known Member
Quote:
Originally Posted by Kiefers http:///forum/thread/378912/2quills-120g-re-build-thread/440#post_3385496
you are most certainly going all the way with this Corey. I have learned alot reading these, wish I had the tools and experience to try something like this. The anticipation is killing me!!
Tools are a must but experience isn't always necessary. Other than the wood working a lot of this stuff is all a first for me. Drilling the tank, re sealing the aquarium, making my own overflows and working with acrylic, the lighting...I'm learning everything as I go. You might be surprised at what you're capable of Keith. I bet you're more of a DIY'er than ya think.
kiefers
Active Member
Quote:
Originally Posted by 2Quills http:///forum/thread/378912/2quills-120g-re-build-thread/440#post_3385500
Tools are a must but experience isn't always necessary. Other than the wood working a lot of this stuff is all a first for me. Drilling the tank, re sealing the aquarium, making my own overflows and working with acrylic, the lighting...I'm learning everything as I go. You might be surprised at what you're capable of Keith. I bet you're more of a DIY'er than ya think.
around the house yes, landscaping yards yes, aquariums ........ unsure Lol...... some day we will see. I should go visist my lil sister, she lives very close to corpus. i could stop by for a bit Lol....
2quills
Well-Known Member
Quote:
Originally Posted by Kiefers http:///forum/thread/378912/2quills-120g-re-build-thread/440#post_3385501
around the house yes, landscaping yards yes, aquariums ........ unsure Lol...... some day we will see. I should go visist my lil sister, she lives very close to corpus. i could stop by for a bit Lol....
Sure man, stop on by.
Quote:
Originally Posted by 1Snapple http:///forum/thread/378912/2quills-120g-re-build-thread/440#post_3385505
Thats one thing about DIY, once you do it once or twice you try to do it for everything =D.
Now did you use the pin method to get the seams without the blubbles?
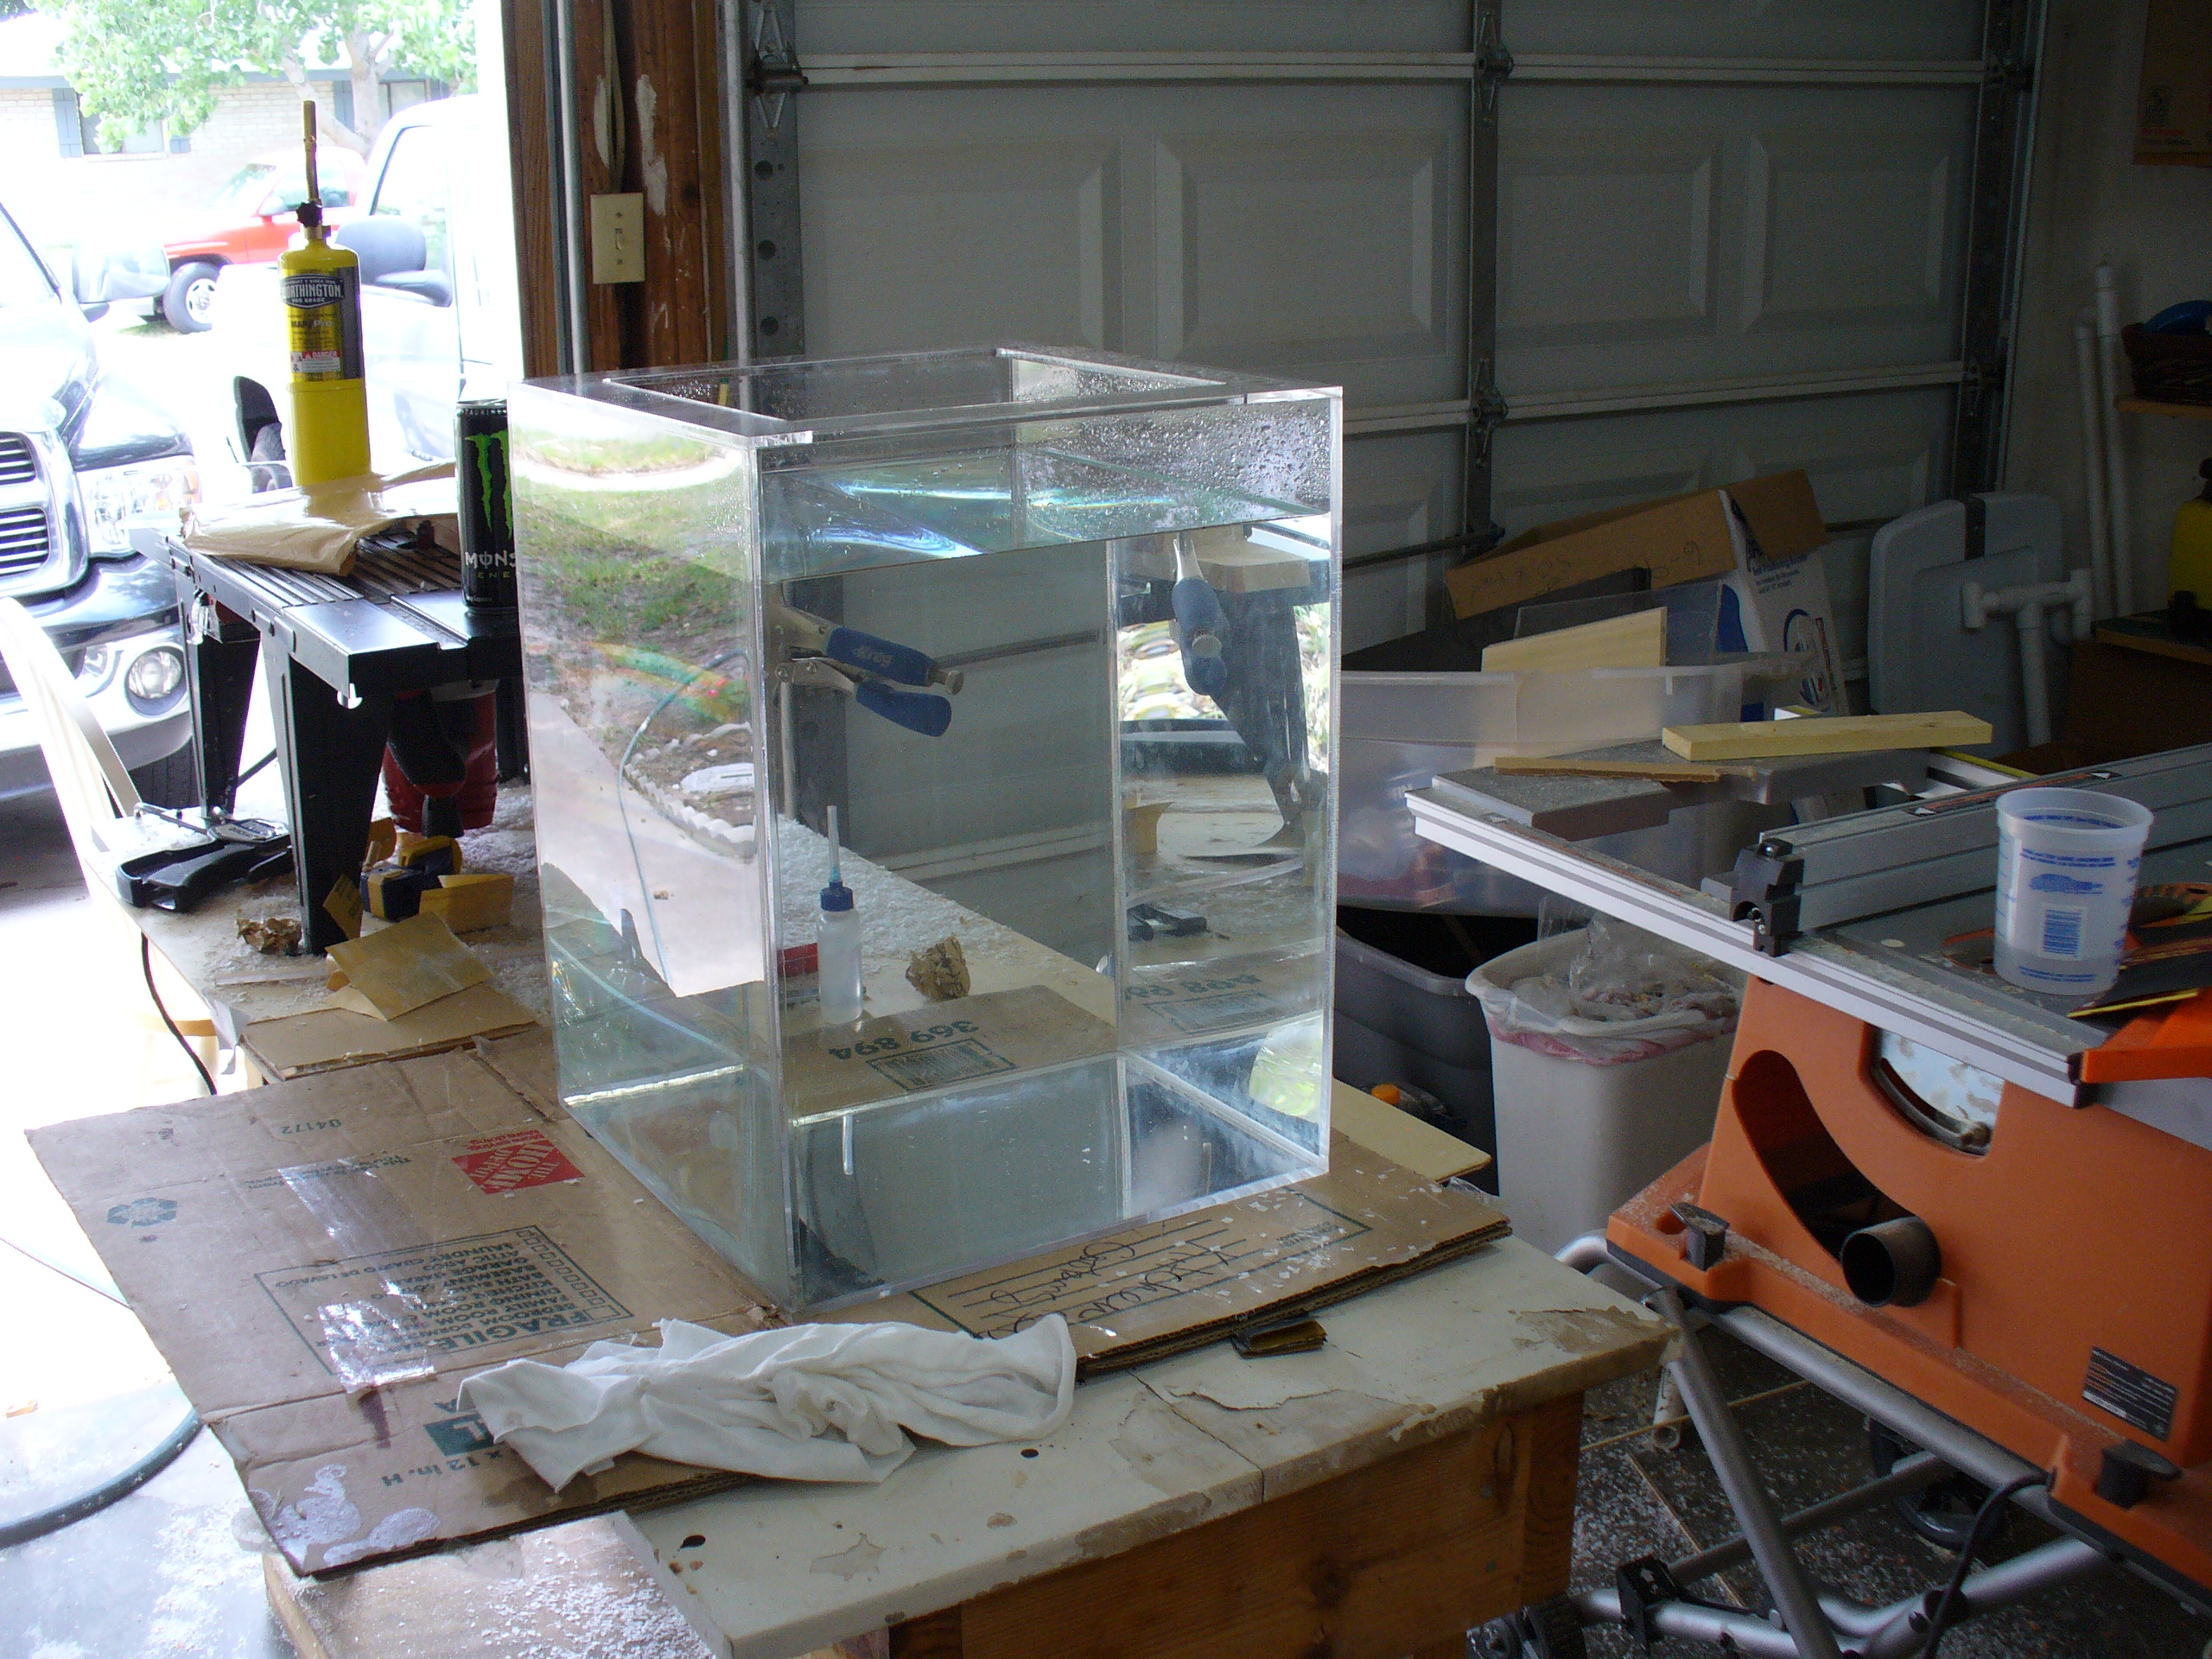
Sorry Josh I forgot to answer that. No I didn't use the pin method. I didn't think it was going to be necessary. I may order some acupuncture needles and try it out for practice though. Just to see if I can get ALL of the joints perfect. Like I said I did get a few small bubbles here and there. I talked with Shawn a little bit this morning and I think I may practice with some other preparation tips that he gave me and see how that goes as well. I just picked up a new bottle of map gas for my torch so I'm going to try and flame polish it here shortly. I'll let ya know how it turns out.
Originally Posted by Kiefers http:///forum/thread/378912/2quills-120g-re-build-thread/440#post_3385501
around the house yes, landscaping yards yes, aquariums ........ unsure Lol...... some day we will see. I should go visist my lil sister, she lives very close to corpus. i could stop by for a bit Lol....
Sure man, stop on by.
Quote:
Originally Posted by 1Snapple http:///forum/thread/378912/2quills-120g-re-build-thread/440#post_3385505
Thats one thing about DIY, once you do it once or twice you try to do it for everything =D.
Now did you use the pin method to get the seams without the blubbles?
Sorry Josh I forgot to answer that. No I didn't use the pin method. I didn't think it was going to be necessary. I may order some acupuncture needles and try it out for practice though. Just to see if I can get ALL of the joints perfect. Like I said I did get a few small bubbles here and there. I talked with Shawn a little bit this morning and I think I may practice with some other preparation tips that he gave me and see how that goes as well. I just picked up a new bottle of map gas for my torch so I'm going to try and flame polish it here shortly. I'll let ya know how it turns out.
2quills
Well-Known Member
Quote:
Originally Posted by 1Snapple http:///forum/thread/378912/2quills-120g-re-build-thread/440#post_3385573
Okay, How is shawns build coming along?
A little slow. He's still working his tail off for his job. I think he's got the tank all epoxied and bulkhead holes drilled. Rapidled just got a shipment of those new drivers in that he's been wanting so I gave him a heads up on that. I don't know if you caught the thread that he posted for a buddy of his here on the site who was having trouble keeping corals or not. But he was going to start building a new sump for that guy today.
I started leak testing the tank tonight...so far so good. The flame polishing is going to take a little practice. One thing is for sure that spending the extra time to prepare your edges is key to a very clean build...which is something that I'm figuring out as I go. I've been practicing welding joints together using different techniques quite a bit today. I think I'm starting to get the hang of it. Far from the work of the masters though.
acrylic51
Active Member
Hey Guys!!!!! Good talking to you Corey.....
Looks really good. I've tried an have used the pin method, and it does take a little practice to get the hang of when to start pulling your pins. I very rarely use that method, but I spend a tremendous amount of time prepping my joints before hand. Every edge is done on a jointer, but as I pointed out I wet sand before glue up.
Flame polishing does take a little practice, but the key is keep the flame moving and don't overheat the material. Make a pass, and move to your next joint. You really don't want to feel any heat transfer to the joint. If you get to much heat, you'll see the material bubble and it starts to sizzle. It will also cause excess glue to fizzle as well. Overheating will stress the joint as well. I've bubbled seams during polishing before, but can be fixed with re sanding an working your way back out wet sanding. I've found over the years as you pointed out already edge prep is key!!!!! Before I polish I will wet sand starting with 600 and go up till it's all but clear and the torch work is very minimal. Another metho around flame polishing is sanding with micro mesh as if buffing out and acrylic tank.....
al&burke
Active Member
Shawn you are only wet sanding the exposed edges - not the one's that are being glued
Quote:
Originally Posted by acrylic51 http:///forum/thread/378912/2quills-120g-re-build-thread/440#post_3385619
Hey Guys!!!!! Good talking to you Corey.....
Looks really good. I've tried an have used the pin method, and it does take a little practice to get the hang of when to start pulling your pins. I very rarely use that method, but I spend a tremendous amount of time prepping my joints before hand. Every edge is done on a jointer, but as I pointed out I wet sand before glue up.
kiefers
Active Member
ya hey Corey..... What were you telling me about DIY?...... Ya this flame polishing sounds like something I had better stay away from Lol!!!
The extent of my DIY is making a netting lid for my DT today with hindges so I can open for feeding. Can't really harm anyone or thing with that.
Your project is really taking off tho!
The extent of my DIY is making a netting lid for my DT today with hindges so I can open for feeding. Can't really harm anyone or thing with that.
Your project is really taking off tho!
2quills
Well-Known Member
Quote:
Originally Posted by acrylic51 http:///forum/thread/378912/2quills-120g-re-build-thread/440#post_3385619
Hey Guys!!!!! Good talking to you Corey.....
Looks really good. I've tried an have used the pin method, and it does take a little practice to get the hang of when to start pulling your pins. I very rarely use that method, but I spend a tremendous amount of time prepping my joints before hand. Every edge is done on a jointer, but as I pointed out I wet sand before glue up.
Flame polishing does take a little practice, but the key is keep the flame moving and don't overheat the material. Make a pass, and move to your next joint. You really don't want to feel any heat transfer to the joint. If you get to much heat, you'll see the material bubble and it starts to sizzle. It will also cause excess glue to fizzle as well. Overheating will stress the joint as well. I've bubbled seams during polishing before, but can be fixed with re sanding an working your way back out wet sanding. I've found over the years as you pointed out already edge prep is key!!!!! Before I polish I will wet sand starting with 600 and go up till it's all but clear and the torch work is very minimal. Another metho around flame polishing is sanding with micro mesh as if buffing out and acrylic tank.....
Shawn, maybe I miss understood. Are you saying you don't wet sand the edges that get glued but only the exposed ones? How else would I get the tool marks out from the router before I weld them? I only ask because below you said the exposed edges. I tried wet sanding a couple of joints yesterday before I glued them and they turned out perfect with no bubbles. I know you have to be careful not to round off the edges when doing it though so I used a piece of wood for a sanding block. And absolutely do not flame polish an edge that is going to be glued. I did practice the flame polishing before trying it on the tank and I did get some sizzling action. Fortunately none on the tank though. You're right, keep the flame moving and don't let the material get too hot.
Quote:
Originally Posted by Kiefers http:///forum/thread/378912/2quills-120g-re-build-thread/440#post_3385660
ya hey Corey..... What were you telling me about DIY?...... Ya this flame polishing sounds like something I had better stay away from Lol!!!
The extent of my DIY is making a netting lid for my DT today with hindges so I can open for feeding. Can't really harm anyone or thing with that.
Your project is really taking off tho!
Fortunately you can hand or mechanical polish as well. I'm going to try those too but I'm a bit of a pyromaniac so I had to go for the flame polish method first. lol Thanks.
al&burke
Active Member
Quote:
Originally Posted by acrylic51 http:///forum/thread/378912/2quills-120g-re-build-thread/440#post_3385673
Hey Al!!!!! Exposed edges....
Hey buddy - how are you? That is what I thought.
Originally Posted by acrylic51 http:///forum/thread/378912/2quills-120g-re-build-thread/440#post_3385673
Hey Al!!!!! Exposed edges....
Hey buddy - how are you? That is what I thought.
acrylic51
Active Member
Quote:
Originally Posted by 2Quills http:///forum/thread/378912/2quills-120g-re-build-thread/440#post_3385722
Shawn, maybe I miss understood. Are you saying you don't wet sand the edges that get glued but only the exposed ones? How else would I get the tool marks out from the router before I weld them? I only ask because below you said the exposed edges. I tried wet sanding a couple of joints yesterday before I glued them and they turned out perfect with no bubbles. I know you have to be careful not to round off the edges when doing it though so I used a piece of wood for a sanding block. And absolutely do not flame polish an edge that is going to be glued. I did practice the flame polishing before trying it on the tank and I did get some sizzling action. Fortunately none on the tank though. You're right, keep the flame moving and don't let the material get too hot.
Fortunately you can hand or mechanical polish as well. I'm going to try those too but I'm a bit of a pyromaniac so I had to go for the flame polish method first. lol Thanks.
Sorry Corey....I ramble on at times.....If I route the edges and don't have them prepped at the shop then I work my way from 120grit up to a 400 wet/dry paper......on the edges that are to be glued...... All the exposed edges get the full treatment of wet/dry from 400-1600 and then I flame polish.
I have in the past wet sanded all my edges (even glued edges with 600 wet/dry) and have no issues.....Actually the 2 sumps I know of are still being used and have been beaten to death.....so no issues if you do prep that way.
I thought of getting 1 of those detail small air buffers (3") from Harbor Freight and trying to buff the edges to speed things up, but every time I go there, they are out of them or the 1 the have the box doesn't look to good.
Quote:
Originally Posted by Al&Burke http:///forum/thread/378912/2quills-120g-re-build-thread/440#post_3385724
Hey buddy - how are you? That is what I thought.
Al yes and no....I have in the past wet/dry sanded all glue edges as well with no problems.....Actually I get super clean solvent joints. My 6' long sump on the 240 was done that way, and that thing has taken a beating.......You are correct though that after I route all the edges flush and then round over. I never leave a squared edge; everything gets rounded over, I go to town with the wet/dry sandpaper. I always leave the outside paper on just in case I get a little careless with wet sanding.....
acrylic51
Active Member
Quote:
Originally Posted by 1Snapple http:///forum/thread/378912/2quills-120g-re-build-thread/440#post_3385573
Okay, How is shawns build coming along?
Hey Josh!!!!! I have to be honest man....not to much progress as of lately....Work has kinda crushed the free time at the moment for the tank, and with the weather being warmer; more to do outside the house at the moment....I have all the epoxy work done except for the final clear coat in the overflow. Bulkheads holes are drilled, still trying to decided if I want to drill the bottom of the tank for CL though....Have mixed feeling on it at this point
.Hopefully here after the dust settles a bit, with the oldest daughter moving out getting her own place, a new puppy for the youngest daughter, and helping my friend Jerry out if you guys remember the thread awhile ago about his ups and downs with his tank.
Currently I'm in the process of building him a sump for his setup, to see if we can get things headed in the right direction for him.....He's put a lot of time and effort into the setup and wanna see it turn out for him; so if it means I go a bit longer away from mine well worth it.....I've known Jerry for quite a long time so.....Plus he's a super IT guy, so hopefully down the road when I get ready to totally wire the house with all the IT stuff he'll be there to bail me out......I'll have to dig up his thread and get his ok to take some pics and post pics of the sump up there for him......
The cool thing about it is that while at Jerry's dry fitting everything we had a chance to a 1 on 1 with Marc Melev.....Really enjoyed picking 1 of the masterminds of the hobbies brain IMHO.....Marc does super work, and was a treat to have him look over my sump plans, and the weird thing about it, Marc and I both had the same idea on how the 1 baffle/fuge wall should be built......Kind of scary!!!!!!