415 Gallon Plywood Tank Build

2quills

Well-Known Member
Quote:
Originally Posted by Al&Burke http:///forum/thread/376802/415-gallon-plywood-tank-build/900#post_3399953
Shawn I am sure they have like 5 hp saws for cutting that material. One of our guys in the shop uses beeswax when he cuts holes in acrylic with holesaws it makes really clean cuts. Something you might want to play around with,
Yep, I know that James likes to use a 50/50 solution of palmolive and water as a lubricant for drilling holes in acrylic that's supposed to work really good too. I didn't see that before I cut the holes in mine so I didn't use anything. But the 3/8" didn't take long to drill through so the bit probably didn't get nearly as hot. I wonder if using a lubricating method would be helpful when routing the edges or cutting the material???
 

acrylic51

Active Member
Yeah I do remember James saying about a 50/50 mix of Palmolive and water....Something that's in the back of my mind.....Right now I'm working the edges from 600 wet/dry to 1200 wet/dry. Been playing with the pin method and my regular glue method and to be quite honest my regular glue method is working quite better than the pin method. The only thing I'm finding with my method over the pin method is that I have to "work" the seam a lot slower to get complete joint coverage.....I don't think that's a big deal though. I think my issue with the pin method might be either having the pins in to far or not pulling the pins soon enough........
 

acrylic51

Active Member
Quote:
Originally Posted by 2Quills http:///forum/thread/376802/415-gallon-plywood-tank-build/900#post_3399943
Let me know what you think of those spiral cut bits Shawn. I almost pulled the trigger and ordered one for the sump build but wasn't sure if it was worth it at the time. Think you'll be fine with the overflow on the end instead of the back.
My buddy Matt even told me yesterday to hunt down the triple fluted spiral bit.....A heck of a lot cleaner cut than a a straight bit, Actually I went online last night, and checked the local WoodCraft and they supposedly have them in stock. Might have to take a trip down there today since they are having a sale and the bit would be 15% off regular price......
 

acrylic51

Active Member
Does anyone know if there's any difference between the old style Denatured alcohol vs the new Bio Degradable Denatured alcohol? The Lowes close to the house only had the Bio was out of the regular stuff. Any idea the difference?????
 

2quills

Well-Known Member
Quote:
Originally Posted by acrylic51 http:///forum/thread/376802/415-gallon-plywood-tank-build/920#post_3399991
Does anyone know if there's any difference between the old style Denatured alcohol vs the new Bio Degradable Denatured alcohol? The Lowes close to the house only had the Bio was out of the regular stuff. Any idea the difference?????
Not really sure other than the fact they say it's made from more renewable resources than the other stuff. How's the practicing coming along?
 

acrylic51

Active Member
Yeah kind of leary about purchasing the Bio degradable stuff: since not really sure what's reuseable in it.....Found the regular stuff at HD. Kind of disappointed today though!!!!! Checked WoodCraft and their website for the store stated they had the triple up cut spiral bit, and they didn't.......I inquired about it, and said it would be 2 weeks for them to get it in.....
Contemplating trying the double fluted straight bit, or double fluted pattern bit. At least with the pattern bit it has the bearing on top and would just require me to build a jig for the slot for the overflow. What do you think? Actually have to sit and finalize size on the overflow. I'm thinking something on the lines of 24"L?????
Didn't get much practicing in today....Spent a good majority of the day reprepping the edges......I started with 600 grit, and worked my way up to 1200 grit....I do find the smoother the edge the better the solvent seems to flow. Then I got side tracked my sister showed up and wants me to start framing an island for her kitchen....I guess she figured the only way to get me started on it was to bring the supplies to my house
. So needless to say tomorrow morning I'll be framing that and hopefully get my attention turned towards practicing.
Did get 1 of my jigs made up for glue up. Nothing fancy; just copied James jig. Still have to flush trim the jig, and 45 the back edge. Once I get the jig ready I'll be set to really practice the pin method. I'm using twisty ties as my pins. I'll have to get some pics up here shortly showing the material thickness, jigs, and edge prep.
 

2quills

Well-Known Member
Well that kinda sucks that they didn't have it. I know I was also looking at the down shear flush trim bits as well and was thinking those might also produce a cleaner cut than the strait fluted bits. They have a slight curve to the cutting edge so it's more of a slicing action.
Guess you'll be busy tommorow. I'm sure once you're over at your sisters she'll probably ask you to re tile the kitchen, install new cabinets, paint and light fixtures while you're at it.
 

acrylic51

Active Member
They did have the double fluted up cut bits, but had my heart set on the triple......Either way I know I want be able to make 1 pass with the router on the cuts.....I can make adjustments on the router by 64ths and would take a little more each pass, and I'm pretty sure using that method the straight bit would work.....The nice thing about the up cut bits; is that they are suppose to pull the shavings/cuttings up out of the work area.....I was also planning on cooling the area as I routed as well hopefully prolonging bit life and a cleaner cut???????
I tiled my sisters kitchen last summer, crown molding, relocated her washer and drier, new sink, cabinets, and countertops.....Wish she'd put her bum husband to work.....Never seen a man with nicer hands than most women!!!!!!
 

acrylic51

Active Member
Corey this is 1 of the bits I had looked at using.....

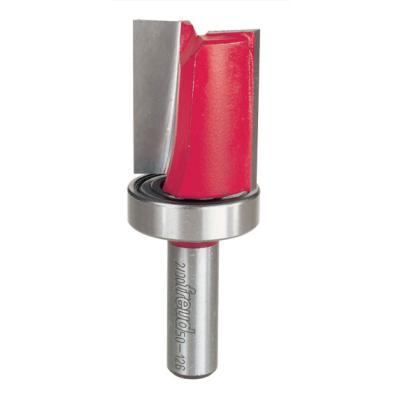
Pattern bit.....

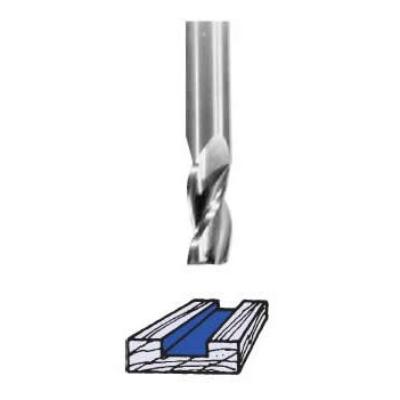
This is the puppy I'd prefer to have.......
 

al&burke

Active Member
Hey Shawn, my routers have a vaccum connection that really help in keeping the chips out of the cutting area. We both know that when those chips get in the cutting area they mess up the finish. Also Shawn I use a bushing guide on my router sometimes it eliminates the need for a bearing - bearings can sometimes get gummed up with chips. So if you used the bushing guide and a vac you should be good to go. Your guide just has to be a bit wider to compensate for the thickness of the guide. Just my 2 cents my friend. I am sure what ever you do it will be spectacular.
 

acrylic51

Active Member
Thanks Al!!!! My PorterCable has the dust collection port as well, just never have used it; since always working out in the garage and blowing crap everywhere doesn't matter....I did practice a bit on a piece of 1" with a standard straight bit, and as long as I only took small passes (depth) cut was fine.....Might take a tad longer to complete the cut, but don't want the heat to the acrylic or worse yet loose a bit in the middle of the cut.....
I do have bushings for my router, and didn't even think of using that.....
Thanks!!!! I also have a straight edge guide for the router, but more worried about using that and the router possibly wondering during the cut, but your way with the bushing and template would eliminate that.....
Question for anyone!!!!!! What determines your water height/level???? Measuring down from the top of the panel it was suggested/advised to come down roughly 1 1/2"- 1 3/4" and start the top of the opening.....I was opting to make the opening 1 1/4". Wouldn't the water level theoretically be set at the lowest point of the opening? Could the water level be adjusted to run higher by more flow from the return pump?
 

al&burke

Active Member
Any of the internal overflows I have set up I have put the bottom of the teeth just about at the same elevation as the black trim - I could be 1/16th lower than the trim and still be OK. And yes if i need the water level higher I can run my pump more.
 

2quills

Well-Known Member
Lowest point of the opening, size/length of the opening and flow. I think those are the 3 things that come to mind when determining the height. I haven't ran mine yet but I did what Al did and built mine so that the bottom of the grooves/teeth on the overflow were the same height as the bottom of the plastic trim around the top of the tank. That way I know at least the water level won't be below that point but still have a little head room to play with if need be.
 

al&burke

Active Member
When my pump is off the water level is just at the trim - when my pump is running the water level is about 1/4 inch above the bottom of the teeth. I think it is good to make overflows slightly bigger, as per length to have good control on your working water level. I have done three tanks like this and there hasn't been a problem, knock on wood.
 

acrylic51

Active Member
Quote:
Originally Posted by 2Quills http:///forum/thread/376802/415-gallon-plywood-tank-build/920#post_3400303
Lowest point of the opening, size/length of the opening and flow. I think those are the 3 things that come to mind when determining the height. I haven't ran mine yet but I did what Al did and built mine so that the bottom of the grooves/teeth on the overflow were the same height as the bottom of the plastic trim around the top of the tank. That way I know at least the water level won't be below that point but still have a little head room to play with if need be.
That's what I was thinking the lowest point of the opening......
Quote:
Originally Posted by Al&Burke
http:///forum/thread/376802/415-gallon-plywood-tank-build/920#post_3400333
When my pump is off the water level is just at the trim - when my pump is running the water level is about 1/4 inch above the bottom of the teeth. I think it is good to make overflows slightly bigger, as per length to have good control on your working water level. I have done three tanks like this and there hasn't been a problem, knock on wood.
Now we have to remember this is an acrylic tank, and for structural purposes, I can't cut the slots a hair under the euro bracing.....I have to leave some structure;stability to tie the euro bracing into. I was advised by James (Envision) to drop down 1 1/4" - 1 1/2" and start my my slot for the overflow would be at that point and my opening is 1 1/4". I'm opting for 1 1/4" so during operation I can increase flow to raise the water level if needed????
 

2quills

Well-Known Member
So you're looking to have the lowest point of the slot to be 2-3/4" from the top of the tank/bottom of your brace. So your water level will land somewhere in the neighborhood of around 2-1/2" from the top of the tank or so. Is that going to be an issue as far as not seeing it from the viewing area?
 

acrylic51

Active Member
Sorry Corey, walked away for a bit.....Yes you are correct the lowest point would be 2 3/4" from the top of the panel. Felt if I go to much higher towards the top of the panel, IMO really compromising the integrity of the structure of that end panel. With the wave boxes I still have to account for the water level wave as well????

Another option could possibly be to use an internal skimmer box to raise the water level just a hair??? My only concern was keeping the tank uncluttered. Your thoughts????
 
Top