415 Gallon Plywood Tank Build

acrylic51

Active Member
Yeah....I've had the plans drawn up awhile, but it was when I was going to have the tank built by Envision, and had been talking to James @ Envision, so alot of input from his experience was transferred over to my plywood build....I had posted in another area and Spanko pointed out a small little detail that I had been overlooking for about 2 hours last night while trying to export the drawings....
I'm with you on still being old fashion and drawing everything out by hand, but it makes it alot easier to draw things up and be able to just click a couple times and get tons of feedback or critiques from others.
 

acrylic51

Active Member
As I had mentioned earlier that I had been planning a custom tank build and had drawn up plans and ran it through a couple very reputable tank builders.....After all the planning and considerations with alot of family issues it was put way on the back burner....Then when the things settled out the plans started brewing again and got the urge to do something totally different and build the plywood tank.....
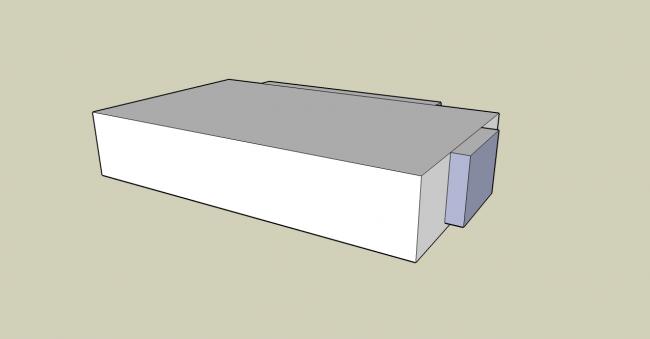
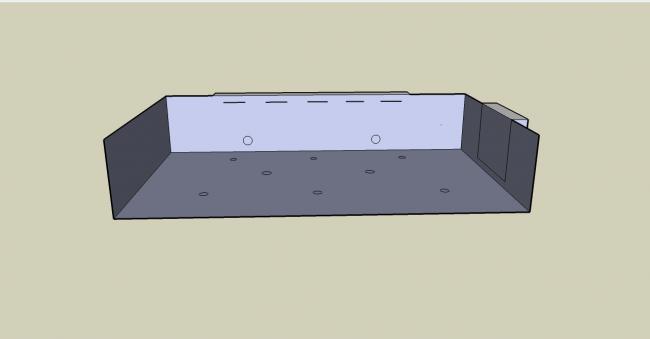
Here's a frontal view of the tank drawing minus the front panel. The drawing shows some detail, but will get to more explainations as we go along. Also including a rough drawing of a side shot of the tank. The external wavebox will not be visible from the viewing area. It will be hidden behind the wall in the fishroom. I will also have to take a pic of the room layout so everyone as a full understanding.


acrylic51

Active Member
Sorry guys not great on the computer can do enough to cause damage
not an artist by any means....I do have to say I like the Sketchup program and it's free, but I have a hard time even drawing a straight line in the program......
Like I had mentioned I had talked to a couple very reputable tank builders and had really narrowed it down to 1 and discussions really got down to details....The biggest topic was the external wave box. My idea or theory was to have the waveboxes mounted on the back wall of the tank on either side of the overflow box. My thinking was this would be a perfect match and give me what I was looking for.....Not trying to produce tidal waves, but want the "ability" if I want....Upon alot of phone calls and emails I headed the advice from the builder and he strongly advised against putting the waveboxes on the backwall of the tank, due to it could cause issues with the overflow, so I had drawn up several options and submitted it to him, and that is how I came to the decision to put the wavebox on the end of the tank. The wavebox will house 3 Tunze 6101 PH's on controllers, but considering running them into either the Profilux controller or Apex controller. Haven't really decided which one yet, still a ways off on that stuff.
A few pics.........The first pic shows the boxes mounted on both sides of the overflow back wall, 2nd pic shows 2 separate boxes on the end, and 3rd pic shows 1 bigger box, that will be divided into 3 separate compartments to house the Tunzes. I chose the 3rd pic option.


acrylic51

Active Member
I know 2Quills was curious and had asked about the layout of the bulkheads and such on the tank....again alot of thought had gone into it. In the past I've done the DIY Durso's with adjustable air valves on my 240 and was pleased, but I got caught up reading BeanAnimals thread on Silent overflows, and have decided I want to do his setup on the new tank. Noise really shouldn't be an issue, but it's always a plus to have minimal noise.
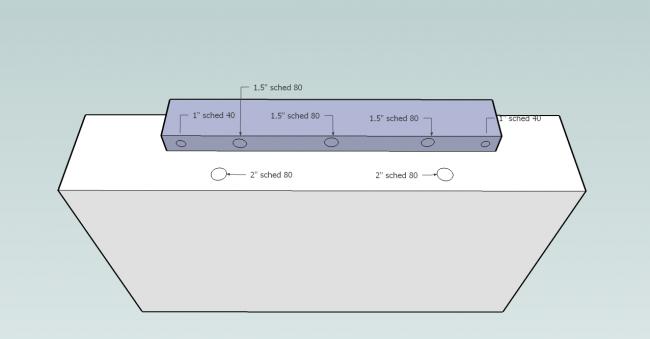
Here's a couple SketchUp drawing showing the overflow layout. The (3) 1.5 bulkheads will be drilled for sched 80 bulkheads. These (3) bulkheads will be for drains to the sump and (1) will serve as a backup or fail safe. For those who aren't sure or unclear, sched 80 bulkheads do require a bigger hole than their sched 40 counterparts. I'm choosing sched 80 because the are built alot better than the sched 40's IMO.
The outside (2) bulkheads will be sched 80 as well. They will be 1" bulkheads. I am choosing to add them in at the build stage for the mere fact that once it's up and running there are always should have, could have, and I can use them to feed a skimmer directly without having to tie into a drain line or whatever. The other is just an extra just in case something else I forget about, and can always be capped if not needed.
Any questions or critiques please respond.....


acrylic51

Active Member
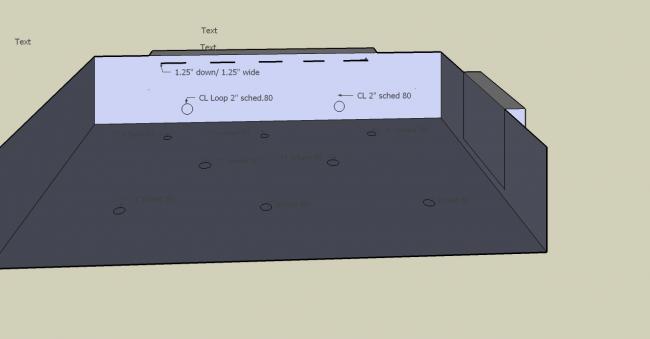
More on the drawings and layout of the tank....I had mentioned earlier about bulkhead layout and placement.....I am planning on using the OceansMotions (OM) on this tank. I'm happy with the results on previous tanks, but unsure whether I am going to use (2) 4Way OM or an 8Way and a 4Way. Not totally important at this stage of the game to have that all ironed out since none of the bulkhead holes will be drilled till the tank is completely glassed and epoxied. I have saw a neat trick about drilling your holes ahead of time, but making a dam for the epoxy when it's poured.....All bulkheads will again be sched 80, just because they are heavy duty and can take alittle more than your standard bulkhead.
Also in the first pic it's kind of outlined what I'm proposing to do to get the water into the external overflow box. The orginal plan was to cut slots across the back 1.25" from the top spaced evenly, but after some long, hard thinking I decided to make a continous slit across the back 1.50" down from the top.....I chose to drop down an additional 1/4" because of producing waves. I've also been toying with a couple ideas about making a removeable screen for the overflow. I could do something permanent, but you always need to take something apart to clean, so by making it removeable will make the task that much easier. I will have to draw that up in SketchUp as well and have it looked at, but this will give a good general idea......
Here's a quick pics of what I have schemed up so far......


acrylic51

Active Member
In an earlier post I had talked about running the OceansMotions(OM) on this setup as well in conjunction with the wavebox for alot of movement.....I have already shown some detailed drawing of the layout of the bulkhead holes for the bottom of the tank, and the drain bulkheads for the CL pumps.....
I've also considered mounting options on the top of the tank for the CL...On thing I'm after is to have a clean a look as possible. I often hate seeing or get distracted by PH's or PVC in the tank and feels it takes away from things.....When I had my 240 custom built I had the eurobracing drilled to accomodate running the OM revs in the top 4 corners of the tank. The tank came out beautiful and GlassCages did an excellent job and followed every detail, but poor planning and not actually having part in hand and working knowledge my placement of the holes were a bit off, but with the prior knowledge now will be easier.......
I had shown pics of the eurobracing that I've already constructed for the tank, and have done most of the work needed to be done to that piece. The reasoning behind the extra wide eurobracing 1 is to try to eliminate any cross bracing, 2 to tie the tank walls together, and to allow proper placement of OM revs if I choose to go that route. The eurobracing will be drilled just slightly larger to accomodate 1" PVC going through the holes for mounting....Shortly I will give more info on the OM's and revs and nozzles.....
Quick pic of top eurobracing and hole layout.....When I get the angle iron and welding work done on the tank, it will all make sense, kind of confusing, but it'll come together......
 

acrylic51

Active Member
On a side note....I finally remembered to call my buddies who own the local acrylic shop, to find out about the black FRP board I had gotten there a bit ago.....Turns out it wasn't FRP, but actually ABS, so I'm in luck and they said the had 1 sheet left, so I'm off this morning after the wife leaves for work to pick it up......I told her I was going to stick to my strict budget....

This is actually amazing....I can't believe nobody has any comments or critiques......What's going on here????
 

spanko

Active Member
Why the wave box? With the Tunzes and the controller you could control the wave action without the box.
 

acrylic51

Active Member
I don't want any PH's inside the DT......I find that detracting....through alot of conversations with JarHead over at -- and a few others.....The way action isn't exactly the same... I'm pretty sure you've caught the DIY Wavebox thread across the way????
 

acrylic51

Active Member
Hey Spanko any good links or such with a bigger tank setup using just the Tunze's on the controllers producing a good wave?
 

spanko

Active Member
Yup, and don't get me wrong, I do like the action of the box. A couple of MP40's with their small profile in that large of a tank though would not be that intrusive to me. Not like putting a Tunze wave box in the tank distracting. But I understand and look forward to your build and testing of the system you have chosen.
 

spanko

Active Member
Have you seen Chingchais tank over on the big site? He has four of them in tank. While you notice them there his tank is so packed with coral your eyes don't even dwell on the.
 

acrylic51

Active Member
Are you talking about ChingChai tank thread over on --? That tank has 4 waveboxes, and 4 6200....That is an awesome setup though.....
 

acrylic51

Active Member
While I was over there I watched a couple videos......I forgot about XTM's, but did you notice how much deeper the wave penetrated with the box compared to without the box? The wave was a little more extreme than I'm after, but even with the appearance of the waveboxes inside the tank takes something away.....
 

acrylic51

Active Member
Originally Posted by spanko
http:///forum/post/3280769
Yup, and don't get me wrong, I do like the action of the box. A couple of MP40's with their small profile in that large of a tank though would not be that intrusive to me. Not like putting a Tunze wave box in the tank distracting. But I understand and look forward to your build and testing of the system you have chosen.
No Spanko I'm following you.....I guess I should have been more clear, the wavebox on my tank will be external, on the 1 end o the tank. It will actually be hidden behind the wall and you'll never actually know the wavebox is there unless your standing in the fishroom. I'm planning that end of the tank to be acrylic for ease of fabrication of the wavebox.
I have thought about using the MP40's, but then heard some many issues of them falling off, and I forget who's tank it was over on the other forum where the Vortech's cause damage to the acrylic, and then I was unsure if the MP40's could mount up to 3/4" thick material.
Is there any issues with them mating fine with 3/4" material? Did they ever conclude if they actually did cause heat issues with the guys tank?
 

spanko

Active Member
I seem to remember, now that you mention it, that the MP40's were causing some crazing on acrylic tanks. Can't remember where right now.
According to the Ecotech site spec for the MP40;
Aquarium Wall Thickness Range: 3/16”-3/4” (4.76mm – 19mm)
So on 3/4" acrylic you would be at maximum spec. I personally would not take that chance either.
This also from the Ecotech site
"9. How do I know if a pump will work with my tank?
A: The three most critical factors to look at are the tank’s thickness, whether it was professionally built and the type of material used to build the tank. Acrylic aquariums which are made from under-sized acrylic, and experience a large amount of bowing may be subject to crazing as a result of the excessive strain on the aquarium’s walls. The VorTech will work on both glass and acrylic tanks that are less than 3/4″. The VorTech is safe for use on all professional built aquariums, however, it is important to keep in mind that not all aquariums are professionally built."
 

acrylic51

Active Member
Thanks Spanko.....for the life of me I can remember the name of the post or the orginator of thread....I do vaguely remember the tank was possibly under built for the size of the tank, and I think the tank did have some age to it as well. I guess the heat/crazing issue kind of stuck in my mind, and possibly deterred me from that direction. I've also heard and read some of Ecotech claim on good on thickness to 3/4", but then I started hearing about issues of the units staying together and falling apart. For that kind of cash; I'm not really looking to deal with what if's??????
Honestly it I don't see how EcoTech can say professionally built.....There are major companies that suggest against their uses and others, and then you have smaller companies and depending who you talk to reputable or not.....Just like the company in Virginia that built that sweet tank for the guy, only to have it come apart at the seam, and the company didn't want to stand behind their work.....Alot of acrylics people/shops will tell you that all acrylic is the same, and if you actually take the time to look at their properties, there is a difference, and difference in qualities of acrylic out there.....So I find their claims questionable???????
I do understand fully when they talk about construction quality.....Proper panel sizing and bracing. Some people might opt to go for a thinner panel on their build to shave a couple bucks. Sizing of panels can be debateable depending who you talk to as well. I know with all the little add ons and reinforcements through conversations with good builders 3/4" will be more than enough, but have honestly considered stepping up to 1" material???? Maybe crazy, but safety......
Since were on that roll, I totally haven't decided on glass vs. acrylic. I do know the pros and cons of both, and it comes down to price....I've checked locally and the glass shops aren't to helpful IMHO....Their prices are outrageous, and I already know that if I go glass the panels will have to be Starphire or LowE glass. My 240 is done in LowE and I will never have another tank done with regular glass. Alot of people will debate, but there is a difference when you put the 2 side by side. With that said having the glass shipped in racks up the expense. Bottom line going to thicker 1" Spartech acrylic would be cheaper.
Alot of people will debate the issue of the acrylic scratching to easy....Another area still not totally decided at this point in the game is if the tank will be bare bottom (BB) or I've been contemplating doing a faux sand bed. Meaning since I'm already pouring epoxy, why not pour an additional coat and before the epoxy sets up sift sand into the wet epoxy and let it harden and do this until I'm satisfied with the coverage???? This way I could still get the look of the sandbed, but wouldn't have to deal with blowing sand with having tons of water movement....
With that being said I have a few questions or options, I'd really love to hear everyones input on......come on guys everyone has gotta have a preference or choice and want to hear exactly why they'd go that route. With that said here are my proposed questions to you all.
1. Glass or Acrylic ?
2. Bare Bottom ? Why?
3. Faux Sand Bed ? Why?
4. SSB (Shallow Sand Bed) Why?
Let's hear your suggestions need the input
 
Top