2Quills, 120G Re-build thread.
- Thread starter 2quills
- Start date
2quills
Well-Known Member
I've been playing around with a couple of finishes. One is a brush on lacquer (gloss)...the other is a polyurethane (satin) finish. The remarkable thing is after 4 coats of both the polyurethane (satin) is quite a bit glossier and smoother than the lacquer (gloss). Infact, if I didn't know any better I'd say the two products swapt cans on me behind my back.
My review on the Lacquer finish is that I like the fact that it dries quick...real quick. But what I also don't like about it is the fact that it dries quick...infact, too quick when using the brushing type. You litteraly only have seconds before it starts thickening up and the directions say NOT to thin the material. If I had to describe it I'd say it that it has to be something like trying to brush maple syrup onto your wood. Barely any time to try and work out the bubbles. It's supposed to be a product that you don't have to sand inbetween coats but I've found that you pretty much have no choice unless you wan't to live with air bubbles in your finish. It also leaves brush strokes. Perhaps the sprayable material would be better suited in order for me to like this type of finish. It is also quite noxious, even in the brush on application. So, Shawn if you plan on spraying this stuff, I hope your wife goes out of town for a good day or two before you do it (for your sake)
 . Make sure you have good ventilation and a respirator. It actually smells just like the urethan enamel paint that I used and it woke my wife up out of a dead sleep one night all they way upstairs and it made her feel nautious. I'm standing there like...What? I don't smell anything. I don't know if that's a good thing or bad.

The polyurethan I have to say does have one negative draw back in the fact that it takes a while to dry before you can re-apply. But because of this it is also a thinner material, you have plenty of time to work out the bubbles. A little light sanding with some 320 grit sandpaper between coats and you're good to go. You get less bubbles after each coat. By the time the 4th coat was dry the finish looked PERFECT. Alot glossier than I expected. I've talked with a couple of different guys up at Sherwin Williams and they both pretty much told me than any finish will yellow over time...some sooner than others. But if you're going with a darker stain it's really not too much of a concern in the long run. They also make a Spar Urethan which has extra u.v. protection that is made for exterior and marine use. Maybe I'll give it a try too but so far I'm liking the poly.
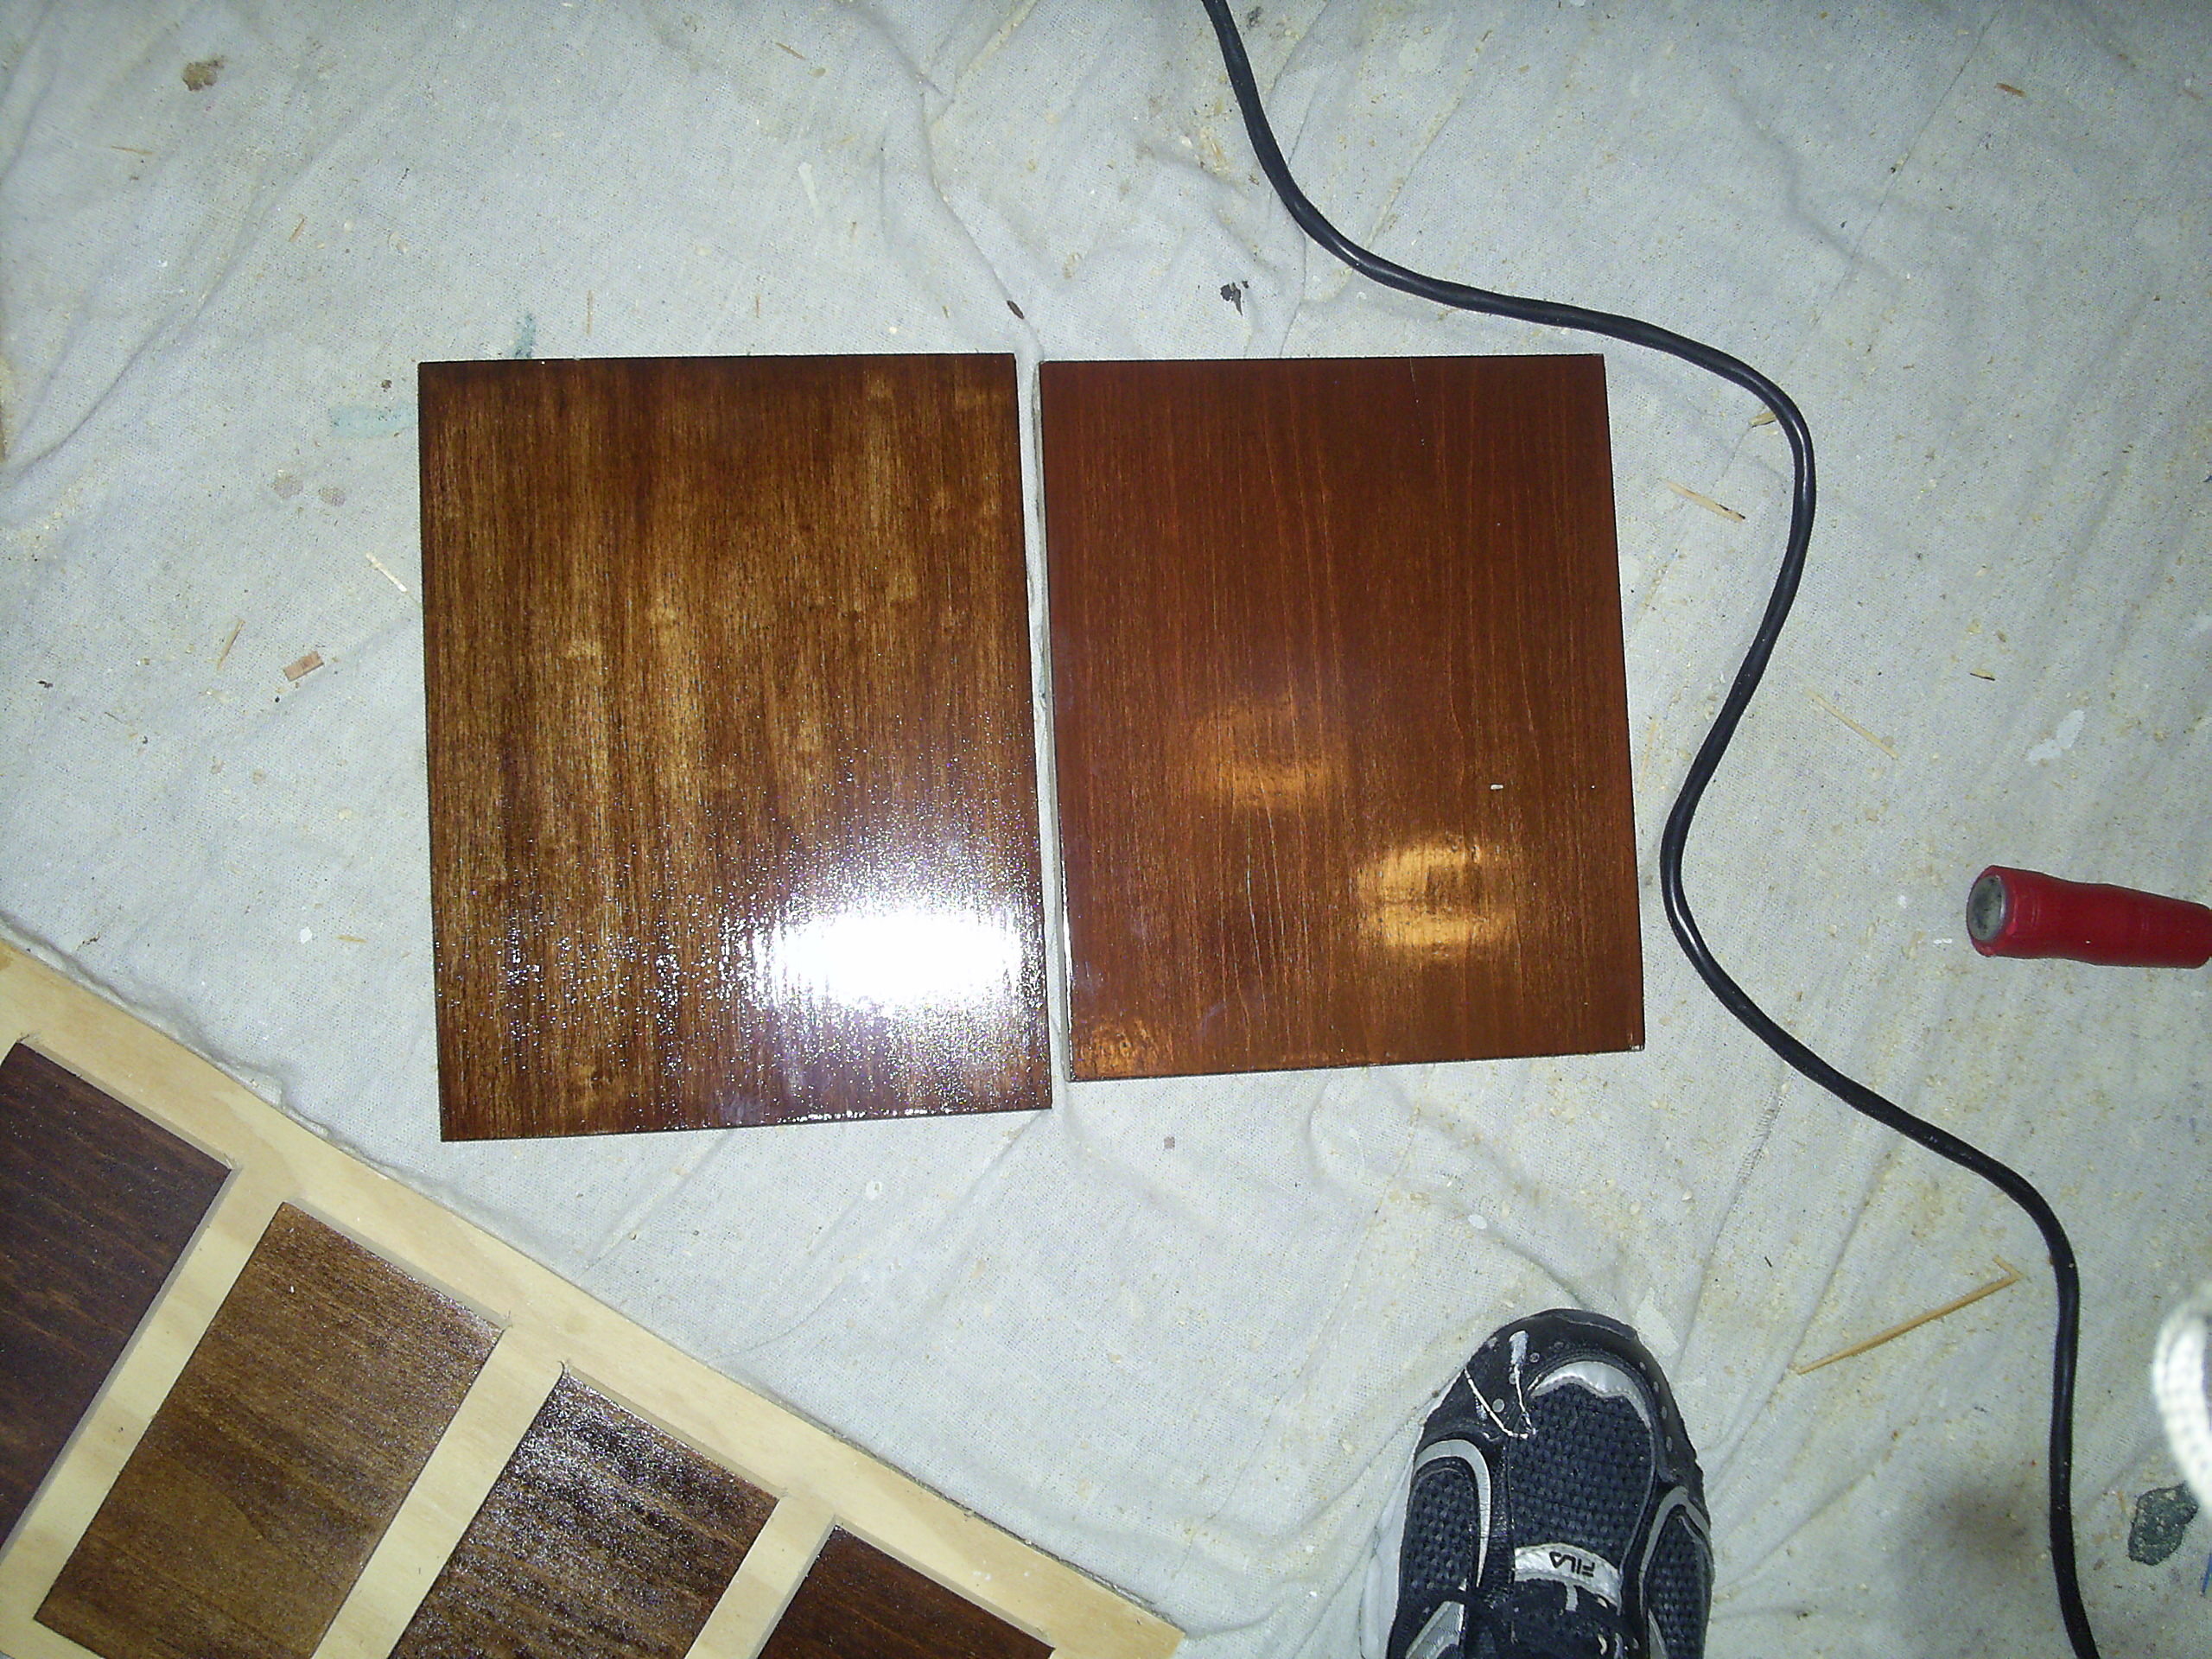
I tried to snap some good shots of these finishes but the true look of the finish and the shine is something that has proven pretty elusive with my POS camera. Maybe Santa Clause will bring me a new camera this year. . The sample on the right is the cherry stain with the poly finish...the one on the left is the english chestnut with the lacquer finish. Both were pre-treated before staining. The cherry sample is 2 coats of stain and the chestnut is 4. Which do you think had better penetration and even color? As if I had to ask.
twaterfish.com/image/id/371480/width/1000/height/800" target="_blank">


My review on the Lacquer finish is that I like the fact that it dries quick...real quick. But what I also don't like about it is the fact that it dries quick...infact, too quick when using the brushing type. You litteraly only have seconds before it starts thickening up and the directions say NOT to thin the material. If I had to describe it I'd say it that it has to be something like trying to brush maple syrup onto your wood. Barely any time to try and work out the bubbles. It's supposed to be a product that you don't have to sand inbetween coats but I've found that you pretty much have no choice unless you wan't to live with air bubbles in your finish. It also leaves brush strokes. Perhaps the sprayable material would be better suited in order for me to like this type of finish. It is also quite noxious, even in the brush on application. So, Shawn if you plan on spraying this stuff, I hope your wife goes out of town for a good day or two before you do it (for your sake)
The polyurethan I have to say does have one negative draw back in the fact that it takes a while to dry before you can re-apply. But because of this it is also a thinner material, you have plenty of time to work out the bubbles. A little light sanding with some 320 grit sandpaper between coats and you're good to go. You get less bubbles after each coat. By the time the 4th coat was dry the finish looked PERFECT. Alot glossier than I expected. I've talked with a couple of different guys up at Sherwin Williams and they both pretty much told me than any finish will yellow over time...some sooner than others. But if you're going with a darker stain it's really not too much of a concern in the long run. They also make a Spar Urethan which has extra u.v. protection that is made for exterior and marine use. Maybe I'll give it a try too but so far I'm liking the poly.
I tried to snap some good shots of these finishes but the true look of the finish and the shine is something that has proven pretty elusive with my POS camera. Maybe Santa Clause will bring me a new camera this year.
. The sample on the right is the cherry stain with the poly finish...the one on the left is the english chestnut with the lacquer finish. Both were pre-treated before staining. The cherry sample is 2 coats of stain and the chestnut is 4. Which do you think had better penetration and even color? As if I had to ask.twaterfish.com/image/id/371480/width/1000/height/800" target="_blank">
2quills
Well-Known Member
Quote:
Originally Posted by meowzer http:///forum/thread/378912/2quills-120g-re-build-thread/120#post_3307818
Which one do you want me to pick....LOL
I am also asking Santa for a camera....HEY...I am SANTA

I like the one on the right.....no left.....right....left....OMG......IDK
I know, right? Picking out finishes is mind boggleing. Sometimes I wished somebody would just pick something for me. But I do have my choice in color nailed down now, it's deffinately going to be the Cherry. And I'm about 95% sure that I'm going to finish it with the Polyurethane. Hey, Santa...I wanna new camera!
Originally Posted by meowzer http:///forum/thread/378912/2quills-120g-re-build-thread/120#post_3307818
Which one do you want me to pick....LOL
I am also asking Santa for a camera....HEY...I am SANTA
I like the one on the right.....no left.....right....left....OMG......IDK
I know, right? Picking out finishes is mind boggleing. Sometimes I wished somebody would just pick something for me. But I do have my choice in color nailed down now, it's deffinately going to be the Cherry. And I'm about 95% sure that I'm going to finish it with the Polyurethane. Hey, Santa...I wanna new camera!
meowzer
Moderator
HAHA.....you got your own Santa......a couple of years ago, we decided to just do our shopping ourselves...LOL...With me into the fish, and him into hunting....we got no problems buying stuff....so I may get a good camera, and he'll probably get another gun
I'm usually the oak type, but I have to say......I think I like the Cherry too

it looks so clean
I'm usually the oak type, but I have to say......I think I like the Cherry too
it looks so clean
acrylic51
Active Member
Quote:
Originally Posted by 2Quills http:///forum/thread/378912/2quills-120g-re-build-thread/120#post_3307862
I know, right? Picking out finishes is mind boggleing. Sometimes I wished somebody would just pick something for me. But I do have my choice in color nailed down now, it's deffinately going to be the Cherry. And I'm about 95% sure that I'm going to finish it with the Polyurethane. Hey, Santa...I wanna new camera!


acrylic51
Active Member
Quote:
Originally Posted by 2Quills http:///forum/thread/378912/2quills-120g-re-build-thread/120#post_3307813
I've been playing around with a couple of finishes. One is a brush on lacquer (gloss)...the other is a polyurethane (satin) finish. The remarkable thing is after 4 coats of both the polyurethane (satin) is quite a bit glossier and smoother than the lacquer (gloss). Infact, if I didn't know any better I'd say the two products swapt cans on me behind my back.
My review on the Lacquer finish is that I like the fact that it dries quick...real quick. But what I also don't like about it is the fact that it dries quick...infact, too quick when using the brushing type. You litteraly only have seconds before it starts thickening up and the directions say NOT to thin the material. If I had to describe it I'd say it that it has to be something like trying to brush maple syrup onto your wood. Barely any time to try and work out the bubbles. It's supposed to be a product that you don't have to sand inbetween coats but I've found that you pretty much have no choice unless you wan't to live with air bubbles in your finish. It also leaves brush strokes. Perhaps the sprayable material would be better suited in order for me to like this type of finish. It is also quite noxious, even in the brush on application. So, Shawn if you plan on spraying this stuff, I hope your wife goes out of town for a good day or two before you do it (for your sake)
The polyurethan I have to say does have one negative draw back in the fact that it takes a while to dry before you can re-apply. But because of this it is also a thinner material, you have plenty of time to work out the bubbles. A little light sanding with some 320 grit sandpaper between coats and you're good to go. You get less bubbles after each coat. By the time the 4th coat was dry the finish looked PERFECT. Alot glossier than I expected. I've talked with a couple of different guys up at Sherwin Williams and they both pretty much told me than any finish will yellow over time...some sooner than others. But if you're going with a darker stain it's really not too much of a concern in the long run. They also make a Spar Urethan which has extra u.v. protection that is made for exterior and marine use. Maybe I'll give it a try too but so far I'm liking the poly.
I tried to snap some good shots of these finishes but the true look of the finish and the shine is something that has proven pretty elusive with my POS camera. Maybe Santa Clause will bring me a new camera this year.
. The sample on the right is the cherry stain with the poly finish...the one on the left is the english chestnut with the lacquer finish. Both were pre-treated before staining. The cherry sample is 2 coats of stain and the chestnut is 4. Which do you think had better penetration and even color? As if I had to ask.To bad we don't live closer.....we could share expenses on stain samples!!!!!!! I was only considering the lacquer finish due to it's dry time. I hadn't thought or looked at the brush lacquer. I was planning from the onset to spray the finish, since my buddy is excellent at it. His garage is already setup and he does quite a bit of paint work as it is for a bunch of places......I just like the quick dry time to cut down on the dust particles in the finish. I agree the finish will yellow, and with a darker color you'd never notice it....just with a natural finish you would after some time....Whenever I sand down between coats of poly I never use sandpaper......Have never gotten good results.....I like to use 0000 steel wool between coats, and you see the last stand finish.....the steel wool cuts, but it's so forgiving, because at times I can get heavy handed.......
Gotta get busy.....you mentioned my wife!!!!! She's going out of town this weekend shopping so free run of the house!!!!! What can I drag inside that she wouldn't normally let me

2quills
Well-Known Member
Quote:
Originally Posted by acrylic51 http:///forum/thread/378912/2quills-120g-re-build-thread/120#post_3308711
To bad we don't live closer.....we could share expenses on stain samples!!!!!!! I was only considering the lacquer finish due to it's dry time. I hadn't thought or looked at the brush lacquer. I was planning from the onset to spray the finish, since my buddy is excellent at it. His garage is already setup and he does quite a bit of paint work as it is for a bunch of places......I just like the quick dry time to cut down on the dust particles in the finish. I agree the finish will yellow, and with a darker color you'd never notice it....just with a natural finish you would after some time....Whenever I sand down between coats of poly I never use sandpaper......Have never gotten good results.....I like to use 0000 steel wool between coats, and you see the last stand finish.....the steel wool cuts, but it's so forgiving, because at times I can get heavy handed.......
Gotta get busy.....you mentioned my wife!!!!! She's going out of town this weekend shopping so free run of the house!!!!! What can I drag inside that she wouldn't normally let me
If you have access to a good place to practice with the sprayer I say try it out for sure. I just picked up some of the brushing stuff to get an idea of how the finish would look or if it was even worth it for me to try and spray in my situation. I'm sure I could probably thin the material a little bit and have some longer working time, just don't know what that would do to the overall durability of it. And to be honest, after seeing how it turned out, given the fact that it was a glossy finish left me a little less than impressed with how it looked. I am still currious to see how the spray product would turn out. And yes, at this point I've probably spent close to $75 just to test finishes lol. Darn, don't make me go back to Sherwing Williams to get another stain haha. That stuff is $20 a quart.
acrylic51
Active Member
I know just for samples that's insane!!!!! I usually use gloss finish, but even with a satin finish, with proper rub down between coats you can get an awesome finish. I just prefer the gloss when it comes to the stand and canopy. Love the wet look. I was considering just purchasing a gun just for the finish coat, and running nothing else through it other than that. The price isn't really that bad. $34.00 for the gun at WoodCraft. It has gotten decent reviews, and the garages are already setup with air driers and such. Mine would just be more an issue with getting all the dust out and knocked down. Hopefully by this week I can get the stain decided on.....Getting anxious to get some color to things......
2quills
Well-Known Member
Quote:
Originally Posted by Al&Burke http:///forum/thread/378912/2quills-120g-re-build-thread/120#post_3308705
Hey Corey, Just my 2cents - I like the cherry as well. How are the new puppies?
Hey, Al! The dogs are doing good. They've been showing progess on the leash and house training lately so that's always a pluss. Can't wait till they grow out of the chewing fase though. Right now they still think everything is food so they need to try it out. Gotta keep a close eye on em still.
Quote:
Originally Posted by bmkj02 http:///forum/thread/378912/2quills-120g-re-build-thread/120#post_3308792
This is looking really nice. I would go with the right.
Thanks! The right is my favorite too.
2quills
Well-Known Member
Quote:
Originally Posted by Al&Burke http:///forum/thread/378912/2quills-120g-re-build-thread/120#post_3309414
What did you end up naming the pups?
We kept the males name the same as what the shelter gave him which is Duke, and we changed her name from April to Duch (Duchess). Duchess...aka, Lady Nibbles and Duke...aka, Sir Poopsalot.
acrylic51
Active Member
Quote:
Originally Posted by 2Quills http:///forum/thread/378912/2quills-120g-re-build-thread/120#post_3307813
I've been playing around with a couple of finishes. One is a brush on lacquer (gloss)...the other is a polyurethane (satin) finish. The remarkable thing is after 4 coats of both the polyurethane (satin) is quite a bit glossier and smoother than the lacquer (gloss). Infact, if I didn't know any better I'd say the two products swapt cans on me behind my back.
My review on the Lacquer finish is that I like the fact that it dries quick...real quick. But what I also don't like about it is the fact that it dries quick...infact, too quick when using the brushing type. You litteraly only have seconds before it starts thickening up and the directions say NOT to thin the material. If I had to describe it I'd say it that it has to be something like trying to brush maple syrup onto your wood. Barely any time to try and work out the bubbles. It's supposed to be a product that you don't have to sand inbetween coats but I've found that you pretty much have no choice unless you wan't to live with air bubbles in your finish. It also leaves brush strokes. Perhaps the sprayable material would be better suited in order for me to like this type of finish. It is also quite noxious, even in the brush on application. So, Shawn if you plan on spraying this stuff, I hope your wife goes out of town for a good day or two before you do it (for your sake)
. Make sure you have good ventilation and a respirator. It actually smells just like the urethan enamel paint that I used and it woke my wife up out of a dead sleep one night all they way upstairs and it made her feel nautious. I'm standing there like...What? I don't smell anything. I don't know if that's a good thing or bad.
The polyurethan I have to say does have one negative draw back in the fact that it takes a while to dry before you can re-apply. But because of this it is also a thinner material, you have plenty of time to work out the bubbles. A little light sanding with some 320 grit sandpaper between coats and you're good to go. You get less bubbles after each coat. By the time the 4th coat was dry the finish looked PERFECT. Alot glossier than I expected. I've talked with a couple of different guys up at Sherwin Williams and they both pretty much told me than any finish will yellow over time...some sooner than others. But if you're going with a darker stain it's really not too much of a concern in the long run. They also make a Spar Urethan which has extra u.v. protection that is made for exterior and marine use. Maybe I'll give it a try too but so far I'm liking the poly.
I tried to snap some good shots of these finishes but the true look of the finish and the shine is something that has proven pretty elusive with my POS camera. Maybe Santa Clause will bring me a new camera this year.. The sample on the right is the cherry stain with the poly finish...the one on the left is the english chestnut with the lacquer finish. Both were pre-treated before staining. The cherry sample is 2 coats of stain and the chestnut is 4. Which do you think had better penetration and even color? As if I had to ask.
Quote:
Originally Posted by acrylic51 http:///forum/thread/378912/2quills-120g-re-build-thread/120#post_3308711
To bad we don't live closer.....we could share expenses on stain samples!!!!!!! I was only considering the lacquer finish due to it's dry time. I hadn't thought or looked at the brush lacquer. I was planning from the onset to spray the finish, since my buddy is excellent at it. His garage is already setup and he does quite a bit of paint work as it is for a bunch of places......I just like the quick dry time to cut down on the dust particles in the finish. I agree the finish will yellow, and with a darker color you'd never notice it....just with a natural finish you would after some time....Whenever I sand down between coats of poly I never use sandpaper......Have never gotten good results.....I like to use 0000 steel wool between coats, and you see the last stand finish.....the steel wool cuts, but it's so forgiving, because at times I can get heavy handed.......
Gotta get busy.....you mentioned my wife!!!!! She's going out of town this weekend shopping so free run of the house!!!!! What can I drag inside that she wouldn't normally let me
Technical question for you Corey!!!! When you did your sample pieces did you sand them down first? What grit are you finish sanding with? I've been finish sanding down to 220 grit, and it appears the Poplar doesn't readily want to accept the stain, as if you just grabbed a piece of unsanded wood and applied the stain....Any help?
Originally Posted by 2Quills http:///forum/thread/378912/2quills-120g-re-build-thread/120#post_3307813
I've been playing around with a couple of finishes. One is a brush on lacquer (gloss)...the other is a polyurethane (satin) finish. The remarkable thing is after 4 coats of both the polyurethane (satin) is quite a bit glossier and smoother than the lacquer (gloss). Infact, if I didn't know any better I'd say the two products swapt cans on me behind my back.
My review on the Lacquer finish is that I like the fact that it dries quick...real quick. But what I also don't like about it is the fact that it dries quick...infact, too quick when using the brushing type. You litteraly only have seconds before it starts thickening up and the directions say NOT to thin the material. If I had to describe it I'd say it that it has to be something like trying to brush maple syrup onto your wood. Barely any time to try and work out the bubbles. It's supposed to be a product that you don't have to sand inbetween coats but I've found that you pretty much have no choice unless you wan't to live with air bubbles in your finish. It also leaves brush strokes. Perhaps the sprayable material would be better suited in order for me to like this type of finish. It is also quite noxious, even in the brush on application. So, Shawn if you plan on spraying this stuff, I hope your wife goes out of town for a good day or two before you do it (for your sake)
The polyurethan I have to say does have one negative draw back in the fact that it takes a while to dry before you can re-apply. But because of this it is also a thinner material, you have plenty of time to work out the bubbles. A little light sanding with some 320 grit sandpaper between coats and you're good to go. You get less bubbles after each coat. By the time the 4th coat was dry the finish looked PERFECT. Alot glossier than I expected. I've talked with a couple of different guys up at Sherwin Williams and they both pretty much told me than any finish will yellow over time...some sooner than others. But if you're going with a darker stain it's really not too much of a concern in the long run. They also make a Spar Urethan which has extra u.v. protection that is made for exterior and marine use. Maybe I'll give it a try too but so far I'm liking the poly.
I tried to snap some good shots of these finishes but the true look of the finish and the shine is something that has proven pretty elusive with my POS camera. Maybe Santa Clause will bring me a new camera this year.
. The sample on the right is the cherry stain with the poly finish...the one on the left is the english chestnut with the lacquer finish. Both were pre-treated before staining. The cherry sample is 2 coats of stain and the chestnut is 4. Which do you think had better penetration and even color? As if I had to ask.Quote:
Originally Posted by acrylic51 http:///forum/thread/378912/2quills-120g-re-build-thread/120#post_3308711
To bad we don't live closer.....we could share expenses on stain samples!!!!!!! I was only considering the lacquer finish due to it's dry time. I hadn't thought or looked at the brush lacquer. I was planning from the onset to spray the finish, since my buddy is excellent at it. His garage is already setup and he does quite a bit of paint work as it is for a bunch of places......I just like the quick dry time to cut down on the dust particles in the finish. I agree the finish will yellow, and with a darker color you'd never notice it....just with a natural finish you would after some time....Whenever I sand down between coats of poly I never use sandpaper......Have never gotten good results.....I like to use 0000 steel wool between coats, and you see the last stand finish.....the steel wool cuts, but it's so forgiving, because at times I can get heavy handed.......
Gotta get busy.....you mentioned my wife!!!!! She's going out of town this weekend shopping so free run of the house!!!!! What can I drag inside that she wouldn't normally let me
Technical question for you Corey!!!! When you did your sample pieces did you sand them down first? What grit are you finish sanding with? I've been finish sanding down to 220 grit, and it appears the Poplar doesn't readily want to accept the stain, as if you just grabbed a piece of unsanded wood and applied the stain....Any help?
al&burke
Active Member
Quote:
Originally Posted by 2Quills http:///forum/thread/378912/2quills-120g-re-build-thread/120#post_3310039
We kept the males name the same as what the shelter gave him which is Duke, and we changed her name from April to Duch (Duchess). Duchess...aka, Lady Nibbles and Duke...aka, Sir Poopsalot.
Right On Corey, I like the names, they are looking really good.
Al
acrylic51
Active Member
Tried the stain out today Corey....I posted over in my thread and now that I actually looked back at your pics of your test pieces....I'm insane!!!!!!!!!
I guess my age is catching up to me, but yes after raising the grain and then sanding and pretreating the color renditions between our 2 samples are pretty close....I did back off on the sanding grit, and honestly I don't believe it was the 220 grit sandpaper, but the mere fact I didn't raise the grain and then sand not allowing the stain to penetrate deep enough.....
What time frame are you working with as far as letting the stain sit before wiping it down? I've tried various time lengths, and colors are pretty consistent though. The Cabot pre treat dries rather quick compared to MinWax....I don't think their instructions are as clear though.....They say no longer than 5 minutes and don't let it dry. Are they referring to the surface of the wood or rather if you turn your sample piece to the side you can see that it deep penetrate the wood and their talking about that drying?? Probably confused the heck out of you there.....
What time frame are you working with as far as letting the stain sit before wiping it down? I've tried various time lengths, and colors are pretty consistent though. The Cabot pre treat dries rather quick compared to MinWax....I don't think their instructions are as clear though.....They say no longer than 5 minutes and don't let it dry. Are they referring to the surface of the wood or rather if you turn your sample piece to the side you can see that it deep penetrate the wood and their talking about that drying?? Probably confused the heck out of you there.....
2quills
Well-Known Member
lol...it's all good, I think I understand. And sorry, I guess I missed your previouse question earlier.
My last samples there in the photos all I did was sand with 220...and I did not actually raise the grain before sanding. I just do a very light coat of the pretreat and whipe it down as soon as I'm done and thats it. Let it sit for about 15 minutes then applied the stain. The stain seemed to take really good on the first coat so I really didnt even whipe it down afterwards. The second coat I put on the morning after and did whipe it down a little bit right after I applied it.
I also applied the stain with just some old pieces of t-shirt that I cut up just to do the samples with so it kind of soaks up the stain while you're applying it...if that makes sense. As apposed to using a brush or the sponge brushes which leave alot of excess stain on the wood. I've always preffered using a rag to apply stain.
acrylic51
Active Member
I'm following you.... Yeah I've never used a brush or anything to apply stain, usually it's and old t shirt as wel, but one the last build, I used an actual staining pad applicator. Looks like nothing more than a sponge and seemed to get really nice coverage. Didn't on the samples, but rather pleased without it. Again I must say very nice stain to work with!!!!!!!
I have noticed that the Cabot stain seems to bead somewhat when applied after the ore treat and doesn't seem to penetrate the wood and all the steps were exact between the 2 samples. Just the beading turns me off on the product. Thanks!!!!!
I have noticed that the Cabot stain seems to bead somewhat when applied after the ore treat and doesn't seem to penetrate the wood and all the steps were exact between the 2 samples. Just the beading turns me off on the product. Thanks!!!!!