415 Gallon Plywood Tank Build

acrylic51

Active Member
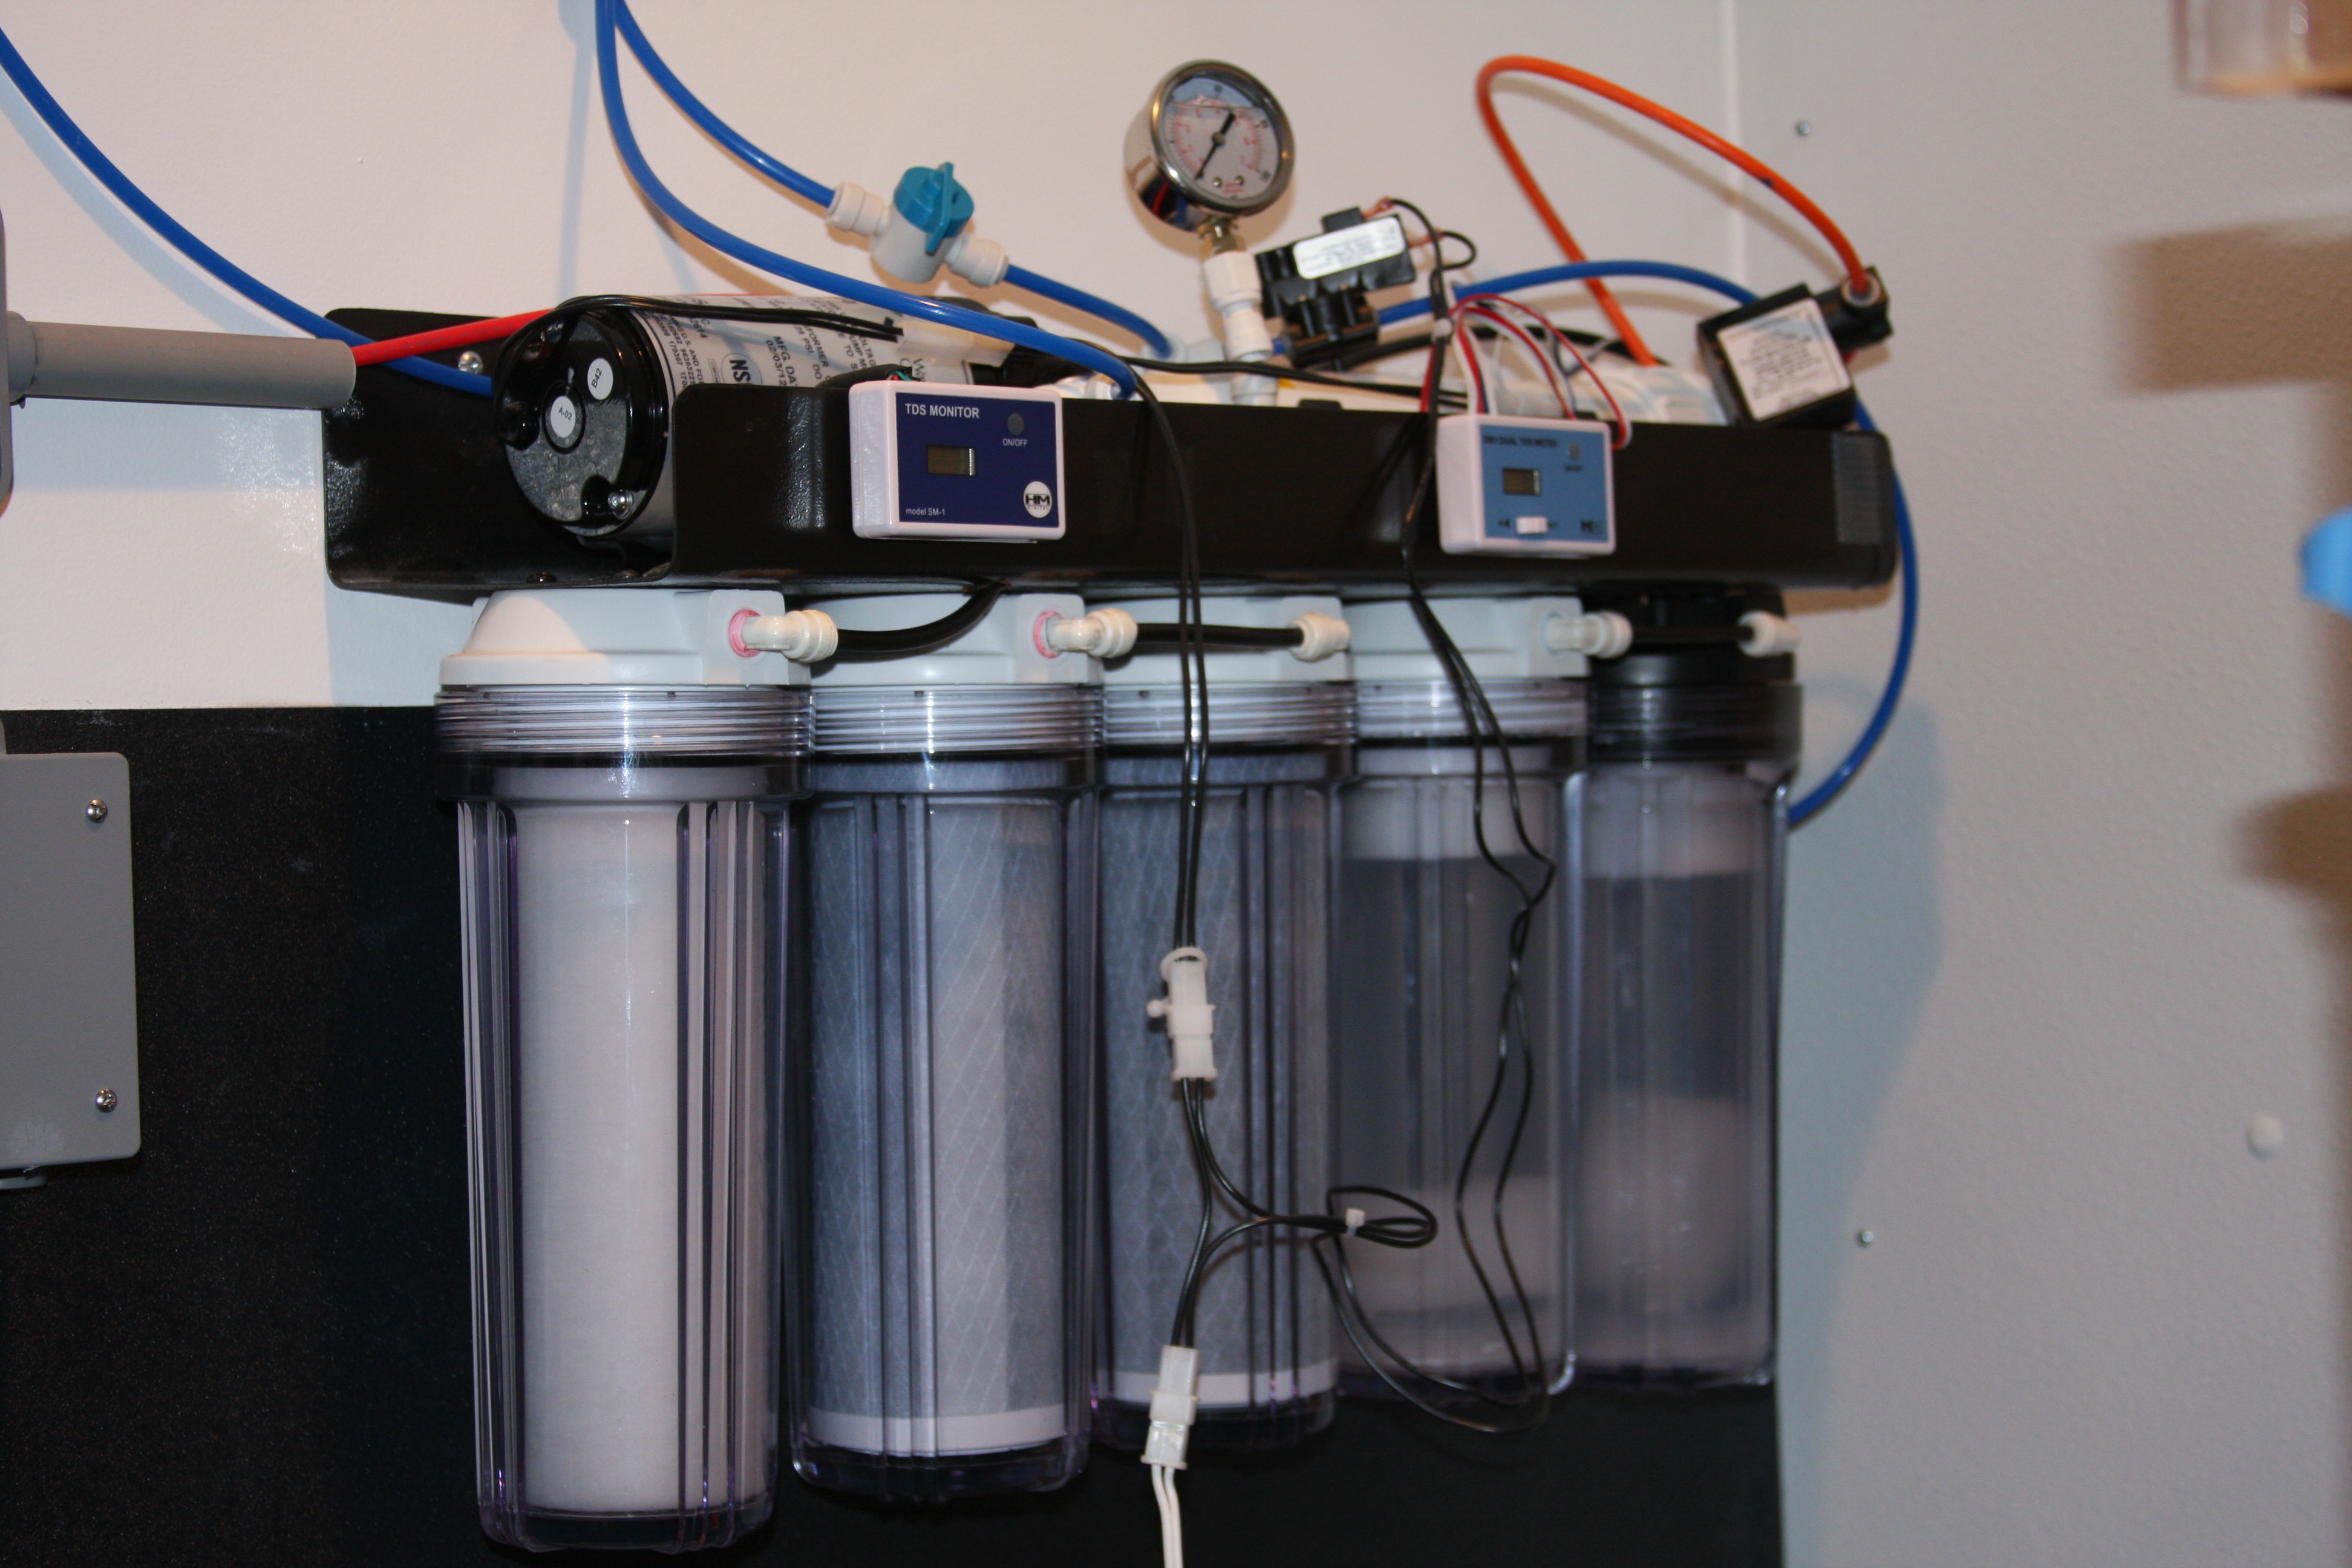
No Seth don't use AWI anymore.....I can shoot you a PM on the parts for the RO/DI......
RickRoss you didn't read the construction details of the plywood tank.........
Shame, Shame.........Actually a plywood tank doesn't have to be reinforced with 2x4's at all......I think some of that might come down to construction practice or maybe a lack of confidence in building skills.....Not really sure, but Kent's big tank didn't use reinforced 2x4's and his tank is a lot bigger than mine.
Taking the plywood tank apart wasn't an easy decision and Corey will attest to that.......There are tons of good plywood builds and there are a few that I would call really skeptical. I did and always do over build. My biggest concern with the plywood build is that a pin hole isn't evident right away and could take weeks to develop, but when it does the options to fix are slim, and its a rather tedious job of repairing it. I did go the extra steps that some do and don't.....I reinforced all the corners with 45's cut to fill all the seams.....This was sealed with waterproof glue and nailed into place and then I took the extra step into doing nothing but pouring the 45's and seams with epoxy to totally seal them.......At that point I laid not just regular fiberglass, but bi axial fiberglass, and if I recall correctly it was either 34oz or 37oz bi axial fiberglass cloth.....This is quite a bit heavier than standard stranded fiberglass cloth, plus a bit more tedious to work with......The entire inside of the tank was fiber glassed with the bi axial cloth, and even the inside of the external overflow box......I even went to the extreme of flipping the tank over on it's top and epoxying the bottom outside of the tank 1/4" thick with epoxy, so basically I knew it wouldn't leak....A big key is small think layers of epoxy instead of trying to pour it in a thick shot.......I didn't want any cross bracing on this tank as well, so thinking again safety and over engineering I used angle iron; which was embedded in epoxy all around the perimeter of the tank......The angle iron was welded at the corners as well, so basically it wasn't coming apart.
When I finally cut the tank apart just before Christmas I had always questioned how thick I had actually poured the epoxy......The thinnest spot or area I could find poured was 1/4".....That was way more than needed, but I've seen some really well built "woodys" sub cum to crazy pinholes in areas you wouldn't have thought crucial......Basically I didn't want to find out the hard way.....I've never been afraid to put money into materials and over build for peace of mind........
RickRoss skim through the pages for the pics outlining the build process........
 

acrylic51

Active Member
Hadn't mentioned it earlier, but attended a frag swap 2 weeks ago and picked up my first 2 additions to the new setup.......The new additions are a 3" Powder Blue and a 3" Yellow Tang.....Currently both are in QT and have been for the past 2 weeks.....So far and fingers crossed not a spot on them and both are eating like pigs.......Were a bit skittish at first, but as of lately as soon as they see me get near the tank they automatically head to the surface for food......

Very slow progress on the final pieces of putting everything together.....Hopefully I'll get really motivated and finishing the plumbing work from the sump to the skimmer.....Did get a pump to feed the skimmer finally, but as mentioned haven't gotten the plumbing done. Also still need to finish the return lines from the OM to the tank.....Still working out details on how I want to support the lines and the tru union ball valves coming off the OM.....I just don't like the idea of them just hanging in the air basically supported by the bulkheads.....
 

1snapple

Active Member
Hey shawn, i dont know if you guys have the read the artical on HLLE but a new study found that carbon is the cause of HLLE in tangs, not the extruded pellets per-say but definately carbon. Google it, i would provide a link but i just dont have teh time right now.
 

2quills

Well-Known Member
Quote:
Originally Posted by acrylic51 http:///t/376802/415-gallon-plywood-tank-build/1620#post_3473818
Hadn't mentioned it earlier, but attended a frag swap 2 weeks ago and picked up my first 2 additions to the new setup.......The new additions are a 3" Powder Blue and a 3" Yellow Tang.....Currently both are in QT and have been for the past 2 weeks.....So far and fingers crossed not a spot on them and both are eating like pigs.......Were a bit skittish at first, but as of lately as soon as they see me get near the tank they automatically head to the surface for food......

Very slow progress on the final pieces of putting everything together.....Hopefully I'll get really motivated and finishing the plumbing work from the sump to the skimmer.....Did get a pump to feed the skimmer finally, but as mentioned haven't gotten the plumbing done. Also still need to finish the return lines from the OM to the tank.....Still working out details on how I want to support the lines and the tru union ball valves coming off the OM.....I just don't like the idea of them just hanging in the air basically supported by the bulkheads.....
Is the OM body going to sit directly over the sump or off to the side of the sump? Was thinking if it were off to the side you might be able to devise some type of cradle for the body itself that had some sort of supports for each line coming off of it. Might also be able to fab up some supports that attach to the side of the stand that you could clamp the lines to somehow.
Got any pics of the new guys?
Quote:
Originally Posted by 1Snapple
http:///t/376802/415-gallon-plywood-tank-build/1620#post_3473979
Hey shawn, i dont know if you guys have the read the artical on HLLE but a new study found that carbon is the cause of HLLE in tangs, not the extruded pellets per-say but definately carbon. Google it, i would provide a link but i just dont have teh time right now.
If you're thinking of the same article I am that one was published a while back. It did make a very good case for activated carbon as being a contributor to the symptoms. IIRC it actually had more to do with the dust that comes from the carbon as being the culpret. But I didn't find the article as proving activated carbon itself as being The Smoking Gun (per say). It also doesn't explain why not everybody who runs activated carbon with tangs comes across the same symptoms. I've had my powder brown now for 2 years and I've ran activated carbon the whole time and he's never once showed the slightest symptoms of HLLE what so ever. I've never been away from my tank for more than 2 days since I've had em so I'm pretty sure I would have noticed it if he did.
Unless you guys can spot it?
 

acrylic51

Active Member
Quote:
Originally Posted by 2Quills http:///t/376802/415-gallon-plywood-tank-build/1620#post_3473985
Is the OM body going to sit directly over the sump or off to the side of the sump? Was thinking if it were off to the side you might be able to devise some type of cradle for the body itself that had some sort of supports for each line coming off of it. Might also be able to fab up some supports that attach to the side of the stand that you could clamp the lines to somehow.
Got any pics of the new guys?
If you're thinking of the same article I am that one was published a while back. It did make a very good case for activated carbon as being a contributor to the symptoms. IIRC it actually had more to do with the dust that comes from the carbon as being the culpret. But I didn't find the article as proving activated carbon itself as being The Smoking Gun (per say). It also doesn't explain why not everybody who runs activated carbon with tangs comes across the same symptoms. I've had my powder brown now for 2 years and I've ran activated carbon the whole time and he's never once showed the slightest symptoms of HLLE what so ever. I've never been away from my tank for more than 2 days since I've had em so I'm pretty sure I would have noticed it if he did.
Unless you guys can spot it?

That guy looks good Corey!!!!!!
Josh hadn't read the article, but I'll make a note to take a gander and read it....Should be rather interesting.....Is it possible some tangs are just more susceptible than others.......
Corey the OM body sits directly atop the pump itself......After a lot of plumbing on my 240 and a lot of bends and craziness I found that you loose quite a bit with super long runs of pipe even with a monster pump, so this time around I wanted to keep the plumbing as simple and straight forward as possible......
The lights are down on the QT tank, but I'll try to get some pics this weekend of the new fish, but will try to shoot a couple pics of the OM mounting so far......I'm more concerned with the lines coming off the bulkheads (back of tank) leading to the OM body. The pump itself is bolted down making movement very minimal. I've been tossing around in my mind using aluminum tubing making support legs tied tight to the stand, but still have to find something to run between the legs, to actually bolt the ball valves to; tying them fast for minimal movement........I know a bit confusing, but my drawing skills suck.....I can visualize, but drawing it......The kindergarten kids would even take my crayons and snap them in half if I tried........
 

acrylic51

Active Member
I have a granddaughter that will be 5 in June, and I know mean......Can be a perfect angel, but a flip of a switch.........
Yeah like I had mentioned I've been contemplating the aluminum frame deal, and trying to limit or not use wood for the cross support, but haven't found any aluminum bar wide enough to accommodate the width of the ball valves themselves......Still not done looking for ideas.....Just wanna do it once, but correctly so I'm satisfied and not toying with it later.....
This past weekend I tried to "buy the farm"......I was getting ready to run some electrical lines through some conduit, and normally I do all my wiring live, and for what ever reason I decided to just stuff both lines through the conduit at once, and "bam" and a loud flash later......Should have seen the inside of the box I was trying to push them through......Bad thing was I thought only 1 of the circuits was live to begin with, but little did I know I had flipped the breaker on the other line a day earlier.......That I should no better since everything is clearly marked in the breaker box and on the outlets as well......Carelessness does happen and can be costly and deadly at times......
With that said here's a few updated pics.....Again not a lot of progress.....I know I should be burning the candle since I'm so close to the end......Don't mind the mess, and by no means a professional photographer......I might have to con my nephew to come over at some point and take care of that.....He's actually pretty good if I give him cigarettes and beer!!!!!


Here's a quick shot of the RO/DI unit.....Please excuse all the mess.....I am still in the process of tidying up the wiring and tubing, but was getting everything in place, and wanted to get the pressure shut off switch on line.....The pressure shut off switch is the little black box just underneath or just in front of the pressure gauge. The pressure shut off switch shuts off the booster pump which is position on the far left of the RO unit........The auto back flush valve is the little black box on the far right of the RO unit; with the orange line running into it......
I was having an issue when I originally put the pressure switch in place, it would shut everything down as planned, but wouldn't shut the booster pump off......I spent about an hour re plumbing and reconnecting the electrical connections between the booster pump, pressure switch and auto flush valve. Again a bit of rushing, and wanting to get things done quick, I totally forgot about adjust the pressure switch adjustment knob to adjust the pressure to shut the pump off.....After some head scratching; I grabbed the small allen wrench and a slight turn counter clockwise and it was working........I did back the pressure of the RO/DI unit down a bit.....How the pump came from factory I was getting almost 90psi......I dialed the pressure back to roughly 64-65psi, which is plenty IMO........My TDS reading coming into the unit on a bad day is 136 and on a good day since I've been tracking is 92.......Coming out of the unit without running any DI, and the unit is setup and designed to run dual DI resins, I'm getting 1-2 TDS......Again keep in mind that the membrane I'm still toying with hasn't been changed since 2005.......Both TDS meters have been calibrated, as well as my handheld TDS meter, and all 3 read identical.......I think again it is key to flush your membranes frequently........

Excuse the mud bucket sitting in front of the new stand.......Showing the skimmer in it's final resting location......Still need to finish up the plumbing work. Started working on the drain line from the skimmer back to the sump and need to drill the sump and run the pump and plumbing from the sump to the skimmer to feed it.......Again I love looking at the skimmer, but I also wanted it out of sight unless someone was really interested in seeing it.....When the stand I've framed out is finished the skimmer will be hidden behind cabinet doors, but the height of the stand itself allows me to easily access the skimmer, and there is plenty of height for the auto neck cleaner which will be installed to keep the skimmer running peak......Got the low down on the neck cleaner from Xcali.........The plumbing lines will also be hidden inside the cabinet as well....Again trying to keep everything as much as possible out of sight and clean looking.......

As you can see in this pic is my QT setup......Nothing fancy, and the canister filter was a freebie from my buddy, that bought it and had never used it and was sitting around his basement.....I guess not totally free he's running my Tunzes right now, so........Anyways, you can see that I did finally decide on the counter tops for the frag/quarantine stand.......This section of the stand actually sits a bit higher than the other portion which I didn't take a pic of, but the other area will be where my frag tank will go.......
Seth I thought of you when I was working on this and I had remembered you specifically saying to rack it if possible.....Well running out on space that's what I did.......The 20 gallon tank on top of the QT is my top off tank......This tank is drilled and plumbed directly to the RO/DI unit, but can easily be isolated from the RO/DI unit with the turn of a valve. I figured it's something that I really don't need access to all the time, and when I need to top that tank off and fill it, I just open the valve from the RO/DI unit and the float valve will take care of the rest........I might have to pull it down and drill another hole depending how I finally decided what I'm doing as far as topping of the DT......I'm torn between the Litemeter III, Elos, setup or configuring my own controlled through the Apex......Not quite sure which route I will take at this point.......

Ok Corey......This is where the OM is mounted......I made a little stand tied to the tank stand itself, but didn't like how the pump stand had a little flex to it, if I applied pressure to it, so I rigged up side supports using those turn buckle setups, and it allowed me to easily and perfectly level the pump stand, and at the same time doesn't allow any downward flex from the pump or weight that I applied to the pump. You can also see the the OM is mounted right above the pump itself. Not overly concerned about the pump or OM itself, since the pump is bolted down fast......My concern as I pointed out is with the lines coming off the OM body; which are the white elbows.......Again those will have lines and tru union ball valves coming off of them leading to the bulkheads drilled in the back of the tank......These are the lines I'm trying to design a mount system to to tie things tight to minimize movement and vibration.......Also weight from the valves and water itself. I'm 99% sure I'm going to use the remainder of my Flex PVC for this plumbing job here.........
 

acrylic51

Active Member
Ok......Again not a photographer, but the best I could capture......The Yellow didn't want to come out and play for whatever reason.....I guess I didn't offer him anything to eat.....
 

snakeblitz33

Well-Known Member
LOL! Yeah, I have no problem with racking up tanks - as long as the top tanks don't have anything beautiful in them.
Everything is looking good. I can't wait to hear that salt is being put in the tank!
I haven't read it in the thread - I kinda skimmed through it and looked at the pictures, LOL,... but I got a question...
How are you going to do water changes quickly and efficiently?
On one of my systems, I had a large plastic container beside the tank that I mixed saltwater in and I used the pump on the closed loop system to pump the old water down the drain and the mixing pump on the NSW tank to pump the new water from the plastic container back into the aquarium... Quick and efficient. I haven't seen you mention anything like this in your thread yet.
 

acrylic51

Active Member
Quote:
Originally Posted by Gemmy http:///t/376802/415-gallon-plywood-tank-build/1620#post_3474088
Gorgeous fish!!!

Thanks Krista.....Picked it up at the last frag swap in April !!!!!! He seems awful curious about things going on around him.....
Quote:
Originally Posted by SnakeBlitz33
http:///t/376802/415-gallon-plywood-tank-build/1620#post_3474097
LOL! Yeah, I have no problem with racking up tanks - as long as the top tanks don't have anything beautiful in them.
Everything is looking good. I can't wait to hear that salt is being put in the tank!
I haven't read it in the thread - I kinda skimmed through it and looked at the pictures, LOL,... but I got a question...
How are you going to do water changes quickly and efficiently?
On one of my systems, I had a large plastic container beside the tank that I mixed saltwater in and I used the pump on the closed loop system to pump the old water down the drain and the mixing pump on the NSW tank to pump the new water from the plastic container back into the aquarium... Quick and efficient. I haven't seen you mention anything like this in your thread yet.
Thanks Seth.....I've been playing tug of war with what I want to do back there and getting impatient at times, and running out of time in a sense....I had thought about the frag tank up top, but thought the same way you did.....It would definitely be out of the way, and wouldn't be easy to access, so it was ruled out in that spot. The top off tank doesn't really matter much, nothing to look at, just need to be able to see there is water there.....
As far as water changes.....That process was thought out long ago during room construction. I would at some point, and it won't be from the start up of the system, but would like to do continuous; or daily water changes.......I do have a couple pics of the mixing station in place and together. Will have to get them posted up and go into more detail about the water changes.......
 
Top